Parts Catalog
Page 3
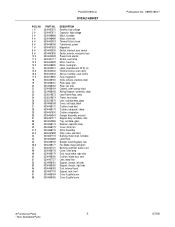
... power Magnetron Switch, interlock, door sensor Switch, monitor, w/ceramic fuse Power Cord, electric Socket, oven lamp Motor, hood fan Motor, cooling fan Lamp, incandescent, 20 W, (3) Thermal Cutout, oven cavity Sensor, humidity, cook control Fuse, magnetron Grille, exhaust, stainless steel Plate, base, right...Cover, stirrer fan Stirrer Assembly Filter, noise, electronic Bushing, motor shaft, turntable Latch Hook Bracket, mounting plate, rear Fan Blade, mag cooling fan Bushing, grommet, power cord Cover, oven lamp Duct, hood intake, right side Cushion, intake duct, seal Lens, lamp filter Support...
... power Magnetron Switch, interlock, door sensor Switch, monitor, w/ceramic fuse Power Cord, electric Socket, oven lamp Motor, hood fan Motor, cooling fan Lamp, incandescent, 20 W, (3) Thermal Cutout, oven cavity Sensor, humidity, cook control Fuse, magnetron Grille, exhaust, stainless steel Plate, base, right...Cover, stirrer fan Stirrer Assembly Filter, noise, electronic Bushing, motor shaft, turntable Latch Hook Bracket, mounting plate, rear Fan Blade, mag cooling fan Bushing, grommet, power cord Cover, oven lamp Duct, hood intake, right side Cushion, intake duct, seal Lens, lamp filter Support...
Installation Instructions
Page 4
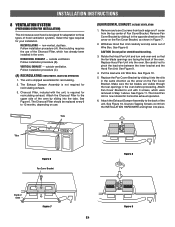
... unit with the unit, is required for your installation. Use two Tapping Screws 4 x 8 from the top center of Fan Cover Bracket. INSTALLATION INSTRUCTIONS 8 VENTILATION SYSTEM (PREPARING OVEN FOR INSTALLATION) This microwave oven/hood is designed for adaptation to three types of hood ventilation systems. Select the type required for recirculating exhaust. RECIRCULATING - Follow installation...
... unit with the unit, is required for your installation. Use two Tapping Screws 4 x 8 from the top center of Fan Cover Bracket. INSTALLATION INSTRUCTIONS 8 VENTILATION SYSTEM (PREPARING OVEN FOR INSTALLATION) This microwave oven/hood is designed for adaptation to three types of hood ventilation systems. Select the type required for recirculating exhaust. RECIRCULATING - Follow installation...
Installation Instructions
Page 5
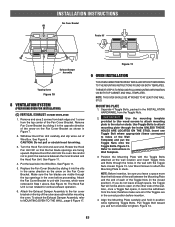
... you leave a space more than the thickness of the wall between the inner bracket and the Hood Fan Unit. Remove and save 2 screws from back edge and 1 screw from the top center of the outercase cabinet after mounting the oven. See Figure 11. 4. See Figure 11. 5. Make sure the fan blades... Withdraw Hood Fan Unit carefully and slip wires out of the Toggles are in the oven before insertion. 4. Put the lead wire into the oven. Replace the Fan Cover Bracket by sliding it in Figure 7. 2. THE NEXT STEP IS TO READ AND FOLLOW MOUNTING INFORMATION ON BOTH TOP CABINET AND WALL TEMPLATES. ...
... you leave a space more than the thickness of the wall between the inner bracket and the Hood Fan Unit. Remove and save 2 screws from back edge and 1 screw from the top center of the outercase cabinet after mounting the oven. See Figure 11. 4. See Figure 11. 5. Make sure the fan blades... Withdraw Hood Fan Unit carefully and slip wires out of the Toggles are in the oven before insertion. 4. Put the lead wire into the oven. Replace the Fan Cover Bracket by sliding it in Figure 7. 2. THE NEXT STEP IS TO READ AND FOLLOW MOUNTING INFORMATION ON BOTH TOP CABINET AND WALL TEMPLATES. ...


