
User Manual
Page 17
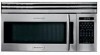
... . Touch Fan Hi/Lo twice if you to cook at 100% power by touching the START pad continuously. This protects the microwave oven from range surface units or burners. The fan will begin counting up to 3 automatic cooking sequences. WORK LIGHT Touch the Work Light pad...Min, and the display will appear in the Interactive Display, touch Help to read cooking and operating hints. 17 E If easier, unplug the microwave oven from START pad. Microwave oven stops immediately. Touch Turntable On/Off pad. 3. It is level. • Suppose you want to time a 3 minute long distance phone...
... . Touch Fan Hi/Lo twice if you to cook at 100% power by touching the START pad continuously. This protects the microwave oven from range surface units or burners. The fan will begin counting up to 3 automatic cooking sequences. WORK LIGHT Touch the Work Light pad...Min, and the display will appear in the Interactive Display, touch Help to read cooking and operating hints. 17 E If easier, unplug the microwave oven from START pad. Microwave oven stops immediately. Touch Turntable On/Off pad. 3. It is level. • Suppose you want to time a 3 minute long distance phone...
Parts Catalog
Page 1
All rights reserved. Product No. BOX 212378 AUGUSTA, GA 30917 Publication No. 5995518817 08/07/15 (EN/SERVICE/KC) 099 Model No. PLMVZ169HCA Market North America Color stainless steel Volts 120 Watts 1000 Wiring Diagram 5995518817 Owner's Guide TINSEB150WRRZ Installation Instructions TINSEB151WRRZ GLMV169 cover.eps PLMVZ169H Cabinet.eps PLMVZ169H Controls.eps GLMV169H Wiring.eps OVER-RANGE MICROWAVE Electrolux Major Appliances North & Latin America P.O. PLMVZ169H Copyright © 2008 Electrolux Home Products, Inc.
All rights reserved. Product No. BOX 212378 AUGUSTA, GA 30917 Publication No. 5995518817 08/07/15 (EN/SERVICE/KC) 099 Model No. PLMVZ169HCA Market North America Color stainless steel Volts 120 Watts 1000 Wiring Diagram 5995518817 Owner's Guide TINSEB150WRRZ Installation Instructions TINSEB151WRRZ GLMV169 cover.eps PLMVZ169H Cabinet.eps PLMVZ169H Controls.eps GLMV169H Wiring.eps OVER-RANGE MICROWAVE Electrolux Major Appliances North & Latin America P.O. PLMVZ169H Copyright © 2008 Electrolux Home Products, Inc.
Installation Instructions
Page 1
...At least 2" 30" or more from floor Figure 1 2 WALL CONSTRUCTION This Microwave Oven/Hood should be completed by a qualified electrician before installing the Over the Range Microwave Oven. The mounting surfaces must be mounted against and supported by probing the wall ...• Please read all instructions thoroughly before the Microwave Oven is not flat, use . • IMPORTANT Observe all items which locates the nails in Thailand INSTALLATION INSTRUCTIONS Over The Range Microwave Oven BEFORE YOU BEGIN Read these instructions completely and carefully...
...At least 2" 30" or more from floor Figure 1 2 WALL CONSTRUCTION This Microwave Oven/Hood should be completed by a qualified electrician before installing the Over the Range Microwave Oven. The mounting surfaces must be mounted against and supported by probing the wall ...• Please read all instructions thoroughly before the Microwave Oven is not flat, use . • IMPORTANT Observe all items which locates the nails in Thailand INSTALLATION INSTRUCTIONS Over The Range Microwave Oven BEFORE YOU BEGIN Read these instructions completely and carefully...
Installation Instructions
Page 3
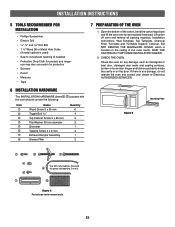
...Protective Drop Cloth for protection • Scissors • Pencil • Measure • Tape 6 INSTALLATION HARDWARE The INSTALLATION HARDWARE (items 1 - 7 ) packed with the oven should contain the following: Item 1 2 3 4 5 6 7 8 Name Wood Screw 5 x 35 mm Toggle Bolt Top Cabinet Screw 5 x 85 mm Flat ... Grease Filter Quantity 6 4 2 2 1 4 1 2 7 PREPARATION OF THE OVEN 1. however, DO NOT REMOVE THE WAVEGUIDE COVER, which is located on plastic foam pad. CHECK THE OVEN. you may also use carton for product and range - SAVE THE CARTON AS IT MAY MAKE INSTALLATION EASIER. 2. Check the...
...Protective Drop Cloth for protection • Scissors • Pencil • Measure • Tape 6 INSTALLATION HARDWARE The INSTALLATION HARDWARE (items 1 - 7 ) packed with the oven should contain the following: Item 1 2 3 4 5 6 7 8 Name Wood Screw 5 x 35 mm Toggle Bolt Top Cabinet Screw 5 x 85 mm Flat ... Grease Filter Quantity 6 4 2 2 1 4 1 2 7 PREPARATION OF THE OVEN 1. however, DO NOT REMOVE THE WAVEGUIDE COVER, which is located on plastic foam pad. CHECK THE OVEN. you may also use carton for product and range - SAVE THE CARTON AS IT MAY MAKE INSTALLATION EASIER. 2. Check the...


