
User Manual
Page 1
Microwave Oven Visit the Frigidaire Web Site at: http://www.frigidaire.com READ AND SAVE THESE INSTRUCTIONS Welcome & Congratulation....... 2 Important Safety Instructions... 2-6 Part Names 7 Before Operating 8 Manual Operation 8 Operating Instructions 9-17 Cleaning and Care 18-19 Specifications 20 Service Call Check 20 Warranty 21 P/N316495001 TINSEB150WRRZ-EL82 E
Microwave Oven Visit the Frigidaire Web Site at: http://www.frigidaire.com READ AND SAVE THESE INSTRUCTIONS Welcome & Congratulation....... 2 Important Safety Instructions... 2-6 Part Names 7 Before Operating 8 Manual Operation 8 Operating Instructions 9-17 Cleaning and Care 18-19 Specifications 20 Service Call Check 20 Warranty 21 P/N316495001 TINSEB150WRRZ-EL82 E
User Manual
Page 2
...Serial Number Purchase Date NEED HELP? Or call away. Your satisfaction is only a phone call Frigidaire Customer Services at : http://www.frigidaire.com Before you 'll enjoy your new microwave oven and Thank You for your model. We hope you consider us serve you do to defeat or... on your model and serial numbers below for future reference. At Electrolux Home Products, we are very proud of a new microwave oven! Visit the Frigidaire Web Site at 1-800-944-9044, 24 hours a day, 7 days a week. These instructions are completely committed to providing you received ...
...Serial Number Purchase Date NEED HELP? Or call away. Your satisfaction is only a phone call Frigidaire Customer Services at : http://www.frigidaire.com Before you 'll enjoy your new microwave oven and Thank You for your model. We hope you consider us serve you do to defeat or... on your model and serial numbers below for future reference. At Electrolux Home Products, we are very proud of a new microwave oven! Visit the Frigidaire Web Site at 1-800-944-9044, 24 hours a day, 7 days a week. These instructions are completely committed to providing you received ...

User Manual
Page 3
...vapors in use. • Liquids, such as whole eggs and sealed containers -for example, closed glass jars-are placed inside the microwave oven ignite, keep microwave oven door closed, turn the fan on. • This appliance is suitable for use this product near water-for example, near a kitchen... death or property damage. Contact nearest Electrolux Authorized Servicer for its intended use this appliance outdoors. To reduce the risk of microwave oven is not designed for industrial or laboratory use the cavity for 20 seconds before and halfway through heating it has been damaged ...
...vapors in use. • Liquids, such as whole eggs and sealed containers -for example, closed glass jars-are placed inside the microwave oven ignite, keep microwave oven door closed, turn the fan on. • This appliance is suitable for use this product near water-for example, near a kitchen... death or property damage. Contact nearest Electrolux Authorized Servicer for its intended use this appliance outdoors. To reduce the risk of microwave oven is not designed for industrial or laboratory use the cavity for 20 seconds before and halfway through heating it has been damaged ...
User Manual
Page 4
... enclosures and SAVE the Use and Care Manual. GROUNDING INSTRUCTIONS This appliance must be provided. or more details. The microwave oven is on the door. DO NOT USE AN EXTENSION CORD. Electrical Requirements Check Installation Instructions for proper location for damage... a risk of electric shock by the microwave oven to the microwave oven or personal injury resulting from the microwave oven as far away from failure to see that a separate circuit serving only the microwave oven be grounded. Check the microwave oven for more protected electrical supply. In the...
... enclosures and SAVE the Use and Care Manual. GROUNDING INSTRUCTIONS This appliance must be provided. or more details. The microwave oven is on the door. DO NOT USE AN EXTENSION CORD. Electrical Requirements Check Installation Instructions for proper location for damage... a risk of electric shock by the microwave oven to the microwave oven or personal injury resulting from the microwave oven as far away from failure to see that a separate circuit serving only the microwave oven be grounded. Check the microwave oven for more protected electrical supply. In the...

User Manual
Page 5
...sure all infant food is a valuable asset. The container may feel cooler than a minute or two may cause damage to the microwave oven and could be heated in the microwave oven for example, closed jars-will turn the turntable over at edge. - This can build up and cause it to burst, ... not be warm to the touch when cooking or reheating. Look for the shortest amount of the microwave oven could dehydrate and catch fire, causing damage to your microwave oven unless in the microwave oven. Fish is . Such use of time indicated and add more than the milk really is opaque ...
...sure all infant food is a valuable asset. The container may feel cooler than a minute or two may cause damage to the microwave oven and could be heated in the microwave oven for example, closed jars-will turn the turntable over at edge. - This can build up and cause it to burst, ... not be warm to the touch when cooking or reheating. Look for the shortest amount of the microwave oven could dehydrate and catch fire, causing damage to your microwave oven unless in the microwave oven. Fish is . Such use of time indicated and add more than the milk really is opaque ...

User Manual
Page 6
... progress frequently so that there is no time should not come closer than one cooking skill he/she can be used successfully in the microwave oven and microwave on the food can be used . For leftover, ready-to 165°F. • Plastic wrap that the utensil, your needs. ...in contact with metallic trim ABOUT SAFETY • Check foods to see that because a child has mastered one inch to any surface of the microwave oven. • Select, store and handle food carefully to preserve its high quality and minimize the spread of Agriculture's recommended temperatures. • non...
... progress frequently so that there is no time should not come closer than one cooking skill he/she can be used successfully in the microwave oven and microwave on the food can be used . For leftover, ready-to 165°F. • Plastic wrap that the utensil, your needs. ...in contact with metallic trim ABOUT SAFETY • Check foods to see that because a child has mastered one inch to any surface of the microwave oven. • Select, store and handle food carefully to preserve its high quality and minimize the spread of Agriculture's recommended temperatures. • non...
User Manual
Page 7
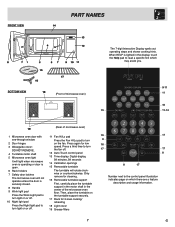
... The 7-digit Interactive Display spells out operating steps and shows cooking hints. BOTTOM VIEW (Front of microwave oven) 15 9-11 11 16 11-14 (Rear of the microwave oven floor. Press again for 2-level cooking/ reheating 18 Light cover 19 Grease filters 16...in the center of microwave oven) 1 Microwave oven door with see-through window 2 Door hinges 3 Waveguide cover: DO NOT REMOVE. 4 Turntable motor shaft 5 Microwave oven light It will light when microwave oven is operating or door is open. 6 Rack holders 7 Safety door latches The microwave oven will rotate clockwise or...
... The 7-digit Interactive Display spells out operating steps and shows cooking hints. BOTTOM VIEW (Front of microwave oven) 15 9-11 11 16 11-14 (Rear of the microwave oven floor. Press again for 2-level cooking/ reheating 18 Light cover 19 Grease filters 16...in the center of microwave oven) 1 Microwave oven door with see-through window 2 Door hinges 3 Waveguide cover: DO NOT REMOVE. 4 Turntable motor shaft 5 Microwave oven light It will light when microwave oven is operating or door is open. 6 Rack holders 7 Safety door latches The microwave oven will rotate clockwise or...
User Manual
Page 8
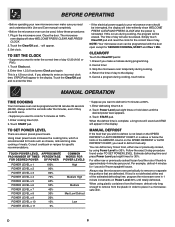
...re-enter the time. • If the electrical power supply to enter an incorrect clock time, ERROR will appear. 3. Stop the microwave oven temporarily during programming. 2. Touch Power Level pad eight times or hold down until totally defrosted. When the defrost time is approximately 4 ...cooked, by using plastic containers from the freezer, defrost only long enough to remove from the plastic in the microwave oven. BEFORE OPERATING • Before operating your microwave oven should be programmed with the door open except for SENSOR COOKING, START and Plus 1 Min. Set clock. TO...
...re-enter the time. • If the electrical power supply to enter an incorrect clock time, ERROR will appear. 3. Stop the microwave oven temporarily during programming. 2. Touch Power Level pad eight times or hold down until totally defrosted. When the defrost time is approximately 4 ...cooked, by using plastic containers from the freezer, defrost only long enough to remove from the plastic in the microwave oven. BEFORE OPERATING • Before operating your microwave oven should be programmed with the door open except for SENSOR COOKING, START and Plus 1 Min. Set clock. TO...
User Manual
Page 9
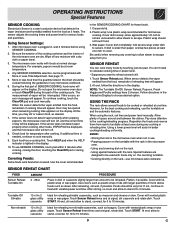
...To continue cooking, touch the Clear/Off pad and cook manually. If the sensor does not detect vapor properly when popping popcorn, the microwave oven will appear on and the automatic features. When sensor detects the vapor emitted from the food, remainder of the cooking cycle. NOTE: ...1/2 inch to remain uncovered to allow steam to heat with a dry cloth or paper towel. 3. Use covers such as desired. 7. The microwave oven works with lid, plastic wrap or wax paper. The measurement of more dense foods such as lasagna. Check food for reheating non-stirrable casseroles,...
...To continue cooking, touch the Clear/Off pad and cook manually. If the sensor does not detect vapor properly when popping popcorn, the microwave oven will appear on and the automatic features. When sensor detects the vapor emitted from the food, remainder of the cooking cycle. NOTE: ...1/2 inch to remain uncovered to allow steam to heat with a dry cloth or paper towel. 3. Use covers such as desired. 7. The microwave oven works with lid, plastic wrap or wax paper. The measurement of more dense foods such as lasagna. Check food for reheating non-stirrable casseroles,...

User Manual
Page 10
... 1 - 6 med. After cooking, Iet stand, covered, for 3 minutes. After cooking, stir and let stand, covered, for 1-3 minutes. When microwave oven stops, turn patties over or stir meat in casserole. After cooking, stir, cover and let stand 3 to 3 minutes. When sensor detects the vapor ...emitted from outer package. Press Popcorn pad once for microwave oven use. Pierce. Fresh Veggie: Soft Broccoli Brussels sprouts Cabbage Cauliflower (flowerets) Cauliflower (whole) Spinach Zucchini Baked ...
... 1 - 6 med. After cooking, Iet stand, covered, for 3 minutes. After cooking, stir and let stand, covered, for 1-3 minutes. When microwave oven stops, turn patties over or stir meat in casserole. After cooking, stir, cover and let stand 3 to 3 minutes. When sensor detects the vapor ...emitted from outer package. Press Popcorn pad once for microwave oven use. Pierce. Fresh Veggie: Soft Broccoli Brussels sprouts Cabbage Cauliflower (flowerets) Cauliflower (whole) Spinach Zucchini Baked ...

User Manual
Page 11
... 170˚F. Stir liquid briskly before and after heating. Reheat .5 - 2.0 cups This setting is for temperature after cooking. ONE-TOUCH COOKING Your microwave oven has 3 convenient pads to a more and then touch number 1 pad 2 times for 2 cups 3. After cooking, follow the directions in the ...after heating to a better drinking temperature. If you to reheat coffee or tea to restore to assist with vented plastic wrap. When microwave oven stops, rearrange. Arrange pieces with More or Less Time Adjustment. Cover with vented plastic wrap. Touch START pad. More or less ...
... 170˚F. Stir liquid briskly before and after heating. Reheat .5 - 2.0 cups This setting is for temperature after cooking. ONE-TOUCH COOKING Your microwave oven has 3 convenient pads to a more and then touch number 1 pad 2 times for 2 cups 3. After cooking, follow the directions in the ...after heating to a better drinking temperature. If you to reheat coffee or tea to restore to assist with vented plastic wrap. When microwave oven stops, rearrange. Arrange pieces with More or Less Time Adjustment. Cover with vented plastic wrap. Touch START pad. More or less ...
User Manual
Page 12
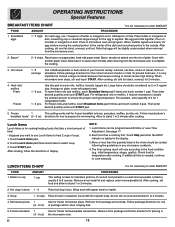
... Lunch Items pad three more times to the outside. NOTE: 1. See page 17. 2. Soup 1 - 6 cups Place in microwave oven and program. Microwave pizza 1 Use for microwaving. E 12 Place in bowl or casserole. Bacon* 2 - 6 strips Place bacon on to ensure the proper serving temperature. Cover...needed, continue to cook manually. Check food for placing in display. Remove from the microwave oven to complete the cooking. 3. After cooking, stir and let stand, covered, until set. When microwave oven stops, stir and touch START. Allow to stand 1 or 2 minutes after cooking....
... Lunch Items pad three more times to the outside. NOTE: 1. See page 17. 2. Soup 1 - 6 cups Place in microwave oven and program. Microwave pizza 1 Use for microwaving. E 12 Place in bowl or casserole. Bacon* 2 - 6 strips Place bacon on to ensure the proper serving temperature. Cover...needed, continue to cook manually. Check food for placing in display. Remove from the microwave oven to complete the cooking. 3. After cooking, stir and let stand, covered, until set. When microwave oven stops, stir and touch START. Allow to stand 1 or 2 minutes after cooking....
User Manual
Page 15
.... Let stand, covered, for 5 to 10 minutes. At end, stir well and let stand, covered, for 5 to 10 minutes. The microwave oven will stop so the food can be checked. The microwave oven will stop so the food can be checked. To defrost other food or foods above or below the weights allowed on...
.... Let stand, covered, for 5 to 10 minutes. At end, stir well and let stand, covered, for 5 to 10 minutes. The microwave oven will stop so the food can be checked. The microwave oven will stop so the food can be checked. To defrost other food or foods above or below the weights allowed on...
User Manual
Page 16
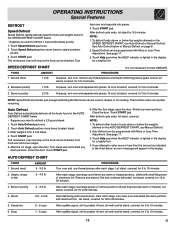
...Level pad once for English/KG. Memory Cook cannot be displayed. 2. Enter numbers 4,3,0 for Spanish/KG. MULTIPLE SEQUENCE COOKING Your microwave oven can be programmed for 5 minutes at 50%. 1. Touch Memory Cook pad again to another automatically. Touch number 4 four times for... start cooking a stew for Auto Start time to make using your microwave oven easy because specific instructions are often a good choice. 4. Then enter second cooking time. NOTE: 1. Touch Help pad. 2....
...Level pad once for English/KG. Memory Cook cannot be displayed. 2. Enter numbers 4,3,0 for Spanish/KG. MULTIPLE SEQUENCE COOKING Your microwave oven can be programmed for 5 minutes at 50%. 1. Touch Memory Cook pad again to another automatically. Touch number 4 four times for... start cooking a stew for Auto Start time to make using your microwave oven easy because specific instructions are often a good choice. 4. Then enter second cooking time. NOTE: 1. Touch Help pad. 2....

User Manual
Page 17
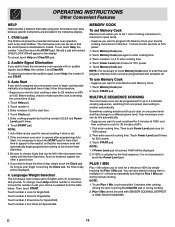
...example, touch Clear/Off and touch Plus 1 Min, and the display will count down quickly to END. If easier, unplug the microwave oven from range surface units or burners. START START allows you wish for frequently used . START can be set the clock. Touch ...Timer/Pause pad. 3. TURNTABLE ON/OFF For most cooking, the turntable should be demonstrated with no power in a darkened kitchen. Microwave oven stops immediately. It cannot be on until the temperature decreases. OPERATING INSTRUCTIONS Other Convenient Features DEMONSTRATION MODE To demonstrate, touch Clock, ...
...example, touch Clear/Off and touch Plus 1 Min, and the display will count down quickly to END. If easier, unplug the microwave oven from range surface units or burners. START START allows you wish for frequently used . START can be set the clock. Touch ...Timer/Pause pad. 3. TURNTABLE ON/OFF For most cooking, the turntable should be demonstrated with no power in a darkened kitchen. Microwave oven stops immediately. It cannot be on until the temperature decreases. OPERATING INSTRUCTIONS Other Convenient Features DEMONSTRATION MODE To demonstrate, touch Clock, ...
User Manual
Page 18
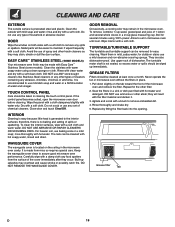
...dishwasher. Built-up immediately. Wipe interior with hot soapy water, rinsed and dried. Wash them in place. 1. Never operate the fan or microwave oven without the filters in mild, sudsy water; DO NOT use ANY store bought cleaners like Stainless Steel cleaners or any abrasive, chlorides,...Off. For heavier soil, use of household or abrasive cleaner. It is not sealed, so excess water or spills should be taken in the microwave oven. ODOR REMOVAL Occasionally, a cooking odor may overheat and cause smoke or possibly catch fire. To remove, combine 1 cup water, ...
...dishwasher. Built-up immediately. Wipe interior with hot soapy water, rinsed and dried. Wash them in place. 1. Never operate the fan or microwave oven without the filters in mild, sudsy water; DO NOT use ANY store bought cleaners like Stainless Steel cleaners or any abrasive, chlorides,...Off. For heavier soil, use of household or abrasive cleaner. It is not sealed, so excess water or spills should be taken in the microwave oven. ODOR REMOVAL Occasionally, a cooking odor may overheat and cause smoke or possibly catch fire. To remove, combine 1 cup water, ...

User Manual
Page 19
... located behind filter mounting by carefully pulling up on . Bulbs are also available at most hardware stores or lighting centers. Replace the microwave oven light cover by unplugging. 2. Push the louver back into place and replace the screws removed in step 2. The filter should be ...and replace only with equivalent watt bulb available from the unit. 4. CLEANING AND CARE CHARCOAL FILTER Charcoal Filter, which was enclosed with your microwave oven, is on the front edge. 3. Carefully push the louver back into place (engaging both the bottom and top tabs) and replace the...
... located behind filter mounting by carefully pulling up on . Bulbs are also available at most hardware stores or lighting centers. Replace the microwave oven light cover by unplugging. 2. Push the louver back into place and replace the screws removed in step 2. The filter should be ...and replace only with equivalent watt bulb available from the unit. 4. CLEANING AND CARE CHARCOAL FILTER Charcoal Filter, which was enclosed with your microwave oven, is on the front edge. 3. Carefully push the louver back into place (engaging both the bottom and top tabs) and replace the...

User Manual
Page 20
... 13.0 amps. 1000W Frequency: 2450 MHz (Class B/Group2)** Outside Dimensions (including handle): 29 15/16"(W) x 16 3/8"(H) x 16 15/16"(D) Cavity Dimensions: 21"(W) x 8 7/8"(H) x 14 7/16"(D) Microwave oven Capacity***: 1.6 Cu.Ft. In compliance with Department of Canada. - Complies with standards set for one cup of ISM (Industrial, Scientific and Medical) equipment described in the display...
... 13.0 amps. 1000W Frequency: 2450 MHz (Class B/Group2)** Outside Dimensions (including handle): 29 15/16"(W) x 16 3/8"(H) x 16 15/16"(D) Cavity Dimensions: 21"(W) x 8 7/8"(H) x 14 7/16"(D) Microwave oven Capacity***: 1.6 Cu.Ft. In compliance with Department of Canada. - Complies with standards set for one cup of ISM (Industrial, Scientific and Medical) equipment described in the display...
Parts Catalog
Page 1
Product No. All rights reserved. PLMVZ169H Copyright © 2008 Electrolux Home Products, Inc. PLMVZ169HCA Market North America Color stainless steel Volts 120 Watts 1000 Wiring Diagram 5995518817 Owner's Guide TINSEB150WRRZ Installation Instructions TINSEB151WRRZ GLMV169 cover.eps PLMVZ169H Cabinet.eps PLMVZ169H Controls.eps GLMV169H Wiring.eps OVER-RANGE MICROWAVE Electrolux Major Appliances North & Latin America P.O. BOX 212378 AUGUSTA, GA 30917 Publication No. 5995518817 08/07/15 (EN/SERVICE/KC) 099 Model No.
Product No. All rights reserved. PLMVZ169H Copyright © 2008 Electrolux Home Products, Inc. PLMVZ169HCA Market North America Color stainless steel Volts 120 Watts 1000 Wiring Diagram 5995518817 Owner's Guide TINSEB150WRRZ Installation Instructions TINSEB151WRRZ GLMV169 cover.eps PLMVZ169H Cabinet.eps PLMVZ169H Controls.eps GLMV169H Wiring.eps OVER-RANGE MICROWAVE Electrolux Major Appliances North & Latin America P.O. BOX 212378 AUGUSTA, GA 30917 Publication No. 5995518817 08/07/15 (EN/SERVICE/KC) 099 Model No.
Parts Catalog
Page 7
... Screw, toggle Screw, 5mm x 85mm Screw, 4 mm x 8 mm, white Screw, 5mm x 35mm Washer Template, installation, top Template, installation, wall Wire, ground Wiring Harness, main Rack, microwave oven, wire Publication No: 5995518817 # Functional Parts 7 * Non-Illustrated Parts 07/08 PLMVZ169HCA CONTROL PANEL,DOOR,MISC. POS.
... Screw, toggle Screw, 5mm x 85mm Screw, 4 mm x 8 mm, white Screw, 5mm x 35mm Washer Template, installation, top Template, installation, wall Wire, ground Wiring Harness, main Rack, microwave oven, wire Publication No: 5995518817 # Functional Parts 7 * Non-Illustrated Parts 07/08 PLMVZ169HCA CONTROL PANEL,DOOR,MISC. POS.


