User Manual
Page 2
... few things you can do need service, you better. Visit the Frigidaire Web Site at 1-800-944-9044, 24 hours a day, 7 days a week. Read this manual. Save time and money. A list of a new microwave oven! IMPORTANT SAFETY INSTRUCTIONS For your purchase of toll-free customer service numbers...receipt here for future reference. Common sense and caution must be practiced when installing, operating and maintaining any object between the oven front face and the door or allow soil or cleaner residue to microwave energy. It is damaged. PLEASE CAREFULLY READ AND SAVE THESE INSTRUCTIONS This...
... few things you can do need service, you better. Visit the Frigidaire Web Site at 1-800-944-9044, 24 hours a day, 7 days a week. Read this manual. Save time and money. A list of a new microwave oven! IMPORTANT SAFETY INSTRUCTIONS For your purchase of toll-free customer service numbers...receipt here for future reference. Common sense and caution must be practiced when installing, operating and maintaining any object between the oven front face and the door or allow soil or cleaner residue to microwave energy. It is damaged. PLEASE CAREFULLY READ AND SAVE THESE INSTRUCTIONS This...

User Manual
Page 3
...cleaning agents, such as whole eggs and sealed containers -for example, closed , turn the fan on page 4. • Install or locate this appliance only in microwave oven. - Visible bubbling or boiling when the container is removed from paper or plastic bags before removing the container. - To ... placing bag in accordance with the provided installation instructions. • Some products such as lye-based oven cleaners, may damage the louver and the grease filters. • When flaming food under the hood, turn microwave oven off and disconnect the power cord or ...
...cleaning agents, such as whole eggs and sealed containers -for example, closed , turn the fan on page 4. • Install or locate this appliance only in microwave oven. - Visible bubbling or boiling when the container is removed from paper or plastic bags before removing the container. - To ... placing bag in accordance with the provided installation instructions. • Some products such as lye-based oven cleaners, may damage the louver and the grease filters. • When flaming food under the hood, turn microwave oven off and disconnect the power cord or ...
User Manual
Page 4
... In the event of an electrical short circuit, grounding reduces risk of electric shock by the microwave oven to rest on plastic foam pad. Electrical Requirements Check Installation Instructions for proper location for any damage, such as feasible or check position and signal of ...cord having a grounding wire with the National Electrical Code and local codes and ordinances. NOTES: 1. Lift carton off microwave oven and remove all packing materials, Installation Instructions, Wall Template, Top Template, Charcoal Filter, Turntable and Turntable Support. Read enclosures and SAVE the Use and ...
... In the event of an electrical short circuit, grounding reduces risk of electric shock by the microwave oven to rest on plastic foam pad. Electrical Requirements Check Installation Instructions for proper location for any damage, such as feasible or check position and signal of ...cord having a grounding wire with the National Electrical Code and local codes and ordinances. NOTES: 1. Lift carton off microwave oven and remove all packing materials, Installation Instructions, Wall Template, Top Template, Charcoal Filter, Turntable and Turntable Support. Read enclosures and SAVE the Use and ...

User Manual
Page 19
...installation. Pull the louver away from parts distributor. Change the charcoal filter. 5. Light cover may become very hot. Bulbs are also available at the circuit breaker panel or by unplugging. 2. CLEANING AND CARE CHARCOAL FILTER Charcoal Filter, which was enclosed with your microwave oven, is on. Oven... only with equivalent watt bulb available from the unit. 4. To replace light bulb, first disconnect power to the microwave oven at the circuit breaker panel or by unplugging. 2. Close light cover and secure with screw removed in step 2. Light cover...
...installation. Pull the louver away from parts distributor. Change the charcoal filter. 5. Light cover may become very hot. Bulbs are also available at the circuit breaker panel or by unplugging. 2. CLEANING AND CARE CHARCOAL FILTER Charcoal Filter, which was enclosed with your microwave oven, is on. Oven... only with equivalent watt bulb available from the unit. 4. To replace light bulb, first disconnect power to the microwave oven at the circuit breaker panel or by unplugging. 2. Close light cover and secure with screw removed in step 2. Light cover...
User Manual
Page 21
... but not limited to, any parts of this appliance that prove to be defective in materials or workmanship when such appliance is installed, used and maintained in accordance with the provided instructions. Service calls which are not a part of the appliance when it is in your ... original date of purchase, Electrolux will pay all receipts. Product that have been removed, altered or cannot be required. Food loss due to correct the installation of God. Service calls to any obligations under this warranty. 5. Service calls to the finish of the unit. 4. Damages to repair or...
... but not limited to, any parts of this appliance that prove to be defective in materials or workmanship when such appliance is installed, used and maintained in accordance with the provided instructions. Service calls which are not a part of the appliance when it is in your ... original date of purchase, Electrolux will pay all receipts. Product that have been removed, altered or cannot be required. Food loss due to correct the installation of God. Service calls to any obligations under this warranty. 5. Service calls to the finish of the unit. 4. Damages to repair or...
Parts Catalog
Page 1
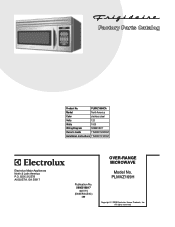
All rights reserved. BOX 212378 AUGUSTA, GA 30917 Publication No. 5995518817 08/07/15 (EN/SERVICE/KC) 099 Model No. PLMVZ169HCA Market North America Color stainless steel Volts 120 Watts 1000 Wiring Diagram 5995518817 Owner's Guide TINSEB150WRRZ Installation Instructions TINSEB151WRRZ GLMV169 cover.eps PLMVZ169H Cabinet.eps PLMVZ169H Controls.eps GLMV169H Wiring.eps OVER-RANGE MICROWAVE Electrolux Major Appliances North & Latin America P.O. PLMVZ169H Copyright © 2008 Electrolux Home Products, Inc. Product No.
All rights reserved. BOX 212378 AUGUSTA, GA 30917 Publication No. 5995518817 08/07/15 (EN/SERVICE/KC) 099 Model No. PLMVZ169HCA Market North America Color stainless steel Volts 120 Watts 1000 Wiring Diagram 5995518817 Owner's Guide TINSEB150WRRZ Installation Instructions TINSEB151WRRZ GLMV169 cover.eps PLMVZ169H Cabinet.eps PLMVZ169H Controls.eps GLMV169H Wiring.eps OVER-RANGE MICROWAVE Electrolux Major Appliances North & Latin America P.O. PLMVZ169H Copyright © 2008 Electrolux Home Products, Inc. Product No.
Parts Catalog
Page 7
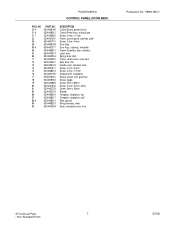
..., stainless steel Screw, 4 mm x 8 mm Screw, 4 mm x 15 mm Hardware Kit, installation Sleeve, power cord, grommet Screw, toggle Screw, 5mm x 85mm Screw, 4 mm x 8 mm, white Screw, 5mm x 35mm Washer Template, installation, top Template, installation, wall Wire, ground Wiring Harness, main Rack, microwave oven, wire Publication No: 5995518817 # Functional Parts 7 * Non-Illustrated Parts 07/08 PLMVZ169HCA...
..., stainless steel Screw, 4 mm x 8 mm Screw, 4 mm x 15 mm Hardware Kit, installation Sleeve, power cord, grommet Screw, toggle Screw, 5mm x 85mm Screw, 4 mm x 8 mm, white Screw, 5mm x 35mm Washer Template, installation, top Template, installation, wall Wire, ground Wiring Harness, main Rack, microwave oven, wire Publication No: 5995518817 # Functional Parts 7 * Non-Illustrated Parts 07/08 PLMVZ169HCA...
Installation Instructions
Page 1
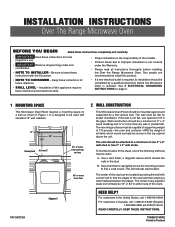
...ll in the top cabinet above the unit. The mounting surfaces must be located by a qualified electrician before installing the Over the Range Microwave Oven. B. For customers in the United States, call: 1-800-944-9044 For customers in Figure 1. Be sure to ...8226; If a new electrical outlet is not flat, use . • IMPORTANT Observe all instructions thoroughly before the Microwave Oven is installed. If the wall is required, its installation should be attached to either side of 2" x 4" wood studding and ³⁄₈" or more from cooking surface...
...ll in the top cabinet above the unit. The mounting surfaces must be located by a qualified electrician before installing the Over the Range Microwave Oven. B. For customers in the United States, call: 1-800-944-9044 For customers in Figure 1. Be sure to ...8226; If a new electrical outlet is not flat, use . • IMPORTANT Observe all instructions thoroughly before the Microwave Oven is installed. If the wall is required, its installation should be attached to either side of 2" x 4" wood studding and ³⁄₈" or more from cooking surface...

Installation Instructions
Page 2
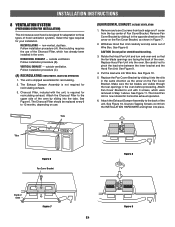
... satisfactory air movement, the total duct length of some typical ductwork parts. INSTALLATION INSTRUCTIONS 3 ELECTRICAL GROUNDING INSTRUCTIONS This appliance must be located inside the cabinet directly above the Microwave Oven mounting location as shown in Figure 2. The receptacle should total less than ...; Elbow (10 ft.) 45° Elbow (5 ft.) Adaptor (5 ft.) 10" Wide Elbow (10 ft.) 90° Elbow (25 ft.) 45° Elbow (5 ft.) Wall cap (40 ft.) Roof cap (24 ft.) Figure 3 E2 DO NOT UNDER ANY CIRCUMSTANCES CUT OR REMOVE THE GROUNDING PIN FROM THE PLUG. This oven is required, ...
... satisfactory air movement, the total duct length of some typical ductwork parts. INSTALLATION INSTRUCTIONS 3 ELECTRICAL GROUNDING INSTRUCTIONS This appliance must be located inside the cabinet directly above the Microwave Oven mounting location as shown in Figure 2. The receptacle should total less than ...; Elbow (10 ft.) 45° Elbow (5 ft.) Adaptor (5 ft.) 10" Wide Elbow (10 ft.) 90° Elbow (25 ft.) 45° Elbow (5 ft.) Wall cap (40 ft.) Roof cap (24 ft.) Figure 3 E2 DO NOT UNDER ANY CIRCUMSTANCES CUT OR REMOVE THE GROUNDING PIN FROM THE PLUG. This oven is required, ...
Installation Instructions
Page 3
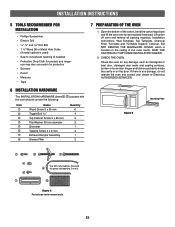
Open the bottom of the carton, bend the carton flaps back and tilt the oven over to rest on the door. E3 INSTALLATION INSTRUCTIONS 5 TOOLS RECOMMENDED FOR INSTALLATION • Phillips Screwdriver • Electric Drill and Drill Bits • 1 ¹⁄&#...exhaust opening (if needed) • Protective Drop Cloth for protection • Scissors • Pencil • Measure • Tape 6 INSTALLATION HARDWARE The INSTALLATION HARDWARE (items 1 - 7 ) packed with the oven should contain the following: Item 1 2 3 4 5 6 7 8 Name Wood Screw 5 x 35 mm Toggle Bolt Top Cabinet...
Open the bottom of the carton, bend the carton flaps back and tilt the oven over to rest on the door. E3 INSTALLATION INSTRUCTIONS 5 TOOLS RECOMMENDED FOR INSTALLATION • Phillips Screwdriver • Electric Drill and Drill Bits • 1 ¹⁄&#...exhaust opening (if needed) • Protective Drop Cloth for protection • Scissors • Pencil • Measure • Tape 6 INSTALLATION HARDWARE The INSTALLATION HARDWARE (items 1 - 7 ) packed with the oven should contain the following: Item 1 2 3 4 5 6 7 8 Name Wood Screw 5 x 35 mm Toggle Bolt Top Cabinet...
Installation Instructions
Page 4
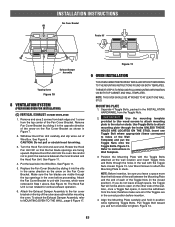
... SYSTEM (PREPARING OVEN FOR INSTALLATION) This microwave oven/hood is designed for adaptation to three types of the Charcoal Filter, which were removed in Step 1 above. Recirculating requires the use . Follow installation procedure (B). Follow installation procedure (C). (A) RECIRCULATING: NON-VENTED, DUCTLESS OPERATION 1. The Exhaust Damper Assembly is shipped assembled for recirculating. 2. Attach the Charcoal Filter to the...
... SYSTEM (PREPARING OVEN FOR INSTALLATION) This microwave oven/hood is designed for adaptation to three types of the Charcoal Filter, which were removed in Step 1 above. Recirculating requires the use . Follow installation procedure (B). Follow installation procedure (C). (A) RECIRCULATING: NON-VENTED, DUCTLESS OPERATION 1. The Exhaust Damper Assembly is shipped assembled for recirculating. 2. Attach the Charcoal Filter to the...
Installation Instructions
Page 5
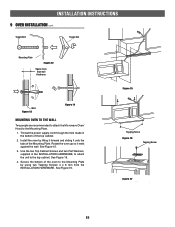
... Replace the Fan Cover Bracket by sliding it cannot be withdrawn from the Toggle Nuts. 2. Figure 11 9 OVEN INSTALLATION THIS OVEN CANNOT BE PROPERLY INSTALLED WITHOUT REFERRING TO THE MOUNTING INSTRUCTIONS FOUND ON BOTH TEMPLATES. Use Wood Screws to attach the Mounting Plate to... arrow on the top of the Toggles are facing upward. Figure 15. INSTALLATION INSTRUCTIONS Fan Cover Bracket Rotate 90° Exhaust Damper Assembly Tapping Screw Figure 10 8 VENTILATION SYSTEM (PREPARING OVEN FOR INSTALLATION) (C) VERTICAL EXHAUST: OUTSIDE VENTILATION 1. Separate 4 Toggle Bolts, packed in...
... Replace the Fan Cover Bracket by sliding it cannot be withdrawn from the Toggle Nuts. 2. Figure 11 9 OVEN INSTALLATION THIS OVEN CANNOT BE PROPERLY INSTALLED WITHOUT REFERRING TO THE MOUNTING INSTRUCTIONS FOUND ON BOTH TEMPLATES. Use Wood Screws to attach the Mounting Plate to... arrow on the top of the Toggles are facing upward. Figure 15. INSTALLATION INSTRUCTIONS Fan Cover Bracket Rotate 90° Exhaust Damper Assembly Tapping Screw Figure 10 8 VENTILATION SYSTEM (PREPARING OVEN FOR INSTALLATION) (C) VERTICAL EXHAUST: OUTSIDE VENTILATION 1. Separate 4 Toggle Bolts, packed in...
Installation Instructions
Page 6
...it forward and sliding it rests against the wall. See Figure 16. 4. See Figure 16. INSTALLATION INSTRUCTIONS 9 OVEN INSTALLATION cont. Thread the power supply cord through the hole made in the INSTALLATION HARDWARE, to attach the unit to the Mounting Plate. 1. Toggle Bolt Toggle Nut Mounting Plate ...Figure 12 Space more than wall thickness Wall Figure 13 Figure 14 MOUNTING OVEN TO THE WALL Two people are recommended to attach the Microwave Oven/ Hood to the...
...it forward and sliding it rests against the wall. See Figure 16. 4. See Figure 16. INSTALLATION INSTRUCTIONS 9 OVEN INSTALLATION cont. Thread the power supply cord through the hole made in the INSTALLATION HARDWARE, to attach the unit to the Mounting Plate. 1. Toggle Bolt Toggle Nut Mounting Plate ...Figure 12 Space more than wall thickness Wall Figure 13 Figure 14 MOUNTING OVEN TO THE WALL Two people are recommended to attach the Microwave Oven/ Hood to the...

Installation Instructions
Page 7
INSTALLATION INSTRUCTIONS CHECKLIST FOR INSTALLATION 1. E7 Plug in the power cord. 3. Make sure the unit has been installed according to all of the Installation Instructions and the Wall and Top Cabinet Templates. 2. Keep the Operation Manual.
INSTALLATION INSTRUCTIONS CHECKLIST FOR INSTALLATION 1. E7 Plug in the power cord. 3. Make sure the unit has been installed according to all of the Installation Instructions and the Wall and Top Cabinet Templates. 2. Keep the Operation Manual.


