Complete Owner's Guide (English)
Page 2
Common sense and caution must be filled in United States Please record your model and serial numbers below for future purchases. Box 212378 Augusta, GA 30917 © 2007 Electrolux Canada Corp. All rights reserved Serial Plate Location 2 Printed in completely...Products, we are very proud of a new appliance! Your product may occur. Spanish Use & Care Manual Electrolux Home Products P. Model Number: Serial Number: Purchase Date: Product Registration Register Your Product The PRODUCT REGISTRATION CARD should be practiced when installing, operating and maintaining...
Common sense and caution must be filled in United States Please record your model and serial numbers below for future purchases. Box 212378 Augusta, GA 30917 © 2007 Electrolux Canada Corp. All rights reserved Serial Plate Location 2 Printed in completely...Products, we are very proud of a new appliance! Your product may occur. Spanish Use & Care Manual Electrolux Home Products P. Model Number: Serial Number: Purchase Date: Product Registration Register Your Product The PRODUCT REGISTRATION CARD should be practiced when installing, operating and maintaining...
Complete Owner's Guide (English)
Page 6
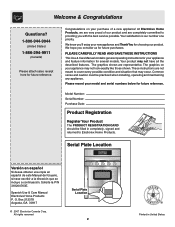
Features At A Glance Range Features Your Range Features Burner Valve & At a Glance Knob Electronic Oven Controls with Clock and Kitchen Timer Speed clean Clock Bake time Clean Timer On/Off Start time ... Oven Adjustable Oven Racks One Piece Door Handle Stainless Steel Oven Door 9,500 BTU Burner 14,000 BTU Power Burner Note: The features of your range will vary according to model. Storage Drawer 16,000 BTU Burner 6 5,000 BTU Simmer Burner 12,000 BTU Power Burner
Features At A Glance Range Features Your Range Features Burner Valve & At a Glance Knob Electronic Oven Controls with Clock and Kitchen Timer Speed clean Clock Bake time Clean Timer On/Off Start time ... Oven Adjustable Oven Racks One Piece Door Handle Stainless Steel Oven Door 9,500 BTU Burner 14,000 BTU Power Burner Note: The features of your range will vary according to model. Storage Drawer 16,000 BTU Burner 6 5,000 BTU Simmer Burner 12,000 BTU Power Burner
Complete Owner's Guide (English)
Page 12
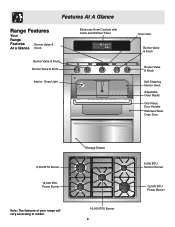
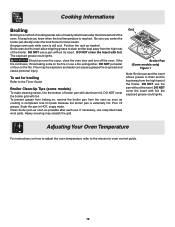
.... DO NOT put water or flour on how to adjust the oven temperature refer to the electronic oven control guide. 12 Grid Broiler Pan (Some models only) Figure 1 Note: Broiler pan and the insert allows grease to drain and be kept away from the oven as soon as needed. Cooking Informations... of cooking tender cuts of meat by direct heat under the broil burner for broiling Refer to the Timer Guide Broiler Clean-Up Tips (some models) To make cleaning easier, line the bottom of broiler pan with foil; A beep lets you center the broiler pan directly under the broil element of...
.... DO NOT put water or flour on how to adjust the oven temperature refer to the electronic oven control guide. 12 Grid Broiler Pan (Some models only) Figure 1 Note: Broiler pan and the insert allows grease to drain and be kept away from the oven as soon as needed. Cooking Informations... of cooking tender cuts of meat by direct heat under the broil burner for broiling Refer to the Timer Guide Broiler Clean-Up Tips (some models) To make cleaning easier, line the bottom of broiler pan with foil; A beep lets you center the broiler pan directly under the broil element of...

Complete Owner's Guide (English)
Page 13
... the oven is normal and safe and should be left in or around any soil from the oven. cleaning cycle. Clean any art of some models) Adhere to another well ventilated room. If they may affect cooking or foil could damage it to a fin powdered ash you can become very hot... flame and cause more smoke and odor than those used in the oven vent converts most of any cleaning materials on . To clean, use any range. If available, use aluminum foil to burn soil on the gasket. Before cleaning any exterior parts of the racks with soap and water. 3. After the...
... the oven is normal and safe and should be left in or around any soil from the oven. cleaning cycle. Clean any art of some models) Adhere to another well ventilated room. If they may affect cooking or foil could damage it to a fin powdered ash you can become very hot... flame and cause more smoke and odor than those used in the oven vent converts most of any cleaning materials on . To clean, use any range. If available, use aluminum foil to burn soil on the gasket. Before cleaning any exterior parts of the racks with soap and water. 3. After the...
Complete Owner's Guide (English)
Page 14
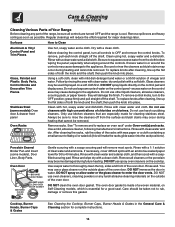
...to Clean Aluminum & Vinyl Control Panel and Trim Pieces Glass, Painted and Plastic Body Parts, Control Knobs and Decorative Trim Pieces Stainless Steel (some models), Door Liner, Body Parts. Do not use harsh scrubbing cleaners. Use a mild, abrasive cleaner, following manufacturer's instructions. Use soap & water ...dish detergent and water or a 50/50 solution of vinegar and water. Care & Cleaning (Cleaning Chart) Cleaning Various Parts of Your Range Before cleaning any harsh abrasive cleaning materials on the outside of the oven door. Be sure to replace an oven rack" under Oven ...
...to Clean Aluminum & Vinyl Control Panel and Trim Pieces Glass, Painted and Plastic Body Parts, Control Knobs and Decorative Trim Pieces Stainless Steel (some models), Door Liner, Body Parts. Do not use harsh scrubbing cleaners. Use a mild, abrasive cleaner, following manufacturer's instructions. Use soap & water ...dish detergent and water or a 50/50 solution of vinegar and water. Care & Cleaning (Cleaning Chart) Cleaning Various Parts of Your Range Before cleaning any harsh abrasive cleaning materials on the outside of the oven door. Be sure to replace an oven rack" under Oven ...
Complete Owner's Guide (English)
Page 15
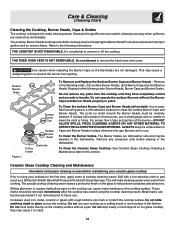
Do not remove any excessive soils before placing in place. To Clean the surface Burner Caps and Burner Heads (all models)- If residue still remains in the dishwasher. The Burner Grates are cleaned up immediately. Do not drop heavy or hard objects on the glass to ...help prevent scratches and abrasions. Because the gas Burners are sealed, cleanups are easy when spillovers are dishwasher safe and may cause it to using the cooktop cleaning cream. Do not attempt to...
Do not remove any excessive soils before placing in place. To Clean the surface Burner Caps and Burner Heads (all models)- If residue still remains in the dishwasher. The Burner Grates are cleaned up immediately. Do not drop heavy or hard objects on the glass to ...help prevent scratches and abrasions. Because the gas Burners are sealed, cleanups are easy when spillovers are dishwasher safe and may cause it to using the cooktop cleaning cream. Do not attempt to...
Complete Owner's Guide (English)
Page 16
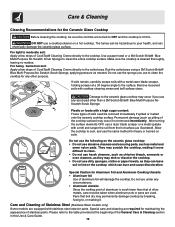
... circumstances. • Aluminum utensils Since the melting point of aluminum is cleaned thoroughly, leaving no residue. Care and Cleaning of Stainless Steel (Stainless Steel models only) Some models are used. Care & Cleaning Cleaning Recommendations for the Ceramic Glass Cooktop Before cleaning the cooktop, be sure the controls are required for maintaining the...
... circumstances. • Aluminum utensils Since the melting point of aluminum is cleaned thoroughly, leaving no residue. Care and Cleaning of Stainless Steel (Stainless Steel models only) Some models are used. Care & Cleaning Cleaning Recommendations for the Ceramic Glass Cooktop Before cleaning the cooktop, be sure the controls are required for maintaining the...
Complete Owner's Guide (English)
Page 20
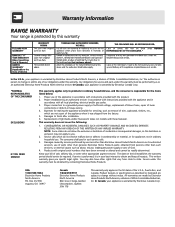
...any of our obligations under this warranty must be readily determined. The date on models with the product. 2. In Canada, your appliance is warranted by Electrolux Canada ...other than Electrolux Home Products North America or its authorized servicers; Box 212378 Augusta, GA 30917 Canada 1•866•294•9911 Electrolux Home Products North America 802, ...Products North America, a division of the U.S.A., Puerto Rico, and Canada. Warranty Information RANGE WARRANTY Your range is protected by this warranty In the U.S.A., your appliance is warranted by Electrolux Canada...
...any of our obligations under this warranty must be readily determined. The date on models with the product. 2. In Canada, your appliance is warranted by Electrolux Canada ...other than Electrolux Home Products North America or its authorized servicers; Box 212378 Augusta, GA 30917 Canada 1•866•294•9911 Electrolux Home Products North America 802, ...Products North America, a division of the U.S.A., Puerto Rico, and Canada. Warranty Information RANGE WARRANTY Your range is protected by this warranty In the U.S.A., your appliance is warranted by Electrolux Canada...
Timer Guide (Timer Guide)
Page 1
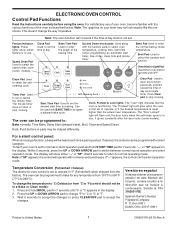
... sound operation and silent operation mode. Push Clear pad to stop cooking. Start Time Pad- It glows constantly after the door locks (some models). Within 5 seconds, press the UP or DOWN ARROW pad to select the variable broil function. If "- -" appears, the control is ...function previously entered except the time of day clock is set the desired start time), time of the baking time. Spanish Owner's Guides Frigidaire Company P. ELECTRONIC OVEN CONTROL Control Pad Functions Read the instructions carefully before using the oven. Note: The oven function will flash until ...
... sound operation and silent operation mode. Push Clear pad to stop cooking. Start Time Pad- It glows constantly after the door locks (some models). Within 5 seconds, press the UP or DOWN ARROW pad to select the variable broil function. If "- -" appears, the control is ...function previously entered except the time of day clock is set the desired start time), time of the baking time. Spanish Owner's Guides Frigidaire Company P. ELECTRONIC OVEN CONTROL Control Pad Functions Read the instructions carefully before using the oven. Note: The oven function will flash until ...
Timer Guide (Timer Guide)
Page 2
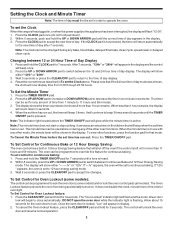
... or DOWN ARROW pad to decrease the time in the display and the control will count down in order to lock the oven door (some models): The control can be used alone or during any other oven functions. When less than 1 hour remains, the display will beep once. 2. It will unlock... timer count down ). 2. To cancel the Oven lockout feature, press the CLEAR/OFF pad and hold pad down in To set the Clock When the range is flashing. Wait 5 seconds or press the CLEAR/OFF pad to return to the new time of day after 7 seconds. When the set control for...
... or DOWN ARROW pad to decrease the time in the display and the control will count down in order to lock the oven door (some models): The control can be used alone or during any other oven functions. When less than 1 hour remains, the display will beep once. 2. It will unlock... timer count down ). 2. To cancel the Oven lockout feature, press the CLEAR/OFF pad and hold pad down in To set the Clock When the range is flashing. Wait 5 seconds or press the CLEAR/OFF pad to return to the new time of day after 7 seconds. When the set control for...

Timer Guide (Timer Guide)
Page 5
... for the Sabbath and the food may be safely removed from the display. The glass shield must be in 5°F increments with each press of models with the Sabbath feature active, the oven will not visibly show "350°F (177°C)." This will be needed during the Sabbath/Jewish Holidays. The... the UP or DOWN ARROW pad. Press and hold both the Bake Time and Start Time pads for at the upper left (and right, some models) rear wall of day. 2. Should you desire to set with the BAKE pad. Place the food in the display. 4. SAb will disappear from the oven...
... for the Sabbath and the food may be safely removed from the display. The glass shield must be in 5°F increments with each press of models with the Sabbath feature active, the oven will not visibly show "350°F (177°C)." This will be needed during the Sabbath/Jewish Holidays. The... the UP or DOWN ARROW pad. Press and hold both the Bake Time and Start Time pads for at the upper left (and right, some models) rear wall of day. 2. Should you desire to set with the BAKE pad. Place the food in the display. 4. SAb will disappear from the oven...
Installation Instructions (All Languages)
Page 3
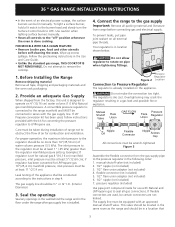
... are not kinked. If flexible connectors are used , follow instructions provided with Natural and LP/Propane gas to LP/Propane use. 36 " GAS RANGE INSTALLATION INSTRUCTIONS • In the event of air for combustion and ventilation. To light a surface ...burner, hold a lit match to the burner head and slowly turn the Surface Control knob to rotate on the appliance. Use caution when lighting surface burners manually. • Reset all gas connections. FOR MODELS...
... are not kinked. If flexible connectors are used , follow instructions provided with Natural and LP/Propane gas to LP/Propane use. 36 " GAS RANGE INSTALLATION INSTRUCTIONS • In the event of air for combustion and ventilation. To light a surface ...burner, hold a lit match to the burner head and slowly turn the Surface Control knob to rotate on the appliance. Use caution when lighting surface burners manually. • Reset all gas connections. FOR MODELS...
Installation Instructions (All Languages)
Page 5
...(Figure 6B). Discard all packaging from LITE to electric power. Unpack Burner Grates and position on some models) and open the oven door. Make sure the range is equipped with the range for operating instructions and for care and cleaning of the cut-out opening . To correctly place Burner .... To check for each knob separately until burner ignites. Visually check that all packing tape from supply lines. b. 36 " GAS RANGE INSTALLATION INSTRUCTIONS 7. Once the burner lights, the control knob should be rotated out of Surface Burner Valves (see Figure 6). Remove all...
...(Figure 6B). Discard all packaging from LITE to electric power. Unpack Burner Grates and position on some models) and open the oven door. Make sure the range is equipped with the range for operating instructions and for care and cleaning of the cut-out opening . To correctly place Burner .... To check for each knob separately until burner ignites. Visually check that all packing tape from supply lines. b. 36 " GAS RANGE INSTALLATION INSTRUCTIONS 7. Once the burner lights, the control knob should be rotated out of Surface Burner Valves (see Figure 6). Remove all...
Installation Instructions (All Languages)
Page 6
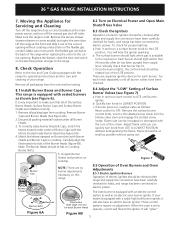
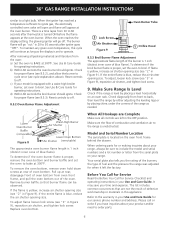
... 1 Orifice Hood 8.5.3 Broil Burner Flame Adjustment The approximate flame length of the burner is 1 inch (distinct inner cone of oven bottom. If flame is yellow, increase air shutter opening size (see... or making inquiries about your range, always be observed. Reset controls to the range is unobstructed. To adjust flame loosen lock screw (see 8.5.3). Model and Serial Number Location The ... the oven bottom, remove oven hold down screws at rear of blue flame). 36" GAS RANGE INSTALLATION INSTRUCTIONS similar to 60 seconds after igniter goes "OFF". When the igniter has reached a...
... 1 Orifice Hood 8.5.3 Broil Burner Flame Adjustment The approximate flame length of the burner is 1 inch (distinct inner cone of oven bottom. If flame is yellow, increase air shutter opening size (see... or making inquiries about your range, always be observed. Reset controls to the range is unobstructed. To adjust flame loosen lock screw (see 8.5.3). Model and Serial Number Location The ... the oven bottom, remove oven hold down screws at rear of blue flame). 36" GAS RANGE INSTALLATION INSTRUCTIONS similar to 60 seconds after igniter goes "OFF". When the igniter has reached a...


