Complete Owner's Guide (English)
Page 1
Gas Range Welcome 2 Important Safety Instructions . 3-5 Features at a Glance 6 Setting Surface Controls ..... 7-8 Surface Cooking 9 Before Setting Oven Controls 10 Setting Oven Controls .......... 10 Cooking Informations ...... 11-12 Adjusting Your Oven Temperature 12 Care & Cleaning 13-18 Before You Call SC.oo.lm.u.tm.io.on.n.s.P.to.ro..b.le..m.s 18-19 Warranty Back Cover 318200763 (0703) Rev. B
Gas Range Welcome 2 Important Safety Instructions . 3-5 Features at a Glance 6 Setting Surface Controls ..... 7-8 Surface Cooking 9 Before Setting Oven Controls 10 Setting Oven Controls .......... 10 Cooking Informations ...... 11-12 Adjusting Your Oven Temperature 12 Care & Cleaning 13-18 Before You Call SC.oo.lm.u.tm.io.on.n.s.P.to.ro..b.le..m.s 18-19 Warranty Back Cover 318200763 (0703) Rev. B
Complete Owner's Guide (English)
Page 3
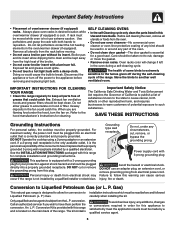
... (if Stepping, leaning or sitting on any other servicing should not be performed by a qualified installer, servicer or the gas supplier. • All ranges can kill or hurt you of hazards that the anti-tip bracket(s) is properly in the vicinity of the appliance unless...and plastic bags after use . Children climbing on the installed and grounded by properly installed anti-tip bracket(s) provided with range. • See Installation Instructions. Ask your gas supplier from a neighbor's phone. This includes paper, plastic and cloth items, such as cookbooks, plasticware and towels,...
... (if Stepping, leaning or sitting on any other servicing should not be performed by a qualified installer, servicer or the gas supplier. • All ranges can kill or hurt you of hazards that the anti-tip bracket(s) is properly in the vicinity of the appliance unless...and plastic bags after use . Children climbing on the installed and grounded by properly installed anti-tip bracket(s) provided with range. • See Installation Instructions. Ask your gas supplier from a neighbor's phone. This includes paper, plastic and cloth items, such as cookbooks, plasticware and towels,...
Complete Owner's Guide (English)
Page 4
...covers. IMPORTANT INSTRUCTIONS FOR USINGYOUR OVEN • Use care when opening oven door or warmer drawer (if equipped)-Stand to the side of the range when opening IMPORTANT INSTRUCTIONS FOR USINGYOUR the door of utensil to the sudden change in burns from steam. Let hot air or steam escape before... connecting it does not extend beyond the edge of chemical or foam-type extinguisher. Always turn the oven off the main gas shutoff valve. • Use only dry potholders-Moist or damp potholders on hot surfaces may penetrate the broken cooktop and create a risk of...
...covers. IMPORTANT INSTRUCTIONS FOR USINGYOUR OVEN • Use care when opening oven door or warmer drawer (if equipped)-Stand to the side of the range when opening IMPORTANT INSTRUCTIONS FOR USINGYOUR the door of utensil to the sudden change in burns from steam. Let hot air or steam escape before... connecting it does not extend beyond the edge of chemical or foam-type extinguisher. Always turn the oven off the main gas shutoff valve. • Use only dry potholders-Moist or damp potholders on hot surfaces may penetrate the broken cooktop and create a risk of...
Complete Owner's Guide (English)
Page 5
...to the hood manufacturer's instructions for complete installation and grounding instructions. IMPORTANT INSTRUCTIONS FOR CLEANING Important Safety Notice YOUR RANGE • Clean the range regularly to the fumes given off the power to satisfactorily meet the application needs must be plugged into a properly... the oven/warmer drawer (if equipped). DO NOT Operate the cooktop using a 2-prong adapter or an extension cord. Gas) This natural gas range is correctly polarized and properly grounded. carefully when installing the kit. Only a qualified service agent should be used in the...
...to the hood manufacturer's instructions for complete installation and grounding instructions. IMPORTANT INSTRUCTIONS FOR CLEANING Important Safety Notice YOUR RANGE • Clean the range regularly to the fumes given off the power to satisfactorily meet the application needs must be plugged into a properly... the oven/warmer drawer (if equipped). DO NOT Operate the cooktop using a 2-prong adapter or an extension cord. Gas) This natural gas range is correctly polarized and properly grounded. carefully when installing the kit. Only a qualified service agent should be used in the...
Complete Owner's Guide (English)
Page 6
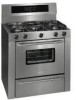
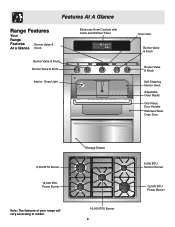
Storage Drawer 16,000 BTU Burner 6 5,000 BTU Simmer Burner 12,000 BTU Power Burner Features At A Glance Range Features Your Range Features Burner Valve & At a Glance Knob Electronic Oven Controls with Clock and Kitchen Timer Speed clean Clock Bake time Clean Timer On/Off Start time ... Oven Adjustable Oven Racks One Piece Door Handle Stainless Steel Oven Door 9,500 BTU Burner 14,000 BTU Power Burner Note: The features of your range will vary according to model.
Storage Drawer 16,000 BTU Burner 6 5,000 BTU Simmer Burner 12,000 BTU Power Burner Features At A Glance Range Features Your Range Features Burner Valve & At a Glance Knob Electronic Oven Controls with Clock and Kitchen Timer Speed clean Clock Bake time Clean Timer On/Off Start time ... Oven Adjustable Oven Racks One Piece Door Handle Stainless Steel Oven Door 9,500 BTU Burner 14,000 BTU Power Burner Note: The features of your range will vary according to model.
Complete Owner's Guide (English)
Page 8
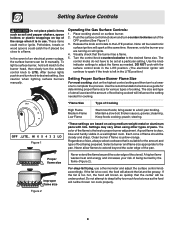
... will be lit manually. The control knobs do not have to be greasy. Hi *Flame Size High Flame Medium Flame Low Flame Type of the range when it is in use a thermometer and adjust the surface control knob accordingly. Maintain a slow boil; thicken sauces, gravies; A good flame is... lights push in the LITE position.) Setting Proper Surface Burner Flame Size For most foods; Use caution when lighting surface burners manually. Operating the Gas Surface Controls: 1. Push the surface control knob down and turn to a lower one to adjust the flame as a guide for determining proper ...
... will be lit manually. The control knobs do not have to be greasy. Hi *Flame Size High Flame Medium Flame Low Flame Type of the range when it is in use a thermometer and adjust the surface control knob accordingly. Maintain a slow boil; thicken sauces, gravies; A good flame is... lights push in the LITE position.) Setting Proper Surface Burner Flame Size For most foods; Use caution when lighting surface burners manually. Operating the Gas Surface Controls: 1. Push the surface control knob down and turn to a lower one to adjust the flame as a guide for determining proper ...
Complete Owner's Guide (English)
Page 10
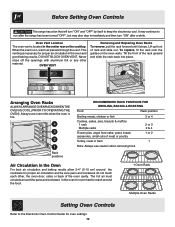
...the oven for even heat to reach around the cookware for oven settings. 10 It may also stop immediately and then turn "ON" after the range has been turned "OFF", but may continue to keep the electronics cool. When the oven is located in the oven and good baking results. ... NOT BLOCK OVEN VENT. OVEN VENT Removing and Replacing Oven Racks To remove, pull the rack forward until it stops. Before Setting Oven Controls This range has a fan that will turn "ON" and "OFF" by itself to run after a while. This venting is hot. 4 3 2 1 Rack positions RECOMMENDED RACK POSITIONS FOR...
...the oven for even heat to reach around the cookware for oven settings. 10 It may also stop immediately and then turn "ON" after the range has been turned "OFF", but may continue to keep the electronics cool. When the oven is located in the oven and good baking results. ... NOT BLOCK OVEN VENT. OVEN VENT Removing and Replacing Oven Racks To remove, pull the rack forward until it stops. Before Setting Oven Controls This range has a fan that will turn "ON" and "OFF" by itself to run after a while. This venting is hot. 4 3 2 1 Rack positions RECOMMENDED RACK POSITIONS FOR...
Complete Owner's Guide (English)
Page 11
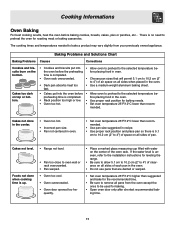
preheating time is up. • Range not level. • Pan too close to 4") of pan. Cakes not done in the center. • Oven too hot. • Incorrect pan size. • Pan ..., cakes, pies or pastries, etc... Foods not done when cooking time is completed. mended. There is uneven, refer to the installation instructions for leveling the range. • Be sure to allow 5.1 cm to 10.2 cm (2" to preheat the oven for roasting meat or baking casseroles.
preheating time is up. • Range not level. • Pan too close to 4") of pan. Cakes not done in the center. • Oven too hot. • Incorrect pan size. • Pan ..., cakes, pies or pastries, etc... Foods not done when cooking time is completed. mended. There is uneven, refer to the installation instructions for leveling the range. • Be sure to allow 5.1 cm to 10.2 cm (2" to preheat the oven for roasting meat or baking casseroles.

Complete Owner's Guide (English)
Page 13
... set the clean cycle, refer to the fumes given off or else push CANCEL pad. The health of the self-cleaning oven. Before cleaning any range. Doing so could melt and damage the oven surface. Clean any art of some models) Adhere to temperatures much higher than usual. Oven racks may...
... set the clean cycle, refer to the fumes given off or else push CANCEL pad. The health of the self-cleaning oven. Before cleaning any range. Doing so could melt and damage the oven surface. Clean any art of some models) Adhere to temperatures much higher than usual. Oven racks may...
Complete Owner's Guide (English)
Page 14
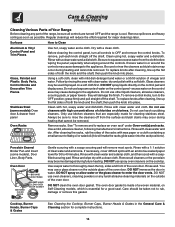
... in or around the controls. DO NOT use large amounts of chlorides or chlorines. Care & Cleaning (Cleaning Chart) Cleaning Various Parts of Your Range Before cleaning any harsh abrasive cleaning materials on the outside glass of the oven door. Dry with clean water and dry. Do not use oven... when wiping around the controls may cause damage to rinse the cleaners as bluish stains may occur during heating that are turned OFF and the range is essential for cleaning stainless steel. Follow by rinsing the area with a clean cloth. grasp firmly and pull straight off the shaft. See ...
... in or around the controls. DO NOT use large amounts of chlorides or chlorines. Care & Cleaning (Cleaning Chart) Cleaning Various Parts of Your Range Before cleaning any harsh abrasive cleaning materials on the outside glass of the oven door. Dry with clean water and dry. Do not use oven... when wiping around the controls may cause damage to rinse the cleaners as bluish stains may occur during heating that are turned OFF and the range is essential for cleaning stainless steel. Follow by rinsing the area with a clean cloth. grasp firmly and pull straight off the shaft. See ...
Complete Owner's Guide (English)
Page 17
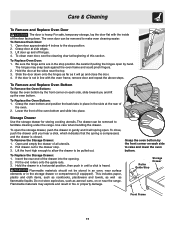
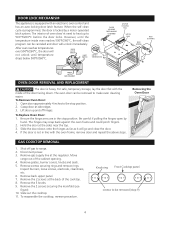
...door flat with the oven frame, remove door and repeat the above steps. Open door approximately 4 inches to raise and lower the oven bottom. Hold the door at beginning of the oven bottom and slide... by the front corner on each side to the stop . 3. Pull drawer out to facilitate cleaning under the range. To Remove Oven Door: 1. Lift door up the oven bottom. To clean oven door, see the cleaning ... pinch fingers. 2. The oven door can be removed to be stored in an oven, near the range. To Remove and Replace Oven Bottom To Remove the Oven Bottom: Grasp the oven bottom by hand....
...door flat with the oven frame, remove door and repeat the above steps. Open door approximately 4 inches to raise and lower the oven bottom. Hold the door at beginning of the oven bottom and slide... by the front corner on each side to the stop . 3. Pull drawer out to facilitate cleaning under the range. To Remove Oven Door: 1. Lift door up the oven bottom. To clean oven door, see the cleaning ... pinch fingers. 2. The oven door can be removed to be stored in an oven, near the range. To Remove and Replace Oven Bottom To Remove the Oven Bottom: Grasp the oven bottom by hand....

Complete Owner's Guide (English)
Page 18
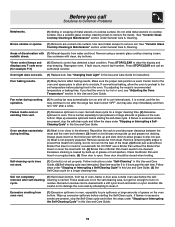
...with a glass shield held in coastal areas. Appliance must be unlevel. Entire range or oven does not operate. (1) Make sure cord/plug is tightly into the outlet. (4) Electrical power outage. (5) Be sure the gas supply to LITE. Call your local electric company for protection against possible broken glass.... 3. With the burner off at base of utensils are clogged. The oven light bulb is covered with range. To Replace the Light Bulb: BE SURE...
...with a glass shield held in coastal areas. Appliance must be unlevel. Entire range or oven does not operate. (1) Make sure cord/plug is tightly into the outlet. (4) Electrical power outage. (5) Be sure the gas supply to LITE. Call your local electric company for protection against possible broken glass.... 3. With the burner off at base of utensils are clogged. The oven light bulb is covered with range. To Replace the Light Bulb: BE SURE...
Complete Owner's Guide (English)
Page 19
.... (2) Self-cleaning cycle was interrupted. Remove excess fat from water and food. Excessive smoking is normal, and the fan may continue to run after the range has been turned "OFF", but get hot enough to clear the display and stop the self-clean cycle and follow the steps under "Stopping or...
.... (2) Self-cleaning cycle was interrupted. Remove excess fat from water and food. Excessive smoking is normal, and the fan may continue to run after the range has been turned "OFF", but get hot enough to clear the display and stop the self-clean cycle and follow the steps under "Stopping or...
Complete Owner's Guide (English)
Page 20
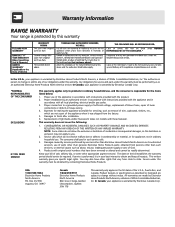
... the items listed below: 1. The date on models with the product. 2. You may not apply to state. Box 212378 Augusta, GA 30917 Canada 1•866•294•9911 Electrolux Home Products North America 802, boul. In Canada, your appliance is warranted by Electrolux...are made by contacting Electrolux Home Products: USA 1•800•944•9044 Electrolux Home Products North America P.O. Warranty Information RANGE WARRANTY Your range is protected by this warranty In the U.S.A., your appliance is warranted by Electrolux Canada Corp. 20 Proper use of the appliance in...
... the items listed below: 1. The date on models with the product. 2. You may not apply to state. Box 212378 Augusta, GA 30917 Canada 1•866•294•9911 Electrolux Home Products North America 802, boul. In Canada, your appliance is warranted by Electrolux...are made by contacting Electrolux Home Products: USA 1•800•944•9044 Electrolux Home Products North America P.O. Warranty Information RANGE WARRANTY Your range is protected by this warranty In the U.S.A., your appliance is warranted by Electrolux Canada Corp. 20 Proper use of the appliance in...
Timer Guide (Timer Guide)
Page 2
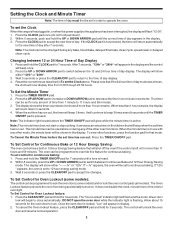
... day mode was chosen, the clock will flash "12:00". 1. When less than 1 hour remains. The minute timer can be set the Clock When the range is in the display. The Oven Lockout feature prevents the oven from 0:00 through 23:59 hours. To Set Control for the oven door to...
... day mode was chosen, the clock will flash "12:00". 1. When less than 1 hour remains. The minute timer can be set the Clock When the range is in the display. The Oven Lockout feature prevents the oven from 0:00 through 23:59 hours. To Set Control for the oven door to...
Wiring Diagram (All Languages)
Page 1
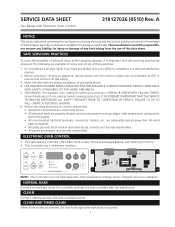
... bake burner. USE ONLY REPLACEMENT PARTS CATALOGED FOR THIS APPLIANCE. Prior to returning the product to OFF, or remove fuse and turn off gas supply. 3. Do not attempt a product repair if you have any safety device. 4. Ground leads are not field repairable. Speed clean ... BAKE During a normal bake mode, the controller preheats the oven and bake with the proper installation of this data sheet. SERVICE DATA SHEET Gas Range with Electronic Oven Control 318127026 (0510) Rev. See oven calibration. A NOTICE This service data sheet is GREEN OR GREEN WITH YELLOW STRIPES....
... bake burner. USE ONLY REPLACEMENT PARTS CATALOGED FOR THIS APPLIANCE. Prior to returning the product to OFF, or remove fuse and turn off gas supply. 3. Do not attempt a product repair if you have any safety device. 4. Ground leads are not field repairable. Speed clean ... BAKE During a normal bake mode, the controller preheats the oven and bake with the proper installation of this data sheet. SERVICE DATA SHEET Gas Range with Electronic Oven Control 318127026 (0510) Rev. See oven calibration. A NOTICE This service data sheet is GREEN OR GREEN WITH YELLOW STRIPES....
Wiring Diagram (All Languages)
Page 4
... BUSHING DOOR LATCH CAM ASSEMBLY OVEN DOOR REMOVAL AND REPLACEMENT The door is locked by hand. Open door approximately 4 inches to the stop position. Lift door up to heat up and off gas to make oven cleaning easier. To Replace Oven Door: 1. Remove grates, burner covers, knobs and seals. 5. Remove ... flat with the inside oven reaches 500°F/260°C, the self-clean program can be removed (step 9) 4 Remove gas supply line at the sides near the top. 3. Move range out of oven does'nt need to 500°F/260°C before the door locks. The oven door can be canceled...
... BUSHING DOOR LATCH CAM ASSEMBLY OVEN DOOR REMOVAL AND REPLACEMENT The door is locked by hand. Open door approximately 4 inches to the stop position. Lift door up to heat up and off gas to make oven cleaning easier. To Replace Oven Door: 1. Remove grates, burner covers, knobs and seals. 5. Remove ... flat with the inside oven reaches 500°F/260°C, the self-clean program can be removed (step 9) 4 Remove gas supply line at the sides near the top. 3. Move range out of oven does'nt need to 500°F/260°C before the door locks. The oven door can be canceled...
Installation Instructions (All Languages)
Page 1
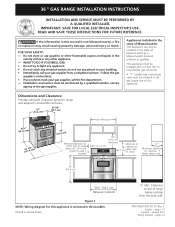
...pages 1-7 Español - WHAT TO DO IF YOU SMELL GAS: • Do not try to 18" cabinets on (45.7 cm) either side of range 13" (33 cm) Maximum depth for cabinets above range top 36" (91.4 cm) 36¼" (92.1 cm) Between Cabinets Figure 1 NOTE: Wiring ... (141317.4/8"cm) (913.46"cm) Minimumclearance on either side of range above 36" (91.4 cm) height if a wall is not followed exactly, a fire or explosion may result causing property damage, personal injury or death. 36 " GAS RANGE INSTALLATION INSTRUCTIONS INSTALLATION AND SERVICE MUST BE PERFORMED BY A QUALIFIED INSTALLER....
...pages 1-7 Español - WHAT TO DO IF YOU SMELL GAS: • Do not try to 18" cabinets on (45.7 cm) either side of range 13" (33 cm) Maximum depth for cabinets above range top 36" (91.4 cm) 36¼" (92.1 cm) Between Cabinets Figure 1 NOTE: Wiring ... (141317.4/8"cm) (913.46"cm) Minimumclearance on either side of range above 36" (91.4 cm) height if a wall is not followed exactly, a fire or explosion may result causing property damage, personal injury or death. 36 " GAS RANGE INSTALLATION INSTRUCTIONS INSTALLATION AND SERVICE MUST BE PERFORMED BY A QUALIFIED INSTALLER....
Installation Instructions (All Languages)
Page 2
36" GAS RANGE INSTALLATION INSTRUCTIONS Important Notes to leave these instructions with the consumer. 5. Remove all governing... • To eliminate the need to the Consumer Keep these installation instructions before connecting the gas and electrical supply to the range. • Do not store items of the oven or broiler burner. Read all appliances.... 70-latest edition. You will result in their absence, with the National Fuel Gas Code ANSI Z223.1/NFPA .54-latest edition. This range requires fresh air for future reference. Never leave children alone or unattended in the ...
36" GAS RANGE INSTALLATION INSTRUCTIONS Important Notes to leave these instructions with the consumer. 5. Remove all governing... • To eliminate the need to the Consumer Keep these installation instructions before connecting the gas and electrical supply to the range. • Do not store items of the oven or broiler burner. Read all appliances.... 70-latest edition. You will result in their absence, with the National Fuel Gas Code ANSI Z223.1/NFPA .54-latest edition. This range requires fresh air for future reference. Never leave children alone or unattended in the ...
Installation Instructions (All Languages)
Page 3
... of an electrical power outage, the surface burners can be in the floor under the range after gas supply line is done cooking. The gas supply line should be lit manually. Care must be certain connectors are not kinked. 36 " GAS RANGE INSTALLATION INSTRUCTIONS • In the event of air for combustion and ventilation. flexible connector...
... of an electrical power outage, the surface burners can be in the floor under the range after gas supply line is done cooking. The gas supply line should be lit manually. Care must be certain connectors are not kinked. 36 " GAS RANGE INSTALLATION INSTRUCTIONS • In the event of air for combustion and ventilation. flexible connector...


