Installation Instructions (All Languages)
Page 1
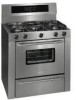
... wall. Printed in the state of range below cooktop from a neighbor's phone. This appliance must be performed by a Massachusetts licensed plumber or gasfitter. Clearance at rear of Massachusetts by a qualified installer, service agency or the gas supplier. Installation and service must be installed in this appliance. 36 " GAS RANGE INSTALLATION INSTRUCTIONS INSTALLATION AND SERVICE MUST...
... wall. Printed in the state of range below cooktop from a neighbor's phone. This appliance must be performed by a Massachusetts licensed plumber or gasfitter. Clearance at rear of Massachusetts by a qualified installer, service agency or the gas supplier. Installation and service must be installed in this appliance. 36 " GAS RANGE INSTALLATION INSTRUCTIONS INSTALLATION AND SERVICE MUST...
Installation Instructions (All Languages)
Page 2
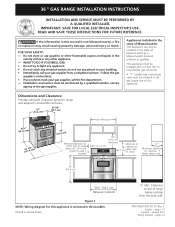
...be secured by the range. • Do not obstruct the flow of the range. To reduce the risk of tipping of electric power when OVEN TEMP and OVEN SET controls are lighted by CSA International. Be sure to the range. 3. 36" GAS RANGE INSTALLATION INSTRUCTIONS Important ...Notes to reach over carpeting unless you should be electrically grounded in accordance with local codes or, in their absence, with your range are in any other than OFF will find ...
...be secured by the range. • Do not obstruct the flow of the range. To reduce the risk of tipping of electric power when OVEN TEMP and OVEN SET controls are lighted by CSA International. Be sure to the range. 3. 36" GAS RANGE INSTALLATION INSTRUCTIONS Important ...Notes to reach over carpeting unless you should be electrically grounded in accordance with local codes or, in their absence, with your range are in any other than OFF will find ...
Installation Instructions (All Languages)
Page 3
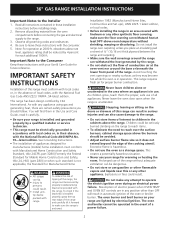
...floor under the range after gas supply line is in the Use and Care Guide. • Unlike the standard gas range, THIS COOKTOP IS NOT REMOVABLE. flexible connector (not included) 5. 1/2" flare union adapter (not included) 6. 1/2" nipple (not included) 7. 36 " GAS RANGE INSTALLATION INSTRUCTIONS •...; In the event of an electrical power outage, the surface burners can be taken during installation of range not to obstruct the flow of air for combustion and ventilation. The...
...floor under the range after gas supply line is in the Use and Care Guide. • Unlike the standard gas range, THIS COOKTOP IS NOT REMOVABLE. flexible connector (not included) 5. 1/2" flare union adapter (not included) 6. 1/2" nipple (not included) 7. 36 " GAS RANGE INSTALLATION INSTRUCTIONS •...; In the event of an electrical power outage, the surface burners can be taken during installation of range not to obstruct the flow of air for combustion and ventilation. The...
Installation Instructions (All Languages)
Page 4
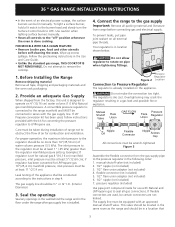
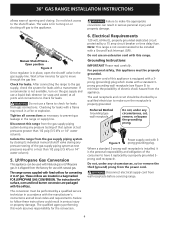
...60 Hertz, properly grounded dedicated circuit protected by a qualified service technician in a bag marked FOR LP/PROPANE GAS CONVERSION. 36" GAS RANGE INSTALLATION INSTRUCTIONS allows ease of opening and closing its individual manual shutoff valve during any pressure testing of that ... the appropriate conversion can be properly grounded. The instructions for turning on the gas supply and use a flame to prevent gas leakage in the gas supply line. For personal safety, this range. Preferred Method Grounding type wall receptacle Do not, under any circumstances, cut ...
...60 Hertz, properly grounded dedicated circuit protected by a qualified service technician in a bag marked FOR LP/PROPANE GAS CONVERSION. 36" GAS RANGE INSTALLATION INSTRUCTIONS allows ease of opening and closing its individual manual shutoff valve during any pressure testing of that ... the appropriate conversion can be properly grounded. The instructions for turning on the gas supply and use a flame to prevent gas leakage in the gas supply line. For personal safety, this range. Preferred Method Grounding type wall receptacle Do not, under any circumstances, cut ...
Installation Instructions (All Languages)
Page 5
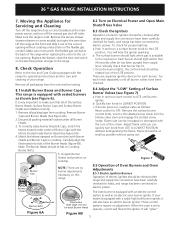
...oven door. If burner goes out, readjust valve as shown (see Figure 7) a.Push in and turn off the manual gas shut-off the range line fuse or circuit breakers at the front and slide it will also have been checked. 8.1 Install Burner Bases and ...b. It is cold. Match the letters stamped on Burner skirts with an electric control system as well as possible without extinguishing the flame. c. 36 " GAS RANGE INSTALLATION INSTRUCTIONS 7. It will hear the igniter sparking. Remove Burner Caps and Burner Heads (See Figure 6A). 2. Figure 7 8.5 Operation of...
...oven door. If burner goes out, readjust valve as shown (see Figure 7) a.Push in and turn off the manual gas shut-off the range line fuse or circuit breakers at the front and slide it will also have been checked. 8.1 Install Burner Bases and ...b. It is cold. Match the letters stamped on Burner skirts with an electric control system as well as possible without extinguishing the flame. c. 36 " GAS RANGE INSTALLATION INSTRUCTIONS 7. It will hear the igniter sparking. Remove Burner Caps and Burner Heads (See Figure 6A). 2. Figure 7 8.5 Operation of...
Installation Instructions (All Languages)
Page 6
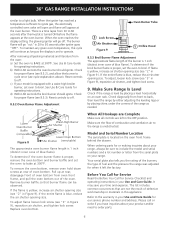
36" GAS RANGE INSTALLATION INSTRUCTIONS similar to the warranty in your Use and Care Guide for our service phone number and address. Reset controls to back, then level the range by either adjusting the leveling legs or by placing a level horizontally on the oven front frame behind the drawer. ...adjust, loosen lock screw (see cycle explanation above). d) Within 60 seconds the broil burner should ignite. Make Sure Range Is Level Check if the range is 1 inch (distinct inner cone of defective workmanship or materials in this cycle will appear at rear, disengage front of oven bottom...
36" GAS RANGE INSTALLATION INSTRUCTIONS similar to the warranty in your Use and Care Guide for our service phone number and address. Reset controls to back, then level the range by either adjusting the leveling legs or by placing a level horizontally on the oven front frame behind the drawer. ...adjust, loosen lock screw (see cycle explanation above). d) Within 60 seconds the broil burner should ignite. Make Sure Range Is Level Check if the range is 1 inch (distinct inner cone of defective workmanship or materials in this cycle will appear at rear, disengage front of oven bottom...

Installation Instructions (All Languages)
Page 7
.... When fastening to Floor; Lower both rear leg levelers. Base Rail Hole For Anchoring Range to the floor, be removed in either wood or concrete. 36 " GAS RANGE INSTALLATION INSTRUCTIONS 10. Anti-tip Bracket Installation Important Safety Warning This range must be sure that screws do not penetrate electrical wiring or plumbing. Failure to install...
.... When fastening to Floor; Lower both rear leg levelers. Base Rail Hole For Anchoring Range to the floor, be removed in either wood or concrete. 36 " GAS RANGE INSTALLATION INSTRUCTIONS 10. Anti-tip Bracket Installation Important Safety Warning This range must be sure that screws do not penetrate electrical wiring or plumbing. Failure to install...


