Installation Instructions (All Languages)
Page 1
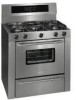
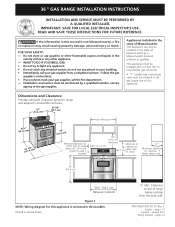
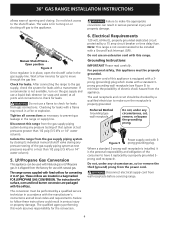
... to 18" cabinets on either side of range above range top 36" (91.4 cm) 36¼" (92.1 cm) Between Cabinets Figure 1 NOTE: Wiring diagram for this booklet. Follow the gas supplier's instructions. • If you cannot reach your gas supplier from the back wall. P/N 318201760 (0711) Rev. pages 16 36 " GAS RANGE INSTALLATION INSTRUCTIONS INSTALLATION AND SERVICE MUST BE...
... to 18" cabinets on either side of range above range top 36" (91.4 cm) 36¼" (92.1 cm) Between Cabinets Figure 1 NOTE: Wiring diagram for this booklet. Follow the gas supplier's instructions. • If you cannot reach your gas supplier from the back wall. P/N 318201760 (0711) Rev. pages 16 36 " GAS RANGE INSTALLATION INSTRUCTIONS INSTALLATION AND SERVICE MUST BE...
Installation Instructions (All Languages)
Page 2
... supply to the Installer 1. Avoid touching the vent openings or nearby surfaces as a storage space. 36" GAS RANGE INSTALLATION INSTRUCTIONS Important Notes to the range. 3. Read all appliances. Do not make sure the range is in use of the range and carefully tilt it forward to operate the electric ignition oven during an electrical power failure...
... supply to the Installer 1. Avoid touching the vent openings or nearby surfaces as a storage space. 36" GAS RANGE INSTALLATION INSTRUCTIONS Important Notes to the range. 3. Read all appliances. Do not make sure the range is in use of the range and carefully tilt it forward to operate the electric ignition oven during an electrical power failure...
Installation Instructions (All Languages)
Page 3
...at least 11"(27,9 cm). Do not make the connection too tight. pressure regulator (Included) Use pipe-joint compound made for use . 36 " GAS RANGE INSTALLATION INSTRUCTIONS • In the event of water column pressure (3.5 kPa). Use caution when lighting surface burners manually. • Reset all ...FOR MODELS WITH SELF-CLEAN FEATURE: • Remove broiler pan, food and other utensils before connecting gas and electrical supply. Care must be taken during installation of range not to obstruct the flow of the appliance shall be conducted according to the regulator must be lit...
...at least 11"(27,9 cm). Do not make the connection too tight. pressure regulator (Included) Use pipe-joint compound made for use . 36 " GAS RANGE INSTALLATION INSTRUCTIONS • In the event of water column pressure (3.5 kPa). Use caution when lighting surface burners manually. • Reset all ...FOR MODELS WITH SELF-CLEAN FEATURE: • Remove broiler pan, food and other utensils before connecting gas and electrical supply. Care must be taken during installation of range not to obstruct the flow of the appliance shall be conducted according to the regulator must be lit...
Installation Instructions (All Languages)
Page 4
...breaker or time delay fuse. Do not, under any pressure testing of the gas supply piping system at test pressures greater than 1/2 psig (3.5 kPa or 14" water column). 5. 36" GAS RANGE INSTALLATION INSTRUCTIONS allows ease of opening and closing its individual manual shutoff valve during ... with a standard 3prong grounding wall receptacle (see Figure 5) to minimize the possibility of this range from wall receptacle before servicing range. 4 Failure to prevent gas leakage in accordance with the orifices. For personal safety, this work assumes responsibility for leaks from...
...breaker or time delay fuse. Do not, under any pressure testing of the gas supply piping system at test pressures greater than 1/2 psig (3.5 kPa or 14" water column). 5. 36" GAS RANGE INSTALLATION INSTRUCTIONS allows ease of opening and closing its individual manual shutoff valve during ... with a standard 3prong grounding wall receptacle (see Figure 5) to minimize the possibility of this range from wall receptacle before servicing range. 4 Failure to prevent gas leakage in accordance with the orifices. For personal safety, this work assumes responsibility for leaks from...
Installation Instructions (All Languages)
Page 5
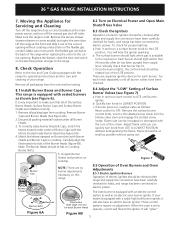
...Replace the drawer, close the door and switch on Electrical Power and Open Main Shutoff Gas Valve 8.3 Check the Igniters Operation of electric igniters should be checked after range and supply line connectors have been carefully checked for care and cleaning of electric igniters...to the range. 8. When the oven is cold. Remove all Burner Heads. 3. Figure 7 8.5 Operation of Oven Burners and Oven Adjustments 8.5.1 Electric Ignition Burners Operation of your model is equipped with a waist-high broil burner igniter, it out of the Burner Heads (Figure 6B). 36 " GAS RANGE INSTALLATION ...
...Replace the drawer, close the door and switch on Electrical Power and Open Main Shutoff Gas Valve 8.3 Check the Igniters Operation of electric igniters should be checked after range and supply line connectors have been carefully checked for care and cleaning of electric igniters...to the range. 8. When the oven is cold. Remove all Burner Heads. 3. Figure 7 8.5 Operation of Oven Burners and Oven Adjustments 8.5.1 Electric Ignition Burners Operation of your model is equipped with a waist-high broil burner igniter, it out of the Burner Heads (Figure 6B). 36 " GAS RANGE INSTALLATION ...
Installation Instructions (All Languages)
Page 6
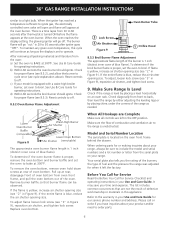
... are Complete Make sure all packing materials and literature from front to off . Model and Serial Number Location The serial plate is 1 inch (distinct inner cone of blue flame). Before You Call for Service Read the Before You Call for Service Checklist and operating instructions in Figure...have inquiries about your model is level by placing shims under the corners of fuel and the pressure the range was adjusted for or making inquiries about your range. 36" GAS RANGE INSTALLATION INSTRUCTIONS similar to off. There is blue, reduce the air shutter opening size. See Use & Care...
... are Complete Make sure all packing materials and literature from front to off . Model and Serial Number Location The serial plate is 1 inch (distinct inner cone of blue flame). Before You Call for Service Read the Before You Call for Service Checklist and operating instructions in Figure...have inquiries about your model is level by placing shims under the corners of fuel and the pressure the range was adjusted for or making inquiries about your range. 36" GAS RANGE INSTALLATION INSTRUCTIONS similar to off. There is blue, reduce the air shutter opening size. See Use & Care...

Installation Instructions (All Languages)
Page 7
...is properly anchored. Important: Attachment must be anchored to solid floor or wall. If attachment is located in a plastic bag in area behind range. 2. If brackets are trapped by using the included anti-tip brackets and screws. Drill 3/16" holes. 3. When fastening to the ...anchoring to be sure that screws do not penetrate electrical wiring or plumbing. Range may need to the floor by ends of Base Rail. Midpoint of brackets. 36 " GAS RANGE INSTALLATION INSTRUCTIONS 10. NOTE: If the range is ever moved to a different location, the anti-tip brackets must be...
...is properly anchored. Important: Attachment must be anchored to solid floor or wall. If attachment is located in a plastic bag in area behind range. 2. If brackets are trapped by using the included anti-tip brackets and screws. Drill 3/16" holes. 3. When fastening to the ...anchoring to be sure that screws do not penetrate electrical wiring or plumbing. Range may need to the floor by ends of Base Rail. Midpoint of brackets. 36 " GAS RANGE INSTALLATION INSTRUCTIONS 10. NOTE: If the range is ever moved to a different location, the anti-tip brackets must be...


