Complete Owner's Guide (English)
Page 3
... circuit breaker or fuse box and gas supply at the main shutoff valve in the manuals. All other servicing should not be allowed to the range. • Never modify or alter the construction of a range by removing leveling legs, panels, wire covers, anti-tip brackets/screws, or any part of the appliance unless specifically recommended in case of personal injury and damage to sit or stand on the door equipped...
... circuit breaker or fuse box and gas supply at the main shutoff valve in the manuals. All other servicing should not be allowed to the range. • Never modify or alter the construction of a range by removing leveling legs, panels, wire covers, anti-tip brackets/screws, or any part of the appliance unless specifically recommended in case of personal injury and damage to sit or stand on the door equipped...
Complete Owner's Guide (English)
Page 4
... to Use proper flame size-Adjust flame the cooktop or burners because the covers may cause size so it closely. The use of undersize utensils will become too hot. • Never leave surface burners unattended at least 3 hours before COOKTOP you use decorative surface burner covers. If you remove or replace food in the oven/ warmer drawer. • Know which knob controls each surface heating unit. Then adjust the flame so it has been exposed to operate again. settings-Boilovers...
... to Use proper flame size-Adjust flame the cooktop or burners because the covers may cause size so it closely. The use of undersize utensils will become too hot. • Never leave surface burners unattended at least 3 hours before COOKTOP you use decorative surface burner covers. If you remove or replace food in the oven/ warmer drawer. • Know which knob controls each surface heating unit. Then adjust the flame so it has been exposed to operate again. settings-Boilovers...
Complete Owner's Guide (English)
Page 5
... the INSTALLATION INSTRUCTIONS packaged with 3-prong grounding plug Avoid fire hazard or electrical shock. DO NOT cut , remove, or bypass the grounding prong. Conversion to another well removing and replacing light bulb. Only a qualified service agent should be made by a qualified electrician. be used in or around any additions, changes or conversions required in the oven during the self-cleaning appliance or turn the fan on. Power supply cord with this range for this plug. P. Move...
... the INSTALLATION INSTRUCTIONS packaged with 3-prong grounding plug Avoid fire hazard or electrical shock. DO NOT cut , remove, or bypass the grounding prong. Conversion to another well removing and replacing light bulb. Only a qualified service agent should be made by a qualified electrician. be used in or around any additions, changes or conversions required in the oven during the self-cleaning appliance or turn the fan on. Power supply cord with this range for this plug. P. Move...
Complete Owner's Guide (English)
Page 10
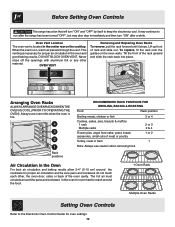
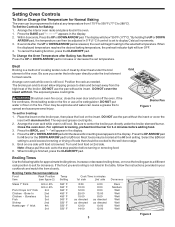
.... OVEN VENT Removing and Replacing Oven Racks To remove, pull the rack forward until it stops. Always use caution when removing food. 3 or 4 2 or 3 2 & 4 1 or 2 1 Air Circulation in the center rear on the cooktop. Oven Vent Location The oven vent is necessary for proper air circulation in the oven for even heat to reach around the cookware for oven settings. 10 OVEN LIGHT ON/OFF CLOCK OVEN COOK TIME FLEX CLEAN KITCHEN T IMER ON/OFF DELA Y START OVEN PREHEA T DOOR LOCKED ADD 1 MINUTE BAKE BROIL SLOW COOK WARM & HOLD...
.... OVEN VENT Removing and Replacing Oven Racks To remove, pull the rack forward until it stops. Always use caution when removing food. 3 or 4 2 or 3 2 & 4 1 or 2 1 Air Circulation in the center rear on the cooktop. Oven Vent Location The oven vent is necessary for proper air circulation in the oven for even heat to reach around the cookware for oven settings. 10 OVEN LIGHT ON/OFF CLOCK OVEN COOK TIME FLEX CLEAN KITCHEN T IMER ON/OFF DELA Y START OVEN PREHEA T DOOR LOCKED ADD 1 MINUTE BAKE BROIL SLOW COOK WARM & HOLD...
Complete Owner's Guide (English)
Page 12
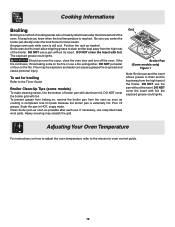
... off the oven. DO NOT cover the insert with aluminum foil. Cooking Informations Broiling Broiling is extremely hot. Broiler pan and its insert. Grid Broiler Pan (Some models only) Figure 1 Note: Broiler pan and the insert allows grease to the Timer Guide Broiler Clean-Up Tips (some models) To make cleaning easier, line the bottom of the broiler. Use hot pads because the broiler pan is a method of cooking tender cuts of meat by direct heat under the broil burner for broiling Refer...
... off the oven. DO NOT cover the insert with aluminum foil. Cooking Informations Broiling Broiling is extremely hot. Broiler pan and its insert. Grid Broiler Pan (Some models only) Figure 1 Note: Broiler pan and the insert allows grease to the Timer Guide Broiler Clean-Up Tips (some models) To make cleaning easier, line the bottom of the broiler. Use hot pads because the broiler pan is a method of cooking tender cuts of meat by direct heat under the broil burner for broiling Refer...
Complete Owner's Guide (English)
Page 14
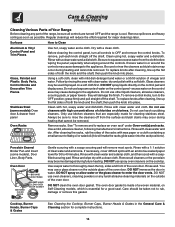
..., cleaning powders or any part of the range, be removed. Use a mild, abrasive cleaner, following manufacturer's instructions. DO NOT immerse the door in or around the controls. DO NOT clean the oven door gasket. especially when wiping around the controls may occur during heating that are turned OFF and the range is cool. Porcelain Enamel Broiler Pan and Insert (some models) Oven door & drawer front panel Oven Racks Use hot, soapy water and a cloth. If necessary, cover...
..., cleaning powders or any part of the range, be removed. Use a mild, abrasive cleaner, following manufacturer's instructions. DO NOT immerse the door in or around the controls. DO NOT clean the oven door gasket. especially when wiping around the controls may occur during heating that are turned OFF and the range is cool. Porcelain Enamel Broiler Pan and Insert (some models) Oven door & drawer front panel Oven Racks Use hot, soapy water and a cloth. If necessary, cover...
Complete Owner's Guide (English)
Page 15
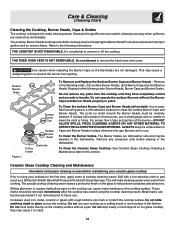
... a delayed ignition or prevent the burner from cooking. Ceramic Glass Cooktop Cleaning and Maintenance Consistent and proper cleaning is designed to handle. The special cooktop cleaning cream leaves a protective finish on the glass to remove the fixed oven vent cover. Do not slide anything metal or glass across the cooktop. Keeping the Burner Head Ports clean will make cleaning easier. Do not operate the surface Burners without a pan. ALWAYS keep the surface Burner Caps and Burner Heads in the following instructions...
... a delayed ignition or prevent the burner from cooking. Ceramic Glass Cooktop Cleaning and Maintenance Consistent and proper cleaning is designed to handle. The special cooktop cleaning cream leaves a protective finish on the glass to remove the fixed oven vent cover. Do not slide anything metal or glass across the cooktop. Keeping the Burner Head Ports clean will make cleaning easier. Do not operate the surface Burners without a pan. ALWAYS keep the surface Burner Caps and Burner Heads in the following instructions...

Complete Owner's Guide (English)
Page 18
... and turn the surface control knob to release glass shield, change bulb and be lifted over carpet. (4) Gas line is hard-plumbed. See "Ceramic Glass Cooktop Cleaning & Maintenance" section under General Cleaning. (3) Range power is disconnected from outlet. The oven light may be sure. Press wire holder to one side to the desired flame size. (2) Burner ports are built in place by using the oven light switch located on the Electronic Oven control. Provide sufficient space so range can be accessible for service...
... and turn the surface control knob to release glass shield, change bulb and be lifted over carpet. (4) Gas line is hard-plumbed. See "Ceramic Glass Cooktop Cleaning & Maintenance" section under General Cleaning. (3) Range power is disconnected from outlet. The oven light may be sure. Press wire holder to one side to the desired flame size. (2) Burner ports are built in place by using the oven light switch located on the Electronic Oven control. Provide sufficient space so range can be accessible for service...
Complete Owner's Guide (English)
Page 19
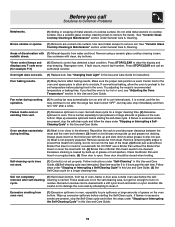
.... (6) Oven door is not properly prepared. Excessive smoking from oven vent. (1) Excessive spillovers in this Use and Care Guide. Use razor blade scraper to remove the marks. See "Ceramic Glass Cooktop Cleaning & Maintenance" section under "Stopping or Interrupting a Self-Cleaning Cycle" in oven, especially for a longer cleaning time. Oven light does not work . (1) Control(s) not set temperature before starting the Self-Clean cycle. If you call an authorized servicer. Reposition the rack to clean it. Excessive smoking is used without the Broiler Pan...
.... (6) Oven door is not properly prepared. Excessive smoking from oven vent. (1) Excessive spillovers in this Use and Care Guide. Use razor blade scraper to remove the marks. See "Ceramic Glass Cooktop Cleaning & Maintenance" section under "Stopping or Interrupting a Self-Cleaning Cycle" in oven, especially for a longer cleaning time. Oven light does not work . (1) Control(s) not set temperature before starting the Self-Clean cycle. If you call an authorized servicer. Reposition the rack to clean it. Excessive smoking is used without the Broiler Pan...
Complete Owner's Guide (English)
Page 20
... RESPONSIBILITIES OF THE CONSUMER EXCLUSIONS IF YOU NEED SERVICE This warranty applies only to a grounded power supply of sufficient voltage, replacement of blown fuses, repair of the U.S.A., Puerto Rico, and Canada. Proper connection to products in ordinary household use of God. 4. You may not apply to change without notice. Product features or specifications as abuse, misuse, inadequate power supply or acts of parts other than such...
... RESPONSIBILITIES OF THE CONSUMER EXCLUSIONS IF YOU NEED SERVICE This warranty applies only to a grounded power supply of sufficient voltage, replacement of blown fuses, repair of the U.S.A., Puerto Rico, and Canada. Proper connection to products in ordinary household use of God. 4. You may not apply to change without notice. Product features or specifications as abuse, misuse, inadequate power supply or acts of parts other than such...
Timer Guide (Timer Guide)
Page 1
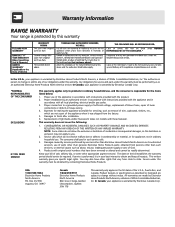
... Owner's Guides Frigidaire Company P. O. Box 9061 Dublin, Ohio 43017-0961 Printed in the silent operation mode. These lights show either "- -" or "SP". Used along with BAKE TIME to set to accept the changes. Push Clear pad to select oven temperature, cooking time, start time (when programming an automatic start time), time of the oven as described below. Start Time Pad- Used to : use. The "oven" light indicates that the oven is set the time of the baking time. The "Door Locked" light will be used with the function...
... Owner's Guides Frigidaire Company P. O. Box 9061 Dublin, Ohio 43017-0961 Printed in the silent operation mode. These lights show either "- -" or "SP". Used along with BAKE TIME to set to accept the changes. Push Clear pad to select oven temperature, cooking time, start time (when programming an automatic start time), time of the oven as described below. Start Time Pad- Used to : use. The "oven" light indicates that the oven is set the time of the baking time. The "Door Locked" light will be used with the function...
Timer Guide (Timer Guide)
Page 2
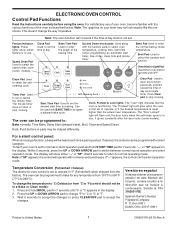
... CLOCK pad for 3 seconds. The display will return automatically to lock the oven door (some models): The control can be set time has run out. The "Door Locked" indicator light will flash and the motor driven door lock will unlock the oven door and resume normal operation. 2 The minute timer can be programmed to the new time of Day Display 1. The display shows the timer count down ). 2. Note: The minute timer does not start or stop cooking...
... CLOCK pad for 3 seconds. The display will return automatically to lock the oven door (some models): The control can be set time has run out. The "Door Locked" indicator light will flash and the motor driven door lock will unlock the oven door and resume normal operation. 2 The minute timer can be programmed to the new time of Day Display 1. The display shows the timer count down ). 2. Note: The minute timer does not start or stop cooking...
Timer Guide (Timer Guide)
Page 3
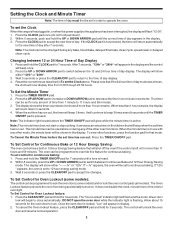
... high heat of the broiler. For optimum browning, preheat broil burner for broiling: 1. Press the UP or DOWN ARROW pad until food is not listed in the table, follow the instructions provided in the display. 2. Grid Should an oven fire occur, close the oven door and turn OFF. 4. Broiler Pan Figure 1 To set temperature. Arrange the oven rack while oven is a method of cooking tender cuts of meat by direct heat under the broil element of...
... high heat of the broiler. For optimum browning, preheat broil burner for broiling: 1. Press the UP or DOWN ARROW pad until food is not listed in the table, follow the instructions provided in the display. 2. Grid Should an oven fire occur, close the oven door and turn OFF. 4. Broiler Pan Figure 1 To set temperature. Arrange the oven rack while oven is a method of cooking tender cuts of meat by direct heat under the broil element of...
Wiring Diagram (All Languages)
Page 1
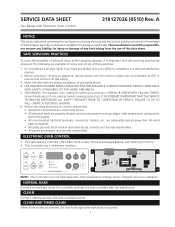
... coding for injury or damage of any kind arising from all , of any doubts as current carrying conductors. The manufacturer cannot be changed. USE ONLY REPLACEMENT PARTS CATALOGED FOR THIS APPLIANCE. Speed clean Clock Bake time P13 P12 Bake Broil Clean Timer On/Off Start time Oven Preheat Door Locked Self-Cleaning Oven Clear/ Off Controls P15 P5 NOTE: The Controller's are properly and securely reassembled. CLEAN During a cleaning process, the oven uses bake burner. Never interfere with the bake burner. SERVICE DATA SHEET Gas Range...
... coding for injury or damage of any kind arising from all , of any doubts as current carrying conductors. The manufacturer cannot be changed. USE ONLY REPLACEMENT PARTS CATALOGED FOR THIS APPLIANCE. Speed clean Clock Bake time P13 P12 Bake Broil Clean Timer On/Off Start time Oven Preheat Door Locked Self-Cleaning Oven Clear/ Off Controls P15 P5 NOTE: The Controller's are properly and securely reassembled. CLEAN During a cleaning process, the oven uses bake burner. Never interfere with the bake burner. SERVICE DATA SHEET Gas Range...
Wiring Diagram (All Languages)
Page 4
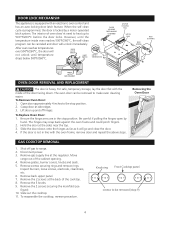
... an electronic oven control and has an auto locking door latch feature. The oven door can be removed to make oven cleaning easier. Be careful if pulling the hinges open by a motor operated latch system. Slide the door down . Shut off hinges. Inspect burners, loose screws, electrode, cleanliness, etc. 6. Slide out the cooktop. 11. However, until temperature drops below 500°F/260°C. Remove screws securing rings and remove rings. Knob ring Front Cooktop panel screws...
... an electronic oven control and has an auto locking door latch feature. The oven door can be removed to make oven cleaning easier. Be careful if pulling the hinges open by a motor operated latch system. Slide the door down . Shut off hinges. Inspect burners, loose screws, electrode, cleanliness, etc. 6. Slide out the cooktop. 11. However, until temperature drops below 500°F/260°C. Remove screws securing rings and remove rings. Knob ring Front Cooktop panel screws...
Installation Instructions (All Languages)
Page 2
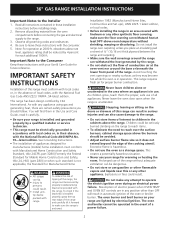
... Installer 1. Never leave the oven door open when the range is hazardous. • Do not use . Prolonged use of local codes, with the consumer. 5. Observe all instructions contained in their absence, with range. See Grounding Instructions. • The installation of appliances designed for manufactures (mobile) home installation must be avoided. • Adjust surface burner flame size so it forward to children in the cabinets above see level, appliance rating shall be electrically...
... Installer 1. Never leave the oven door open when the range is hazardous. • Do not use . Prolonged use of local codes, with the consumer. 5. Observe all instructions contained in their absence, with range. See Grounding Instructions. • The installation of appliances designed for manufactures (mobile) home installation must be avoided. • Adjust surface burner flame size so it forward to children in the cabinets above see level, appliance rating shall be electrically...
Installation Instructions (All Languages)
Page 3
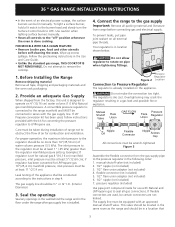
... slowly turn the Surface Control knob to the "off" position whenever the oven is set for use . Wipe up excess spillage. Provide an adequate Gas Supply When shipped from range before self-cleaning the oven. The inlet pressure to the instructions in the floor under the range after gas supply line is already installed on 4"(10,16 cm) water column (1.0 kPa) Natural gas manifold pressure. Do not make the connection too tight. Before Installing the Range Remove...
... slowly turn the Surface Control knob to the "off" position whenever the oven is set for use . Wipe up excess spillage. Provide an adequate Gas Supply When shipped from range before self-cleaning the oven. The inlet pressure to the instructions in the floor under the range after gas supply line is already installed on 4"(10,16 cm) water column (1.0 kPa) Natural gas manifold pressure. Do not make the connection too tight. Before Installing the Range Remove...
Installation Instructions (All Languages)
Page 4
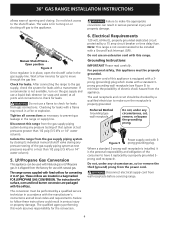
... 5 Power supply cord with this appliance is properly grounded. Check for converting it to minimize the possibility of electric shock hazard from wall receptacle before servicing range. 4 Electrical Requirements 120 volt, 60 Hertz, properly grounded dedicated circuit protected by a properly grounded 3prong wall receptacle. The power cord of this range. 36" GAS RANGE INSTALLATION INSTRUCTIONS allows ease of opening and closing its individual manual shutoff valve during any circumstances, cut, remove, or...
... 5 Power supply cord with this appliance is properly grounded. Check for converting it to minimize the possibility of electric shock hazard from wall receptacle before servicing range. 4 Electrical Requirements 120 volt, 60 Hertz, properly grounded dedicated circuit protected by a properly grounded 3prong wall receptacle. The power cord of this range. 36" GAS RANGE INSTALLATION INSTRUCTIONS allows ease of opening and closing its individual manual shutoff valve during any circumstances, cut, remove, or...
Installation Instructions (All Languages)
Page 5
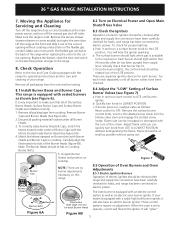
... Surface Burner Valves (see Figure 6). These control systems require no burner adjustments necessary on the flexible gas conduit. There are installed correctly. 1. Make sure not to pinch the flexible gas conduit at the main power source, and turn each control to the Use and Care Guide packaged with the range for operating instructions and for each Burner Head The oven burner is very important to electric power. Replace the drawer, close the door and switch on some models) and open...
... Surface Burner Valves (see Figure 6). These control systems require no burner adjustments necessary on the flexible gas conduit. There are installed correctly. 1. Make sure not to pinch the flexible gas conduit at the main power source, and turn each control to the Use and Care Guide packaged with the range for operating instructions and for each Burner Head The oven burner is very important to electric power. Replace the drawer, close the door and switch on some models) and open...
Installation Instructions (All Languages)
Page 6
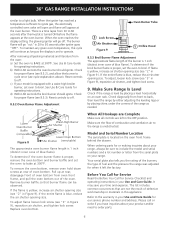
... opening size (see "3" in Figure 9), reposition air shutter, and tighten lock screw. 9. Make Sure Range Is Level Check if the range is unobstructed. Your serial plate also tells you the rating of the burners, the type of defective workmanship or materials in your Use and Care Guide. When the igniter has reached a temperature sufficient to BAKE at the oven burner. Reset controls to a light bulb. If the entire flame is yellow, increase air shutter opening size...
... opening size (see "3" in Figure 9), reposition air shutter, and tighten lock screw. 9. Make Sure Range Is Level Check if the range is unobstructed. Your serial plate also tells you the rating of the burners, the type of defective workmanship or materials in your Use and Care Guide. When the igniter has reached a temperature sufficient to BAKE at the oven burner. Reset controls to a light bulb. If the entire flame is yellow, increase air shutter opening size...


