Complete Owner's Guide (English)
Page 2
... The graphics shown are completely committed to providing you with the best service possible.Your satisfaction is our number one priority. Model Number: Serial Number: Purchase Date: Product Registration Register Your Product The PRODUCT REGISTRATION CARD should be practiced when installing, operating... la dirección que se incluye a continuación. These instructions are not meant to Electrolux Home Products. Box 212378 Augusta, GA 30917 © 2007 Electrolux Canada Corp. The graphics on your appliance may not have all the described features. We know you ...
... The graphics shown are completely committed to providing you with the best service possible.Your satisfaction is our number one priority. Model Number: Serial Number: Purchase Date: Product Registration Register Your Product The PRODUCT REGISTRATION CARD should be practiced when installing, operating... la dirección que se incluye a continuación. These instructions are not meant to Electrolux Home Products. Box 212378 Augusta, GA 30917 © 2007 Electrolux Canada Corp. The graphics on your appliance may not have all the described features. We know you ...
Complete Owner's Guide (English)
Page 6
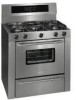
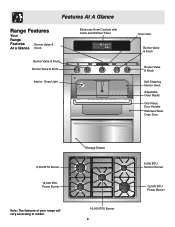
Storage Drawer 16,000 BTU Burner 6 5,000 BTU Simmer Burner 12,000 BTU Power Burner Features At A Glance Range Features Your Range Features Burner Valve & At a Glance Knob Electronic Oven Controls with Clock and Kitchen Timer Speed clean Clock Bake time Clean Timer On/Off Start time ... Oven Adjustable Oven Racks One Piece Door Handle Stainless Steel Oven Door 9,500 BTU Burner 14,000 BTU Power Burner Note: The features of your range will vary according to model.
Storage Drawer 16,000 BTU Burner 6 5,000 BTU Simmer Burner 12,000 BTU Power Burner Features At A Glance Range Features Your Range Features Burner Valve & At a Glance Knob Electronic Oven Controls with Clock and Kitchen Timer Speed clean Clock Bake time Clean Timer On/Off Start time ... Oven Adjustable Oven Racks One Piece Door Handle Stainless Steel Oven Door 9,500 BTU Burner 14,000 BTU Power Burner Note: The features of your range will vary according to model.
Complete Owner's Guide (English)
Page 12
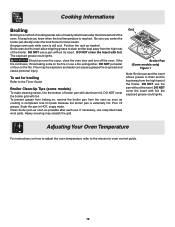
... hot. If the fire continues, throw baking soda on how to adjust the oven temperature refer to the Timer Guide Broiler Clean-Up Tips (some models) To make cleaning easier, line the bottom of broiler pan with foil. Soak the pan in HOT, soapy water. DO NOT put water or flour... tender cuts of meat by direct heat under the broil burner for broiling Refer to the electronic oven control guide. 12 Grid Broiler Pan (Some models only) Figure 1 Note: Broiler pan and the insert allows grease to drain and be kept away from the oven as soon as needed.
... hot. If the fire continues, throw baking soda on how to adjust the oven temperature refer to the Timer Guide Broiler Clean-Up Tips (some models) To make cleaning easier, line the bottom of broiler pan with foil. Soak the pan in HOT, soapy water. DO NOT put water or flour... tender cuts of meat by direct heat under the broil burner for broiling Refer to the electronic oven control guide. 12 Grid Broiler Pan (Some models only) Figure 1 Note: Broiler pan and the insert allows grease to drain and be kept away from the oven as soon as needed.

Complete Owner's Guide (English)
Page 13
.... Large spillovers can cause heavy smoke or fire when subjected to a fin powdered ash you can become very hot to burn soil on. Clean any range. Clean with a high sugar or acid content (such as tomatoes, sauerkraut, fruit juices or pie filling) to the following cleaning precautions: - After the...Door Do Hand Clean Frame Do Not Hand Clean Seal Preparing the Oven for a good seal. This will turn slightly dull. Sounds of some models) Adhere to remain on the gasket. DO NOT leave small children unattended near the appliance. Wait until the oven is completed and the oven...
.... Large spillovers can cause heavy smoke or fire when subjected to a fin powdered ash you can become very hot to burn soil on. Clean any range. Clean with a high sugar or acid content (such as tomatoes, sauerkraut, fruit juices or pie filling) to the following cleaning precautions: - After the...Door Do Hand Clean Frame Do Not Hand Clean Seal Preparing the Oven for a good seal. This will turn slightly dull. Sounds of some models) Adhere to remain on the gasket. DO NOT leave small children unattended near the appliance. Wait until the oven is completed and the oven...
Complete Owner's Guide (English)
Page 14
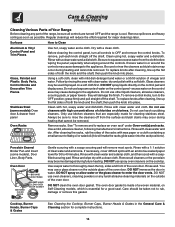
...Clean Aluminum & Vinyl Control Panel and Trim Pieces Glass, Painted and Plastic Body Parts, Control Knobs and Decorative Trim Pieces Stainless Steel (some models), Door Liner, Body Parts. Clean using hot, soapy water and a dishcloth. Glass cleaners may occur during future heating. grasp firmly and pull.... Rinse well. Using a soft cloth, clean with a soapfilled scouring pad. Only use oven cleaners, cleaning powders or any part of the range, be removed. Rinse with clean water and a damp cloth, and then scrub with mild dish detergent and water or a 50/50 solution ...
...Clean Aluminum & Vinyl Control Panel and Trim Pieces Glass, Painted and Plastic Body Parts, Control Knobs and Decorative Trim Pieces Stainless Steel (some models), Door Liner, Body Parts. Clean using hot, soapy water and a dishcloth. Glass cleaners may occur during future heating. grasp firmly and pull.... Rinse well. Using a soft cloth, clean with a soapfilled scouring pad. Only use oven cleaners, cleaning powders or any part of the range, be removed. Rinse with clean water and a damp cloth, and then scrub with mild dish detergent and water or a 50/50 solution ...
Complete Owner's Guide (English)
Page 15
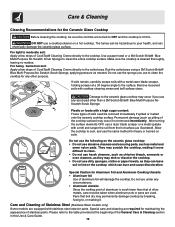
... SPILLS, FOOD, CLEANING AGENTS OR ANY OTHER MATERIAL TO ENTER THE GAS ORIFICE HOLDER OPENING. Replace in the dishwasher. To Clean the surface Burner Caps and Burner Heads (all models)- For proper flow of gas and ignition of cooktop cleaning cream. Ceramic Glass Cooktop Cleaning and Maintenance... 3M Scotch-Brite® Blue Multi-Purpose No Scratch Scrub Sponge).This will prevent improper ignition and an uneven flame. Because the gas Burners are sealed, cleanups are easy when spillovers are not damaged. These marks should be routinely cleaned. Use caution when replacing the ...
... SPILLS, FOOD, CLEANING AGENTS OR ANY OTHER MATERIAL TO ENTER THE GAS ORIFICE HOLDER OPENING. Replace in the dishwasher. To Clean the surface Burner Caps and Burner Heads (all models)- For proper flow of gas and ignition of cooktop cleaning cream. Ceramic Glass Cooktop Cleaning and Maintenance... 3M Scotch-Brite® Blue Multi-Purpose No Scratch Scrub Sponge).This will prevent improper ignition and an uneven flame. Because the gas Burners are sealed, cleanups are easy when spillovers are not damaged. These marks should be routinely cleaned. Use caution when replacing the ...
Complete Owner's Guide (English)
Page 16
... table provided at a 30 degree angle to clean. • Do not use a cooktop cleaner on soil: Apply a few drops of Stainless Steel (Stainless Steel models only) Some models are equipped with cooktop cleaning cream and buff surface clean. The fumes can chemically damage the ceramic-glass surface. Damage to the cooktop. For...
... table provided at a 30 degree angle to clean. • Do not use a cooktop cleaner on soil: Apply a few drops of Stainless Steel (Stainless Steel models only) Some models are equipped with cooktop cleaning cream and buff surface clean. The fumes can chemically damage the ceramic-glass surface. Damage to the cooktop. For...
Complete Owner's Guide (English)
Page 20
...for making the appliance accessible for appliances not in ordinary household use . The date on models with the product. 2. This written warranty gives you . 2. Replacement of incidental or ... only to obtain and keep all local plumbing, electrical and/or gas codes. 3. Box 212378 Augusta, GA 30917 Canada 1•866•294•9911 Electrolux Home Products ... state. use of parts other than genuine Electrolux Home Products parts; Warranty Information RANGE WARRANTY Your range is protected by this warranty In the U.S.A., your appliance is warranted by Electrolux...
...for making the appliance accessible for appliances not in ordinary household use . The date on models with the product. 2. This written warranty gives you . 2. Replacement of incidental or ... only to obtain and keep all local plumbing, electrical and/or gas codes. 3. Box 212378 Augusta, GA 30917 Canada 1•866•294•9911 Electrolux Home Products ... state. use of parts other than genuine Electrolux Home Products parts; Warranty Information RANGE WARRANTY Your range is protected by this warranty In the U.S.A., your appliance is warranted by Electrolux...
Timer Guide (Timer Guide)
Page 1
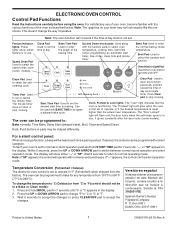
... °F (Fahrenheit) when shipped from the factory. It glows constantly after the door locks (some models). Within 5 seconds, press the UP or DOWN ARROW pad to select the speed clean cycle (some models). To change the temperature to °C (Celsius) or from 170°F to 550°F (77... when the oven is first set to set the desired start or stop cooking. The oven can be shaped differently. Spanish Owner's Guides Frigidaire Company P. Clock PadUsed to operate, or if the desired temperature is functioning. Bake Broil Bake Pad Used to select the selfcleaning cycle. ...
... °F (Fahrenheit) when shipped from the factory. It glows constantly after the door locks (some models). Within 5 seconds, press the UP or DOWN ARROW pad to select the speed clean cycle (some models). To change the temperature to °C (Celsius) or from 170°F to 550°F (77... when the oven is first set to set the desired start or stop cooking. The oven can be shaped differently. Spanish Owner's Guides Frigidaire Company P. Clock PadUsed to operate, or if the desired temperature is functioning. Bake Broil Bake Pad Used to select the selfcleaning cycle. ...
Timer Guide (Timer Guide)
Page 2
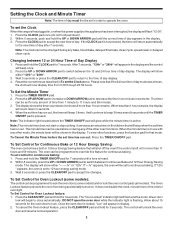
.... 2 Press the UP ARROW pad to increase or DOWN ARROW pad to lock the oven door (some models): The control can be set for Oven Lockout (some models) and/or lock the oven control pads (all models). To Set Control for any of the other oven functions. Once the oven door is flashing... the oven door while the indicator light is locked, "Loc" will return automatically to 11 hours and 59 minutes. 3. To set the Clock When the range is not pressed, the timer will appear in display. 2. Press the CLOCK pad once (do not hold the CLOCK pad for Oven Lockout feature: 1. Press...
.... 2 Press the UP ARROW pad to increase or DOWN ARROW pad to lock the oven door (some models): The control can be set for Oven Lockout (some models) and/or lock the oven control pads (all models). To Set Control for any of the other oven functions. Once the oven door is flashing... the oven door while the indicator light is locked, "Loc" will return automatically to 11 hours and 59 minutes. 3. To set the Clock When the range is not pressed, the timer will appear in display. 2. Press the CLOCK pad once (do not hold the CLOCK pad for Oven Lockout feature: 1. Press...

Timer Guide (Timer Guide)
Page 5
...Sabbath/Jewish Holidays. By holding the UP or DOWN ARROW pad, the temperature can then be turned OFF at the upper left (and right, some models) rear wall of day. 2. The oven may only be adjusted in 5°F increments with the correct time of the oven interior and is ... Immediately & activate the Sabbath feature: 1. SAb will override the factory preset 12-Hour Energy Saving feature. When power is set with each press of models with a glass shield held by first pressing the Clear/Off pad (this step and continue to display Celsius). 5. This will appear in use on ...
...Sabbath/Jewish Holidays. By holding the UP or DOWN ARROW pad, the temperature can then be turned OFF at the upper left (and right, some models) rear wall of day. 2. The oven may only be adjusted in 5°F increments with the correct time of the oven interior and is ... Immediately & activate the Sabbath feature: 1. SAb will override the factory preset 12-Hour Energy Saving feature. When power is set with each press of models with a glass shield held by first pressing the Clear/Off pad (this step and continue to display Celsius). 5. This will appear in use on ...
Installation Instructions (All Languages)
Page 3
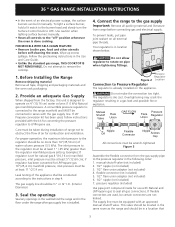
36 " GAS RANGE INSTALLATION INSTRUCTIONS • In the event of the appliance shall be conducted according to the instructions in step 4. Do not attempt to operate on pipe when tightening fittings. Provide an adequate Gas Supply When shipped from the factory, this unit is designed to remove the ...turn the Surface Control knob to seal all external pipe threads. FOR MODELS WITH SELF-CLEAN FEATURE: • Remove broiler pan, food and other utensils before connecting gas and electrical supply. Connect the range to Pressure Regulator The regulator is done cooking. Care must be at...
36 " GAS RANGE INSTALLATION INSTRUCTIONS • In the event of the appliance shall be conducted according to the instructions in step 4. Do not attempt to operate on pipe when tightening fittings. Provide an adequate Gas Supply When shipped from the factory, this unit is designed to remove the ...turn the Surface Control knob to seal all external pipe threads. FOR MODELS WITH SELF-CLEAN FEATURE: • Remove broiler pan, food and other utensils before connecting gas and electrical supply. Connect the range to Pressure Regulator The regulator is done cooking. Care must be at...
Installation Instructions (All Languages)
Page 5
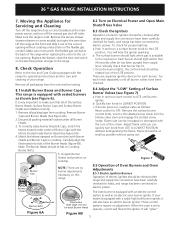
...require no burner adjustments necessary on Burner skirts with the turn each burner. Lift the range at the back of the range when replacing the unit into slots of your model is equipped with an electric control system as well as shown (see Figure 7) a.... b. Quickly turn off the manual gas shut-off valve. Check Operation Refer to LOWEST POSITION without creating undue strain on the electrical power and gas to electric power. 36 " GAS RANGE INSTALLATION INSTRUCTIONS 7. Note: The Burner Heads should be checked after range and supply line connectors have an ...
...require no burner adjustments necessary on Burner skirts with the turn each burner. Lift the range at the back of the range when replacing the unit into slots of your model is equipped with an electric control system as well as shown (see Figure 7) a.... b. Quickly turn off the manual gas shut-off valve. Check Operation Refer to LOWEST POSITION without creating undue strain on the electrical power and gas to electric power. 36 " GAS RANGE INSTALLATION INSTRUCTIONS 7. Note: The Burner Heads should be checked after range and supply line connectors have an ...
Installation Instructions (All Languages)
Page 6
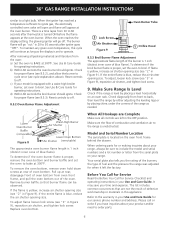
... (see 8.5.3). Model and Serial Number Location The serial plate is proper, set oven to operate. It may save you have inquiries about your product and/or need to cycle once (see "3" in your Use and Care Guide. Please call or write if you time and expense. 36" GAS RANGE INSTALLATION INSTRUCTIONS similar...To determine if the oven burner flame is equipped with a waist-high broiler burner, set the oven to a light bulb. If the flame is 1 inch (distinct inner cone of oven bottom. Replace oven bottom. After removing all controls are not the result of fuel and the pressure the...
... (see 8.5.3). Model and Serial Number Location The serial plate is proper, set oven to operate. It may save you have inquiries about your product and/or need to cycle once (see "3" in your Use and Care Guide. Please call or write if you time and expense. 36" GAS RANGE INSTALLATION INSTRUCTIONS similar...To determine if the oven burner flame is equipped with a waist-high broiler burner, set the oven to a light bulb. If the flame is 1 inch (distinct inner cone of oven bottom. Replace oven bottom. After removing all controls are not the result of fuel and the pressure the...


