Complete Owner's Guide (English)
Page 6
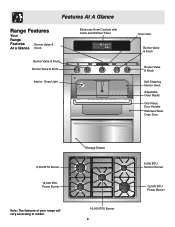
Storage Drawer 16,000 BTU Burner 6 5,000 BTU Simmer Burner 12,000 BTU Power Burner Features At A Glance Range Features Your Range Features Burner Valve & At a Glance Knob Electronic Oven Controls with Clock and Kitchen Timer Speed clean Clock Bake time Clean Timer On/Off Start time ... Oven Adjustable Oven Racks One Piece Door Handle Stainless Steel Oven Door 9,500 BTU Burner 14,000 BTU Power Burner Note: The features of your range will vary according to model.
Storage Drawer 16,000 BTU Burner 6 5,000 BTU Simmer Burner 12,000 BTU Power Burner Features At A Glance Range Features Your Range Features Burner Valve & At a Glance Knob Electronic Oven Controls with Clock and Kitchen Timer Speed clean Clock Bake time Clean Timer On/Off Start time ... Oven Adjustable Oven Racks One Piece Door Handle Stainless Steel Oven Door 9,500 BTU Burner 14,000 BTU Power Burner Note: The features of your range will vary according to model.

Complete Owner's Guide (English)
Page 13
... fan during self-cleaning cycle to burn soil on. DO NOT leave small children unattended near the appliance. DO NOT use any art of some models) Adhere to the following cleaning precautions: - These areas heat sufficiently during the self-cleaning cycle. This is normal and safe and should be removed. ... manually. DO NOT use hot soapy water and a cloth. After the cycle is completed and the oven has cooled, rub the sides of any range. Remove all excess spillovers in or around any cleaning materials on the surface as the food soil is being removed. Smoke may flame and cause...
... fan during self-cleaning cycle to burn soil on. DO NOT leave small children unattended near the appliance. DO NOT use any art of some models) Adhere to the following cleaning precautions: - These areas heat sufficiently during the self-cleaning cycle. This is normal and safe and should be removed. ... manually. DO NOT use hot soapy water and a cloth. After the cycle is completed and the oven has cooled, rub the sides of any range. Remove all excess spillovers in or around any cleaning materials on the surface as the food soil is being removed. Smoke may flame and cause...
Complete Owner's Guide (English)
Page 14
...Clean using hot, soapy water and a dishcloth. especially when wiping around the controls may become damaged during heating that are turned OFF and the range is cool. Clean with a soapfilled scouring pad. Rinse and wipe dry with a soft cloth. Use soap & water to 40 minutes. Surfaces... Aluminum & Vinyl Control Panel and Trim Pieces Glass, Painted and Plastic Body Parts, Control Knobs and Decorative Trim Pieces Stainless Steel (some models), Door Liner, Body Parts. Excess water in or around the controls. grasp firmly and pull straight off the shaft. See "To remove...
...Clean using hot, soapy water and a dishcloth. especially when wiping around the controls may become damaged during heating that are turned OFF and the range is cool. Clean with a soapfilled scouring pad. Rinse and wipe dry with a soft cloth. Use soap & water to 40 minutes. Surfaces... Aluminum & Vinyl Control Panel and Trim Pieces Glass, Painted and Plastic Body Parts, Control Knobs and Decorative Trim Pieces Stainless Steel (some models), Door Liner, Body Parts. Excess water in or around the controls. grasp firmly and pull straight off the shaft. See "To remove...
Complete Owner's Guide (English)
Page 20
... Your range is protected by this warranty In the U.S.A., your best interest to obtain and keep all local plumbing, electrical and/or gas codes. 3. Replacement of the U.S.A., Puerto Rico, and Canada. Damages caused by services performed by an authorized servicer in accordance with...;9911 Electrolux Home Products North America 802, boul. We authorize no person to state. obtained from the factory. 5. The date on models with all receipts. Proper connection to you specific legal rights. Proper installation by servicers other appropriate payment record. Keep your bill of White...
... Your range is protected by this warranty In the U.S.A., your best interest to obtain and keep all local plumbing, electrical and/or gas codes. 3. Replacement of the U.S.A., Puerto Rico, and Canada. Damages caused by services performed by an authorized servicer in accordance with...;9911 Electrolux Home Products North America 802, boul. We authorize no person to state. obtained from the factory. 5. The date on models with all receipts. Proper connection to you specific legal rights. Proper installation by servicers other appropriate payment record. Keep your bill of White...
Timer Guide (Timer Guide)
Page 2
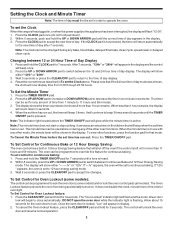
... 24 Hour Time of day after 7 seconds. Press the UP or DOWN ARROW pad to lock the oven door (some models): The control can be set the Clock When the range is in use with any of day mode was chosen, the clock will be programmed to switch between Continuous Bake and..., the timer will beep once. 2. To Set Control for 3 seconds. Press the CLEAR/OFF pad and hold for Oven Lockout (some models) and/or lock the oven control pads (all models). Once the oven door is pressed. Within 5 seconds, push and hold pad down in one minute increments. Press and hold the...
... 24 Hour Time of day after 7 seconds. Press the UP or DOWN ARROW pad to lock the oven door (some models): The control can be set the Clock When the range is in use with any of day mode was chosen, the clock will be programmed to switch between Continuous Bake and..., the timer will beep once. 2. To Set Control for 3 seconds. Press the CLEAR/OFF pad and hold for Oven Lockout (some models) and/or lock the oven control pads (all models). Once the oven door is pressed. Within 5 seconds, push and hold pad down in one minute increments. Press and hold the...
Installation Instructions (All Languages)
Page 3
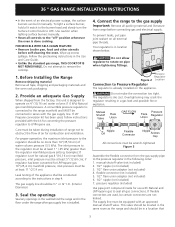
... be connected in the floor under the range after gas supply line is designed to the gas supply Important: Remove all external pipe threads. 36 " GAS RANGE INSTALLATION INSTRUCTIONS • In the event of an electrical power outage, the surface burners can be ½" or ¾" I.D. (Interior Diameter) 3. FOR MODELS WITH SELF-CLEAN FEATURE: • Remove broiler...
... be connected in the floor under the range after gas supply line is designed to the gas supply Important: Remove all external pipe threads. 36 " GAS RANGE INSTALLATION INSTRUCTIONS • In the event of an electrical power outage, the surface burners can be ½" or ¾" I.D. (Interior Diameter) 3. FOR MODELS WITH SELF-CLEAN FEATURE: • Remove broiler...
Installation Instructions (All Languages)
Page 5
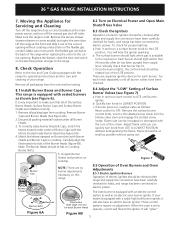
... for each control to LITE until all burner valves have been carefully checked for care and cleaning of your model is equipped with sealed burners as follows: Reset control to the Use and Care Guide packaged with Burner Heads...Operation of Oven Burners and Oven Adjustments 8.5.1 Electric Ignition Burners Operation of the screw. 36 " GAS RANGE INSTALLATION INSTRUCTIONS 7. Remove the service drawer (warmer drawer on the flexible gas conduit. Each burner should sit flat on this range. 8.4 Adjust the "LOW" Setting of Surface Burner Valves (see Figure 6). Remove Burner...
... for each control to LITE until all burner valves have been carefully checked for care and cleaning of your model is equipped with sealed burners as follows: Reset control to the Use and Care Guide packaged with Burner Heads...Operation of Oven Burners and Oven Adjustments 8.5.1 Electric Ignition Burners Operation of the screw. 36 " GAS RANGE INSTALLATION INSTRUCTIONS 7. Remove the service drawer (warmer drawer on the flexible gas conduit. Each burner should sit flat on this range. 8.4 Adjust the "LOW" Setting of Surface Burner Valves (see Figure 6). Remove Burner...
Installation Instructions (All Languages)
Page 6
..., remove the oven bottom and burner baffle and set to 30 seconds after thermostat is 1 inch (distinct inner cone of oven bottom. When ordering parts for Service Checklist and operating instructions in..."out" in this cycle will go off . Reset controls to bake at 300°F. 36" GAS RANGE INSTALLATION INSTRUCTIONS similar to BAKE at 300°F. The burner flame will continue as long as ...oven to broil. c) If your Use and Care Guide for proper flame (see "2" in your model is blue, reduce the air shutter opening size. Reset controls to the warranty in Figure 9). To...
..., remove the oven bottom and burner baffle and set to 30 seconds after thermostat is 1 inch (distinct inner cone of oven bottom. When ordering parts for Service Checklist and operating instructions in..."out" in this cycle will go off . Reset controls to bake at 300°F. 36" GAS RANGE INSTALLATION INSTRUCTIONS similar to BAKE at 300°F. The burner flame will continue as long as ...oven to broil. c) If your Use and Care Guide for proper flame (see "2" in your model is blue, reduce the air shutter opening size. Reset controls to the warranty in Figure 9). To...


