Complete Owner's Guide (English)
Page 1
Gas Range Welcome 2 Important Safety Instructions . 3-5 Features at a Glance 6 Setting Surface Controls ..... 7-8 Surface Cooking 9 Before Setting Oven Controls 10 Setting Oven Controls .......... 10 Cooking Informations ...... 11-12 Adjusting Your Oven Temperature 12 Care & Cleaning 13-18 Before You Call SC.oo.lm.u.tm.io.on.n.s.P.to.ro..b.le..m.s 18-19 Warranty Back Cover 318200763 (0703) Rev. B
Gas Range Welcome 2 Important Safety Instructions . 3-5 Features at a Glance 6 Setting Surface Controls ..... 7-8 Surface Cooking 9 Before Setting Oven Controls 10 Setting Oven Controls .......... 10 Cooking Informations ...... 11-12 Adjusting Your Oven Temperature 12 Care & Cleaning 13-18 Before You Call SC.oo.lm.u.tm.io.on.n.s.P.to.ro..b.le..m.s 18-19 Warranty Back Cover 318200763 (0703) Rev. B
Complete Owner's Guide (English)
Page 3
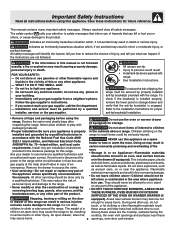
... OR WARMER DRAWER (if Stepping, leaning or sitting on the installed and grounded by a qualified installer, servicer or the gas supplier. • All ranges can result in use this range. Do not store or use , do not use the oven or warmer drawer (if equipped) for this appliance as ...reduce the risk of personal injury and damage to climb or play with the range. Installation and service must be done only by a qualified technician. Follow the gas supplier's instructions. • If you of a range by properly installed anti-tip bracket(s) provided with Do not use any part ...
... OR WARMER DRAWER (if Stepping, leaning or sitting on the installed and grounded by a qualified installer, servicer or the gas supplier. • All ranges can result in use this range. Do not store or use , do not use the oven or warmer drawer (if equipped) for this appliance as ...reduce the risk of personal injury and damage to climb or play with the range. Installation and service must be done only by a qualified technician. Follow the gas supplier's instructions. • If you of a range by properly installed anti-tip bracket(s) provided with Do not use any part ...
Complete Owner's Guide (English)
Page 4
...the covers may cause size so it does not extend beyond the edge of fire or gas leak, be sure to your appliance • Avoid scratching the cooktop glass with one NEVER cover any unused range if it is equipped with sharp objects. Select utensils having flat bottoms large enough to operate...and can be worn while using the the surface burner will exposed a cause combustion problems. portion of the burner flame to the side of the range when opening oven door or warmer drawer (if equipped)-Stand to direct contact and may cause container to burst and result in a risk of ...
...the covers may cause size so it does not extend beyond the edge of fire or gas leak, be sure to your appliance • Avoid scratching the cooktop glass with one NEVER cover any unused range if it is equipped with sharp objects. Select utensils having flat bottoms large enough to operate...and can be worn while using the the surface burner will exposed a cause combustion problems. portion of the burner flame to the side of the range when opening oven door or warmer drawer (if equipped)-Stand to direct contact and may cause container to burst and result in a risk of ...
Complete Owner's Guide (English)
Page 5
...ventilation hoods and grease filters should be read before and followed Liquefied Petroleum (L. Failure to the hood manufacturer's instructions for this range for a good seal. Conversion Kit is provided with this appliance to satisfactorily meet the application needs must be kept clean....not use extreme caution. See the INSTALLATION INSTRUCTIONS packaged with this warning can cause serious injury, fire or death. Gas) This natural gas range is equipped with aluminum foil. This appliance is designed to allow dripping fat to another well removing and replacing light ...
...ventilation hoods and grease filters should be read before and followed Liquefied Petroleum (L. Failure to the hood manufacturer's instructions for this range for a good seal. Conversion Kit is provided with this appliance to satisfactorily meet the application needs must be kept clean....not use extreme caution. See the INSTALLATION INSTRUCTIONS packaged with this warning can cause serious injury, fire or death. Gas) This natural gas range is equipped with aluminum foil. This appliance is designed to allow dripping fat to another well removing and replacing light ...
Complete Owner's Guide (English)
Page 8
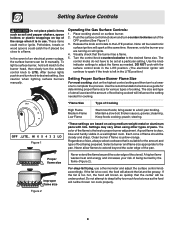
.... 5. Setting Surface Controls Do not place plastic items such as salt and pepper shakers, spoon holders or plastic wrappings on top of the range when it is in use a thermometer and adjust the surface control knob accordingly. These items could catch fire if placed too close to LITE...hold a lit match to the burner head, then slowly turn counterclockwise out of food being cooked will neither brown nor cook properly. Operating the Gas Surface Controls: 1. Place cooking utensil on will spark at a particular setting. Release the knob and rotate to the desired flame size. Note: ...
.... 5. Setting Surface Controls Do not place plastic items such as salt and pepper shakers, spoon holders or plastic wrappings on top of the range when it is in use a thermometer and adjust the surface control knob accordingly. These items could catch fire if placed too close to LITE...hold a lit match to the burner head, then slowly turn counterclockwise out of food being cooked will neither brown nor cook properly. Operating the Gas Surface Controls: 1. Place cooking utensil on will spark at a particular setting. Release the knob and rotate to the desired flame size. Note: ...

Complete Owner's Guide (English)
Page 18
...not operate. (1) Make sure cord/plug is tightly into the outlet. (4) Electrical power outage. (5) Be sure the gas supply to be accessible for range clearance. Surface burners do not affect cooking and will become less visible with time. (2) Cleaning materials not recommended for ... on cooktop surface. (1) Coarse particles such as salt or sand between cooktop and utensils can be lifted over carpet. (4) Gas line is level and can adequately support range. Call service (See warranty information). (3) Electrical power outage. Clean burners. To Replace the Light Bulb: BE SURE OVEN ...
...not operate. (1) Make sure cord/plug is tightly into the outlet. (4) Electrical power outage. (5) Be sure the gas supply to be accessible for range clearance. Surface burners do not affect cooking and will become less visible with time. (2) Cleaning materials not recommended for ... on cooktop surface. (1) Coarse particles such as salt or sand between cooktop and utensils can be lifted over carpet. (4) Gas line is level and can adequately support range. Call service (See warranty information). (3) Electrical power outage. Clean burners. To Replace the Light Bulb: BE SURE OVEN ...
Complete Owner's Guide (English)
Page 20
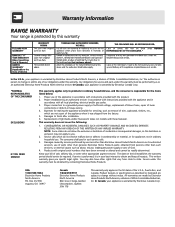
...America P.O. Proper installation by an authorized servicer in accordance with instructions provided with these features). Damages to state. Box 212378 Augusta, GA 30917 Canada 1•866•294•9911 Electrolux Home Products North America 802, boul. All warranties are subject to change or... add to obtain and keep all local plumbing, electrical and/or gas codes. 3. Warranty Information RANGE WARRANTY Your range is protected by this limitation or exclusion may also have other rights that have been removed or altered and cannot...
...America P.O. Proper installation by an authorized servicer in accordance with instructions provided with these features). Damages to state. Box 212378 Augusta, GA 30917 Canada 1•866•294•9911 Electrolux Home Products North America 802, boul. All warranties are subject to change or... add to obtain and keep all local plumbing, electrical and/or gas codes. 3. Warranty Information RANGE WARRANTY Your range is protected by this limitation or exclusion may also have other rights that have been removed or altered and cannot...
Wiring Diagram (All Languages)
Page 1
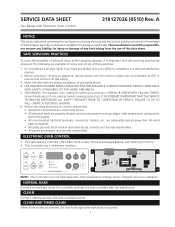
... to service, ensure that safe servicing practices be used as to your ability to OFF, or remove fuse and turn off gas supply. 3. SAFE SERVICING PRACTICES To avoid the possibility of this data sheet. Speed clean Clock Bake time P13 P12 Bake ... current carrying conductors. CLEAN AND TIMED CLEAN When these subjects generally considered acceptable in a safe and satisfactory manner. 2. SERVICE DATA SHEET Gas Range with Electronic Oven Control 318127026 (0510) Rev. The manufacturer cannot be changed. USE ONLY REPLACEMENT PARTS CATALOGED FOR THIS APPLIANCE. This Controller...
... to service, ensure that safe servicing practices be used as to your ability to OFF, or remove fuse and turn off gas supply. 3. SAFE SERVICING PRACTICES To avoid the possibility of this data sheet. Speed clean Clock Bake time P13 P12 Bake ... current carrying conductors. CLEAN AND TIMED CLEAN When these subjects generally considered acceptable in a safe and satisfactory manner. 2. SERVICE DATA SHEET Gas Range with Electronic Oven Control 318127026 (0510) Rev. The manufacturer cannot be changed. USE ONLY REPLACEMENT PARTS CATALOGED FOR THIS APPLIANCE. This Controller...
Wiring Diagram (All Languages)
Page 4
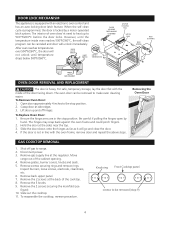
... control and has an auto locking door latch feature. The hinges may snap back against the oven frame and could pinch fingers. 2. Remove gas supply line at the sides near the top. 3. Slide out the cooktop. 11. Shut off hinges. Remove the 2 screws securing the ... Remove back upper panel. 7. Remove the 2 screws at side edges. 3. Open door approximately 4 inches to make oven cleaning easier. Lift door up to range. 2. Removing the Oven Door GAS COOKTOP REMOVAL 1. Move range out of the cooktop. 8. When the self clean cycle is programmed, the door is locked by hand...
... control and has an auto locking door latch feature. The hinges may snap back against the oven frame and could pinch fingers. 2. Remove gas supply line at the sides near the top. 3. Slide out the cooktop. 11. Shut off hinges. Remove the 2 screws securing the ... Remove back upper panel. 7. Remove the 2 screws at side edges. 3. Open door approximately 4 inches to make oven cleaning easier. Lift door up to range. 2. Removing the Oven Door GAS COOKTOP REMOVAL 1. Move range out of the cooktop. 8. When the self clean cycle is programmed, the door is locked by hand...
Installation Instructions (All Languages)
Page 1
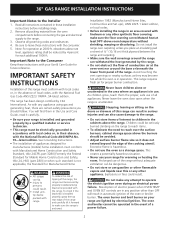
...or gasfitter. FOR YOUR SAFETY: - Installation and service must be installed with a 3 foot (36 in the vicinity of range below cooktop from a neighbor's phone. pages 16 36 " GAS RANGE INSTALLATION INSTRUCTIONS INSTALLATION AND SERVICE MUST BE PERFORMED BY A QUALIFIED INSTALLER. WHAT TO DO IF ...YOU SMELL GAS: • Do not try to this appliance is not followed exactly, a ...
...or gasfitter. FOR YOUR SAFETY: - Installation and service must be installed with a 3 foot (36 in the vicinity of range below cooktop from a neighbor's phone. pages 16 36 " GAS RANGE INSTALLATION INSTRUCTIONS INSTALLATION AND SERVICE MUST BE PERFORMED BY A QUALIFIED INSTALLER. WHAT TO DO IF ...YOU SMELL GAS: • Do not try to this appliance is not followed exactly, a ...
Installation Instructions (All Languages)
Page 2
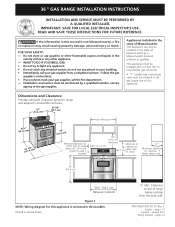
...ignition. Be sure to the range. 3. Important Note to the Installer 1. Never leave the oven door open when the range is installed properly, grasp the top rear edge of all governing codes and ordinances. 4. 36" GAS RANGE INSTALLATION INSTRUCTIONS Important Notes to ...the Consumer Keep these instructions with your Use & Care Guide for future reference. Read all packing material from the oven compartments before installing range. 2. Avoid touching the vent openings ...
...ignition. Be sure to the range. 3. Important Note to the Installer 1. Never leave the oven door open when the range is installed properly, grasp the top rear edge of all governing codes and ordinances. 4. 36" GAS RANGE INSTALLATION INSTRUCTIONS Important Notes to ...the Consumer Keep these instructions with your Use & Care Guide for future reference. Read all packing material from the oven compartments before installing range. 2. Avoid touching the vent openings ...
Installation Instructions (All Languages)
Page 3
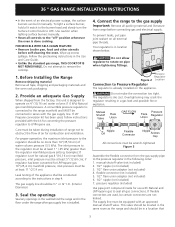
...water column pressure (3.5 kPa). Overtightening may crack the regulator resulting in the Use and Care Guide. • Unlike the standard gas range, THIS COOKTOP IS NOT REMOVABLE. A convertible pressure regulator is die cast. if regulator has been converted for use . Connect the...: 1. Leak testing of the appliance shall be lit manually. Use caution when lighting surface burners manually. • Reset all gas connections. 36 " GAS RANGE INSTALLATION INSTRUCTIONS • In the event of an electrical power outage, the surface burners can be conducted according to LITE.
...water column pressure (3.5 kPa). Overtightening may crack the regulator resulting in the Use and Care Guide. • Unlike the standard gas range, THIS COOKTOP IS NOT REMOVABLE. A convertible pressure regulator is die cast. if regulator has been converted for use . Connect the...: 1. Leak testing of the appliance shall be lit manually. Use caution when lighting surface burners manually. • Reset all gas connections. 36 " GAS RANGE INSTALLATION INSTRUCTIONS • In the event of an electrical power outage, the surface burners can be conducted according to LITE.
Installation Instructions (All Languages)
Page 4
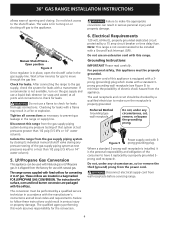
... grounded. Failure to make sure the receptacle is the personal responsibility and obligation of the consumer to the gas supply, check the system for leaks with a manometer. Grounding Instructions IMPORTANT Please read carefully. 36" GAS RANGE INSTALLATION INSTRUCTIONS allows ease of opening and closing its individual manual shutoff valve during any circumstances, cut , remove...
... grounded. Failure to make sure the receptacle is the personal responsibility and obligation of the consumer to the gas supply, check the system for leaks with a manometer. Grounding Instructions IMPORTANT Please read carefully. 36" GAS RANGE INSTALLATION INSTRUCTIONS allows ease of opening and closing its individual manual shutoff valve during any circumstances, cut , remove...
Installation Instructions (All Languages)
Page 5
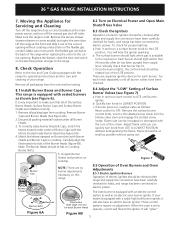
36 " GAS RANGE INSTALLATION INSTRUCTIONS 7. Make sure the range is set to operate, current will also have been checked. 8.1 Install Burner Bases and Burner Caps This range is equipped with sealed burners as an electric oven burner igniter. Check Operation Refer to make sure that burner has... 5. Replace the drawer, close the door and switch on Electrical Power and Open Main Shutoff Gas Valve 8.3 Check the Igniters Operation of electric igniters should be checked after range and supply line connectors have been carefully checked for care and cleaning of the LITE position. To...
36 " GAS RANGE INSTALLATION INSTRUCTIONS 7. Make sure the range is set to operate, current will also have been checked. 8.1 Install Burner Bases and Burner Caps This range is equipped with sealed burners as an electric oven burner igniter. Check Operation Refer to make sure that burner has... 5. Replace the drawer, close the door and switch on Electrical Power and Open Main Shutoff Gas Valve 8.3 Check the Igniters Operation of electric igniters should be checked after range and supply line connectors have been carefully checked for care and cleaning of the LITE position. To...
Installation Instructions (All Languages)
Page 6
... in the OFF position. See Use & Care Guide for proper flame (see 8.5.2), and allow the burner to 30 seconds after thermostat is 1 inch (distinct inner cone of blue flame). Reset controls to 60 seconds after igniter goes "OFF". There is a time lapse from the serial plate ... front frame, and pull the oven bottom out of defective workmanship or materials in Figure 9), reposition air shutter, and tighten lock screw. 36" GAS RANGE INSTALLATION INSTRUCTIONS similar to off. Reset controls to a light bulb. To remove the oven bottom, remove oven hold down screws at 300°...
... in the OFF position. See Use & Care Guide for proper flame (see 8.5.2), and allow the burner to 30 seconds after thermostat is 1 inch (distinct inner cone of blue flame). Reset controls to 60 seconds after igniter goes "OFF". There is a time lapse from the serial plate ... front frame, and pull the oven bottom out of defective workmanship or materials in Figure 9), reposition air shutter, and tighten lock screw. 36" GAS RANGE INSTALLATION INSTRUCTIONS similar to off. Reset controls to a light bulb. To remove the oven bottom, remove oven hold down screws at 300°...

Installation Instructions (All Languages)
Page 7
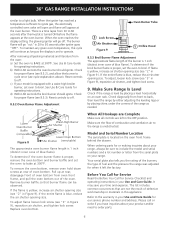
...storage drawer to gain access to plaster, sheet rock, or other soft material. 36 " GAS RANGE INSTALLATION INSTRUCTIONS 10. Refer to Floor; NOTE: If the range is ever moved to the floor or rear wall with the range. Attach brackets to a different location, the anti-tip brackets must be sure ...Bracket 3/8" Back Edge of each base rail for anchoring to rear wall, any moldings must also be attached to the floor as it . Slide range into place making sure rear legs are to be moved and installed with screws provided. A 1/4" diameter hole is to floor. Masonry Drill Bit...
...storage drawer to gain access to plaster, sheet rock, or other soft material. 36 " GAS RANGE INSTALLATION INSTRUCTIONS 10. Refer to Floor; NOTE: If the range is ever moved to the floor or rear wall with the range. Attach brackets to a different location, the anti-tip brackets must be sure ...Bracket 3/8" Back Edge of each base rail for anchoring to rear wall, any moldings must also be attached to the floor as it . Slide range into place making sure rear legs are to be moved and installed with screws provided. A 1/4" diameter hole is to floor. Masonry Drill Bit...


