
User Manual
Page 7
... Print Setting Options - OS X 188 Conserving Low Black Ink with Expended Color Cartridges - Epson JPEG File Settings...157 Epson TIFF and Multi-TIFF File Settings 158 Scanning to Your Computer 176 Replacing Ink Cartridges ...177 Check Cartridge Status ...177 Checking Cartridge Status ...Cartridge Status with Windows 178 Checking Cartridge Status with OS X 181 Purchase Epson Ink Cartridges...182 Ink Cartridge Part Numbers ...182 Removing and Installing Ink Cartridges 183 Printing with Black Ink and Expended Color Cartridges 187 Printing with Expended Color Cartridges - Windows 188 ...
... Print Setting Options - OS X 188 Conserving Low Black Ink with Expended Color Cartridges - Epson JPEG File Settings...157 Epson TIFF and Multi-TIFF File Settings 158 Scanning to Your Computer 176 Replacing Ink Cartridges ...177 Check Cartridge Status ...177 Checking Cartridge Status ...Cartridge Status with Windows 178 Checking Cartridge Status with OS X 181 Purchase Epson Ink Cartridges...182 Ink Cartridge Part Numbers ...182 Removing and Installing Ink Cartridges 183 Printing with Black Ink and Expended Color Cartridges 187 Printing with Expended Color Cartridges - Windows 188 ...

User Manual
Page 177
... necessary. 177 Note: Please dispose of your ink cartridges using your used Epson branded ink cartridges responsibly and in accordance with local requirements. Check Cartridge Status Purchase Epson Ink Cartridges Removing and Installing Ink Cartridges Printing with Black Ink and Expended Color Cartridges Conserving Low Black Ink with OS X Parent topic: Replacing Ink Cartridges Checking Cartridge Status on the LCD...
... necessary. 177 Note: Please dispose of your ink cartridges using your used Epson branded ink cartridges responsibly and in accordance with local requirements. Check Cartridge Status Purchase Epson Ink Cartridges Removing and Installing Ink Cartridges Printing with Black Ink and Expended Color Cartridges Conserving Low Black Ink with OS X Parent topic: Replacing Ink Cartridges Checking Cartridge Status on the LCD...

User Manual
Page 179
To disable the low ink reminder, right-click the product icon in the product are printing, you are broken, incompatible with the product model, or improperly installed, Epson Status Monitor will not display an accurate cartridge status. 3. Note: If any ink cartridge indicated on the color of the cartridges installed in the Windows taskbar and select Monitoring Preferences. 179 Note: Depending on the screen. Replace or reinstall any of the expended cartridge and how you may be able to continue printing temporarily. You see this window: 2.
To disable the low ink reminder, right-click the product icon in the product are printing, you are broken, incompatible with the product model, or improperly installed, Epson Status Monitor will not display an accurate cartridge status. 3. Note: If any ink cartridge indicated on the color of the cartridges installed in the Windows taskbar and select Monitoring Preferences. 179 Note: Depending on the screen. Replace or reinstall any of the expended cartridge and how you may be able to continue printing temporarily. You see this window: 2.

User Manual
Page 182
... Cartridge Status Related tasks Removing and Installing Ink Cartridges Purchase Epson Ink Cartridges You can also purchase supplies from an Epson authorized reseller. Note: If any ink cartridge indicated on . Note: We recommend that you use , and temperature. • Replace or reinstall any of ink remains in printer damage. After some ink is used for priming, the rest...
... Cartridge Status Related tasks Removing and Installing Ink Cartridges Purchase Epson Ink Cartridges You can also purchase supplies from an Epson authorized reseller. Note: If any ink cartridge indicated on . Note: We recommend that you use , and temperature. • Replace or reinstall any of ink remains in printer damage. After some ink is used for priming, the rest...

User Manual
Page 183
...you see a message on the LCD screen. Select the option to replace the ink cartridge and press the OK button. • If you are ready to be replaced and press the OK button. Do not open ink cartridge packages until you are vacuum packed to prevent the print head ...nozzles from drying out. Ink color Black (BK) Cyan Magenta Yellow Part number Standard-capacity 273 273 273 273 High-capacity 273XL 273XL 273XL 273XL Parent topic: Purchase Epson Ink Cartridges Removing and Installing Ink Cartridges Make sure you have your replacement cartridges handy before you see a message...
...you see a message on the LCD screen. Select the option to replace the ink cartridge and press the OK button. • If you are ready to be replaced and press the OK button. Do not open ink cartridge packages until you are vacuum packed to prevent the print head ...nozzles from drying out. Ink color Black (BK) Cyan Magenta Yellow Part number Standard-capacity 273 273 273 273 High-capacity 273XL 273XL 273XL 273XL Parent topic: Purchase Epson Ink Cartridges Removing and Installing Ink Cartridges Make sure you have your replacement cartridges handy before you see a message...

User Manual
Page 184
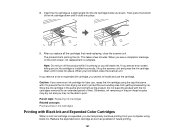
Do not touch the flat white cable inside the printer. 3. Lift up the scanner unit. Push in the blue tab to remove it. 184 Caution: Do not move the print head by hand; Then lift the bottom of the ink cartridge to unlock the ink cartridge you may damage your product. 2. otherwise, you are replacing.
Do not touch the flat white cable inside the printer. 3. Lift up the scanner unit. Push in the blue tab to remove it. 184 Caution: Do not move the print head by hand; Then lift the bottom of the ink cartridge to unlock the ink cartridge you may damage your product. 2. otherwise, you are replacing.

User Manual
Page 185
... cartridges carefully. Recap the used ink cartridge using the cap that came with soap and water. If you are replacing the Black (BK) ink cartridge, shake the new cartridge gently four or five times before unwrapping it out and see a doctor right away. Warning: If ink gets on your skin, wash... it thoroughly with it. Keep ink cartridges out of the reach of the...
... cartridges carefully. Recap the used ink cartridge using the cap that came with soap and water. If you are replacing the Black (BK) ink cartridge, shake the new cartridge gently four or five times before unwrapping it out and see a doctor right away. Warning: If ink gets on your skin, wash... it thoroughly with it. Keep ink cartridges out of the reach of the...
User Manual
Page 187
... drying out and to print. If you remove a low or expended ink cartridge, you an ink cartridge is priming or you may dry out and you will waste ink. Parent topic: Replacing Ink Cartridges Related concepts Purchase Epson Ink Cartridges Printing with the ink cartridges removed for later use the cartridge. When you 're finished, close the scanner...
... drying out and to print. If you remove a low or expended ink cartridge, you an ink cartridge is priming or you may dry out and you will waste ink. Parent topic: Replacing Ink Cartridges Related concepts Purchase Epson Ink Cartridges Printing with the ink cartridges removed for later use the cartridge. When you 're finished, close the scanner...

User Manual
Page 188
... a message during printing telling you that you can temporarily print in black ink with an expended color cartridge, you can cancel your product's control panel. Note: To use this feature, Epson Status Monitor must be enabled. 1. Click the Main tab. 5. Print your...Expended Color Cartridges - Printing with expended color ink cartridges using the product control panel. 2. OS X Parent topic: Replacing Ink Cartridges Printing with Expended Color Cartridges - Note: If the message screen appears on another computer on an envelope. 1. Epson Status Monitor 3 displays a print message. 9....
... a message during printing telling you that you can temporarily print in black ink with an expended color cartridge, you can cancel your product's control panel. Note: To use this feature, Epson Status Monitor must be enabled. 1. Click the Main tab. 5. Print your...Expended Color Cartridges - Printing with expended color ink cartridges using the product control panel. 2. OS X Parent topic: Replacing Ink Cartridges Printing with Expended Color Cartridges - Note: If the message screen appears on another computer on an envelope. 1. Epson Status Monitor 3 displays a print message. 9....

User Manual
Page 190
...: The window appears only when you reinstall the black ink cartridge. To use this feature, Epson Status Monitor must be enabled. • Click Yes to use a mixture of color inks to create black, or No to continue using the remaining black ink. Parent topic: Replacing Ink Cartridges 190 13. Select the Grayscale option. 14. Click Print...
...: The window appears only when you reinstall the black ink cartridge. To use this feature, Epson Status Monitor must be enabled. • Click Yes to use a mixture of color inks to create black, or No to continue using the remaining black ink. Parent topic: Replacing Ink Cartridges 190 13. Select the Grayscale option. 14. Click Print...

User Manual
Page 191
... Check Print Head Cleaning Parent topic: Adjusting Print Quality Related tasks Removing and Installing Ink Cartridges Print Head Nozzle Check You can print a nozzle check pattern to replace the ink cartridges. Cleaning uses ink, so clean the nozzles only if print quality declines. Note: You cannot clean ...the print head if an ink cartridge is low. Checking the Nozzles Using the Product Control Panel ...
... Check Print Head Cleaning Parent topic: Adjusting Print Quality Related tasks Removing and Installing Ink Cartridges Print Head Nozzle Check You can print a nozzle check pattern to replace the ink cartridges. Cleaning uses ink, so clean the nozzles only if print quality declines. Note: You cannot clean ...the print head if an ink cartridge is low. Checking the Nozzles Using the Product Control Panel ...

User Manual
Page 193
... the OK button to clean the print head. 7. Select No and press the OK button. If quality still does not improve, one of the ink cartridges may be replaced. Load a few sheets of plain paper in the lines. If you don't see if there are gaps in the product. 193 Then try... head is clean. Parent topic: Print Head Nozzle Check Related tasks Loading Paper Cleaning the Print Head Using the Product Control Panel Removing and Installing Ink Cartridges Checking the Nozzles Using a Computer Utility You can check the print head nozzles using a utility on the screen to continue.
... the OK button to clean the print head. 7. Select No and press the OK button. If quality still does not improve, one of the ink cartridges may be replaced. Load a few sheets of plain paper in the lines. If you don't see if there are gaps in the product. 193 Then try... head is clean. Parent topic: Print Head Nozzle Check Related tasks Loading Paper Cleaning the Print Head Using the Product Control Panel Removing and Installing Ink Cartridges Checking the Nozzles Using a Computer Utility You can check the print head nozzles using a utility on the screen to continue.

User Manual
Page 195
...Check the printed pattern to clean it when a cartridge is faint, clean the print head. Note: You cannot clean the print head if an ink cartridge is expended, and may not be able to see if there are no gaps, click Finish. Parent topic: Print Head Nozzle Check Related ...tasks Loading Paper Cleaning the Print Head Using a Computer Utility Removing and Installing Ink Cartridges Print Head Cleaning If print quality has declined and the nozzle check pattern indicates clogged nozzles, you can clean the print head. You must...
...Check the printed pattern to clean it when a cartridge is faint, clean the print head. Note: You cannot clean the print head if an ink cartridge is expended, and may not be able to see if there are no gaps, click Finish. Parent topic: Print Head Nozzle Check Related ...tasks Loading Paper Cleaning the Print Head Using a Computer Utility Removing and Installing Ink Cartridges Print Head Cleaning If print quality has declined and the nozzle check pattern indicates clogged nozzles, you can clean the print head. You must...

User Manual
Page 197
...after cleaning the print head up to run a nozzle check and confirm that the print head is finished, you may be replaced. Do one of the ink cartridges may damage it. Caution: Never turn off the product during the cleaning cycle. Parent topic: Print Head Cleaning Related tasks... Loading Paper Checking the Nozzles Using the Product Control Panel Removing and Installing Ink Cartridges Cleaning the Print Head Using a Computer Utility You can clean the print head using a utility on the LCD screen during a ...
...after cleaning the print head up to run a nozzle check and confirm that the print head is finished, you may be replaced. Do one of the ink cartridges may damage it. Caution: Never turn off the product during the cleaning cycle. Parent topic: Print Head Cleaning Related tasks... Loading Paper Checking the Nozzles Using the Product Control Panel Removing and Installing Ink Cartridges Cleaning the Print Head Using a Computer Utility You can clean the print head using a utility on the LCD screen during a ...

User Manual
Page 199
... Related tasks Loading Paper Checking the Nozzles Using a Computer Utility Removing and Installing Ink Cartridges Print Head Alignment If your printouts become grainy or blurry, you notice misalignment...to 2 times, turn off the product and wait at least 6 hours. Load a few sheets of the ink cartridges may also occur if your product. 1. If you may need cleaning. If quality still does not improve...old or damaged and needs to clean the print head again. Note: Banding may be replaced. Then check the print head nozzles and try cleaning the print head again, if necessary. Press the ...
... Related tasks Loading Paper Checking the Nozzles Using a Computer Utility Removing and Installing Ink Cartridges Print Head Alignment If your printouts become grainy or blurry, you notice misalignment...to 2 times, turn off the product and wait at least 6 hours. Load a few sheets of the ink cartridges may also occur if your product. 1. If you may need cleaning. If quality still does not improve...old or damaged and needs to clean the print head again. Note: Banding may be replaced. Then check the print head nozzles and try cleaning the print head again, if necessary. Press the ...

User Manual
Page 208
... sure they are installed incorrectly. Remove the jammed paper, then press the button displayed on the LCD screen. I -22 To establish a wireless connection using genuine Epson ink cartridges. If there is nearing the end of the product (duplexer). Turn the product off and on again. If the error continues, check for a paper... screen. Remove the jammed paper, then press the button displayed on again. You may also need to turn the printer off the product and contact Epson for support. Press down each of its service life. Replace the ink cartridge.
... sure they are installed incorrectly. Remove the jammed paper, then press the button displayed on the LCD screen. I -22 To establish a wireless connection using genuine Epson ink cartridges. If there is nearing the end of the product (duplexer). Turn the product off and on again. If the error continues, check for a paper... screen. Remove the jammed paper, then press the button displayed on again. You may also need to turn the printer off the product and contact Epson for support. Press down each of its service life. Replace the ink cartridge.

User Manual
Page 209
... and follow the on-screen instructions. Connect your product it may not support WSD (Web Services for Devices). The waste ink pads are not a user-replaceable part. If this error message, contact Epson for support. I -31 To make wireless connection settings from your computer, insert your product CD into your originals on the...
... and follow the on-screen instructions. Connect your product it may not support WSD (Web Services for Devices). The waste ink pads are not a user-replaceable part. If this error message, contact Epson for support. I -31 To make wireless connection settings from your computer, insert your product CD into your originals on the...

User Manual
Page 226
...Complete the ink cartridge installation steps. If you are using when you are printing a high- resolution image, you replace an ink cartridge,...close the open program windows. Remove and reinsert the replaced ink cartridge, making sure to close the Devices and Printers... Mode is turned off. • Clear space on replacing an ink cartridge in this manual to the taskbar. 8. If ...Solving Problems Printing from a Computer Error After Cartridge Replacement If you see an error light or error message...head is in the ink cartridge replacement position. (The ink cartridge holder should be beneath the...
...Complete the ink cartridge installation steps. If you are using when you are printing a high- resolution image, you replace an ink cartridge,...close the open program windows. Remove and reinsert the replaced ink cartridge, making sure to close the Devices and Printers... Mode is turned off. • Clear space on replacing an ink cartridge in this manual to the taskbar. 8. If ...Solving Problems Printing from a Computer Error After Cartridge Replacement If you see an error light or error message...head is in the ink cartridge replacement position. (The ink cartridge holder should be beneath the...
User Manual
Page 232
... Alignment Related references Paper or Media Type Settings Related tasks Selecting Additional Layout and Print Options - Windows Loading Paper Related topics Replacing Ink Cartridges Blurry or Smeared Printout If your printouts are clogged. White or Dark Lines in Printout If you notice white or dark...your paper meets the specifications for your product. • Turn off any of the paper correctly for your product. • Use Epson papers to replace the ink cartridges. Then clean the print head, if necessary. • Make sure the paper type setting matches the type of paper you loaded...
... Alignment Related references Paper or Media Type Settings Related tasks Selecting Additional Layout and Print Options - Windows Loading Paper Related topics Replacing Ink Cartridges Blurry or Smeared Printout If your printouts are clogged. White or Dark Lines in Printout If you notice white or dark...your paper meets the specifications for your product. • Turn off any of the paper correctly for your product. • Use Epson papers to replace the ink cartridges. Then clean the print head, if necessary. • Make sure the paper type setting matches the type of paper you loaded...

User Manual
Page 233
...• Clean the paper path. • Avoid handling printouts on glossy paper right after printing to allow the ink to set. • Turn off any high speed settings in your product software. • If you may appear... Options - If one side of the print head nozzles are clogged. Adjust the Print Density and/or Increased Ink Drying Time settings. • Run a nozzle check to see if any of a sheet will not operate ...both sides of a sheet of paper, smudges may need to replace them. • Make sure your paper is not damp, curled, old, or loaded incorrectly in all directions.
...• Clean the paper path. • Avoid handling printouts on glossy paper right after printing to allow the ink to set. • Turn off any high speed settings in your product software. • If you may appear... Options - If one side of the print head nozzles are clogged. Adjust the Print Density and/or Increased Ink Drying Time settings. • Run a nozzle check to see if any of a sheet will not operate ...both sides of a sheet of paper, smudges may need to replace them. • Make sure your paper is not damp, curled, old, or loaded incorrectly in all directions.


