
User Manual
Page 4
... 37 Connecting to a New Wi-Fi Router 37 Disabling Wi-Fi Features ...38 Loading Paper ...39 Loading Paper for Documents ...39 Loading Paper for Photos ...42 Loading Envelopes ...45 Paper Loading Capacity ...48 Available EPSON Papers...49 Borderless Paper Type Compatibility 50 Paper or Media Type Settings ...51 Placing Originals on the Product ...52 Placing Originals on the...
... 37 Connecting to a New Wi-Fi Router 37 Disabling Wi-Fi Features ...38 Loading Paper ...39 Loading Paper for Documents ...39 Loading Paper for Photos ...42 Loading Envelopes ...45 Paper Loading Capacity ...48 Available EPSON Papers...49 Borderless Paper Type Compatibility 50 Paper or Media Type Settings ...51 Placing Originals on the Product ...52 Placing Originals on the...

User Manual
Page 7
... ...180 Aligning the Print Head Using the Product Control Panel 181 Aligning the Print Head Using a Computer Utility 183 Cleaning the Paper Path ...184 Cleaning and Transporting Your Product 186 Cleaning Your Product ...186 Transporting Your Product ...186 7 Windows 168 Printing With ...Expended Color Cartridges - Mac OS X 168 Conserving Low Black Ink with Mac OS X 158 Purchase Epson Ink Cartridges...160 Ink Cartridge Part Numbers ...160 Removing and Installing Ink Cartridges 161 Replacing Ink Cartridges Using a Computer Utility 166 Printing ...
... ...180 Aligning the Print Head Using the Product Control Panel 181 Aligning the Print Head Using a Computer Utility 183 Cleaning the Paper Path ...184 Cleaning and Transporting Your Product 186 Cleaning Your Product ...186 Transporting Your Product ...186 7 Windows 168 Printing With ...Expended Color Cartridges - Mac OS X 168 Conserving Low Black Ink with Mac OS X 158 Purchase Epson Ink Cartridges...160 Ink Cartridge Part Numbers ...160 Removing and Installing Ink Cartridges 161 Replacing Ink Cartridges Using a Computer Utility 166 Printing ...
User Manual
Page 8
... Solving Copying Problems ...199 Product Makes Noise, But Nothing Copies 199 Product Makes Noise When It Sits for a While 200 Solving Paper Problems...200 Paper Feeding Problems...200 Paper Jam Problems ...201 Paper Ejection Problems ...202 Solving Problems Printing from a Computer 202 Nothing Prints ...203 Product Icon Does Not Appear in Windows Taskbar 204...
... Solving Copying Problems ...199 Product Makes Noise, But Nothing Copies 199 Product Makes Noise When It Sits for a While 200 Solving Paper Problems...200 Paper Feeding Problems...200 Paper Jam Problems ...201 Paper Ejection Problems ...202 Solving Problems Printing from a Computer 202 Nothing Prints ...203 Product Icon Does Not Appear in Windows Taskbar 204...
User Manual
Page 10
Technical Specifications ...225 Windows System Requirements ...225 Mac System Requirements ...226 Printing Specifications ...226 Scanning Specifications ...226 Paper Specifications ...227 Printable Area Specifications ...228 Ink Cartridge Specifications...229 Memory Card Specifications ...230 Dimension Specifications ...231 Electrical Specifications ...231 Environmental Specifications ... Notice...242 libTIFF Software Acknowledgment 243 A Note Concerning Responsible Use of Copyrighted Materials 243 Default Delay Times for Power Management for Epson Products 243 Copyright Attribution ...244 10
Technical Specifications ...225 Windows System Requirements ...225 Mac System Requirements ...226 Printing Specifications ...226 Scanning Specifications ...226 Paper Specifications ...227 Printable Area Specifications ...228 Ink Cartridge Specifications...229 Memory Card Specifications ...230 Dimension Specifications ...231 Electrical Specifications ...231 Environmental Specifications ... Notice...242 libTIFF Software Acknowledgment 243 A Note Concerning Responsible Use of Copyrighted Materials 243 Default Delay Times for Power Management for Epson Products 243 Copyright Attribution ...244 10

User Manual
Page 15
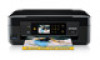
Product Parts - Top Product Parts - Top 1 Sheet feeder 2 Paper support 3 Output tray 4 Paper stopper 5 Feeder guard 6 Edge guide 15 Product Parts Locations See these sections to identify the parts on your product. Back Parent topic: Product Basics Product Parts - Inside Product Parts -
Product Parts - Top Product Parts - Top 1 Sheet feeder 2 Paper support 3 Output tray 4 Paper stopper 5 Feeder guard 6 Edge guide 15 Product Parts Locations See these sections to identify the parts on your product. Back Parent topic: Product Basics Product Parts - Inside Product Parts -

User Manual
Page 39
Loading Paper for Documents Loading Paper for Photos Loading Envelopes Paper Loading Capacity Available EPSON Papers Borderless Paper Type Compatibility Paper or Media Type Settings Loading Paper for the type of paper types and sizes. 1. Pull up the paper support and its extension. 39 Loading Paper Before you print, load paper for Documents You can print documents on a variety of printing you will do. Flip the feeder guard forward. 2.
Loading Paper for Documents Loading Paper for Photos Loading Envelopes Paper Loading Capacity Available EPSON Papers Borderless Paper Type Compatibility Paper or Media Type Settings Loading Paper for the type of paper types and sizes. 1. Pull up the paper support and its extension. 39 Loading Paper Before you print, load paper for Documents You can print documents on a variety of printing you will do. Flip the feeder guard forward. 2.

User Manual
Page 40
Pull out the output tray and open the paper stopper on legal-size or longer paper, leave the paper stopper closed. 4. Note: If you are inserting a stack of paper, fan the sheets first and tap the stack on a flat surface to even the edges. 40 If you print on the end. Slide the edge guide left. 5. 3.
Pull out the output tray and open the paper stopper on legal-size or longer paper, leave the paper stopper closed. 4. Note: If you are inserting a stack of paper, fan the sheets first and tap the stack on a flat surface to even the edges. 40 If you print on the end. Slide the edge guide left. 5. 3.

User Manual
Page 41
Slide the edge guide against the right side and beneath the line on the left edge guide. 7. Always follow these paper loading guidelines: • Load only the recommended number of sheets. 41 Flip the feeder guard back. Insert paper, glossy or printable side up and short edge first, against the paper, but not too tightly. 8. 6.
Slide the edge guide against the right side and beneath the line on the left edge guide. 7. Always follow these paper loading guidelines: • Load only the recommended number of sheets. 41 Flip the feeder guard back. Insert paper, glossy or printable side up and short edge first, against the paper, but not too tightly. 8. 6.

User Manual
Page 42
• Load paper short edge first, no matter which way your document faces. • Load letterhead or pre-printed paper top edge first. • Do not load paper past the line on a variety of paper types and sizes. 1. Parent topic: Loading Paper Related references Paper Loading Capacity Loading Paper for Photos You can print photos on the left edge guide. • Check the paper package for any additional loading instructions. Flip the feeder guard forward. 2. Pull up the paper support and its extension. 42
• Load paper short edge first, no matter which way your document faces. • Load letterhead or pre-printed paper top edge first. • Do not load paper past the line on a variety of paper types and sizes. 1. Parent topic: Loading Paper Related references Paper Loading Capacity Loading Paper for Photos You can print photos on the left edge guide. • Check the paper package for any additional loading instructions. Flip the feeder guard forward. 2. Pull up the paper support and its extension. 42

User Manual
Page 43
Slide the edge guide left. 5. If you are inserting a stack of paper, fan the sheets first and tap the stack on the end. 4. Pull out the output tray and open the paper stopper on a flat surface to even the edges. 43 3.
Slide the edge guide left. 5. If you are inserting a stack of paper, fan the sheets first and tap the stack on the end. 4. Pull out the output tray and open the paper stopper on a flat surface to even the edges. 43 3.

User Manual
Page 44
Flip the feeder guard back. Always follow these paper loading guidelines: • Load only the recommended number of sheets. 44 Insert paper, glossy or printable side up and short edge first, against the paper, but not too tightly. 8. Slide the edge guide against the right side and beneath the line on the left edge guide. 7. 6.
Flip the feeder guard back. Always follow these paper loading guidelines: • Load only the recommended number of sheets. 44 Insert paper, glossy or printable side up and short edge first, against the paper, but not too tightly. 8. Slide the edge guide against the right side and beneath the line on the left edge guide. 7. 6.

User Manual
Page 45
Parent topic: Loading Paper Related references Paper Loading Capacity Loading Envelopes You can print on the left edge guide. • Check the paper package for any additional loading instructions. Flip the feeder guard forward. 2. • Load paper short edge first, no matter which way your photo faces. • Do not load paper past the line on plain paper envelopes in this size: No. 10 (4.1 × 9.5 inches [105 × 241 mm]). 1. Pull up the paper support and its extension. 45
Parent topic: Loading Paper Related references Paper Loading Capacity Loading Envelopes You can print on the left edge guide. • Check the paper package for any additional loading instructions. Flip the feeder guard forward. 2. • Load paper short edge first, no matter which way your photo faces. • Do not load paper past the line on plain paper envelopes in this size: No. 10 (4.1 × 9.5 inches [105 × 241 mm]). 1. Pull up the paper support and its extension. 45

User Manual
Page 46
Pull out the output tray and open the paper stopper on the end. 4. Slide the edge guide left. 46 3.
Pull out the output tray and open the paper stopper on the end. 4. Slide the edge guide left. 46 3.

User Manual
Page 47
Load up and flap edge left. 6. Parent topic: Loading Paper 47 5. Slide the edge guide against the right side. Flip the feeder guard back. Load them printable side up to 10 envelopes against the envelopes, but not too tightly. 7. Always follow these envelope loading guidelines: • If you have trouble loading a stack of envelopes, press each envelope flat before loading it or load one envelope at a time. • Do not load envelopes above the arrow mark inside the edge guide. • Do not load envelopes that are curled, folded, or too thin.
Load up and flap edge left. 6. Parent topic: Loading Paper 47 5. Slide the edge guide against the right side. Flip the feeder guard back. Load them printable side up to 10 envelopes against the envelopes, but not too tightly. 7. Always follow these envelope loading guidelines: • If you have trouble loading a stack of envelopes, press each envelope flat before loading it or load one envelope at a time. • Do not load envelopes above the arrow mark inside the edge guide. • Do not load envelopes that are curled, folded, or too thin.

User Manual
Page 48
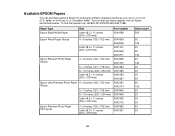
... mm])* Approximately 100 sheets** Epson Bright White Paper 80 sheets Epson Presentation Paper Matte Epson Photo Paper Glossy 20 sheets Epson Premium Photo Paper Glossy Epson Ultra Premium Photo Paper Glossy Epson Premium Photo Paper Semi-gloss Plain paper - Parent topic: Loading Paper Related references Available EPSON Papers 48 Paper Loading Capacity Paper type Load up to this many sheets Plain paper - Do not load paper past the line inside...
... mm])* Approximately 100 sheets** Epson Bright White Paper 80 sheets Epson Presentation Paper Matte Epson Photo Paper Glossy 20 sheets Epson Premium Photo Paper Glossy Epson Ultra Premium Photo Paper Glossy Epson Premium Photo Paper Semi-gloss Plain paper - Parent topic: Loading Paper Related references Available EPSON Papers 48 Paper Loading Capacity Paper type Load up to this many sheets Plain paper - Do not load paper past the line inside...
User Manual
Page 49
sales) or www.epson.ca (Canadian sales). Paper Type Epson Bright White Paper Epson Photo Paper Glossy Size Letter (8.5 × 11 inches [216 × 279 mm]) 4 × 6 inches (102 × 152 mm) Letter (8.5 × 11 inches [216 × 279 mm]) Epson Premium Photo Paper Glossy 4 × 6 inches (102 × 152 mm) 5 ×... (127 × 178 mm) 8 × 10 inches (203 × 254 mm) Letter (8.5 × 11 inches [216 × 279 mm]) Epson Premium Photo Paper Semi-gloss 4 × 6 inches (102 × 152 mm) Letter (8.5 × 11 inches [216 × 279 mm]) Part number S041586 S041809 ...
sales) or www.epson.ca (Canadian sales). Paper Type Epson Bright White Paper Epson Photo Paper Glossy Size Letter (8.5 × 11 inches [216 × 279 mm]) 4 × 6 inches (102 × 152 mm) Letter (8.5 × 11 inches [216 × 279 mm]) Epson Premium Photo Paper Glossy 4 × 6 inches (102 × 152 mm) 5 ×... (127 × 178 mm) 8 × 10 inches (203 × 254 mm) Letter (8.5 × 11 inches [216 × 279 mm]) Epson Premium Photo Paper Semi-gloss 4 × 6 inches (102 × 152 mm) Letter (8.5 × 11 inches [216 × 279 mm]) Part number S041586 S041809 ...

User Manual
Page 51
... Paper Epson Bright White Paper Epson Presentation Paper Matte Epson Iron-on Cool Peel Transfer paper Epson Photo Quality Self-adhesive Sheets Epson Ultra Premium Photo Paper Glossy Ultra Premium Photo Paper Glossy Epson Premium Photo Paper Glossy Premium Photo Paper Glossy Epson Photo Paper Glossy Photo Paper Glossy Epson Premium Photo Paper Semi-gloss Premium Photo Paper Semi-Gloss Epson Premium Presentation Paper Matte Premium Presentation Paper Matte Epson Premium Presentation Paper Matte Doublesided Epson...
... Paper Epson Bright White Paper Epson Presentation Paper Matte Epson Iron-on Cool Peel Transfer paper Epson Photo Quality Self-adhesive Sheets Epson Ultra Premium Photo Paper Glossy Ultra Premium Photo Paper Glossy Epson Premium Photo Paper Glossy Premium Photo Paper Glossy Epson Photo Paper Glossy Photo Paper Glossy Epson Premium Photo Paper Semi-gloss Premium Photo Paper Semi-Gloss Epson Premium Presentation Paper Matte Premium Presentation Paper Matte Epson Premium Presentation Paper Matte Doublesided Epson...

User Manual
Page 54
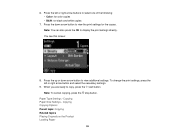
... the left or right arrow buttons, select Copy, and press the OK button. Place your original document or photo on in the product. 3. Load the paper you want to 99). 54 You see this screen: 5. Copying Documents or Photos Copying and Restoring Photos Copying Documents or Photos You can copy color...
... the left or right arrow buttons, select Copy, and press the OK button. Place your original document or photo on in the product. 3. Load the paper you want to 99). 54 You see this screen: 5. Copying Documents or Photos Copying and Restoring Photos Copying Documents or Photos You can copy color...
User Manual
Page 55
... screen: 8. When you are ready to display the print settings directly. Note: To cancel copying, press the stop button. Copying Paper Size Settings - Press the down arrow button to view additional settings. Paper Type Settings - 6. Note: You can also press the OK to copy, press the start button. To change the print... the following: • Color: for color copies • B&W: for the copies. Copying Copying Options Parent topic: Copying Related topics Placing Originals on the Product Loading Paper 55 Press the left or right arrow button and select the necessary settings. 9.
... screen: 8. When you are ready to display the print settings directly. Note: To cancel copying, press the stop button. Copying Paper Size Settings - Press the down arrow button to view additional settings. Paper Type Settings - 6. Note: You can also press the OK to copy, press the start button. To change the print... the following: • Color: for color copies • B&W: for the copies. Copying Copying Options Parent topic: Copying Related topics Placing Originals on the Product Loading Paper 55 Press the left or right arrow button and select the necessary settings. 9.

User Manual
Page 56
... Transfer paper Epson Photo Quality Self-adhesive Sheets Epson Brochure & Flyer Paper Matte Double-sided Epson Photo Paper Glossy Epson Premium Presentation Paper Matte Epson Premium Photo Paper Glossy Epson Premium Photo Paper Semi-gloss Epson Ultra Premium Photo Paper Glossy Epson Ultra Premium Presentation Paper Matte Paper Type setting Plain Paper Photo Paper Parent topic: Copying Documents or Photos Paper Size Settings - Paper type loaded Plain paper Epson Bright White Paper Epson Presentation Paper Matte Epson...
... Transfer paper Epson Photo Quality Self-adhesive Sheets Epson Brochure & Flyer Paper Matte Double-sided Epson Photo Paper Glossy Epson Premium Presentation Paper Matte Epson Premium Photo Paper Glossy Epson Premium Photo Paper Semi-gloss Epson Ultra Premium Photo Paper Glossy Epson Ultra Premium Presentation Paper Matte Paper Type setting Plain Paper Photo Paper Parent topic: Copying Documents or Photos Paper Size Settings - Paper type loaded Plain paper Epson Bright White Paper Epson Presentation Paper Matte Epson...


