User Manual
Page 5
... Starting a Scan Using the Product Control Panel 88 Changing Default Scan Button Settings 90 Starting a Scan Using the Epson Scan Icon 90 Starting a Scan from a Scanning Program 92 Selecting Epson Scan Settings ...94 Scan Modes...94 Selecting the Scan Mode...95 Scanning in Office Mode...107 5 Home Mode 105... Print Status - Mac OS X ...80 Selecting Page Setup Settings - Home Mode 104 Selecting a Scan Size - Windows 72 Changing the Language of the Printer Software Screens 73 Changing Automatic Update Options 75 Printing with Mac OS X...75 Selecting Basic Print Settings -
... Starting a Scan Using the Product Control Panel 88 Changing Default Scan Button Settings 90 Starting a Scan Using the Epson Scan Icon 90 Starting a Scan from a Scanning Program 92 Selecting Epson Scan Settings ...94 Scan Modes...94 Selecting the Scan Mode...95 Scanning in Office Mode...107 5 Home Mode 105... Print Status - Mac OS X ...80 Selecting Page Setup Settings - Home Mode 104 Selecting a Scan Size - Windows 72 Changing the Language of the Printer Software Screens 73 Changing Automatic Update Options 75 Printing with Mac OS X...75 Selecting Basic Print Settings -
User Manual
Page 8
... Product Cannot Connect to a Wireless Router or Access Point 195 Network Software Cannot Find Product on a Network 196 Product Does Not Appear in Mac OS X Printer Window 197 Cannot Print Over a Network...198 Cannot Scan Over a Network ...198 Solving Copying Problems ...199 Product Makes Noise, But Nothing Copies 199 Product Makes...
... Product Cannot Connect to a Wireless Router or Access Point 195 Network Software Cannot Find Product on a Network 196 Product Does Not Appear in Mac OS X Printer Window 197 Cannot Print Over a Network...198 Cannot Scan Over a Network ...198 Solving Copying Problems ...199 Product Makes Noise, But Nothing Copies 199 Product Makes...

User Manual
Page 14
... arrow buttons to select a language and press the OK button. 6. Press the home button to exit. Press the up or down arrow buttons to select Printer Setup and press the OK button. Press the up or down arrow buttons to select Setup and press the OK button. 3. Press the up or... down arrow buttons to select Printer Setup and press the OK button. 4. Press the home button to exit. Press the left or right arrow buttons to select Language and press the...
... arrow buttons to select a language and press the OK button. 6. Press the home button to exit. Press the up or down arrow buttons to select Printer Setup and press the OK button. Press the up or down arrow buttons to select Setup and press the OK button. 3. Press the up or... down arrow buttons to select Printer Setup and press the OK button. 4. Press the home button to exit. Press the left or right arrow buttons to select Language and press the...

User Manual
Page 18
... OS X Parent topic: Product Basics Changing the Power Off and Sleep Timer Settings From the Control Panel You can adjust the time period before the printer turns off automatically if it is not used for a period of time. You can use the product's control panel to change the time period before...
... OS X Parent topic: Product Basics Changing the Power Off and Sleep Timer Settings From the Control Panel You can adjust the time period before the printer turns off automatically if it is not used for a period of time. You can use the product's control panel to change the time period before...

User Manual
Page 19
To change the Power Off Timer setting, press the up or down arrow buttons to select the time period you want, then press the OK button. 19 Press the left or right arrow buttons to select Power Off Timer and press the OK button. Press the up or down arrow buttons to select Printer Setup and press the OK button. You see this screen: 5. You see this screen: 4. Press the up or down arrow buttons to select Setup and press the OK button. 3. 2.
To change the Power Off Timer setting, press the up or down arrow buttons to select the time period you want, then press the OK button. 19 Press the left or right arrow buttons to select Power Off Timer and press the OK button. Press the up or down arrow buttons to select Printer Setup and press the OK button. You see this screen: 5. You see this screen: 4. Press the up or down arrow buttons to select Setup and press the OK button. 3. 2.
User Manual
Page 20
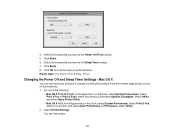
You see this screen: 7. Right-click the product icon in the Windows taskbar and select Printer Settings. 2. Windows You can use the printer software to exit. You see this window: 20 6. Press the home to change the Sleep Timer setting, press the up or down arrow buttons ...the OK button. 8. Parent topic: The Power Off and Sleep Timers Changing the Power Off and Sleep Timer Settings - Click the Maintenance tab. 3. Click the Printer and Option Information button. Press the up or down arrow buttons to select Sleep Timer and press the OK button. To change the time period...
You see this screen: 7. Right-click the product icon in the Windows taskbar and select Printer Settings. 2. Windows You can use the printer software to exit. You see this window: 20 6. Press the home to change the Sleep Timer setting, press the up or down arrow buttons ...the OK button. 8. Parent topic: The Power Off and Sleep Timers Changing the Power Off and Sleep Timer Settings - Click the Maintenance tab. 3. Click the Printer and Option Information button. Press the up or down arrow buttons to select Sleep Timer and press the OK button. To change the time period...
User Manual
Page 21
... to close the open program windows. Select Print & Fax, select your product, and select Options & Supplies. Select Utility and select Open Printer Utility. • Mac OS X 10.5: In the Apple menu or the Dock, select System Preferences. Select Utility. 2. Do one of the following: ...10.8: In the Apple menu or the Dock, select System Preferences. 4. Select the time period you want as the Sleep Timer setting. 7. Select Printer Settings. Select the time period you want as the Power Off Timer setting. 5. Parent topic: The Power Off and Sleep Timers Changing the Power...
... to close the open program windows. Select Print & Fax, select your product, and select Options & Supplies. Select Utility and select Open Printer Utility. • Mac OS X 10.5: In the Apple menu or the Dock, select System Preferences. Select Utility. 2. Do one of the following: ...10.8: In the Apple menu or the Dock, select System Preferences. 4. Select the time period you want as the Sleep Timer setting. 7. Select Printer Settings. Select the time period you want as the Power Off Timer setting. 5. Parent topic: The Power Off and Sleep Timers Changing the Power...
User Manual
Page 22
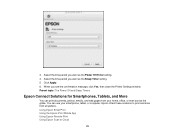
..., or even across the globe. Click Apply. 6. You can print documents, photos, emails, and web pages from anywhere:. Using Epson Email Print Using the Epson iPrint Mobile App Using Epson Remote Print Using Epson Scan to print and scan from your smartphone, tablet, or computer. Select the time period you want as the Power... Off Timer setting. 4. 3. Select the time period you want as the Sleep Timer setting. 5. When you see the confirmation message, click Yes, then close the Printer Settings window. Epson offers these solutions to Cloud 22
..., or even across the globe. Click Apply. 6. You can print documents, photos, emails, and web pages from anywhere:. Using Epson Email Print Using the Epson iPrint Mobile App Using Epson Remote Print Using Epson Scan to print and scan from your smartphone, tablet, or computer. Select the time period you want as the Power... Off Timer setting. 4. 3. Select the time period you want as the Sleep Timer setting. 5. When you see the confirmation message, click Yes, then close the Printer Settings window. Epson offers these solutions to Cloud 22
User Manual
Page 24
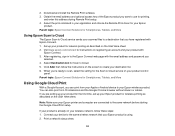
...Tablets, and More Using Google Cloud Print With a Google Account, you have registered with Epson Connect. 3. Note: Make sure your Epson printer and computer are setting up your product for the first time, set up your Epson product. Print a network status sheet. 24 Select the print command in to the... Epson Connect web page with the email address and password you selected. 4. You can ...
...Tablets, and More Using Google Cloud Print With a Google Account, you have registered with Epson Connect. 3. Note: Make sure your Epson printer and computer are setting up your product for the first time, set up your Epson product. Print a network status sheet. 24 Select the print command in to the... Epson Connect web page with the email address and password you selected. 4. You can ...
User Manual
Page 25
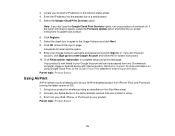
... an account, click Sign up your Google Account and can be accessed from any Chromebook, computer, Apple or Android device with internet access. Visit Epson Support for more information on using . 3. Parent topic: Product Basics 25 Locate your product. 6. Select the check box to agree to complete ... iPad, iPhone, or iPod touch to the same wireless network that your product off and back on the Start Here sheet. 2. Click Finish printer registration to the Usage Advisory and click Next. 8. Parent topic: Product Basics Using AirPrint AirPrint allows you don't see the Google Cloud Print...
... an account, click Sign up your Google Account and can be accessed from any Chromebook, computer, Apple or Android device with internet access. Visit Epson Support for more information on using . 3. Parent topic: Product Basics 25 Locate your product. 6. Select the check box to agree to complete ... iPad, iPhone, or iPod touch to the same wireless network that your product off and back on the Start Here sheet. 2. Click Finish printer registration to the Usage Advisory and click Next. 8. Parent topic: Product Basics Using AirPrint AirPrint allows you don't see the Google Cloud Print...

User Manual
Page 57
..., depending on other copying settings. Load photo paper in faded photos as the Custom Size setting Selects the paper size for the copy printout Adjusts printer settings for the selected paper type Provides best quality for photo copies Provides good quality for most copies Provides lower quality for your copies.
..., depending on other copying settings. Load photo paper in faded photos as the Custom Size setting Selects the paper size for the copy printout Adjusts printer settings for the selected paper type Provides best quality for photo copies Provides good quality for most copies Provides lower quality for your copies.

User Manual
Page 61
You see the Main tab of your application's help utility for details. 3. See your printer settings window: 61 Note: You may also need to use. Select the print command in your screen, the Print option in the File menu, or another command. 2. If necessary, select your print settings. Note: You may need to select Properties or Preferences to view your product name as the printer you want to select a print icon on your application.
You see the Main tab of your application's help utility for details. 3. See your printer settings window: 61 Note: You may also need to use. Select the print command in your screen, the Print option in the File menu, or another command. 2. If necessary, select your print settings. Note: You may need to select Properties or Preferences to view your product name as the printer you want to select a print icon on your application.

User Manual
Page 62
... select Borders. 8. Note: The setting may not exactly match the name of the border options: • If you want to access the Epson product support website, click the Online Support button. Note: You can also select the User Defined setting to print without borders. Check the borderless... paper compatibility list for details. 6. Select any of your document or photo as shown in the printer settings window. 4. Note: You must select a compatible borderless paper type and size to create a custom paper size. 7. Select one of your...
... select Borders. 8. Note: The setting may not exactly match the name of the border options: • If you want to access the Epson product support website, click the Online Support button. Note: You can also select the User Defined setting to print without borders. Check the borderless... paper compatibility list for details. 6. Select any of your document or photo as shown in the printer settings window. 4. Note: You must select a compatible borderless paper type and size to create a custom paper size. 7. Select one of your...

User Manual
Page 66
... or removes red-eye in low-resolution images such as the paper Type or Media Type setting. Black/Grayscale Prints text and graphics in your printer software. Parent topic: Selecting Advanced Print Settings - Windows Color Management Options - Depending on the Advanced tab to customize your printout before printing. Windows You can...
... or removes red-eye in low-resolution images such as the paper Type or Media Type setting. Black/Grayscale Prints text and graphics in your printer software. Parent topic: Selecting Advanced Print Settings - Windows Color Management Options - Depending on the Advanced tab to customize your printout before printing. Windows You can...
User Manual
Page 67
... the Page Layout tab. 67 Note: Fix Photo uses a sophisticated face recognition technology to work, both eyes and the nose must be visible in your printer software using only your application software. For this to optimize photos that include faces. You can select a variety of flawed photos.
... the Page Layout tab. 67 Note: Fix Photo uses a sophisticated face recognition technology to work, both eyes and the nose must be visible in your printer software using only your application software. For this to optimize photos that include faces. You can select a variety of flawed photos.
User Manual
Page 72
... window: 72 If you want to change your Windows programs, you are printing in that program session. Select Printer Settings. Windows When you change the print settings you use in all your print settings in the Windows taskbar. 2. You see print jobs lined up ...
... window: 72 If you want to change your Windows programs, you are printing in that program session. Select Printer Settings. Windows When you change the print settings you use in all your print settings in the Windows taskbar. 2. You see print jobs lined up ...

User Manual
Page 73
These settings are now the defaults selected for printing in the Windows taskbar. 73 Changing the Language of the Printer Software Screens Parent topic: Printing with Windows Changing the Language of the Printer Software Screens You can still change the language used on the Windows printer software screens. 1. Right-click the product icon in any program session. You can change them as defaults in all your Windows programs. 4. 3. Select the print settings you want to use as needed for printing. Click OK.
These settings are now the defaults selected for printing in the Windows taskbar. 73 Changing the Language of the Printer Software Screens Parent topic: Printing with Windows Changing the Language of the Printer Software Screens You can still change the language used on the Windows printer software screens. 1. Right-click the product icon in any program session. You can change them as defaults in all your Windows programs. 4. 3. Select the print settings you want to use as needed for printing. Click OK.

User Manual
Page 74
Select Printer Settings. Select the language you access them. Click OK to use as the Language setting. 5. Parent topic: Selecting Default Print Settings - You see the maintenance options: 4. Click the Maintenance tab. You see the printer settings window. 3. The printer software screens appear in the language you selected the next time you want to close the printer software window. Windows 74 2.
Select Printer Settings. Select the language you access them. Click OK to use as the Language setting. 5. Parent topic: Selecting Default Print Settings - You see the maintenance options: 4. Click the Maintenance tab. You see the printer settings window. 3. The printer software screens appear in the language you selected the next time you want to close the printer software window. Windows 74 2.

User Manual
Page 75
... print with your product using any Mac OS X printing program, as described in the Windows taskbar. 2. Select Software Update Settings. Changing Automatic Update Options Your printer software for Windows automatically checks for updates, select a setting in the Check every menu. • To disable the automatic update feature, select the Never option...
... print with your product using any Mac OS X printing program, as described in the Windows taskbar. 2. Select Software Update Settings. Changing Automatic Update Options Your printer software for Windows automatically checks for updates, select a setting in the Check every menu. • To disable the automatic update feature, select the Never option...

User Manual
Page 76
...print command in the File menu, or another command. Select your application. Mac OS X Selecting Printing Preferences - See your product: 76 You see the expanded printer settings window for your application's help utility for details. 3. Mac OS X Selecting Print Layout Options - Mac OS X Managing Color - Open a photo or...printing. 2. Selecting Basic Print Settings - Note: You may need to expand the print window. If necessary, click the arrow next to the Printer setting or the Show Details button to select a print icon on your screen, the Print option in your product as the...
...print command in the File menu, or another command. Select your application. Mac OS X Selecting Printing Preferences - See your product: 76 You see the expanded printer settings window for your application's help utility for details. 3. Mac OS X Selecting Print Layout Options - Mac OS X Managing Color - Open a photo or...printing. 2. Selecting Basic Print Settings - Note: You may need to expand the print window. If necessary, click the arrow next to the Printer setting or the Show Details button to select a print icon on your screen, the Print option in your product as the...


