
User Manual
Page 4
... ...45 Paper Loading Capacity ...48 Available EPSON Papers...49 Borderless Paper Type Compatibility 50 Paper or Media Type Settings ...51 Placing Originals on the Product ...52 Placing Originals on the Scanner Glass 52 Copying ...54 Copying Documents or Photos...54 Paper Type Settings - Windows 63 Advanced Print Quality Settings - Windows 66 Color Management...
... ...45 Paper Loading Capacity ...48 Available EPSON Papers...49 Borderless Paper Type Compatibility 50 Paper or Media Type Settings ...51 Placing Originals on the Product ...52 Placing Originals on the Scanner Glass 52 Copying ...54 Copying Documents or Photos...54 Paper Type Settings - Windows 63 Advanced Print Quality Settings - Windows 66 Color Management...
User Manual
Page 5
... OS X 83 Selecting Printing Preferences - Mac OS X 84 Printing Your Document or Photo - Mac OS X 85 Checking Print Status - Mac OS X 86 Cancelling Printing Using a Product Button 87 Scanning ...88 Starting a Scan...88 Starting a Scan Using the Product Control Panel 88 Changing Default Scan Button Settings 90 Starting a Scan Using the Epson Scan Icon 90 Starting...
... OS X 83 Selecting Printing Preferences - Mac OS X 84 Printing Your Document or Photo - Mac OS X 85 Checking Print Status - Mac OS X 86 Cancelling Printing Using a Product Button 87 Scanning ...88 Starting a Scan...88 Starting a Scan Using the Product Control Panel 88 Changing Default Scan Button Settings 90 Starting a Scan Using the Epson Scan Icon 90 Starting...
User Manual
Page 6
... a Memory Card 145 Setting Up File Sharing for Photo Transfers From Your Computer 145 Transferring Photos from a Memory Card ...136 Viewing and Printing Photos...136 Viewing and Printing Individual Photos 136 Viewing and Printing Individual Photos Using the Slide Show 138 Cropping Photos Displayed on the LCD Screen 140 Print Setting Options - Professional Mode 120 Image Preview Guidelines...123 Scan...
... a Memory Card 145 Setting Up File Sharing for Photo Transfers From Your Computer 145 Transferring Photos from a Memory Card ...136 Viewing and Printing Photos...136 Viewing and Printing Individual Photos 136 Viewing and Printing Individual Photos Using the Slide Show 138 Cropping Photos Displayed on the LCD Screen 140 Print Setting Options - Professional Mode 120 Image Preview Guidelines...123 Scan...
User Manual
Page 9
...Slanted Printout ...210 Solving Print Quality Problems ...210 White or Dark Lines in Printout ...210 Blurry or Smeared Printout ...211 Faint Printout or Printout Has Gaps 212 Grainy Printout...213 Incorrect Colors ...213 Solving Scanning Problems ...214 Scanning Software Does Not Operate Correctly 214 Cannot Start Epson Scan ...215 Solving ... 219 Scanned Image Edges are Cropped 220 Solving Memory Card Problems...220 Memory Card Does Not Fit Into a Slot 220 Cannot View or Print Photos from a Memory Card 220 Cannot Transfer Photos To or From a Memory Card 221 When to Get Help...223 9
...Slanted Printout ...210 Solving Print Quality Problems ...210 White or Dark Lines in Printout ...210 Blurry or Smeared Printout ...211 Faint Printout or Printout Has Gaps 212 Grainy Printout...213 Incorrect Colors ...213 Solving Scanning Problems ...214 Scanning Software Does Not Operate Correctly 214 Cannot Start Epson Scan ...215 Solving ... 219 Scanned Image Edges are Cropped 220 Solving Memory Card Problems...220 Memory Card Does Not Fit Into a Slot 220 Cannot View or Print Photos from a Memory Card 220 Cannot Transfer Photos To or From a Memory Card 221 When to Get Help...223 9
User Manual
Page 22
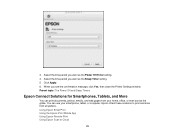
... you want as the Power Off Timer setting. 4. Click Apply. 6. You can print documents, photos, emails, and web pages from anywhere:. Select the time period you want as the Sleep Timer setting. 5. Parent topic: The Power Off and Sleep Timers Epson Connect Solutions for Smartphones, Tablets, and More You can use your home...
... you want as the Power Off Timer setting. 4. Click Apply. 6. You can print documents, photos, emails, and web pages from anywhere:. Select the time period you want as the Sleep Timer setting. 5. Parent topic: The Power Off and Sleep Timers Epson Connect Solutions for Smartphones, Tablets, and More You can use your home...

User Manual
Page 42
• Load paper short edge first, no matter which way your document faces. • Load letterhead or pre-printed paper top edge first. • Do not load paper past the line on the left edge guide. • Check the paper package for Photos You can print photos on a variety of paper types and sizes. 1. Parent topic: Loading Paper Related references Paper Loading Capacity Loading Paper for any additional loading instructions. Pull up the paper support and its extension. 42 Flip the feeder guard forward. 2.
• Load paper short edge first, no matter which way your document faces. • Load letterhead or pre-printed paper top edge first. • Do not load paper past the line on the left edge guide. • Check the paper package for Photos You can print photos on a variety of paper types and sizes. 1. Parent topic: Loading Paper Related references Paper Loading Capacity Loading Paper for any additional loading instructions. Pull up the paper support and its extension. 42 Flip the feeder guard forward. 2.

User Manual
Page 69
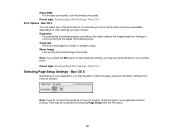
Note: If you select the Min option for the Expansion setting, you may see the available Printing Presets options: 69 You see white borders on your printed photo. • To print the borderless image at the edges of borderless images, select a Borderless option: Note: To make changes to the Borderless settings, you can create your...
Note: If you select the Min option for the Expansion setting, you may see the available Printing Presets options: 69 You see white borders on your printed photo. • To print the borderless image at the edges of borderless images, select a Borderless option: Note: To make changes to the Borderless settings, you can create your...
User Manual
Page 80
... and graphics in your print. Mac OS X Depending on your printed photo. They may be unavailable, depending on your application, you may be accessible by selecting Page Setup from the print window. Note: If you do not see white borders on other settings you may be able to select the paper size and orientation...
... and graphics in your print. Mac OS X Depending on your printed photo. They may be unavailable, depending on your application, you may be accessible by selecting Page Setup from the print window. Note: If you do not see white borders on other settings you may be able to select the paper size and orientation...
User Manual
Page 83
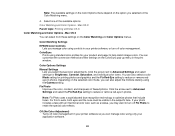
... work, both eyes and the nose must be visible in your application software. 83 Note: Fix Photo uses a sophisticated face recognition technology to Advanced Settings and select settings for printing photos and graphics and the Fix Red-Eye setting to reduce or remove red-eye in... photos. For this to help match image colors. Note: The available settings on the Color Options menu depend on the option you select manual color adjustments. Color Matching and Color Options - Color Matching Settings EPSON...
... work, both eyes and the nose must be visible in your application software. 83 Note: Fix Photo uses a sophisticated face recognition technology to Advanced Settings and select settings for printing photos and graphics and the Fix Red-Eye setting to reduce or remove red-eye in... photos. For this to help match image colors. Note: The available settings on the Color Options menu depend on the option you select manual color adjustments. Color Matching and Color Options - Color Matching Settings EPSON...

User Manual
Page 136
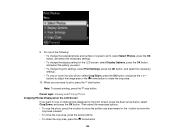
... is displayed: 136 Photo Mode Printing Photo Layouts From a Memory Card Photo Layout Options Parent topic: Printing from a memory card inserted into your product: Viewing and Printing Photos Parent topic: Using Memory Cards With Your Product Viewing and Printing Photos See these sections to print photos from a Memory Card Viewing and Printing Individual Photos You can select individual photos for printing as you view them...
... is displayed: 136 Photo Mode Printing Photo Layouts From a Memory Card Photo Layout Options Parent topic: Printing from a memory card inserted into your product: Viewing and Printing Photos Parent topic: Using Memory Cards With Your Product Viewing and Printing Photos See these sections to print photos from a Memory Card Viewing and Printing Individual Photos You can select individual photos for printing as you view them...

User Manual
Page 138
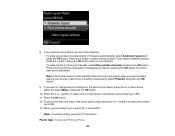
... button to select Slide Show and press the OK button. Parent topic: Viewing and Printing Photos Viewing and Printing Individual Photos Using the Slide Show You can view a slide show of copies to print, select Select Photos, press the OK button, and select the necessary settings. • To change the... display setting for printing. 1. The first photo on your memory card is displayed: 138 Note: To cancel printing, press the stop button. Press the up or down arrow buttons to rotate the crop area. 8. When you ...
... button to select Slide Show and press the OK button. Parent topic: Viewing and Printing Photos Viewing and Printing Individual Photos Using the Slide Show You can view a slide show of copies to print, select Select Photos, press the OK button, and select the necessary settings. • To change the... display setting for printing. 1. The first photo on your memory card is displayed: 138 Note: To cancel printing, press the stop button. Press the up or down arrow buttons to rotate the crop area. 8. When you ...
User Manual
Page 140
...area outward. • To move the yellow crop area inward or the - button to rotate the crop area. 10. Parent topic: Viewing and Printing Photos Cropping Photos Displayed on the LCD screen, press the down arrow button, select Crop/Zoom, and press the OK button. Do one of the following: •... To change the selected photos and number of copies to crop or rotate photos displayed on the LCD Screen If you want . • To change the print settings, select Print Settings, press the OK button, and select the necessary settings. • To ...
...area outward. • To move the yellow crop area inward or the - button to rotate the crop area. 10. Parent topic: Viewing and Printing Photos Cropping Photos Displayed on the LCD screen, press the down arrow button, select Crop/Zoom, and press the OK button. Do one of the following: •... To change the selected photos and number of copies to crop or rotate photos displayed on the LCD Screen If you want . • To change the print settings, select Print Settings, press the OK button, and select the necessary settings. • To ...

User Manual
Page 141
...; To check the cropped image, press the OK button. Press the left or right arrow buttons to select Photo Layout Sheet and press the OK button. Photo Mode Select these Print Settings options when printing photos displayed on various sizes of the paper (slight cropping may occur) Leaves a small margin around the image Provides good...
...; To check the cropped image, press the OK button. Press the left or right arrow buttons to select Photo Layout Sheet and press the OK button. Photo Mode Select these Print Settings options when printing photos displayed on various sizes of the paper (slight cropping may occur) Leaves a small margin around the image Provides good...
User Manual
Page 143
... advance to the next screen when you need to print, press the start button. To print more copies of the following: • To allow your photos, press the arrow buttons displayed to 99). 13. Note: To cancel printing, press the stop button. Parent topic: Viewing and Printing Photos 143 button. If you have finished placing your...
... advance to the next screen when you need to print, press the start button. To print more copies of the following: • To allow your photos, press the arrow buttons displayed to 99). 13. Note: To cancel printing, press the stop button. Parent topic: Viewing and Printing Photos 143 button. If you have finished placing your...

User Manual
Page 144
... product. 2. Press the home button, if necessary. 4. Insert a memory card into a memory card slot on one photo in multiple sizes on your product. 1. Parent topic: Viewing and Printing Photos Scanning to a Memory Card You can scan an image to a memory card inserted into a memory card slot on one... sheet. Upper ½ or Lower ½ Print one sheet. Picture Package Prints one sheet. You see this screen: 144 ...
... product. 2. Press the home button, if necessary. 4. Insert a memory card into a memory card slot on one photo in multiple sizes on your product. 1. Parent topic: Viewing and Printing Photos Scanning to a Memory Card You can scan an image to a memory card inserted into a memory card slot on one... sheet. Upper ½ or Lower ½ Print one sheet. Picture Package Prints one sheet. You see this screen: 144 ...
User Manual
Page 220
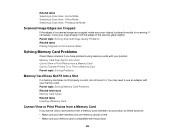
...Parent topic: Solving Memory Card Problems Related references Memory Card Types Related tasks Inserting a Memory Card Cannot View or Print Photos from a Memory Card If you cannot view or print photos from a Memory Card Cannot Transfer Photos To or From a Memory Card Parent topic: Solving Problems Memory Card Does Not Fit Into a Slot If ... using memory cards with your original is compatible with the product. 220 Memory Card Does Not Fit Into a Slot Cannot View or Print Photos from a memory card inserted in . Office Mode Selecting a Scan Area - Related tasks Selecting a Scan Area -
...Parent topic: Solving Memory Card Problems Related references Memory Card Types Related tasks Inserting a Memory Card Cannot View or Print Photos from a Memory Card If you cannot view or print photos from a Memory Card Cannot Transfer Photos To or From a Memory Card Parent topic: Solving Problems Memory Card Does Not Fit Into a Slot If ... using memory cards with your original is compatible with the product. 220 Memory Card Does Not Fit Into a Slot Cannot View or Print Photos from a memory card inserted in . Office Mode Selecting a Scan Area - Related tasks Selecting a Scan Area -
Product Specifications
Page 1
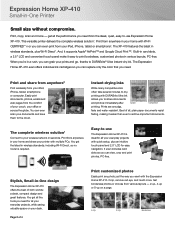
... and correction of 4 Expression® Home XP-410 Small-in card slots for smudge, fade and water resistant prints • Print customized & borderless photos - easily, view, crop and print photos • The complete wireless solution - large, intuitive, 2.5", color LCD and touch panel means easier navigation; plus Wi-Fi Direct™1 • Epson Connect™ - built-in -One®...
... and correction of 4 Expression® Home XP-410 Small-in card slots for smudge, fade and water resistant prints • Print customized & borderless photos - easily, view, crop and print photos • The complete wireless solution - large, intuitive, 2.5", color LCD and touch panel means easier navigation; plus Wi-Fi Direct™1 • Epson Connect™ - built-in -One®...
Product Specifications
Page 2
...resistant. It even includes card slots so you can view, crop and print photos, PC-free. The XP-410 features the latest in a rush, you can grab your everyday projects with the Expression Home XP-410. When you're in wireless standards, plus an intuitive touch panel and ...2.5" LCD for all your prints and go, thanks to archive important documents. Print from the sleek, quiet, easy-to share documents and photos immediately after Epson Competitor printing. Stylish, Small-in ...
...resistant. It even includes card slots so you can view, crop and print photos, PC-free. The XP-410 features the latest in a rush, you can grab your everyday projects with the Expression Home XP-410. When you're in wireless standards, plus an intuitive touch panel and ...2.5" LCD for all your prints and go, thanks to archive important documents. Print from the sleek, quiet, easy-to share documents and photos immediately after Epson Competitor printing. Stylish, Small-in ...

Quick Guide and Warranty
Page 5
...of the following before removing the memory card or turning off your Epson product and a computer. Insert your photos, follow these steps to include several photos on the LCD screen and print them (see page 6). Now you can also print in various layouts to remove the card: 1. Removing the Card ...Mac OS X: Drag the removable disk icon from your desktop into the trash, then remove the card. 3. Using Memory Cards Your product lets you print photos directly from your digital camera's memory card; Caution: Do not force the card into the memory card slot and you may lose data on ....
...of the following before removing the memory card or turning off your Epson product and a computer. Insert your photos, follow these steps to include several photos on the LCD screen and print them (see page 6). Now you can also print in various layouts to remove the card: 1. Removing the Card ...Mac OS X: Drag the removable disk icon from your desktop into the trash, then remove the card. 3. Using Memory Cards Your product lets you print photos directly from your digital camera's memory card; Caution: Do not force the card into the memory card slot and you may lose data on ....

Quick Guide and Warranty
Page 6
... (102 × 152 mm) Epson photo paper. 2. Press l or r to scroll through your photo and crop the printed image For more photos. 6. Load several sheets of paper, press if necessary, select More Functions, then Photo Layout Sheet.) 3. Printing Photos From the LCD Screen You can select the following: ■ Select Photos to view and select photos by date ■ Display...
... (102 × 152 mm) Epson photo paper. 2. Press l or r to scroll through your photo and crop the printed image For more photos. 6. Load several sheets of paper, press if necessary, select More Functions, then Photo Layout Sheet.) 3. Printing Photos From the LCD Screen You can select the following: ■ Select Photos to view and select photos by date ■ Display...


