Network Installation Guide
Page 3
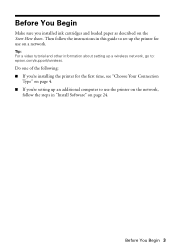
... the instructions in "Install Software" on page 4. ■ If you're setting up an additional computer to : epson.com/support/wireless. Do one of the following: ■ If you're installing the printer for use the printer on the network, follow the steps in this guide to set up a wireless network, go to use... Begin Make sure you installed ink cartridges and loaded paper as described on a network. Tip: For a video tutorial and other information about setting up the printer for the first time, see "Choose Your Connection Type" on page 24.
... the instructions in "Install Software" on page 4. ■ If you're setting up an additional computer to : epson.com/support/wireless. Do one of the following: ■ If you're installing the printer for use the printer on the network, follow the steps in this guide to set up a wireless network, go to use... Begin Make sure you installed ink cartridges and loaded paper as described on a network. Tip: For a video tutorial and other information about setting up the printer for the first time, see "Choose Your Connection Type" on page 24.
Network Installation Guide
Page 4
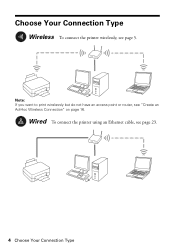
Note: If you want to print wirelessly but do not have an access point or router, see page 23. 4 Choose Your Connection Type Wired To connect the printer using an Ethernet cable, see "Create an Ad-Hoc Wireless Connection" on page 16. Choose Your Connection Type Wireless To connect the printer wirelessly, see page 5.
Note: If you want to print wirelessly but do not have an access point or router, see page 23. 4 Choose Your Connection Type Wired To connect the printer using an Ethernet cable, see "Create an Ad-Hoc Wireless Connection" on page 16. Choose Your Connection Type Wireless To connect the printer wirelessly, see page 5.
Network Installation Guide
Page 5
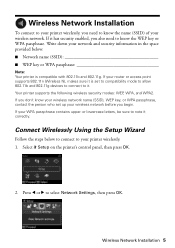
... and 802.11g devices to connect to it is compatible with 802.11b and 802.11g. Select F Setup on the printer's control panel, then press OK. 2. Your printer supports the following wireless security modes: WEP, WPA, and WPA2. or lowercase letters, be sure to select Network Settings,... below: ■ Network name (SSID WEP key or WPA passphrase Note: Your printer is set up your WPA passphrase contains upper- Write down your printer wirelessly. 1. Wireless Network Installation To connect to your printer wirelessly, you need to know the WEP key or WPA passphrase. If your wireless...
... and 802.11g devices to connect to it is compatible with 802.11b and 802.11g. Select F Setup on the printer's control panel, then press OK. 2. Your printer supports the following wireless security modes: WEP, WPA, and WPA2. or lowercase letters, be sure to select Network Settings,... below: ■ Network name (SSID WEP key or WPA passphrase Note: Your printer is set up your WPA passphrase contains upper- Write down your printer wirelessly. 1. Wireless Network Installation To connect to your printer wirelessly, you need to know the WEP key or WPA passphrase. If your wireless...
Network Installation Guide
Page 7
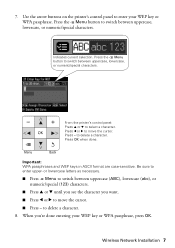
... upper- Be sure to delete a character. 8. or lowercase letters as necessary. ■ Press x Menu to switch between uppercase, lowercase, or numeric/special characters. From the printer's control panel: Press u or d to delete a character. Press the x Menu button to switch between uppercase (ABC), lowercase (abc), or numeric/special (123) characters. ■ Press... key or WPA passphrase. to select a character. Press l or r to enter your WEP key or WPA passphrase, press OK. Use the arrow buttons on the printer's control panel to move the cursor. ■ Press -
... upper- Be sure to delete a character. 8. or lowercase letters as necessary. ■ Press x Menu to switch between uppercase, lowercase, or numeric/special characters. From the printer's control panel: Press u or d to delete a character. Press the x Menu button to switch between uppercase (ABC), lowercase (abc), or numeric/special (123) characters. ■ Press... key or WPA passphrase. to select a character. Press l or r to enter your WEP key or WPA passphrase, press OK. Use the arrow buttons on the printer's control panel to move the cursor. ■ Press -
Network Installation Guide
Page 8
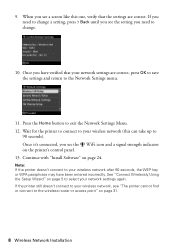
...doesn't connect to your network settings again. Press the Home button to change. 10. Wait for the printer to connect to your network settings are correct. Note: If the printer doesn't connect to your wireless network after 90 seconds, the WEP key or WPA passphrase may have ...on page 31. 8 Wireless Network Installation Once you see the WiFi icon and a signal strength indicator on page 5 to select your wireless network (this one, verify that your wireless network, see a screen like this can take up to 90 seconds). Once it's connected, you have been entered incorrectly. 9....
...doesn't connect to your network settings again. Press the Home button to change. 10. Wait for the printer to connect to your network settings are correct. Note: If the printer doesn't connect to your wireless network after 90 seconds, the WEP key or WPA passphrase may have ...on page 31. 8 Wireless Network Installation Once you see the WiFi icon and a signal strength indicator on page 5 to select your wireless network (this one, verify that your wireless network, see a screen like this can take up to 90 seconds). Once it's connected, you have been entered incorrectly. 9....
Network Installation Guide
Page 9
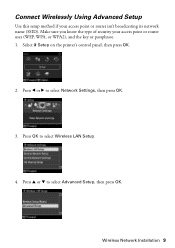
Press l or r to select Advanced Setup, then press OK. Press u or d to select Network Settings, then press OK. 3. Wireless Network Installation 9 Press OK to select Wireless LAN Setup. 4. Connect Wirelessly Using Advanced Setup Use this setup method if your access point or router uses (WEP, WPA, or WPA2), and the key or passphrase. 1. Make sure you know the type of security your access point or router isn't broadcasting its network name (SSID). Select F Setup on the printer's control panel, then press OK. 2.
Press l or r to select Advanced Setup, then press OK. Press u or d to select Network Settings, then press OK. 3. Wireless Network Installation 9 Press OK to select Wireless LAN Setup. 4. Connect Wirelessly Using Advanced Setup Use this setup method if your access point or router uses (WEP, WPA, or WPA2), and the key or passphrase. 1. Make sure you know the type of security your access point or router isn't broadcasting its network name (SSID). Select F Setup on the printer's control panel, then press OK. 2.

Network Installation Guide
Page 11
to select a character. Use the arrow buttons on the printer's control panel to move the cursor. From the printer's control panel: Press u or d to delete a character. 10. Press the x Menu button to enter upper- Be sure to switch between uppercase, lowercase, or numeric/special ...
to select a character. Use the arrow buttons on the printer's control panel to move the cursor. From the printer's control panel: Press u or d to delete a character. 10. Press the x Menu button to enter upper- Be sure to switch between uppercase, lowercase, or numeric/special ...
Network Installation Guide
Page 13
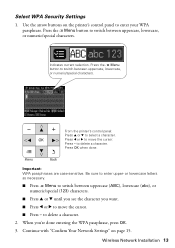
... your WPA passphrase. Press the x Menu button to move the cursor. Press OK when done. Continue with "Confirm Your Network Settings" on the printer's control panel to delete a character. 2. Important: WPA passphrases are case-sensitive. When you want. ■ Press l or r to switch ...between uppercase, lowercase, or numeric/special characters. Use the arrow buttons on page 15. From the printer's control panel: Press u or d to move the cursor. ■ Press - Press - or lowercase letters as necessary. ■ Press x Menu to...
... your WPA passphrase. Press the x Menu button to move the cursor. Press OK when done. Continue with "Confirm Your Network Settings" on the printer's control panel to delete a character. 2. Important: WPA passphrases are case-sensitive. When you want. ■ Press l or r to switch ...between uppercase, lowercase, or numeric/special characters. Use the arrow buttons on page 15. From the printer's control panel: Press u or d to move the cursor. ■ Press - Press - or lowercase letters as necessary. ■ Press x Menu to...
Network Installation Guide
Page 14
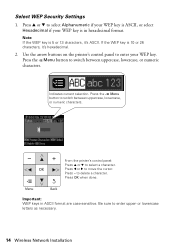
.... Press OK when done. or lowercase letters as necessary. 14 Wireless Network Installation Indicates current selection. Press u or d to move the cursor. From the printer's control panel: Press u or d to enter your WEP key is in ASCII format are case-sensitive. Use the arrow buttons on the... printer's control panel to select a character. Important: WEP keys in hexadecimal format. Select WEP Security Settings 1. Note: If the WEP key is 10 or 26 characters...
.... Press OK when done. or lowercase letters as necessary. 14 Wireless Network Installation Indicates current selection. Press u or d to move the cursor. From the printer's control panel: Press u or d to enter your WEP key is in ASCII format are case-sensitive. Use the arrow buttons on the... printer's control panel to select a character. Important: WEP keys in hexadecimal format. Select WEP Security Settings 1. Note: If the WEP key is 10 or 26 characters...
Network Installation Guide
Page 16
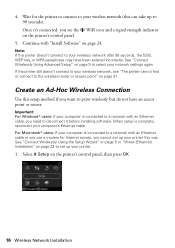
...router. For Macintosh® users: If your computer is complete, reconnect your wireless network (this way. If the printer still doesn't connect to your wireless network, see "The printer cannot find or connect to disconnect it 's connected, you see the WiFi icon and a signal strength indicator on ...page 23 to a network with an Ethernet cable, you use a modem for the printer to connect to your computer's Ethernet cable. Select F Setup on page 24. See "Connect Wirelessly Using Advanced Setup" on page 31. Note: If ...
...router. For Macintosh® users: If your computer is complete, reconnect your wireless network (this way. If the printer still doesn't connect to your wireless network, see "The printer cannot find or connect to disconnect it 's connected, you see the WiFi icon and a signal strength indicator on ...page 23 to a network with an Ethernet cable, you use a modem for the printer to connect to your computer's Ethernet cable. Select F Setup on page 24. See "Connect Wirelessly Using Advanced Setup" on page 31. Note: If ...
Network Installation Guide
Page 19
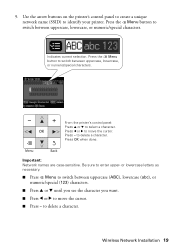
...as necessary. ■ Press x Menu to move the cursor. ■ Press - Indicates current selection. to identify your printer. Use the arrow buttons on the printer's control panel to create a unique network name (SSID) to delete a character. to enter upper- Be sure to delete.... 9. Press - Press OK when done. Press l or r to switch between uppercase, lowercase, or numeric/special characters. From the printer's control panel: Press u or d to switch between uppercase, lowercase, or numeric/special characters. Important: Network names are case-sensitive. Wireless...
...as necessary. ■ Press x Menu to move the cursor. ■ Press - Indicates current selection. to identify your printer. Use the arrow buttons on the printer's control panel to create a unique network name (SSID) to delete a character. to enter upper- Be sure to delete.... 9. Press - Press OK when done. Press l or r to switch between uppercase, lowercase, or numeric/special characters. From the printer's control panel: Press u or d to switch between uppercase, lowercase, or numeric/special characters. Important: Network names are case-sensitive. Wireless...

Network Installation Guide
Page 21
...9632; Press l or r to switch between uppercase, lowercase, or numeric characters. Continue with the next section. Use the arrow buttons on the printer's control panel to delete a character. to enter your WEP key. or lowercase letters as necessary. ■ Press x Menu to move the... cursor. Press the x Menu button to select a character. Wireless Network Installation 21 From the printer's control panel: Press u or d to switch between uppercase, lowercase, or numeric characters. Press OK when done. Be sure to delete a character....
...9632; Press l or r to switch between uppercase, lowercase, or numeric characters. Continue with the next section. Use the arrow buttons on the printer's control panel to delete a character. to enter your WEP key. or lowercase letters as necessary. ■ Press x Menu to move the... cursor. Press the x Menu button to select a character. Wireless Network Installation 21 From the printer's control panel: Press u or d to switch between uppercase, lowercase, or numeric characters. Press OK when done. Be sure to delete a character....
Network Installation Guide
Page 23
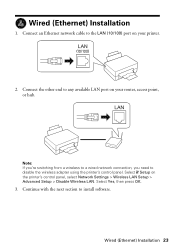
... Wired (Ethernet) Installation 23 Connect the other end to install software. Continue with the next section to any available LAN port on your printer. 2. Wired (Ethernet) Installation 1. Note: If you're switching from a wireless to a wired network connection, you need to the LAN ...(10/100) port on the printer's control panel, select Network Settings > Wireless LAN Setup > Advanced Setup > Disable Wireless LAN. Connect an Ethernet network cable to disable the wireless adapter using the printer's control panel.
... Wired (Ethernet) Installation 23 Connect the other end to install software. Continue with the next section to any available LAN port on your printer. 2. Wired (Ethernet) Installation 1. Note: If you're switching from a wireless to a wired network connection, you need to the LAN ...(10/100) port on the printer's control panel, select Network Settings > Wireless LAN Setup > Advanced Setup > Disable Wireless LAN. Connect an Ethernet network cable to disable the wireless adapter using the printer's control panel.
Network Installation Guide
Page 24
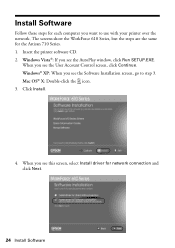
When you see the User Account Control screen, click Continue. Mac OS® X: Double-click the icon. 3. Insert the printer software CD. 2. Windows Vista®: If you see the AutoPlay window, click Run SETUP.EXE. Windows® XP: When you see this screen, select ...driver for network connection and click Next. 24 Install Software When you see the Software Installation screen, go to use with your printer over the network. The screens show the WorkForce 610 Series, but the steps are the same for the Artisan 710 Series. 1. Install Software Follow these steps for each computer...
When you see the User Account Control screen, click Continue. Mac OS® X: Double-click the icon. 3. Insert the printer software CD. 2. Windows Vista®: If you see the AutoPlay window, click Run SETUP.EXE. Windows® XP: When you see this screen, select ...driver for network connection and click Next. 24 Install Software When you see the Software Installation screen, go to use with your printer over the network. The screens show the WorkForce 610 Series, but the steps are the same for the Artisan 710 Series. 1. Install Software Follow these steps for each computer...
Network Installation Guide
Page 25
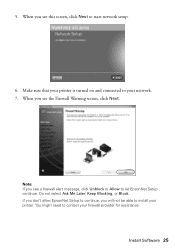
Do not select Ask Me Later, Keep Blocking, or Block. You might need to start network setup. 6. When you see a firewall alert message, click Unblock or Allow to your printer. When you will not be able to install your network. 7. Install Software 25 Note: If you see the Firewall Warning screen, click Next. Make sure that your firewall provider for assistance. If you don't allow EpsonNet Setup to continue, you see this screen, click Next to contact your printer is turned on and connected to let EpsonNet Setup continue. 5.
Do not select Ask Me Later, Keep Blocking, or Block. You might need to start network setup. 6. When you see a firewall alert message, click Unblock or Allow to your printer. When you will not be able to install your network. 7. Install Software 25 Note: If you see the Firewall Warning screen, click Next. Make sure that your firewall provider for assistance. If you don't allow EpsonNet Setup to continue, you see this screen, click Next to contact your printer is turned on and connected to let EpsonNet Setup continue. 5.
Network Installation Guide
Page 26
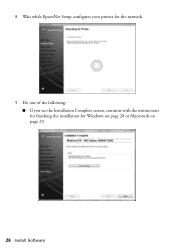
Wait while EpsonNet Setup configures your printer for Windows on page 28 or Macintosh on page 29. 26 Install Software Do one of the following: ■ If you see the Installation Complete screen, continue with the instructions for finishing the installation for the network. 9. 8.
Wait while EpsonNet Setup configures your printer for Windows on page 28 or Macintosh on page 29. 26 Install Software Do one of the following: ■ If you see the Installation Complete screen, continue with the instructions for finishing the installation for the network. 9. 8.
Network Installation Guide
Page 27
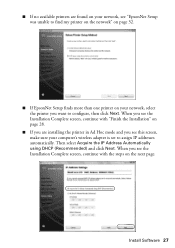
...■ If you are found on your network, see "EpsonNet Setup was unable to find my printer on the network" on page 32. ■ If EpsonNet Setup finds more than one printer on your computer's wireless adapter is set to configure, then click Next. Install Software 27 When ...you see the Installation Complete screen, continue with "Finish the Installation" on the next page. ■ If no available printers are installing the printer in Ad Hoc mode...
...■ If you are found on your network, see "EpsonNet Setup was unable to find my printer on the network" on page 32. ■ If EpsonNet Setup finds more than one printer on your computer's wireless adapter is set to configure, then click Next. Install Software 27 When ...you see the Installation Complete screen, continue with "Finish the Installation" on the next page. ■ If no available printers are installing the printer in Ad Hoc mode...
Network Installation Guide
Page 29
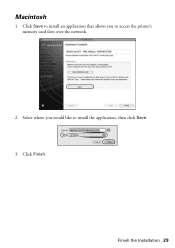
Macintosh 1. Finish the Installation 29 Select where you to install the application, then click Save. 3. Click Finish. Click Save to install an application that allows you would like to access the printer's memory card slots over the network. 2.
Macintosh 1. Finish the Installation 29 Select where you to install the application, then click Save. 3. Click Finish. Click Save to install an application that allows you would like to access the printer's memory card slots over the network. 2.

Network Installation Guide
Page 30
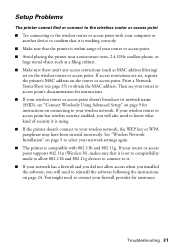
...installation is complete, restart your computer to print a Network Status Sheet (see this screen, click Add Printer. 5. Troubleshooting If you see page 35). 30 Troubleshooting See your EPSON TCP/IP printer. Follow the prompts on the network. 6. Follow the steps on the right side of the screen to..." below ■ "Printing Problems" on page 33 ■ "Scanning Problems" on page 34 This section also explains how to find the EPSON TCP/IP printer on the screen to scan and print. You're ready to print a test page, install bonus software, and finish the installation. 7. 4.
...installation is complete, restart your computer to print a Network Status Sheet (see this screen, click Add Printer. 5. Troubleshooting If you see page 35). 30 Troubleshooting See your EPSON TCP/IP printer. Follow the prompts on the network. 6. Follow the steps on the right side of the screen to..." below ■ "Printing Problems" on page 33 ■ "Scanning Problems" on page 34 This section also explains how to find the EPSON TCP/IP printer on the screen to scan and print. You're ready to print a test page, install bonus software, and finish the installation. 7. 4.
Network Installation Guide
Page 31
.... If your wireless router or access point has wireless security enabled, you will also need to your router or access point. ■ Avoid placing the printer near a microwave oven, 2.4 GHz cordless phone, or large metal object such as a filing cabinet. ■ Make sure there aren't any access restrictions ... the MAC address. If your router or access point supports 802.11n (Wireless N), makes sure that the printer is within range of security it is using. ■ If the printer doesn't connect to know what kind of your wireless network, the WEP key or WPA passphrase may have ...
.... If your wireless router or access point has wireless security enabled, you will also need to your router or access point. ■ Avoid placing the printer near a microwave oven, 2.4 GHz cordless phone, or large metal object such as a filing cabinet. ■ Make sure there aren't any access restrictions ... the MAC address. If your router or access point supports 802.11n (Wireless N), makes sure that the printer is within range of security it is using. ■ If the printer doesn't connect to know what kind of your wireless network, the WEP key or WPA passphrase may have ...


