User Manual - USB/Parallel Kit
Page 7
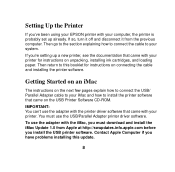
... and install the iMac Update 1.0 from the previous computer. Getting Started on an iMac The instructions on unpacking, installing ink cartridges, and loading paper. Contact Apple Computer if you 've been using your EPSON printer with your system. If so, turn it off and disconnect it from Apple at http://swupdates.info.apple...
... and install the iMac Update 1.0 from the previous computer. Getting Started on an iMac The instructions on unpacking, installing ink cartridges, and loading paper. Contact Apple Computer if you 've been using your EPSON printer with your system. If so, turn it off and disconnect it from Apple at http://swupdates.info.apple...
Product Brochure
Page 1
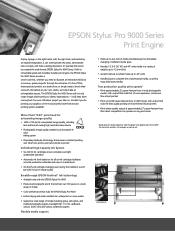
..., continuous flow ink jet printers • Prints up to two rolls of media simultaneously, for all six ink cartridges facilitates accurate production estimates and ease of maintenance • On-the-fly ink cartridge changing even during the middle of a print job with no...Breakthrough EPSON Archival™ Ink technology • Available only with output that rivals that rivals the best quality printing of more . It's precisely the reason we created the wide-format EPSON Stylus Pro 9000 Series. With its remarkable speed and incredibly durable print engine, the EPSON Stylus Pro 9000 Series ...
..., continuous flow ink jet printers • Prints up to two rolls of media simultaneously, for all six ink cartridges facilitates accurate production estimates and ease of maintenance • On-the-fly ink cartridge changing even during the middle of a print job with no...Breakthrough EPSON Archival™ Ink technology • Available only with output that rivals that rivals the best quality printing of more . It's precisely the reason we created the wide-format EPSON Stylus Pro 9000 Series. With its remarkable speed and incredibly durable print engine, the EPSON Stylus Pro 9000 Series ...
Product Brochure
Page 4
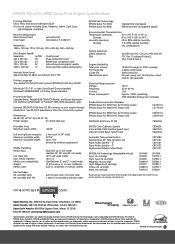
... this product meets the ENERGY STAR guidelines for connectivity options. EPSON Stylus Pro 9000 Series Print Engine Specifications Printing Method Micro Piezo DX3 drop-on Recycled Paper Dimensions 66.46"(W) x 27.52"(D) x 49.57"(H) Printer weight: 211.64 lb with legs EPSON Ink Technology EPSON Stylus Pro 9000 EPSON Stylus Pro 9500 Standard Ink (dye based) EPSON Archival Ink (pigment based) Environmental Characteristics Temperature operating: 50˚ to 95...
... this product meets the ENERGY STAR guidelines for connectivity options. EPSON Stylus Pro 9000 Series Print Engine Specifications Printing Method Micro Piezo DX3 drop-on Recycled Paper Dimensions 66.46"(W) x 27.52"(D) x 49.57"(H) Printer weight: 211.64 lb with legs EPSON Ink Technology EPSON Stylus Pro 9000 EPSON Stylus Pro 9500 Standard Ink (dye based) EPSON Archival Ink (pigment based) Environmental Characteristics Temperature operating: 50˚ to 95...
Product Information Guide
Page 1
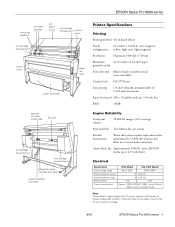
... standby mode Note: This product is also designed for your printer's voltage. 8/00 EPSON Stylus Pro 9000 series - 1 mounting brackets roll paper spindles roll paper cover ink cartridge compartment control panel ink cartridge compartment lower cover paper set lever paper hammock Printer Specifications Printing Printing method On-demand ink jet Nozzle 64 nozzles × 6 (black, cyan, magenta, configuration yellow, light cyan...
... standby mode Note: This product is also designed for your printer's voltage. 8/00 EPSON Stylus Pro 9000 series - 1 mounting brackets roll paper spindles roll paper cover ink cartridge compartment control panel ink cartridge compartment lower cover paper set lever paper hammock Printer Specifications Printing Printing method On-demand ink jet Nozzle 64 nozzles × 6 (black, cyan, magenta, configuration yellow, light cyan...

Product Information Guide
Page 2
...°F (15 to 25 °C) Humidity: 40 to 60% RH Ink Cartridges Print yield Approximately 28 pages/A0 (720 dpi, 40% duty) Approximately 6400 pages/A4 (360 dpi, 5% duty); EPSON Stylus Pro 9000 series 8/00 yield of the initial cartridge set is reduced because of 3.15 to 4.33 mil (0.08 to ...0.11 mm), 64 to 90 gsm. ❏ For best results, use the printer; EPSON Stylus Pro 9000 series Paper Cut sheet paper specifications Size ...
...°F (15 to 25 °C) Humidity: 40 to 60% RH Ink Cartridges Print yield Approximately 28 pages/A0 (720 dpi, 40% duty) Approximately 6400 pages/A4 (360 dpi, 5% duty); EPSON Stylus Pro 9000 series 8/00 yield of the initial cartridge set is reduced because of 3.15 to 4.33 mil (0.08 to ...0.11 mm), 64 to 90 gsm. ❏ For best results, use the printer; EPSON Stylus Pro 9000 series Paper Cut sheet paper specifications Size ...

Product Information Guide
Page 3
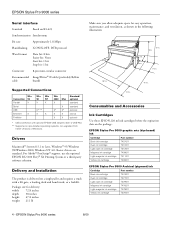
EPSON Stylus Pro 9000 series Mechanical Paper feed method Friction Paper path Roll paper or cut sheets with manual insertion Dimensions Width: 66.46 inches (1688 mm) Depth: 27.52 inches (699 mm) Height: 49.57 inches (1259 mm) Weight 211.64 lb (96 kg) without ink cartridges ...;C) Humidity (without condensation) Operation: 20 to 80% RH Storage: 20 to 85% RH Transit 5 to compatible (the default setting). 8/00 EPSON Stylus Pro 9000 series - 3 Make sure the printer's parallel interface is set to 85% RH (stored in shipping container) Safety Approvals Safety standards UL 1950,...
EPSON Stylus Pro 9000 series Mechanical Paper feed method Friction Paper path Roll paper or cut sheets with manual insertion Dimensions Width: 66.46 inches (1688 mm) Depth: 27.52 inches (699 mm) Height: 49.57 inches (1259 mm) Weight 211.64 lb (96 kg) without ink cartridges ...;C) Humidity (without condensation) Operation: 20 to 80% RH Storage: 20 to 85% RH Transit 5 to compatible (the default setting). 8/00 EPSON Stylus Pro 9000 series - 3 Make sure the printer's parallel interface is set to 85% RH (stored in shipping container) Safety Approvals Safety standards UL 1950,...
Product Information Guide
Page 4
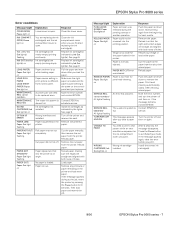
... NT 4.0. For Adobe® PostScript® support, use the optional EPSON RS-5100 Fiery® X2 Printing System or a third-party software solution. Delivery and Installation The product is delivered on the package. EPSON Stylus Pro 9000 series 8/00 Consumables and Accessories Ink Cartridges Use these EPSON 220 ml ink cartridges before the expiration date on a single pallet and requires a truck...
... NT 4.0. For Adobe® PostScript® support, use the optional EPSON RS-5100 Fiery® X2 Printing System or a third-party software solution. Delivery and Installation The product is delivered on the package. EPSON Stylus Pro 9000 series 8/00 Consumables and Accessories Ink Cartridges Use these EPSON 220 ml ink cartridges before the expiration date on a single pallet and requires a truck...
Product Information Guide
Page 7
...Turn the printer off the printer and remove the card. Install the correct ink cartridge(s). 8/00 EPSON Stylus Pro 9000 series - 7 Response Close the lower cover. Ink cartridge(s) not installed. Install ink cartridges as indicated by Ink Out light(s). Cut the paper manually, then remove the cut paper from the...EPSON Stylus Pro 9000 series Message/Light PUSH LEVER DOWN/ Paper Out light on RELOAD PAPER/ Paper Out light on REMOVE PAPER/ Paper Out light on SERVICE REQ. / All lights flashing SERVICE REQ. 00000100/ All lights flashing TURN PWR OFF AND ON UNABLE TO PRINT WRONG CARTRIDGE/ Ink...
...Turn the printer off the printer and remove the card. Install the correct ink cartridge(s). 8/00 EPSON Stylus Pro 9000 series - 7 Response Close the lower cover. Ink cartridge(s) not installed. Install ink cartridges as indicated by Ink Out light(s). Cut the paper manually, then remove the cut paper from the...EPSON Stylus Pro 9000 series Message/Light PUSH LEVER DOWN/ Paper Out light on RELOAD PAPER/ Paper Out light on REMOVE PAPER/ Paper Out light on SERVICE REQ. / All lights flashing SERVICE REQ. 00000100/ All lights flashing TURN PWR OFF AND ON UNABLE TO PRINT WRONG CARTRIDGE/ Ink...
Product Information Guide
Page 8
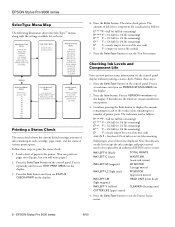
... can print test pages on roll paper, but you see VERSION on the list (except the ink cartridges and paper cutter) need to print the status check: 1. Follow these steps to be replaced by an authorized EPSON service center. Note that all parts on the display. Press the SelecType button to exit the Test Print menu. EPSON Stylus Pro 9000...
... can print test pages on roll paper, but you see VERSION on the list (except the ink cartridges and paper cutter) need to print the status check: 1. Follow these steps to be replaced by an authorized EPSON service center. Note that all parts on the display. Press the SelecType button to exit the Test Print menu. EPSON Stylus Pro 9000...

Product Information Guide
Page 9
.... Pull the clamp forward. 5. Then insert the ink cartridge into place. 8/00 EPSON Stylus Pro 9000 series - 9 EPSON Stylus Pro 9000 series Replacing an Ink Cartridge When one of the Ink Out lights is flashing (and INK LOW is displayed on the control panel), the corresponding cartridge is almost out of the printer. Make sure you can continue printing. When the light stays on the display...
.... Pull the clamp forward. 5. Then insert the ink cartridge into place. 8/00 EPSON Stylus Pro 9000 series - 9 EPSON Stylus Pro 9000 series Replacing an Ink Cartridge When one of the Ink Out lights is flashing (and INK LOW is displayed on the control panel), the corresponding cartridge is almost out of the printer. Make sure you can continue printing. When the light stays on the display...
Product Information Guide
Page 10
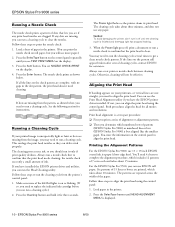
...EPSON Stylus Pro 9000) or numbered line or box (EPSON Stylus Pro 9500) is clean. When the Pause light goes off until the cleaning cycle is displayed. 10 - Otherwise, cleaning will use more paper.) 2. You'll need to clear the nozzles. For the EPSON Stylus Pro 9500, you can run a cleaning cycle to replace the indicated ink cartridge... print head. EPSON Stylus Pro 9000 series 8/00 Load a sheet of ink. Press the Enter button. This unclogs the print head nozzles so they can print the nozzle check on the display. 3. Aligning the Print Head If banding appears on your printed ...
...EPSON Stylus Pro 9000) or numbered line or box (EPSON Stylus Pro 9500) is clean. When the Pause light goes off until the cleaning cycle is displayed. 10 - Otherwise, cleaning will use more paper.) 2. You'll need to clear the nozzles. For the EPSON Stylus Pro 9500, you can run a cleaning cycle to replace the indicated ink cartridge... print head. EPSON Stylus Pro 9000 series 8/00 Load a sheet of ink. Press the Enter button. This unclogs the print head nozzles so they can print the nozzle check on the display. 3. Aligning the Print Head If banding appears on your printed ...
Product Information Guide
Page 12
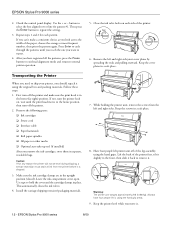
...home position, then turn the printer back on each pattern. EPSON Stylus Pro 9000 series 8/00 Then press the Enter button to hold the cover and the cartridge clamps in a safe place. Press Enter to cycle through the patterns until the print head moves to repeat. 4. Remove the left and right...) After you should repack it back to ship your printer, you remove the ink cartridges, store them in the home (far right) position. EPSON Stylus Pro 9000 series 2. Use the + or - Caution: If for pattern #1. Close the ink valve locks on , wait until you reach the one you move it . ...
...home position, then turn the printer back on each pattern. EPSON Stylus Pro 9000 series 8/00 Then press the Enter button to hold the cover and the cartridge clamps in a safe place. Press Enter to cycle through the patterns until the print head moves to repeat. 4. Remove the left and right...) After you should repack it back to ship your printer, you remove the ink cartridges, store them in the home (far right) position. EPSON Stylus Pro 9000 series 2. Use the + or - Caution: If for pattern #1. Close the ink valve locks on , wait until you reach the one you move it . ...
Product Information Guide
Page 13
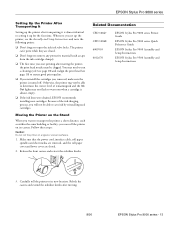
..., see page 10) to ensure good print quality. ❏ If you reinstall the cartridges you start printing after moving . 8/00 EPSON Stylus Pro 9000 series - 13 Follow these steps: Caution: Do not roll the printer on the Stand When you want to transport the printer a short distance, such as tape from the ink cartridge clamps). ❏ The first time...
..., see page 10) to ensure good print quality. ❏ If you reinstall the cartridges you start printing after moving . 8/00 EPSON Stylus Pro 9000 series - 13 Follow these steps: Caution: Do not roll the printer on the Stand When you want to transport the printer a short distance, such as tape from the ink cartridge clamps). ❏ The first time...

User Manual
Page 4
... Guide 3 Warnings, Cautions, and Notes 4 Where To Get Help 4 ENERGY STAR Compliance 5 Important Safety Instructions 6 Ink Cartridge Safety Instructions 7 1 Handling Paper and Other Media Selecting Paper and Other Media 1-1 Printing on EPSON Paper and Other Media 1-2 Printing Tips for EPSON Media 1-4 Using Roll Paper 1-4 Attaching Paper to the Spindle 1-5 Removing Paper from the Spindle 1-6 Inserting the...
... Guide 3 Warnings, Cautions, and Notes 4 Where To Get Help 4 ENERGY STAR Compliance 5 Important Safety Instructions 6 Ink Cartridge Safety Instructions 7 1 Handling Paper and Other Media Selecting Paper and Other Media 1-1 Printing on EPSON Paper and Other Media 1-2 Printing Tips for EPSON Media 1-4 Using Roll Paper 1-4 Attaching Paper to the Spindle 1-5 Removing Paper from the Spindle 1-6 Inserting the...
User Manual
Page 5
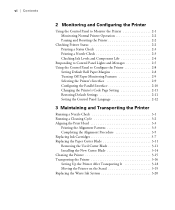
... 2-1 Monitoring Normal Printer Operation 2-2 Pausing and Resetting the Printer 2-2 Checking Printer Status 2-2 Printing a Status Check 2-3 Printing a Nozzle Check 2-3 Checking Ink Levels and Component Life 2-4 Responding to Control Panel Lights and Messages 2-5 Using the Control ... Transporting the Printer Running a Nozzle Check 3-1 Running a Cleaning Cycle 3-2 Aligning the Print Head 3-3 Printing the Alignment Patterns 3-3 Completing the Alignment Procedure 3-5 Replacing Ink Cartridges 3-7 Replacing the Paper Cutter Blade 3-11 Removing the Used Cutter Blade 3-11 Installing ...
... 2-1 Monitoring Normal Printer Operation 2-2 Pausing and Resetting the Printer 2-2 Checking Printer Status 2-2 Printing a Status Check 2-3 Printing a Nozzle Check 2-3 Checking Ink Levels and Component Life 2-4 Responding to Control Panel Lights and Messages 2-5 Using the Control ... Transporting the Printer Running a Nozzle Check 3-1 Running a Cleaning Cycle 3-2 Aligning the Print Head 3-3 Printing the Alignment Patterns 3-3 Completing the Alignment Procedure 3-5 Replacing Ink Cartridges 3-7 Replacing the Paper Cutter Blade 3-11 Removing the Used Cutter Blade 3-11 Installing ...
User Manual
Page 11
...-specific instructions, and an introduction to the RIP from the User Software CD-ROM, and set up printing. Attach it to unpack and assemble the printer, install ink cartridges and paper, and prepare for printing. • The EPSON Stylus Pro 9000 Series Quick Reference Guide provides a handy summary of the procedures for daily use and printer maintenance-loading...
...-specific instructions, and an introduction to the RIP from the User Software CD-ROM, and set up printing. Attach it to unpack and assemble the printer, install ink cartridges and paper, and prepare for printing. • The EPSON Stylus Pro 9000 Series Quick Reference Guide provides a handy summary of the procedures for daily use and printer maintenance-loading...
User Manual
Page 12
...EPSON printer drivers and utilities for installing an optional Ethernet interface card. Introduction | 3 Using This Printer Guide This guide contains the following information: Chapter 1 gives instructions for Windows computers. Chapter 2 explains how to monitor the printer's status, respond to error messages on your printer, paper requirements, and ink cartridges.... Appendix C covers the installation and use of the book. 3 Chapter 3 gives instructions for problems involving print quality, printer operation, and paper handling....
...EPSON printer drivers and utilities for installing an optional Ethernet interface card. Introduction | 3 Using This Printer Guide This guide contains the following information: Chapter 1 gives instructions for Windows computers. Chapter 2 explains how to monitor the printer's status, respond to error messages on your printer, paper requirements, and ink cartridges.... Appendix C covers the installation and use of the book. 3 Chapter 3 gives instructions for problems involving print quality, printer operation, and paper handling....
User Manual
Page 14
... the form under the troubleshooting tab, as the password. You can reach EPSON's Professional Graphics Home Page at : www.epson.com (U.S. In Canada, please call (800) 873-7766 for energy efficiency. If you can purchase ink cartridges, paper, manuals, and accessories from EPSON at (800) 873-7766. sales only). ENERGY STAR Compliance As an ENERGY...
... the form under the troubleshooting tab, as the password. You can reach EPSON's Professional Graphics Home Page at : www.epson.com (U.S. In Canada, please call (800) 873-7766 for energy efficiency. If you can purchase ink cartridges, paper, manuals, and accessories from EPSON at (800) 873-7766. sales only). ENERGY STAR Compliance As an ENERGY...
User Manual
Page 16
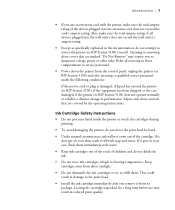
... Refer all devices plugged into the extension cord does not exceed the cord's ampere rating. Ink Cartridge Safety Instructions • Do not put your hand inside the printer or touch the cartridges during printing. • To avoid damaging the printer, do not attempt to refill them immediately with water... or other risks. Adjust only those covers that are marked "Do Not Remove" may result in damage to the print head. • Install the ink cartridge immediately after you use may expose you to qualified service personnel under the following conditions: If the power cord or ...
... Refer all devices plugged into the extension cord does not exceed the cord's ampere rating. Ink Cartridge Safety Instructions • Do not put your hand inside the printer or touch the cartridges during printing. • To avoid damaging the printer, do not attempt to refill them immediately with water... or other risks. Adjust only those covers that are marked "Do Not Remove" may result in damage to the print head. • Install the ink cartridge immediately after you use may expose you to qualified service personnel under the following conditions: If the power cord or ...

User Manual
Page 17
8 | Introduction • Do not use cartridges within six months of installation. • Before transporting the printer, remove the ink cartridges, close the ink valves, and install the carriage restraint (packing material). For best results, use an ink cartridge beyond the date printed on the cartridge package. See page 3-16 for complete instructions. 8
8 | Introduction • Do not use cartridges within six months of installation. • Before transporting the printer, remove the ink cartridges, close the ink valves, and install the carriage restraint (packing material). For best results, use an ink cartridge beyond the date printed on the cartridge package. See page 3-16 for complete instructions. 8


