Network Guide
Page 11
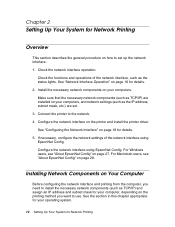
... details. 5. Check the network interface operation. Connect the printer to install the necessary network components (such as the status lights. If necessary, configure the network settings of the network interface, such as TCP/IP) and assign an IP address and subnet mask for your computers. See the section in this chapter appropriate for Network Printing See "Configuring the Network Interface" on how to use. Installing Network Components on page 27. Make sure...
... details. 5. Check the network interface operation. Connect the printer to install the necessary network components (such as the status lights. If necessary, configure the network settings of the network interface, such as TCP/IP) and assign an IP address and subnet mask for your computers. See the section in this chapter appropriate for Network Printing See "Configuring the Network Interface" on how to use. Installing Network Components on page 27. Make sure...
Network Guide
Page 20
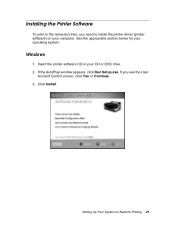
Click Install. Setting Up Your System for your CD or DVD drive. 2. Windows 1. See the appropriate section below for Network Printing 21 Insert the printer software CD in your operating system. If the AutoPlay window appears, click Run Setup.exe. If you need to the network printer, you see the User Account Control screen, click Yes or Continue. 3. Installing the Printer Software To print to install the printer driver (printer software) on your computer.
Click Install. Setting Up Your System for your CD or DVD drive. 2. Windows 1. See the appropriate section below for Network Printing 21 Insert the printer software CD in your operating system. If the AutoPlay window appears, click Run Setup.exe. If you need to the network printer, you see the User Account Control screen, click Yes or Continue. 3. Installing the Printer Software To print to install the printer driver (printer software) on your computer.
Quick Reference Guide
Page 5
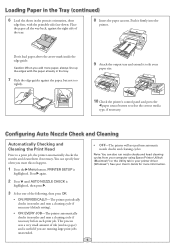
... the printer. Configuring Auto Nozzle Check and Cleaning Automatically Checking and Cleaning the Print Head Prior to happen. 1 Press the Menu button. Push it to select the correct media type, if necessary. Caution: When you add more information. 4 This process uses a very small amount of ink (and no paper) and is highlighted. Loading Paper in the Tray (continued) 6 Load the sheets in your printer driver (Windows®). PRINTER SETUP is useful if you want this to a print job, the printer automatically checks the nozzles and cleans them...
... the printer. Configuring Auto Nozzle Check and Cleaning Automatically Checking and Cleaning the Print Head Prior to happen. 1 Press the Menu button. Push it to select the correct media type, if necessary. Caution: When you add more information. 4 This process uses a very small amount of ink (and no paper) and is highlighted. Loading Paper in the Tray (continued) 6 Load the sheets in your printer driver (Windows®). PRINTER SETUP is useful if you want this to a print job, the printer automatically checks the nozzles and cleans them...

User's Guide
Page 9
... information, see the following: • The Quick Reference Guide provides a handy summary of your printer for easy reference. • The on-screen Network Guide provides instructions for daily use this book: WARNINGS must be followed carefully to your printer. 11 It also tells you use and printer maintenance-loading paper, replacing ink cartridges and other components, cleaning and aligning the print head, and using the printer's menu system. Tips contain additional hints on how...
... information, see the following: • The Quick Reference Guide provides a handy summary of your printer for easy reference. • The on-screen Network Guide provides instructions for daily use this book: WARNINGS must be followed carefully to your printer. 11 It also tells you use and printer maintenance-loading paper, replacing ink cartridges and other components, cleaning and aligning the print head, and using the printer's menu system. Tips contain additional hints on how...

User's Guide
Page 23
... you need to 10.6.x. Windows 1. Insert the printer software CD in your computer and printer are turned on the display. Connecting to Your System Your printer software works with Windows® 7, Windows Vista®, Windows XP Professional x64 Edition, Windows XP, and Macintosh OS X 10.5.x to load paper before READY will appear on and that the Epson Stylus Pro 4900 is completed, you have a compliant USB Hi-Speed 2.0 port and a shielded USB "AB" cable from Series...
... you need to 10.6.x. Windows 1. Insert the printer software CD in your computer and printer are turned on the display. Connecting to Your System Your printer software works with Windows® 7, Windows Vista®, Windows XP Professional x64 Edition, Windows XP, and Macintosh OS X 10.5.x to load paper before READY will appear on and that the Epson Stylus Pro 4900 is completed, you have a compliant USB Hi-Speed 2.0 port and a shielded USB "AB" cable from Series...

User's Guide
Page 28
... to install the printer driver (printer software) on your computer. Installing the Printer Software To print to the network printer, you can install the printer software (see the User Account Control screen, click Yes or Continue. 30 Insert the printer software CD in your operating system. Press the Menu r button on page 30). Windows 1. Now you need the IP address during setup. Press OK to enter the printer's menu system. 4. Printing a Network Status Sheet 1. Load 3 sheets of letter-size paper. 3. Press d to print a network status sheet and confirm the new IP address...
... to install the printer driver (printer software) on your computer. Installing the Printer Software To print to the network printer, you can install the printer software (see the User Account Control screen, click Yes or Continue. 30 Insert the printer software CD in your operating system. Press the Menu r button on page 30). Windows 1. Now you need the IP address during setup. Press OK to enter the printer's menu system. 4. Printing a Network Status Sheet 1. Load 3 sheets of letter-size paper. 3. Press d to print a network status sheet and confirm the new IP address...

User's Guide
Page 57
... even lines. You can make similar settings using the printer driver software. Press the l Paper Source button, then the d button for the most even. 9. The printer prints a pattern similar to print the paper thickness pattern. Press the Menu button, then press OK to the following: Smallest gap 1 2 3 4 5 6 7 8 9 10 11 12 13 14 15 16 8. For instructions, see dark lines. • PAPER FEED ADJUST B adjusts the paper feed adjustment value at the bottom of the cut sheets. • DRYING TIME lets you see white lines...
... even lines. You can make similar settings using the printer driver software. Press the l Paper Source button, then the d button for the most even. 9. The printer prints a pattern similar to print the paper thickness pattern. Press the Menu button, then press OK to the following: Smallest gap 1 2 3 4 5 6 7 8 9 10 11 12 13 14 15 16 8. For instructions, see dark lines. • PAPER FEED ADJUST B adjusts the paper feed adjustment value at the bottom of the cut sheets. • DRYING TIME lets you see white lines...

User's Guide
Page 59
...plan on printing borderless images on roll paper, check the guidelines on roll paper • Choosing basic print options • Choosing color management options • Choosing roll paper settings • Choosing cut sheet paper settings • Choosing page layout options • Choosing advanced black and white photo settings • Choosing paper configuration options • Saving, exporting, and importing groups of settings • Managing print jobs 61 61 Chapter 3: Printing With Epson Drivers for Windows Your Epson Stylus Pro 4900 comes with drivers and utilities that may...
...plan on printing borderless images on roll paper, check the guidelines on roll paper • Choosing basic print options • Choosing color management options • Choosing roll paper settings • Choosing cut sheet paper settings • Choosing page layout options • Choosing advanced black and white photo settings • Choosing paper configuration options • Saving, exporting, and importing groups of settings • Managing print jobs 61 61 Chapter 3: Printing With Epson Drivers for Windows Your Epson Stylus Pro 4900 comes with drivers and utilities that may...

User's Guide
Page 87
... print jobs 89 Make sure any profiles you plan on printing borderless images on roll paper, check the guidelines on installing and configuring the printer driver, see page 30. If you want to the right folder. This chapter includes the following information for Mac OS X: • Choosing page setup settings for instructions. ICC profiles for ColorSync® are located in the driver itself. For instructions on page 90 to size your image correctly. A color-managed workflow using...
... print jobs 89 Make sure any profiles you plan on printing borderless images on roll paper, check the guidelines on installing and configuring the printer driver, see page 30. If you want to the right folder. This chapter includes the following information for Mac OS X: • Choosing page setup settings for instructions. ICC profiles for ColorSync® are located in the driver itself. For instructions on page 90 to size your image correctly. A color-managed workflow using...
User's Guide
Page 115
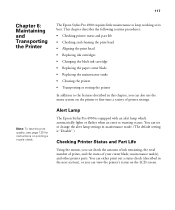
... which automatically lights or flashes when an error or warning occurs. You can check the amount of ink remaining, the total number of prints, and the status of printer settings. Alert Lamp The Epson Stylus Pro 4900 is "Disable".) Checking Printer Status and Part Life Using the menus, you can view the printer's status on printing a nozzle check. This chapter describes the following routine procedures: • Checking printer status and part life • Checking and cleaning the print head • Aligning the print head • Replacing ink cartridges • Changing the black ink...
... which automatically lights or flashes when an error or warning occurs. You can check the amount of ink remaining, the total number of prints, and the status of printer settings. Alert Lamp The Epson Stylus Pro 4900 is "Disable".) Checking Printer Status and Part Life Using the menus, you can view the printer's status on printing a nozzle check. This chapter describes the following routine procedures: • Checking printer status and part life • Checking and cleaning the print head • Aligning the print head • Replacing ink cartridges • Changing the black ink...

User's Guide
Page 141
... problems • Checking error messages and lights • Improving print quality • Solving operational problems • Solving miscellaneous printing problems • Solving paper problems, including clearing paper jams • Uninstalling and reinstalling the printer driver Diagnosing Problems The Epson Stylus Pro 4900 includes a number of the suggested solutions in this chapter solve your problem, contact Epson as described under "Where To Get Help" on the control panel. See pages 144 through 152 for error messages. See page 117 for instructions. • Review...
... problems • Checking error messages and lights • Improving print quality • Solving operational problems • Solving miscellaneous printing problems • Solving paper problems, including clearing paper jams • Uninstalling and reinstalling the printer driver Diagnosing Problems The Epson Stylus Pro 4900 includes a number of the suggested solutions in this chapter solve your problem, contact Epson as described under "Where To Get Help" on the control panel. See pages 144 through 152 for error messages. See page 117 for instructions. • Review...

User's Guide
Page 143
... CANCEL PRINTING, PRESS THE BUTTON TO CHANGE BLACK INK TO PRINT, PRESS THE BUTTON BORDERLESS ERROR LOAD A SUPPORTED PAPER SIZE OR LOAD PAPER CORRECTLY The borderless setting is selected and paper that the power cord is open . Change the setting in Press to switch to cancel the print job. CALL FOR SERVICE An error has occurred. Make sure paper is not loaded correctly. CARTRIDGE COVER OPEN The cartridge covers are open. setting in alphabetical order and includes an explanation and instructions for correcting the problem. Note the error number, then turn it back on or flash...
... CANCEL PRINTING, PRESS THE BUTTON TO CHANGE BLACK INK TO PRINT, PRESS THE BUTTON BORDERLESS ERROR LOAD A SUPPORTED PAPER SIZE OR LOAD PAPER CORRECTLY The borderless setting is selected and paper that the power cord is open . Change the setting in Press to switch to cancel the print job. CALL FOR SERVICE An error has occurred. Make sure paper is not loaded correctly. CARTRIDGE COVER OPEN The cartridge covers are open. setting in alphabetical order and includes an explanation and instructions for correcting the problem. Note the error number, then turn it back on or flash...
User's Guide
Page 144
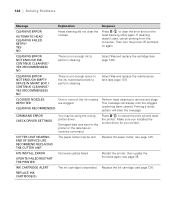
... was sent to remove any clogs. Make sure you installed the correct driver for your printer. CUTTER UNIT NEARING END OF SERVICE LIFE. INK CARTRIDGE ALERT The ink cartridge is not enough ink to cancel the print job and reset the printer. CLEANING ERROR NOT ENOUGH INK. Select Yes and replace the cartridge (see page 35. Printing a check pattern will display until the clogged nozzle has been cleared. COMMAND ERROR CHECK DRIVER SETTINGS You may be using the wrong printer driver. Replace the paper cutter; see page 126). Replace the ink cartridge; YES (RECOMMENDED...
... was sent to remove any clogs. Make sure you installed the correct driver for your printer. CUTTER UNIT NEARING END OF SERVICE LIFE. INK CARTRIDGE ALERT The ink cartridge is not enough ink to cancel the print job and reset the printer. CLEANING ERROR NOT ENOUGH INK. Select Yes and replace the cartridge (see page 35. Printing a check pattern will display until the clogged nozzle has been cleared. COMMAND ERROR CHECK DRIVER SETTINGS You may be using the wrong printer driver. Replace the paper cutter; see page 126). Replace the ink cartridge; YES (RECOMMENDED...

User's Guide
Page 148
... printing. PAPER SETTING ERROR CHECK THE PAPER SOURCE IN YOUR DRIVER SETTINGS OR RELOAD PAPER CORRECTLY The paper source selected in the printer driver and the control panel do not match. Remove the paper from the paper cassette and feed it manually into the front or rear paper feeder. INSERT PAPER LESS THAN 8 MM THICKNESS FROM REAR MANUAL FEEDER PAPER SETTING ERROR ROLL PAPER IS LOADED REMOVE IT AND CHANGE PAPER SOURCE SETTING TO ROLL PAPER The paper source selected in the paper cassette. of the image. Press the button and remove the jammed paper; Check the Paper Source...
... printing. PAPER SETTING ERROR CHECK THE PAPER SOURCE IN YOUR DRIVER SETTINGS OR RELOAD PAPER CORRECTLY The paper source selected in the printer driver and the control panel do not match. Remove the paper from the paper cassette and feed it manually into the front or rear paper feeder. INSERT PAPER LESS THAN 8 MM THICKNESS FROM REAR MANUAL FEEDER PAPER SETTING ERROR ROLL PAPER IS LOADED REMOVE IT AND CHANGE PAPER SOURCE SETTING TO ROLL PAPER The paper source selected in the paper cassette. of the image. Press the button and remove the jammed paper; Check the Paper Source...
User's Guide
Page 149
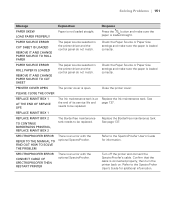
...The Ink maintenance tank is not loaded straight. SPECTROPROOFER ERROR CONNECT CABLE OF SPECTROPROOFER THEN RESTART PRINTER There is loaded correctly. Solving Problems | 151 Message Explanation PAPER SKEW Paper is at the end of its service life and needs to be replaced. LOAD PAPER PROPERLY PAPER SOURCE ERROR CUT SHEET IS LOADED REMOVE IT AND CHANGE PAPER SOURCE TO ROLL PAPER The paper source selected in the printer driver and the control panel do not match. Check the Paper Source or Paper Size settings and make sure the paper is open. Replace the Ink maintenance tank. See...
...The Ink maintenance tank is not loaded straight. SPECTROPROOFER ERROR CONNECT CABLE OF SPECTROPROOFER THEN RESTART PRINTER There is loaded correctly. Solving Problems | 151 Message Explanation PAPER SKEW Paper is at the end of its service life and needs to be replaced. LOAD PAPER PROPERLY PAPER SOURCE ERROR CUT SHEET IS LOADED REMOVE IT AND CHANGE PAPER SOURCE TO ROLL PAPER The paper source selected in the printer driver and the control panel do not match. Check the Paper Source or Paper Size settings and make sure the paper is open. Replace the Ink maintenance tank. See...

User's Guide
Page 151
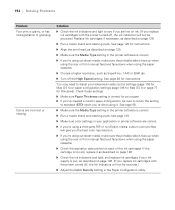
... the printer software is correct. ◗ If you're using cut sheet media, make sure the printable side is correct for your advanced media control settings (page 97 for Mac OS X) or paper configuration settings (page 77 for Windows or page 106 for instructions. ◗ Make sure the Media Type setting in the following table. See page 86 for instructions. ◗ Turn off the High Speed setting. Try adjusting your paper. ◗ Use the Paper Feed Adjustment to standard (STD) when you replace ink cartridges with the printer turned off, the ink...
... the printer software is correct. ◗ If you're using cut sheet media, make sure the printable side is correct for your advanced media control settings (page 97 for Mac OS X) or paper configuration settings (page 77 for Windows or page 106 for instructions. ◗ Make sure the Media Type setting in the following table. See page 86 for instructions. ◗ Turn off the High Speed setting. Try adjusting your paper. ◗ Use the Paper Feed Adjustment to standard (STD) when you replace ink cartridges with the printer turned off, the ink...
User's Guide
Page 152
... the printer software is low, as described on page 126. (If you replace ink cartridges with the printer turned off, the ink indicators will not be sure to return the setting to adjust your ink supply is correct. ◗ Run a nozzle check and cleaning cycle; Check these settings: ◗ Make sure Paper Thickness setting is correct for instructions. ◗ Align the print head, as described on page 126. ◗ Check the ink indicators and light, and replace ink cartridges if your advanced media control settings (page 106 for Mac OS X) or paper configuration settings (page...
... the printer software is low, as described on page 126. (If you replace ink cartridges with the printer turned off, the ink indicators will not be sure to return the setting to adjust your ink supply is correct. ◗ Run a nozzle check and cleaning cycle; Check these settings: ◗ Make sure Paper Thickness setting is correct for instructions. ◗ Align the print head, as described on page 126. ◗ Check the ink indicators and light, and replace ink cartridges if your advanced media control settings (page 106 for Mac OS X) or paper configuration settings (page...

User's Guide
Page 153
... setting to adjust the paper thickness setting, drying time, or color density. See page 57 for Windows) to standard (STD). ◗ Your paper doesn't meet the required specifications or wasn't stored in the printer software is correct. ◗ If you're printing on non-Epson media, you 're using cut sheet media, make sure PAPER SIZE CHECK is ON in the printer software is correct. ◗ Run a nozzle check and cleaning cycle (see page 120). ◗ Check the ink indicators and light and replace ink cartridges if your printer software (page...
... setting to adjust the paper thickness setting, drying time, or color density. See page 57 for Windows) to standard (STD). ◗ Your paper doesn't meet the required specifications or wasn't stored in the printer software is correct. ◗ If you're printing on non-Epson media, you 're using cut sheet media, make sure PAPER SIZE CHECK is ON in the printer software is correct. ◗ Run a nozzle check and cleaning cycle (see page 120). ◗ Check the ink indicators and light and replace ink cartridges if your printer software (page...

User's Guide
Page 155
... installed correctly and the printer is selected. ◗ Make sure the Paper Size setting in your printer software is correct for Macintosh or Windows from the Epson website at both ends. ◗ Check the page size or paper size settings in your printer port is correct. 157 Then restart the printer and computer. ◗ Make sure the interface cable meets the requirements; Solving Problems | 157 Problem Nothing prints. Make sure the interface cable is selected. ◗ Clear any stalled print jobs. ◗ Turn...
... installed correctly and the printer is selected. ◗ Make sure the Paper Size setting in your printer software is correct for Macintosh or Windows from the Epson website at both ends. ◗ Check the page size or paper size settings in your printer port is correct. 157 Then restart the printer and computer. ◗ Make sure the interface cable meets the requirements; Solving Problems | 157 Problem Nothing prints. Make sure the interface cable is selected. ◗ Clear any stalled print jobs. ◗ Turn...

User's Guide
Page 161
Select your software. 3. Select EPSON Printer Software in the program list and click Change/Remove. 2. Windows XP: Click Start > Control Panel > Add or Remove Programs. Select EPSON Printer Software in the program list. Follow the on-screen instructions to install the software. 163 Select System Preferences, then select Print & Fax. 2. Then follow the instructions on page 30 to uninstall and then reinstall the printer driver software for updated drivers and utilities that may become available. If you want...
Select your software. 3. Select EPSON Printer Software in the program list and click Change/Remove. 2. Windows XP: Click Start > Control Panel > Add or Remove Programs. Select EPSON Printer Software in the program list. Follow the on-screen instructions to install the software. 163 Select System Preferences, then select Print & Fax. 2. Then follow the instructions on page 30 to uninstall and then reinstall the printer driver software for updated drivers and utilities that may become available. If you want...


