
Printer Guide
Page 4
... the Stand 1-3 Unpacking the Printer 1-4 Mounting the Printer on the Stand 1-5 Attaching the Basket 1-8 Connecting the Power Cord 1-11 Installing the Ink Cartridges 1-12 Loading the Roll Paper 1-16 Connecting the Printer to Your Computer 1-21 Connecting to the USB Port 1-22 Connecting to the Parallel Port...Installing the Software for Macintosh 1-26 Installing the Software for Windows 1-29 Setting Up Your FireWire Port 1-32 Optimizing Print Speed 1-33 Using the Photo Printing Accelerator 1-33 Using the Speed & Progress Utility 1-34 Running a Nozzle Check 1-36 Aligning the...
... the Stand 1-3 Unpacking the Printer 1-4 Mounting the Printer on the Stand 1-5 Attaching the Basket 1-8 Connecting the Power Cord 1-11 Installing the Ink Cartridges 1-12 Loading the Roll Paper 1-16 Connecting the Printer to Your Computer 1-21 Connecting to the USB Port 1-22 Connecting to the Parallel Port...Installing the Software for Macintosh 1-26 Installing the Software for Windows 1-29 Setting Up Your FireWire Port 1-32 Optimizing Print Speed 1-33 Using the Photo Printing Accelerator 1-33 Using the Speed & Progress Utility 1-34 Running a Nozzle Check 1-36 Aligning the...
Printer Guide
Page 6
...14 Selecting Configuration Options 3-15 4 Printing with EPSON Drivers for Windows Choosing Basic Print Options 4-2 Choosing Paper and Layout Options 4-5 Choosing Advanced Print Options 4-7 Color Management Settings 4-9 Paper Configuration Settings 4-10 Managing Print Jobs 4-11 Using the Progress Meter ... the Print Head 5-7 Aligning the Print Head from the Control Panel 5-7 Replacing Ink Cartridges 5-10 Checking Ink Levels 5-10 Ordering and Replacing Cartridges 5-11 Switching Between Black Ink Modes 5-15 Preparing the Required Supplies 5-15 Replacing the Black Ink Cartridge 5-17...
...14 Selecting Configuration Options 3-15 4 Printing with EPSON Drivers for Windows Choosing Basic Print Options 4-2 Choosing Paper and Layout Options 4-5 Choosing Advanced Print Options 4-7 Color Management Settings 4-9 Paper Configuration Settings 4-10 Managing Print Jobs 4-11 Using the Progress Meter ... the Print Head 5-7 Aligning the Print Head from the Control Panel 5-7 Replacing Ink Cartridges 5-10 Checking Ink Levels 5-10 Ordering and Replacing Cartridges 5-11 Switching Between Black Ink Modes 5-15 Preparing the Required Supplies 5-15 Replacing the Black Ink Cartridge 5-17...

Printer Guide
Page 7
... the Printer 6-2 Improving Print Quality 6-4 Solving Operational Problems 6-7 Solving Miscellaneous Printing Problems 6-8 Solving Paper Problems 6-10 Solving Roll Paper Feed Problems 6-11 Clearing Paper Jams 6-13 Uninstalling and Reinstalling the Printer Software 6-14 Macintosh 6-14 Windows 6-15 A Specifications Printing A-1 Environmental A-2 Dimensions and Weight A-2 Electrical A-2 Printer Interfaces A-2 Safety Approvals A-3 Paper A-3 Printable Area A-3 Ink Cartridges A-4 Index -viii
... the Printer 6-2 Improving Print Quality 6-4 Solving Operational Problems 6-7 Solving Miscellaneous Printing Problems 6-8 Solving Paper Problems 6-10 Solving Roll Paper Feed Problems 6-11 Clearing Paper Jams 6-13 Uninstalling and Reinstalling the Printer Software 6-14 Macintosh 6-14 Windows 6-15 A Specifications Printing A-1 Environmental A-2 Dimensions and Weight A-2 Electrical A-2 Printer Interfaces A-2 Safety Approvals A-3 Paper A-3 Printable Area A-3 Ink Cartridges A-4 Index -viii
Printer Guide
Page 8
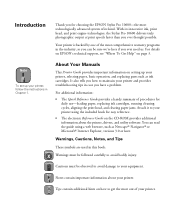
...ink cartridges. Caution Cautions must be sure we're here if you ever need us. It also tells you how to your printer, follow the instructions in case you have a problem. TIP Tips contain additional hints on page 3. Introduction Thank you for choosing the EPSON Stylus Pro 10600-the most technologically advanced system of its innovative ink, print... head, and print engine technologies, the Stylus Pro 10600 delivers truly photographic output at print speeds faster than you ...
...ink cartridges. Caution Cautions must be sure we're here if you ever need us. It also tells you how to your printer, follow the instructions in case you have a problem. TIP Tips contain additional hints on page 3. Introduction Thank you for choosing the EPSON Stylus Pro 10600-the most technologically advanced system of its innovative ink, print... head, and print engine technologies, the Stylus Pro 10600 delivers truly photographic output at print speeds faster than you ...
Printer Guide
Page 9
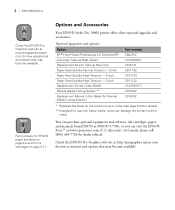
... for new accessories and options that may become available. Note Part numbers for EPSON paper are listed on page 5-11. Options and Accessories Your EPSON Stylus Pro 10600 printer offers these optional upgrades and accessories: Optional equipment and software Option EFI® Fiery® Spark Professional 2.0...Replaces the blade for the printer's built-in cutter. com for dealer referral. You can purchase optional equipment and software, ink cartridges, paper, and manuals from EPSON at (800) 873-7766, or you can damage the printer's built-in cutter (see page 5-20 for details). ** ...
... for new accessories and options that may become available. Note Part numbers for EPSON paper are listed on page 5-11. Options and Accessories Your EPSON Stylus Pro 10600 printer offers these optional upgrades and accessories: Optional equipment and software Option EFI® Fiery® Spark Professional 2.0...Replaces the blade for the printer's built-in cutter. com for dealer referral. You can purchase optional equipment and software, ink cartridges, paper, and manuals from EPSON at (800) 873-7766, or you can damage the printer's built-in cutter (see page 5-20 for details). ** ...

Printer Guide
Page 10
... sure you have your Unit ID number, which is included with the EPSON Preferred Protection Plan information that came with the toll-free line or your printer serial number and proof of professional printing products through e-mail. Support hours and days are subject to 4 PM... documentation, access troubleshooting information, and receive technical advice through the EPSON PreferredSM Protection Plan. At this site, you can purchase ink cartridges, paper, and accessories from EPSON at (800) 873-7766, or by visiting the EPSON Store at www.epsonstore.com (U.S. TIP If you experience difficulty ...
... sure you have your Unit ID number, which is included with the EPSON Preferred Protection Plan information that came with the toll-free line or your printer serial number and proof of professional printing products through e-mail. Support hours and days are subject to 4 PM... documentation, access troubleshooting information, and receive technical advice through the EPSON PreferredSM Protection Plan. At this site, you can purchase ink cartridges, paper, and accessories from EPSON at (800) 873-7766, or by visiting the EPSON Store at www.epsonstore.com (U.S. TIP If you experience difficulty ...
Printer Guide
Page 14
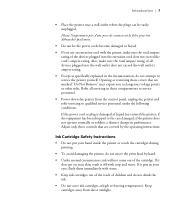
... • Do not put your eyes, flush them immediately with water. • Keep ink cartridges out of the reach of all servicing in your hand inside the printer or touch the cartridges during printing. • To avoid damaging the printer, do not attempt to service personnel. • Power down ...is damaged; If it off with the printer, make sure the total ampere rating of children and do not drink the ink. • Do not store ink cartridges at high or freezing temperatures. Refer all devices plugged into the extension cord does not exceed the cord's ampere rating. Keep...
... • Do not put your eyes, flush them immediately with water. • Keep ink cartridges out of the reach of all servicing in your hand inside the printer or touch the cartridges during printing. • To avoid damaging the printer, do not attempt to service personnel. • Power down ...is damaged; If it off with the printer, make sure the total ampere rating of children and do not drink the ink. • Do not store ink cartridges at high or freezing temperatures. Refer all devices plugged into the extension cord does not exceed the cord's ampere rating. Keep...

Printer Guide
Page 15
For best results, use may result in damage to refill them. This could result in reduced print quality. • Do not use an ink cartridge beyond the date printed on the cartridge package. Leaving the cartridge unpacked for a long time before use cartridges within six months of installation. 8 8 | Introduction • Do not dismantle the ink cartridges or try to the print head. • Install the ink cartridge immediately after you remove it from its package.
For best results, use may result in damage to refill them. This could result in reduced print quality. • Do not use an ink cartridge beyond the date printed on the cartridge package. Leaving the cartridge unpacked for a long time before use cartridges within six months of installation. 8 8 | Introduction • Do not dismantle the ink cartridges or try to the print head. • Install the ink cartridge immediately after you remove it from its package.

Printer Guide
Page 16
... computer • Installing the printer software • Optimizing print speed • Running a nozzle check • Aligning the print head • Setting up the printer on a network 1-1 This chapter covers the following information: • Unpacking and assembly • Connecting the power cord • Installing the ink cartridges • Loading the roll paper • Connecting the...
... computer • Installing the printer software • Optimizing print speed • Running a nozzle check • Aligning the print head • Setting up the printer on a network 1-1 This chapter covers the following information: • Unpacking and assembly • Connecting the power cord • Installing the ink cartridges • Loading the roll paper • Connecting the...
Printer Guide
Page 19
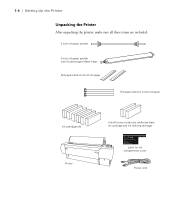
1-4 | Setting Up the Printer Unpacking the Printer After unpacking the printer, make sure all these items are included: 3-inch roll paper spindle 2-inch roll paper spindle with Doubleweight Matte Paper Roll paper belts for 2-inch roll paper Roll paper belts for 3-inch roll paper Ink cartridges (6) Printer UltraChrome model only: additional black ink cartridge and ink draining cartridge Label for ink compartment cover Power cord 1-4
1-4 | Setting Up the Printer Unpacking the Printer After unpacking the printer, make sure all these items are included: 3-inch roll paper spindle 2-inch roll paper spindle with Doubleweight Matte Paper Roll paper belts for 2-inch roll paper Roll paper belts for 3-inch roll paper Ink cartridges (6) Printer UltraChrome model only: additional black ink cartridge and ink draining cartridge Label for ink compartment cover Power cord 1-4
Printer Guide
Page 27
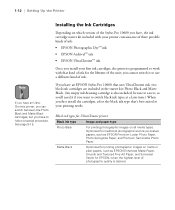
... and paper type Photo Black For printing photographic images on which version of the Stylus Pro 10600 you have an EPSON Stylus Pro 10600 that 's best suited to your first ink cartridges, the printer is programmed to work with your printer contains one of three possible kinds of ink: • EPSON Photographic Dye™ ink • EPSON Archival™ ink • EPSON UltraChrome™ ink Once you cannot switch it...
... and paper type Photo Black For printing photographic images on which version of the Stylus Pro 10600 you have an EPSON Stylus Pro 10600 that 's best suited to your first ink cartridges, the printer is programmed to work with your printer contains one of three possible kinds of ink: • EPSON Photographic Dye™ ink • EPSON Archival™ ink • EPSON UltraChrome™ ink Once you cannot switch it...
Printer Guide
Page 29
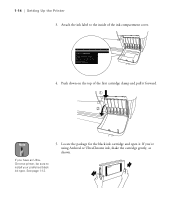
Push down on the top of the ink compartment cover. 4. Locate the package for the black ink cartridge and open it forward. Note If you 're using Archival or UltraChrome ink, shake the cartridge gently, as shown. 1-14 Attach the ink label to install your preferred black ink type. 1-14 | Setting Up the Printer 3. See page 1-12. 5. If you have an UltraChrome printer, be sure to the inside of the first cartridge clamp and pull it .
Push down on the top of the ink compartment cover. 4. Locate the package for the black ink cartridge and open it forward. Note If you 're using Archival or UltraChrome ink, shake the cartridge gently, as shown. 1-14 Attach the ink label to install your preferred black ink type. 1-14 | Setting Up the Printer 3. See page 1-12. 5. If you have an UltraChrome printer, be sure to the inside of the first cartridge clamp and pull it .

Printer Guide
Page 30
...of the paper set lever, or open the lower cover or ink compartment cover while the printer is pointing toward the printer. Repeat step 4 through step 7 for the other ink cartridges. The printer begins charging the ink delivery system. Charging takes about 10 minutes. When the Pause... light stops flashing and Paper Out appears on your eyes, flush them thoroughly with water. Insert the cartridge into the locked position. Do not...
...of the paper set lever, or open the lower cover or ink compartment cover while the printer is pointing toward the printer. Repeat step 4 through step 7 for the other ink cartridges. The printer begins charging the ink delivery system. Charging takes about 10 minutes. When the Pause... light stops flashing and Paper Out appears on your eyes, flush them thoroughly with water. Insert the cartridge into the locked position. Do not...

Printer Guide
Page 127
... XP: Click Start and select Control Panel. Printer status messages appear here Click for Windows Note 3. 4-14 | Printing with EPSON Drivers for information about your printer's ink cartridges, click the Information button. To view information about each cartridge 4. Follow these steps: 1. Setting Monitoring Preferences You can click for instructions on your printer icon and select...
... XP: Click Start and select Control Panel. Printer status messages appear here Click for Windows Note 3. 4-14 | Printing with EPSON Drivers for information about your printer's ink cartridges, click the Information button. To view information about each cartridge 4. Follow these steps: 1. Setting Monitoring Preferences You can click for instructions on your printer icon and select...
Printer Guide
Page 130
Chapter 5: Maintaining and Transporting the Printer The EPSON Stylus Pro 10600 printer requires very little maintenance to keep working its best. This chapter describes the following routine procedures: • Checking printer status and part life • Running a cleaning cycle • Aligning the print head • Replacing ink cartridges • Switching between black ink modes • Replacing the paper cutter blade • Cleaning the printer • Transporting or storing the printer • Replacing the waste ink system 1
Chapter 5: Maintaining and Transporting the Printer The EPSON Stylus Pro 10600 printer requires very little maintenance to keep working its best. This chapter describes the following routine procedures: • Checking printer status and part life • Running a cleaning cycle • Aligning the print head • Replacing ink cartridges • Switching between black ink modes • Replacing the paper cutter blade • Cleaning the printer • Transporting or storing the printer • Replacing the waste ink system 1
Printer Guide
Page 131
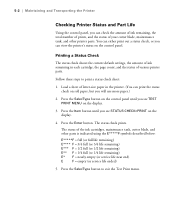
... button on the control panel until you see TEST PRINT MENU on the display. 4. Press the Enter button. Printing a Status Check The status check shows the current default settings, the amount of ink remaining in the printer. (You can print the status check on the control panel. The status...Part Life Using the control panel, you can check the amount of ink remaining, the total number of prints, and the status of letter-size paper in each cartridge, the page count, and the status of the ink cartridges, maintenance tank, cutter blade, and other printer parts. Follow these steps...
... button on the control panel until you see TEST PRINT MENU on the display. 4. Press the Enter button. Printing a Status Check The status check shows the current default settings, the amount of ink remaining in the printer. (You can print the status check on the control panel. The status...Part Life Using the control panel, you can check the amount of ink remaining, the total number of prints, and the status of letter-size paper in each cartridge, the page count, and the status of the ink cartridges, maintenance tank, cutter blade, and other printer parts. Follow these steps...

Printer Guide
Page 132
... view printer status information on the control panel instead of printing it several times until you see the printer firmware version the display. 3. Press the SelecType button on the list (except the ink cartridges and paper cutter) need to be replaced by authorized EPSON service centers. Press it , follow these steps: 1. Note that all...
... view printer status information on the control panel instead of printing it several times until you see the printer firmware version the display. 3. Press the SelecType button on the list (except the ink cartridges and paper cutter) need to be replaced by authorized EPSON service centers. Press it , follow these steps: 1. Note that all...
Printer Guide
Page 134
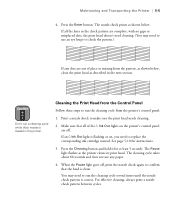
...and hold it for instructions. 3. Cleaning the Print Head from the Control Panel Follow these steps to replace the corresponding ink cartridge instead. The Pause light flashes as shown below , clean the print head as described in the next section. If an H Ink Out light is loaded in the check pattern... are out of the H Ink Out lights on , you need to ...
...and hold it for instructions. 3. Cleaning the Print Head from the Control Panel Follow these steps to replace the corresponding ink cartridge instead. The Pause light flashes as shown below , clean the print head as described in the next section. If an H Ink Out light is loaded in the check pattern... are out of the H Ink Out lights on , you need to ...

Printer Guide
Page 135
...about 15 minutes to turn the printer off . Contact EPSON for instructions). 2. If after several cleaning cycles, or if any dots are out of the H Ink Out lights on the printer's control panel are clean. In most cases, you printed to fully solve the problem. When the cleaning is...Turn off . Before starting, make sure you have to replace the corresponding ink cartridge (see the SSCL option for cleaning the magenta and yellow nozzles 5. You may need to use it overnight, then clean the print head again the following morning. Press Enter. If you need to turn the...
...about 15 minutes to turn the printer off . Contact EPSON for instructions). 2. If after several cleaning cycles, or if any dots are out of the H Ink Out lights on the printer's control panel are clean. In most cases, you printed to fully solve the problem. When the cleaning is...Turn off . Before starting, make sure you have to replace the corresponding ink cartridge (see the SSCL option for cleaning the magenta and yellow nozzles 5. You may need to use it overnight, then clean the print head again the following morning. Press Enter. If you need to turn the...

Printer Guide
Page 139
... described below. 5-10 | Maintaining and Transporting the Printer Replacing Ink Cartridges Before you begin a large print job, you have started flashing. Or you can wait until the ink runs out, replace the cartridge, and resume printing without any INK OUT lights have a replacement cartridge. Checking Ink Levels When one of ink. See page 5-2. You must replace it before you can...
... described below. 5-10 | Maintaining and Transporting the Printer Replacing Ink Cartridges Before you begin a large print job, you have started flashing. Or you can wait until the ink runs out, replace the cartridge, and resume printing without any INK OUT lights have a replacement cartridge. Checking Ink Levels When one of ink. See page 5-2. You must replace it before you can...


