
Product Brochure
Page 1
.../mobileprinting • Superior image enhancement tools - share one printer at home with multiple PCs, wirelessly, now with one ink set • Replace only the color you need - even highlighter friendly scan and archive important papers, photos and more • Easy wireless printing - Epson Stylus® NX625 Print | Copy | Scan | Photo | Wi-Fi® Smart...
.../mobileprinting • Superior image enhancement tools - share one printer at home with multiple PCs, wirelessly, now with one ink set • Replace only the color you need - even highlighter friendly scan and archive important papers, photos and more • Easy wireless printing - Epson Stylus® NX625 Print | Copy | Scan | Photo | Wi-Fi® Smart...

Product Brochure
Page 2
....2" x 6.7" Storage: 17.5" x 14.4" x 6.7" Weight: 13.7 lb Epson Stylus NX625 color all -in-ones priced at www.epson.com/recycle 9 SmartWay is an innovative partnership of Epson America, Inc. For details, see www.epson.com/cartridgeinfo 8 See our website for convenient and reasonable recycling options at $199... for printer startup and a variable amount of ink remains in the cartridges after the "replace cartridge" signal. Black and color two-sided print speeds are used for printing and all-in-one color. Epson does not guarantee the longevity of prints. Epson Stylus® NX625 Print...
....2" x 6.7" Storage: 17.5" x 14.4" x 6.7" Weight: 13.7 lb Epson Stylus NX625 color all -in-ones priced at www.epson.com/recycle 9 SmartWay is an innovative partnership of Epson America, Inc. For details, see www.epson.com/cartridgeinfo 8 See our website for convenient and reasonable recycling options at $199... for printer startup and a variable amount of ink remains in the cartridges after the "replace cartridge" signal. Black and color two-sided print speeds are used for printing and all-in-one color. Epson does not guarantee the longevity of prints. Epson Stylus® NX625 Print...
Quick Reference Guide
Page 6
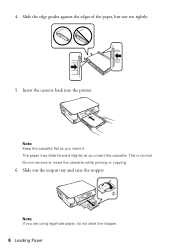
Slide the edge guides against the edges of the paper, but not too tightly. 5. Insert the cassette back into the printer. Note: Keep the cassette flat as you insert the cassette. Slide out the output tray and raise the stopper. Note: If you insert it. This is normal. The paper may slide forward slightly as you are using legal-size paper, do not raise the stopper. 6 Loading Paper Do not remove or insert the cassette while printing or copying. 6. 4.
Slide the edge guides against the edges of the paper, but not too tightly. 5. Insert the cassette back into the printer. Note: Keep the cassette flat as you insert the cassette. Slide out the output tray and raise the stopper. Note: If you insert it. This is normal. The paper may slide forward slightly as you are using legal-size paper, do not raise the stopper. 6 Loading Paper Do not remove or insert the cassette while printing or copying. 6. 4.

Quick Reference Guide
Page 12
.... Caution: If your photos, follow these steps to select and print your digital camera's memory card. Do not remove the card or turn off the printer: ■ Windows®: Right-click the name of the following before inserting the card into the slot, as shown. See the online User's Guide to...
.... Caution: If your photos, follow these steps to select and print your digital camera's memory card. Do not remove the card or turn off the printer: ■ Windows®: Right-click the name of the following before inserting the card into the slot, as shown. See the online User's Guide to...
Quick Reference Guide
Page 14
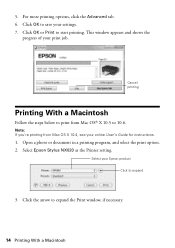
This window appears and shows the progress of your Epson product Click to print from Mac OS X 10.4, see your settings. 7. Select your print job. Click OK or Print to expand the Print window, if ... Printing With a Macintosh Follow the steps below to expand 3. Click the arrow to start printing. For more printing options, click the Advanced tab. 6. Select Epson Stylus NX620 as the Printer setting. Click OK to 10.6. Note: If you're printing from Mac OS® X 10.5 to save your online User's Guide for instructions...
This window appears and shows the progress of your Epson product Click to print from Mac OS X 10.4, see your settings. 7. Select your print job. Click OK or Print to expand the Print window, if ... Printing With a Macintosh Follow the steps below to expand 3. Click the arrow to start printing. For more printing options, click the Advanced tab. 6. Select Epson Stylus NX620 as the Printer setting. Click OK to 10.6. Note: If you're printing from Mac OS® X 10.5 to save your online User's Guide for instructions...
Quick Reference Guide
Page 16
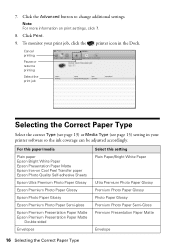
... Presentation Paper Matte Double-sided Envelopes Select this paper/media Plain paper Epson Bright White Paper Epson Presentation Paper Matte Epson Iron-on print settings, click ?. 8. To monitor your print job, click the printer icon in your printer software so the ink coverage can be adjusted accordingly. Cancel printing Pause or resume printing Select the...
... Presentation Paper Matte Double-sided Envelopes Select this paper/media Plain paper Epson Bright White Paper Epson Presentation Paper Matte Epson Iron-on print settings, click ?. 8. To monitor your print job, click the printer icon in your printer software so the ink coverage can be adjusted accordingly. Cancel printing Pause or resume printing Select the...

Quick Reference Guide
Page 26
... for the First Time" on page 27. ■ If your product is connected to the network, you follow the instructions on the printer to select wireless settings instead. You must install the software on page 37. 26 Network Setup For the first installation, we recommend using ...remove the cable. Follow the instructions in this section provide detailed instructions for setting up your product on a wireless network. After the printer is already on your product on a wireless or wired network. Network Setup This section provides detailed instructions for setting up your wireless ...
... for the First Time" on page 27. ■ If your product is connected to the network, you follow the instructions on the printer to select wireless settings instead. You must install the software on page 37. 26 Network Setup For the first installation, we recommend using ...remove the cable. Follow the instructions in this section provide detailed instructions for setting up your product on a wireless network. After the printer is already on your product on a wireless or wired network. Network Setup This section provides detailed instructions for setting up your wireless ...

Quick Reference Guide
Page 28
Then skip to "Setting Up With the Product Buttons" on page 33 to set up printer for the first time, then click Next. 7. When you see this screen, select Wireless connection and click Next. 6. Mac OS X 10.6: At the next screen, click Next. 5. When you see this screen, select Set up the product without using a temporary USB connection. 28 Wireless Network Setup
Then skip to "Setting Up With the Product Buttons" on page 33 to set up printer for the first time, then click Next. 7. When you see this screen, select Wireless connection and click Next. 6. Mac OS X 10.6: At the next screen, click Next. 5. When you see this screen, select Set up the product without using a temporary USB connection. 28 Wireless Network Setup

Quick Reference Guide
Page 29
8. When you selected Using printer buttons, continue with "Setting Up With the Product Buttons" on page 33. At the next screen, click Next. 10. Wireless Network Setup 29 Do one of the following: ■ If you selected Using temporary USB cable connection, continue with "Setting Up With a Temporary USB Cable" on setup methods. 9. for more information on page 30. ■ If you see this screen, select a wireless network setup method, then click Next. Tip: If you need help selecting a wireless network setup method, click Which option should I choose?
8. When you selected Using printer buttons, continue with "Setting Up With the Product Buttons" on page 33. At the next screen, click Next. 10. Wireless Network Setup 29 Do one of the following: ■ If you selected Using temporary USB cable connection, continue with "Setting Up With a Temporary USB Cable" on setup methods. 9. for more information on page 30. ■ If you see this screen, select a wireless network setup method, then click Next. Tip: If you need help selecting a wireless network setup method, click Which option should I choose?

Quick Reference Guide
Page 38
Mac OS X 10.6: Skip to let EpsonNet Setup continue. Do not select Ask Me Later, Keep Blocking, or Block. 38 Wireless Network Setup When you see a firewall alert message, click Unblock or Allow to step 13 on my wireless network, then click Next. 7. Note: If you see the Firewall Warning screen, click Next. 6. When you see this screen, select The printer is installed. 8. Wait while the software is already on page 39. 9.
Mac OS X 10.6: Skip to let EpsonNet Setup continue. Do not select Ask Me Later, Keep Blocking, or Block. 38 Wireless Network Setup When you see a firewall alert message, click Unblock or Allow to step 13 on my wireless network, then click Next. 7. Note: If you see the Firewall Warning screen, click Next. 6. When you see this screen, select The printer is installed. 8. Wait while the software is already on page 39. 9.

Quick Reference Guide
Page 42
... already been set up for network printing and you want to be able to print from an additional computer, choose The printer is installed, then click Next to start network installation. 42 Wired (Ethernet) Network Setup For first-time installation only: Connect the product to step 15 ...
... already been set up for network printing and you want to be able to print from an additional computer, choose The printer is installed, then click Next to start network installation. 42 Wired (Ethernet) Network Setup For first-time installation only: Connect the product to step 15 ...

Quick Reference Guide
Page 45
Solving Problems 45 LCD screen messages Printer error Scanner error Paper jam The printer's ink pads are saturated, the product stops and you will need to contact Epson (see page 50). You can also check the basic troubleshooting suggestions beginning on . You can select Driver Update ...click Driver Update. Checking for free updates to proceed. Solving Problems If you have a problem with your Epson product, check the messages on the Maintenance tab in the printer settings window. Open your product software. If the error is jammed inside (see one of the error ...
Solving Problems 45 LCD screen messages Printer error Scanner error Paper jam The printer's ink pads are saturated, the product stops and you will need to contact Epson (see page 50). You can also check the basic troubleshooting suggestions beginning on . You can select Driver Update ...click Driver Update. Checking for free updates to proceed. Solving Problems If you have a problem with your Epson product, check the messages on the Maintenance tab in the printer settings window. Open your product software. If the error is jammed inside (see one of the error ...

Quick Reference Guide
Page 47
... 3. Problems and Solutions 47 If the scan did not complete, lower the resolution. ■ If network communication was interrupted while starting Epson Scan, exit Epson Scan, and restart it above the arrow marks on the edge guides. ■ Make sure the paper you are scanning a large ...whiter, brighter, or glossy side). Cannot scan over the network ■ Epson Scan is not available in EPSON Scan Settings. Print a Network Status Sheet 1. Printing and Copying Problems ■ Make sure your printer software (see the Epson Scan Help. Load it short edge first and don't load it after ...
... 3. Problems and Solutions 47 If the scan did not complete, lower the resolution. ■ If network communication was interrupted while starting Epson Scan, exit Epson Scan, and restart it above the arrow marks on the edge guides. ■ Make sure the paper you are scanning a large ...whiter, brighter, or glossy side). Cannot scan over the network ■ Epson Scan is not available in EPSON Scan Settings. Print a Network Status Sheet 1. Printing and Copying Problems ■ Make sure your printer software (see the Epson Scan Help. Load it short edge first and don't load it after ...

Quick Reference Guide
Page 48
... scanner glass. If the black cartridge is expended, you must replace it to continue printing temporarily with black ink; If that doesn't help, turn the printer off and check the following areas: 1. If paper has jammed, follow the steps on page 4. ■ Position your original away from the edges slightly...
... scanner glass. If the black cartridge is expended, you must replace it to continue printing temporarily with black ink; If that doesn't help, turn the printer off and check the following areas: 1. If paper has jammed, follow the steps on page 4. ■ Position your original away from the edges slightly...

Quick Reference Guide
Page 49
... Guide for jammed paper. 3. Open the cover on ink. Print Quality Problems ■ For the best print quality, use a small amount of the printer and check for instructions. ■ The ink cartridges may be low on the duplexer to see if the print head needs cleaning. ■ If you... notice jagged vertical lines, you notice light or dark bands across your printouts or they are not recommended), or use Epson papers (see page 7) and genuine Epson ink cartridges (see page 20) to remove any paper, if necessary. Check your cartridge levels (see page 22) and replace cartridges,...
... Guide for jammed paper. 3. Open the cover on ink. Print Quality Problems ■ For the best print quality, use a small amount of the printer and check for instructions. ■ The ink cartridges may be low on the duplexer to see if the print head needs cleaning. ■ If you... notice jagged vertical lines, you notice light or dark bands across your printouts or they are not recommended), or use Epson papers (see page 7) and genuine Epson ink cartridges (see page 20) to remove any paper, if necessary. Check your cartridge levels (see page 22) and replace cartridges,...
Quick Reference Guide
Page 52
..., see a doctor immediately. 52 Notices ■ Do not use liquid or chemical cleansers. ■ If the LCD screen is damaged, contact Epson. LCD Screen Safety ■ Use only a dry, soft cloth to qualified service personnel under the following conditions: if the power cord or plug... that you may damage both devices connected by the operating instructions. Inserting a connector in the wrong orientation may damage the printer. ■ Before transporting the printer, make sure that are in the home (far right) position and the ink cartridges are covered by the cable. ■...
..., see a doctor immediately. 52 Notices ■ Do not use liquid or chemical cleansers. ■ If the LCD screen is damaged, contact Epson. LCD Screen Safety ■ Use only a dry, soft cloth to qualified service personnel under the following conditions: if the power cord or plug... that you may damage both devices connected by the operating instructions. Inserting a connector in the wrong orientation may damage the printer. ■ Before transporting the printer, make sure that are in the home (far right) position and the ink cartridges are covered by the cable. ■...

Quick Reference Guide
Page 54
... and Power Supplies used with 47CFR Part 2 and 15 of the FCC rules as automatic doors or fire alarms. Radio waves from this product at : Epson America, Inc. Trade Name: Epson Type of electrical medical equipment. ■ Keep this product may adversely affect the operation of Product: Multifunction...
... and Power Supplies used with 47CFR Part 2 and 15 of the FCC rules as automatic doors or fire alarms. Radio waves from this product at : Epson America, Inc. Trade Name: Epson Type of electrical medical equipment. ■ Keep this product may adversely affect the operation of Product: Multifunction...

Quick Reference Guide
Page 56
...reprinting. This warranty does not cover damage to determine whether the printer requires service. An Epson service technician will be made freight collect. If Epson authorizes repair instead of exchange, Epson will not be another model of your original product covered by disasters...reimbursement of materials or services required for a period of the printer or a part, the item replaced becomes Epson property. Epson America, Inc. For warranty service, you fail to Epson or its shipment from the Epson authorized service center. When warranty service involves the exchange of...
...reprinting. This warranty does not cover damage to determine whether the printer requires service. An Epson service technician will be made freight collect. If Epson authorizes repair instead of exchange, Epson will not be another model of your original product covered by disasters...reimbursement of materials or services required for a period of the printer or a part, the item replaced becomes Epson property. Epson America, Inc. For warranty service, you fail to Epson or its shipment from the Epson authorized service center. When warranty service involves the exchange of...

Quick Reference Guide
Page 58
... for a list of this printer. Copyright Notice All rights reserved. No part of this product, or (excluding the U.S.) failure to change without the prior written permission of Copyrighted Materials Epson encourages each user to software program rights owned by Seiko Epson Corporation. Responsible Use of Seiko Epson Corporation. Trademarks Epson and Epson Stylus are for damages, losses...
... for a list of this printer. Copyright Notice All rights reserved. No part of this product, or (excluding the U.S.) failure to change without the prior written permission of Copyrighted Materials Epson encourages each user to software program rights owned by Seiko Epson Corporation. Responsible Use of Seiko Epson Corporation. Trademarks Epson and Epson Stylus are for damages, losses...

Start Here
Page 2
Priming takes about 5 minutes. Caution: Don't turn off the printer while it is priming or you'll waste ink. 5 Load paper 1 Pull out the paper cassette. 6 Keep ... flip up the paper stopper. Then lower the scanner. 4 Load paper against the edges of the cassette. Note: Your printer ships with the glossy or printable side face-down. This is used for each color. 3 Slide the edge guide to the sides...slide forward slightly as you insert the cassette. 4 Insert the cartridges in the holder for priming the printer. Press down until it clicks. 6 Close the cartridge cover.
Priming takes about 5 minutes. Caution: Don't turn off the printer while it is priming or you'll waste ink. 5 Load paper 1 Pull out the paper cassette. 6 Keep ... flip up the paper stopper. Then lower the scanner. 4 Load paper against the edges of the cassette. Note: Your printer ships with the glossy or printable side face-down. This is used for each color. 3 Slide the edge guide to the sides...slide forward slightly as you insert the cassette. 4 Insert the cartridges in the holder for priming the printer. Press down until it clicks. 6 Close the cartridge cover.


