
Quick Reference Guide
Page 2
... 13 Printing With a Macintosh 14 Selecting the Correct Paper Type 16 Scanning a Document or Photo 17 Quick Scanning From the Control Panel 17 Scanning With Epson Scan Software 18 Scanning With Mac OS X 10.6 19 Maintaining Your Product 20 Checking the Print Head Nozzles 20 Cleaning the Print Head 21 Checking...
... 13 Printing With a Macintosh 14 Selecting the Correct Paper Type 16 Scanning a Document or Photo 17 Quick Scanning From the Control Panel 17 Scanning With Epson Scan Software 18 Scanning With Mac OS X 10.6 19 Maintaining Your Product 20 Checking the Print Head Nozzles 20 Cleaning the Print Head 21 Checking...

Quick Reference Guide
Page 26
... up your product, choose your connection, and install the software. The on-screen instructions during the installation process help : ■ For wireless network setup, see below. ■ For wired network (Ethernet®) setup, see page 40. Follow the instructions in this chapter only if you need additional help you follow the instructions on... software on every computer from which you 'll need to set up your network connection. Note: If you have a USB cable, you want to simplify wireless setup. If you're using a USB cable (not included) to print. After the printer is already on...
... up your product, choose your connection, and install the software. The on-screen instructions during the installation process help : ■ For wireless network setup, see below. ■ For wired network (Ethernet®) setup, see page 40. Follow the instructions in this chapter only if you need additional help you follow the instructions on... software on every computer from which you 'll need to set up your network connection. Note: If you have a USB cable, you want to simplify wireless setup. If you're using a USB cable (not included) to print. After the printer is already on...
Quick Reference Guide
Page 27
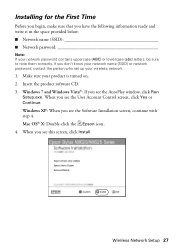
... product software CD. 3. Wireless Network Setup 27 Windows XP: When you see this screen, click Install. When you see the Software Installation screen, continue with step 4. Windows 7 and Windows Vista®: If you see the User Account Control screen, click Yes or Continue. Mac OS® X: Double-click the Epson icon. 4. Installing for...) letters, be sure to note them correctly. When you don't know your network name (SSID) or network password, contact the person who set up your wireless network. 1. If you see the AutoPlay window, click Run...
... product software CD. 3. Wireless Network Setup 27 Windows XP: When you see this screen, click Install. When you see the Software Installation screen, continue with step 4. Windows 7 and Windows Vista®: If you see the User Account Control screen, click Yes or Continue. Mac OS® X: Double-click the Epson icon. 4. Installing for...) letters, be sure to note them correctly. When you don't know your network name (SSID) or network password, contact the person who set up your wireless network. 1. If you see the AutoPlay window, click Run...

Quick Reference Guide
Page 28
5. Then skip to "Setting Up With the Product Buttons" on page 33 to set up printer for the first time, then click Next. 7. Mac OS X 10.6: At the next screen, click Next. When you see this screen, select Set up the product without using a temporary USB connection. 28 Wireless Network Setup When you see this screen, select Wireless connection and click Next. 6.
5. Then skip to "Setting Up With the Product Buttons" on page 33 to set up printer for the first time, then click Next. 7. Mac OS X 10.6: At the next screen, click Next. When you see this screen, select Set up the product without using a temporary USB connection. 28 Wireless Network Setup When you see this screen, select Wireless connection and click Next. 6.

Quick Reference Guide
Page 29
At the next screen, click Next. 10. for more information on page 30. ■ If you see this screen, select a wireless network setup method, then click Next. When you selected Using printer buttons, continue with "Setting Up With a Temporary USB Cable" on setup methods. 9. Do one of the following: ■ If you selected Using temporary USB cable connection, continue with "Setting Up With the Product Buttons" on page 33. Wireless Network Setup 29 8. Tip: If you need help selecting a wireless network setup method, click Which option should I choose?
At the next screen, click Next. 10. for more information on page 30. ■ If you see this screen, select a wireless network setup method, then click Next. When you selected Using printer buttons, continue with "Setting Up With a Temporary USB Cable" on setup methods. 9. Do one of the following: ■ If you selected Using temporary USB cable connection, continue with "Setting Up With the Product Buttons" on page 33. Wireless Network Setup 29 8. Tip: If you need help selecting a wireless network setup method, click Which option should I choose?
Quick Reference Guide
Page 30
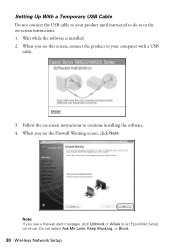
Setting Up With a Temporary USB Cable Do not connect the USB cable to your computer with a USB cable. 3. Wait while the software is installed. 2. When you see a firewall alert message, click Unblock or Allow to continue installing the software. 4. Note: If you see this screen, connect the product to your product until instructed to do so in the on -screen instructions to let EpsonNet Setup continue. Follow the on -screen instructions. 1. Do not select Ask Me Later, Keep Blocking, or Block. 30 Wireless Network Setup When you see the Firewall Warning screen, click Next.
Setting Up With a Temporary USB Cable Do not connect the USB cable to your computer with a USB cable. 3. Wait while the software is installed. 2. When you see a firewall alert message, click Unblock or Allow to continue installing the software. 4. Note: If you see this screen, connect the product to your product until instructed to do so in the on -screen instructions to let EpsonNet Setup continue. Follow the on -screen instructions. 1. Do not select Ask Me Later, Keep Blocking, or Block. 30 Wireless Network Setup When you see the Firewall Warning screen, click Next.

Quick Reference Guide
Page 31
Note: If your network name contains uppercase (ABC) or lowercase (abc) letters, enter them correctly. If your network name isn't in the list, select Enter Manually. Wireless Network Setup 31 When you see a screen like the following , select your security key contains uppercase (ABC) or lowercase (abc) letters, enter them correctly. 6. Note: If your network name (SSID) from the list, then click Next. If you see a screen like the following , enter your security key or passphrase, then click Next. 5.
Note: If your network name contains uppercase (ABC) or lowercase (abc) letters, enter them correctly. If your network name isn't in the list, select Enter Manually. Wireless Network Setup 31 When you see a screen like the following , select your security key contains uppercase (ABC) or lowercase (abc) letters, enter them correctly. 6. Note: If your network name (SSID) from the list, then click Next. If you see a screen like the following , enter your security key or passphrase, then click Next. 5.

Quick Reference Guide
Page 32
When you see "Setting Up Additional Computers" on page 37. 32 Wireless Network Setup Follow the on the screen to the product, see the Installation Complete screen, print a test page, then click Finish. 10. When installation is complete, remove the CD and restart your software. Wait while EpsonNet Setup configures your computer. 9. To set up additional computers to print to remove the USB cable from the product and your product for the network. 8. 7. Follow the instructions on -screen instructions to install the rest of your computer.
When you see "Setting Up Additional Computers" on page 37. 32 Wireless Network Setup Follow the on the screen to the product, see the Installation Complete screen, print a test page, then click Finish. 10. When installation is complete, remove the CD and restart your software. Wait while EpsonNet Setup configures your computer. 9. To set up additional computers to print to remove the USB cable from the product and your product for the network. 8. 7. Follow the instructions on -screen instructions to install the rest of your computer.

Quick Reference Guide
Page 33
... its network name. Press the y Back button to return to the previous screen, press OK to select Setup Wizard, then repeat step 2. ■ If you still can't find the network name in the list, your wireless network, follow these steps to set it up using Mac OS X 10.6, or you do not... the product on page 36. See "Entering Your SSID Manually" on your router or access point is turned on the screen to start the product's wireless Setup Wizard. 2. Setting Up With the Product Buttons If you are using the product buttons: 1. Follow the instructions on and working correctly.
... its network name. Press the y Back button to return to the previous screen, press OK to select Setup Wizard, then repeat step 2. ■ If you still can't find the network name in the list, your wireless network, follow these steps to set it up using Mac OS X 10.6, or you do not... the product on page 36. See "Entering Your SSID Manually" on your router or access point is turned on the screen to start the product's wireless Setup Wizard. 2. Setting Up With the Product Buttons If you are using the product buttons: 1. Follow the instructions on and working correctly.

Quick Reference Guide
Page 34
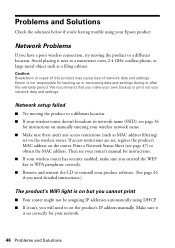
... short video tutorial on how to step 10 on page 46. 5. Wait while the software is installed. 34 Wireless Network Setup Follow the instructions on -screen instructions to your wireless network has security enabled, use the product's buttons to enter them correctly. If you see this screen, do one... of the following: ■ If your wireless network, see a network setup failed message, the network password may have security enabled, click Next and continue with step 4. Note: If the product still doesn't ...
... short video tutorial on how to step 10 on page 46. 5. Wait while the software is installed. 34 Wireless Network Setup Follow the instructions on -screen instructions to your wireless network has security enabled, use the product's buttons to enter them correctly. If you see this screen, do one... of the following: ■ If your wireless network, see a network setup failed message, the network password may have security enabled, click Next and continue with step 4. Note: If the product still doesn't ...

Quick Reference Guide
Page 35
...Additional Computers" on -screen instructions to the product, see a firewall alert message, click Unblock or Allow to let EpsonNet Setup continue. Wait while EpsonNet Setup configures your computer. To set up additional computers to print to install the rest of your software. When installation is ...complete, remove the CD and restart your product for the network. 9. Wireless Network Setup 35 Note: If you see the Installation Complete screen, print a test page, then click Finish. 10. 7. When you see the ...
...Additional Computers" on -screen instructions to the product, see a firewall alert message, click Unblock or Allow to let EpsonNet Setup continue. Wait while EpsonNet Setup configures your computer. To set up additional computers to print to install the rest of your software. When installation is ...complete, remove the CD and restart your product for the network. 9. Wireless Network Setup 35 Note: If you see the Installation Complete screen, print a test page, then click Finish. 10. 7. When you see the ...

Quick Reference Guide
Page 36
... to enter it . Press u, d, l, or r to highlight a letter or function button on the product control panel, press u or d to enter your network password. 36 Wireless Network Setup Use the function buttons to select uppercase (AB12), lowercase (ab12), symbols (!#%@), or spaces ( ), and to enter uppercase letters (ABC) or lowercase letters (abc) correctly. Important...
... to enter it . Press u, d, l, or r to highlight a letter or function button on the product control panel, press u or d to enter your network password. 36 Wireless Network Setup Use the function buttons to select uppercase (AB12), lowercase (ab12), symbols (!#%@), or spaces ( ), and to enter uppercase letters (ABC) or lowercase letters (abc) correctly. Important...

Quick Reference Guide
Page 37
Wireless Network Setup 37 Insert the product software CD. 3. Make sure your product is turned on. 2. Windows XP: When you see the AutoPlay window, click Run Setup.exe. When you see the Software Installation screen, continue with step 4. Setting Up Additional Computers 1. Windows 7 and Windows Vista: If you see this screen, select Wireless connection and click Next. When you see the User Account Control screen, click Yes or Continue. Mac OS X: Double-click the Epson icon. 4. When you see this screen, click Install. 5.
Wireless Network Setup 37 Insert the product software CD. 3. Make sure your product is turned on. 2. Windows XP: When you see the AutoPlay window, click Run Setup.exe. When you see the Software Installation screen, continue with step 4. Setting Up Additional Computers 1. Windows 7 and Windows Vista: If you see this screen, select Wireless connection and click Next. When you see the User Account Control screen, click Yes or Continue. Mac OS X: Double-click the Epson icon. 4. When you see this screen, click Install. 5.

Quick Reference Guide
Page 38
When you see this screen, select The printer is installed. 8. 6. Wait while the software is already on page 39. 9. Do not select Ask Me Later, Keep Blocking, or Block. 38 Wireless Network Setup Mac OS X 10.6: Skip to let EpsonNet Setup continue. When you see the Firewall Warning screen, click Next. Note: If you see a firewall alert message, click Unblock or Allow to step 13 on my wireless network, then click Next. 7.
When you see this screen, select The printer is installed. 8. 6. Wait while the software is already on page 39. 9. Do not select Ask Me Later, Keep Blocking, or Block. 38 Wireless Network Setup Mac OS X 10.6: Skip to let EpsonNet Setup continue. When you see the Firewall Warning screen, click Next. Note: If you see a firewall alert message, click Unblock or Allow to step 13 on my wireless network, then click Next. 7.

Quick Reference Guide
Page 39
10. Follow the on-screen instructions to install the rest of your computer. If you see a screen like this one, select Epson Stylus NX620, then click Next. 11. When installation is complete, remove the CD and restart your software. Wait while EpsonNet Setup configures your product for the network. 12. When you see the Installation Complete screen, print a test page, then click Finish. 13. Wireless Network Setup 39
10. Follow the on-screen instructions to install the rest of your computer. If you see a screen like this one, select Epson Stylus NX620, then click Next. 11. When installation is complete, remove the CD and restart your software. Wait while EpsonNet Setup configures your product for the network. 12. When you see the Installation Complete screen, print a test page, then click Finish. 13. Wireless Network Setup 39
Quick Reference Guide
Page 40
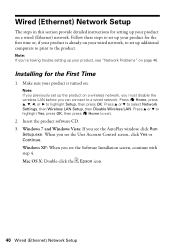
... detailed instructions for setting up your product on a wireless network, you must disable the wireless LAN before you can connect to a wired network. Note: If you see the Software Installation screen, continue with step 4. Mac OS X: Double-click the Epson icon. 40 Wired (Ethernet) Network Setup Follow these steps to set up your product...
... detailed instructions for setting up your product on a wireless network, you must disable the wireless LAN before you can connect to a wired network. Note: If you see the Software Installation screen, continue with step 4. Mac OS X: Double-click the Epson icon. 40 Wired (Ethernet) Network Setup Follow these steps to set up your product...
Quick Reference Guide
Page 46
... has security enabled, make your own backup or print out your Epson product. If access restrictions are set correctly for instructions on manually entering your wireless network name. ■ Make sure there aren't any access restrictions (such as a filing cabinet. Print a Network Status Sheet ... router might not be assigning IP addresses automatically using your network data and settings. Then see your network. 46 Problems and Solutions Network setup failed ■ Try moving the product to a microwave oven, 2.4 GHz cordless phone, or large metal object such as MAC address ...
... has security enabled, make your own backup or print out your Epson product. If access restrictions are set correctly for instructions on manually entering your wireless network name. ■ Make sure there aren't any access restrictions (such as a filing cabinet. Print a Network Status Sheet ... router might not be assigning IP addresses automatically using your network data and settings. Then see your network. 46 Problems and Solutions Network setup failed ■ Try moving the product to a microwave oven, 2.4 GHz cordless phone, or large metal object such as MAC address ...
Start Here
Page 3
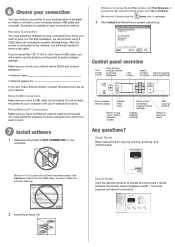
...Start copying/ printing Return to access the online User's Guide, software downloads, Epson Supplies CentralSM, and more (requires an Internet connection). 2 Insert the product CD. Macintosh®: Double-click the Epson icon, if necessary. 3 Click Install and follow the on every computer from...for details on every computer from which you 're using a USB cable (not included) to simplify wireless setup. See below for copying, printing, scanning, and network setup. Wireless Connection You must install the software on each connection method. After the printer is NOT CONNECTED to ...
...Start copying/ printing Return to access the online User's Guide, software downloads, Epson Supplies CentralSM, and more (requires an Internet connection). 2 Insert the product CD. Macintosh®: Double-click the Epson icon, if necessary. 3 Click Install and follow the on every computer from...for details on every computer from which you 're using a USB cable (not included) to simplify wireless setup. See below for copying, printing, scanning, and network setup. Wireless Connection You must install the software on each connection method. After the printer is NOT CONNECTED to ...


