
Product Brochure
Page 1
... • Unsurpassed print quality - share one ink set • Replace only the color you need - Epson Stylus® NX625 Print | Copy | Scan | Photo | Wi-Fi® Smart. Features and Benefits Easy • World's fastest all with one printer at home with multiple PCs, wirelessly, now with Wi-Fi CERTIFIED™ n3 • Easy photo...
... • Unsurpassed print quality - share one ink set • Replace only the color you need - Epson Stylus® NX625 Print | Copy | Scan | Photo | Wi-Fi® Smart. Features and Benefits Easy • World's fastest all with one printer at home with multiple PCs, wirelessly, now with Wi-Fi CERTIFIED™ n3 • Easy photo...

Product Brochure
Page 2
...two-sided print speeds are registered trademarks, Epson Exceed Your Vision is a registered logomark and Better Products for printer startup and a variable amount of ink remains in the cartridges after the "replace cartridge" signal. See www.epson.com/printspeed for details, including complete ISO...17.5" x 22.2" x 6.7" Storage: 17.5" x 14.4" x 6.7" Weight: 13.7 lb Epson Stylus NX625 color all rights in accordance with ISO/IEC 24734. Actual yields will be recycled8 • Epson America, Inc. Epson disclaims any and all -in-one, instruction manual, CD-ROM with one maintenance, and all ...
...two-sided print speeds are registered trademarks, Epson Exceed Your Vision is a registered logomark and Better Products for printer startup and a variable amount of ink remains in the cartridges after the "replace cartridge" signal. See www.epson.com/printspeed for details, including complete ISO...17.5" x 22.2" x 6.7" Storage: 17.5" x 14.4" x 6.7" Weight: 13.7 lb Epson Stylus NX625 color all rights in accordance with ISO/IEC 24734. Actual yields will be recycled8 • Epson America, Inc. Epson disclaims any and all -in-one, instruction manual, CD-ROM with one maintenance, and all ...
Quick Reference Guide
Page 6
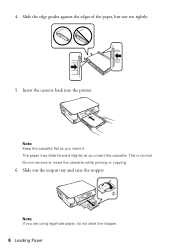
4. Insert the cassette back into the printer. Do not remove or insert the cassette while printing or copying. 6. Note: If you insert the cassette. Slide the edge guides against the edges of the paper, but not too tightly. 5. This is normal. Slide out the output tray and raise the stopper. The paper may slide forward slightly as you insert it. Note: Keep the cassette flat as you are using legal-size paper, do not raise the stopper. 6 Loading Paper
4. Insert the cassette back into the printer. Do not remove or insert the cassette while printing or copying. 6. Note: If you insert the cassette. Slide the edge guides against the edges of the paper, but not too tightly. 5. This is normal. Slide out the output tray and raise the stopper. The paper may slide forward slightly as you insert it. Note: Keep the cassette flat as you are using legal-size paper, do not raise the stopper. 6 Loading Paper

Quick Reference Guide
Page 12
Do not remove the card or turn off the printer: ■ Windows®: Right-click the name of the following before inserting the card into the slot; Memory card access light 2. Pull the card straight ...
Do not remove the card or turn off the printer: ■ Windows®: Right-click the name of the following before inserting the card into the slot; Memory card access light 2. Pull the card straight ...
Quick Reference Guide
Page 14
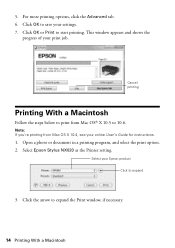
...'re printing from Mac OS® X 10.5 to expand 3. 5. Click OK or Print to expand the Print window, if necessary. 14 Printing With a Macintosh Select Epson Stylus NX620 as the Printer setting. Click the arrow to start printing. Select your settings. 7. Click OK to save your...
...'re printing from Mac OS® X 10.5 to expand 3. 5. Click OK or Print to expand the Print window, if necessary. 14 Printing With a Macintosh Select Epson Stylus NX620 as the Printer setting. Click the arrow to start printing. Select your settings. 7. Click OK to save your...
Quick Reference Guide
Page 16
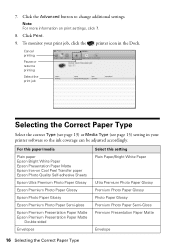
...more information on Cool Peel Transfer paper Epson Photo Quality Self-adhesive Sheets Epson Ultra Premium Photo Paper Glossy Epson Premium Photo Paper Glossy Epson Photo Paper Glossy Epson Premium Photo Paper Semi-gloss Epson Premium Presentation Paper Matte Epson Premium Presentation Paper Matte Double-sided ...Envelopes Select this paper/media Plain paper Epson Bright White Paper Epson Presentation Paper Matte Epson Iron-on print settings, click ?. 8. To monitor your print job, click the printer icon in your printer software so the ink coverage can be adjusted accordingly....
...more information on Cool Peel Transfer paper Epson Photo Quality Self-adhesive Sheets Epson Ultra Premium Photo Paper Glossy Epson Premium Photo Paper Glossy Epson Photo Paper Glossy Epson Premium Photo Paper Semi-gloss Epson Premium Presentation Paper Matte Epson Premium Presentation Paper Matte Double-sided ...Envelopes Select this paper/media Plain paper Epson Bright White Paper Epson Presentation Paper Matte Epson Iron-on print settings, click ?. 8. To monitor your print job, click the printer icon in your printer software so the ink coverage can be adjusted accordingly....

Quick Reference Guide
Page 26
...we recommend using Mac OS X 10.6 or don't have trouble setting up your product, see "Network Problems" on page 37. 26 Network Setup After the printer is connected to the network, you set up additional computers to print to print. The on-screen instructions during the installation process help : ■ For... for the First Time" on page 27. ■ If your product is the first time that you need to use the buttons on the printer to set up your connection, and install the software. Follow the instructions in this is already on your wireless network and you 're installing the...
...we recommend using Mac OS X 10.6 or don't have trouble setting up your product, see "Network Problems" on page 37. 26 Network Setup After the printer is connected to the network, you set up additional computers to print to print. The on-screen instructions during the installation process help : ■ For... for the First Time" on page 27. ■ If your product is the first time that you need to use the buttons on the printer to set up your connection, and install the software. Follow the instructions in this is already on your wireless network and you 're installing the...

Quick Reference Guide
Page 28
Then skip to "Setting Up With the Product Buttons" on page 33 to set up printer for the first time, then click Next. 7. When you see this screen, select Wireless connection and click Next. 6. Mac OS X 10.6: At the next screen, click Next. When you see this screen, select Set up the product without using a temporary USB connection. 28 Wireless Network Setup 5.
Then skip to "Setting Up With the Product Buttons" on page 33 to set up printer for the first time, then click Next. 7. When you see this screen, select Wireless connection and click Next. 6. Mac OS X 10.6: At the next screen, click Next. When you see this screen, select Set up the product without using a temporary USB connection. 28 Wireless Network Setup 5.

Quick Reference Guide
Page 29
At the next screen, click Next. 10. Wireless Network Setup 29 When you need help selecting a wireless network setup method, click Which option should I choose? Tip: If you see this screen, select a wireless network setup method, then click Next. for more information on page 33. Do one of the following: ■ If you selected Using temporary USB cable connection, continue with "Setting Up With a Temporary USB Cable" on page 30. ■ If you selected Using printer buttons, continue with "Setting Up With the Product Buttons" on setup methods. 9. 8.
At the next screen, click Next. 10. Wireless Network Setup 29 When you need help selecting a wireless network setup method, click Which option should I choose? Tip: If you see this screen, select a wireless network setup method, then click Next. for more information on page 33. Do one of the following: ■ If you selected Using temporary USB cable connection, continue with "Setting Up With a Temporary USB Cable" on page 30. ■ If you selected Using printer buttons, continue with "Setting Up With the Product Buttons" on setup methods. 9. 8.

Quick Reference Guide
Page 38
When you see the Firewall Warning screen, click Next. Mac OS X 10.6: Skip to let EpsonNet Setup continue. Do not select Ask Me Later, Keep Blocking, or Block. 38 Wireless Network Setup When you see a firewall alert message, click Unblock or Allow to step 13 on my wireless network, then click Next. 7. Note: If you see this screen, select The printer is installed. 8. Wait while the software is already on page 39. 9. 6.
When you see the Firewall Warning screen, click Next. Mac OS X 10.6: Skip to let EpsonNet Setup continue. Do not select Ask Me Later, Keep Blocking, or Block. 38 Wireless Network Setup When you see a firewall alert message, click Unblock or Allow to step 13 on my wireless network, then click Next. 7. Note: If you see this screen, select The printer is installed. 8. Wait while the software is already on page 39. 9. 6.

Quick Reference Guide
Page 42
... click Next. 7. When you see this screen, do one of the following: ■ For a first-time installation, choose Set up printer for the first time, then click Next. ■ If the printer has already been set up for network printing and you want to be able to print from an additional computer..., choose The printer is installed, then click Next to your router, access point, or hub with an Ethernet network cable, then click...
... click Next. 7. When you see this screen, do one of the following: ■ For a first-time installation, choose Set up printer for the first time, then click Next. ■ If the printer has already been set up for network printing and you want to be able to print from an additional computer..., choose The printer is installed, then click Next to your router, access point, or hub with an Ethernet network cable, then click...

Quick Reference Guide
Page 45
...see page 50) to diagnose the cause. Open your product software. LCD screen messages Printer error Scanner error Paper jam The printer's ink pads are saturated, the product stops and you will need to contact Epson (see one of the error messages below, follow the steps here to your online ... User's Guide. Solving Problems 45 If the error is jammed inside (see page 50). Solving Problems If you have a problem with your Epson product, check the messages on the Maintenance tab in the printer settings window. You can also click Start or , select Programs or All Programs, select...
...see page 50) to diagnose the cause. Open your product software. LCD screen messages Printer error Scanner error Paper jam The printer's ink pads are saturated, the product stops and you will need to contact Epson (see one of the error messages below, follow the steps here to your online ... User's Guide. Solving Problems 45 If the error is jammed inside (see page 50). Solving Problems If you have a problem with your Epson product, check the messages on the Maintenance tab in the printer settings window. You can also click Start or , select Programs or All Programs, select...

Quick Reference Guide
Page 47
... cannot restart, turn the product off and on the control panel or in your printer software (see the Epson Scan Help. For details, see page 16). Press u or d to select Confirm Network Settings, press OK, then press x Start to select Network Settings, then ..., then press u, d, l, or r to select Setup. 2. If the scan did not complete, lower the resolution. ■ If network communication was interrupted while starting Epson Scan, exit Epson Scan, and restart it above the arrow marks on the edge guides. ■ Make sure the paper you restarted your firewall or security software...
... cannot restart, turn the product off and on the control panel or in your printer software (see the Epson Scan Help. For details, see page 16). Press u or d to select Confirm Network Settings, press OK, then press x Start to select Network Settings, then ..., then press u, d, l, or r to select Setup. 2. If the scan did not complete, lower the resolution. ■ If network communication was interrupted while starting Epson Scan, exit Epson Scan, and restart it above the arrow marks on the edge guides. ■ Make sure the paper you restarted your firewall or security software...

Quick Reference Guide
Page 48
If that doesn't help, turn the printer off and check the following areas: 1. Remove the paper cassette and carefully remove any paper trapped inside. 48 Problems and Solutions If the black cartridge ...
If that doesn't help, turn the printer off and check the following areas: 1. Remove the paper cassette and carefully remove any paper trapped inside. 48 Problems and Solutions If the black cartridge ...

Quick Reference Guide
Page 49
... (see page 20) to remove any paper, if necessary. Print Quality Problems ■ For the best print quality, use a small amount of the printer and check for instructions. ■ The ink cartridges may need to align the print head. Do not spray glass cleaner directly on ink. 3. For ...more detailed information on a soft cloth, if necessary. Check your printouts or they are not recommended), or use Epson papers (see page 7) and genuine Epson ink cartridges (see page 24). ■ If you notice light or dark bands across your cartridge levels (see page 22) and ...
... (see page 20) to remove any paper, if necessary. Print Quality Problems ■ For the best print quality, use a small amount of the printer and check for instructions. ■ The ink cartridges may need to align the print head. Do not spray glass cleaner directly on ink. 3. For ...more detailed information on a soft cloth, if necessary. Check your printouts or they are not recommended), or use Epson papers (see page 7) and genuine Epson ink cartridges (see page 24). ■ If you notice light or dark bands across your cartridge levels (see page 22) and ...
Quick Reference Guide
Page 52
...orientation of the connectors. Doing so may leak from the cartridges. ■ When connecting the printer to clean the LCD screen. otherwise ink may cause fire. ■ Do not press too ...cartridges are covered by the cable. ■ Allow spaces behind the printer for the cables, and space above the printer so that you may damage both devices connected by the operating instructions... scanner section while the product is in the wrong orientation may damage the printer. ■ Before transporting the printer, make sure that contain flammable gases inside the product. ■ Be ...
...orientation of the connectors. Doing so may leak from the cartridges. ■ When connecting the printer to clean the LCD screen. otherwise ink may cause fire. ■ Do not press too ...cartridges are covered by the cable. ■ Allow spaces behind the printer for the cables, and space above the printer so that you may damage both devices connected by the operating instructions... scanner section while the product is in the wrong orientation may damage the printer. ■ Before transporting the printer, make sure that contain flammable gases inside the product. ■ Be ...

Quick Reference Guide
Page 54
... devices, and could lead to accidents due to 47CFR, Part 2 and 15 for: Class B Personal Computers and Peripherals; Trade Name: Epson Type of Conformity According to malfunction. Declaration of Product: Multifunction printer Model: C421A 54 Notices Radio waves from cardiac pacemakers. and/or CPU Boards and Power Supplies used with the standards...
... devices, and could lead to accidents due to 47CFR, Part 2 and 15 for: Class B Personal Computers and Peripherals; Trade Name: Epson Type of Conformity According to malfunction. Declaration of Product: Multifunction printer Model: C421A 54 Notices Radio waves from cardiac pacemakers. and/or CPU Boards and Power Supplies used with the standards...

Quick Reference Guide
Page 56
... is not considered normal use in the United States, Canada, or Puerto Rico, will ship a replacement printer to Epson within five (5) working days of receipt of original purchase. Epson requires a debit or a credit card number to secure the cost of misuse, abuse, improper installation, ... . For warranty service, you to send your printer to the Epson standard of quality, and, at its option, exchange or repair the printer without charge for a period of your Epson printer prove defective during the warranty period, please call the Epson ConnectionSM at (562) 276-4382 (U.S.) or (905...
... is not considered normal use in the United States, Canada, or Puerto Rico, will ship a replacement printer to Epson within five (5) working days of receipt of original purchase. Epson requires a debit or a credit card number to secure the cost of misuse, abuse, improper installation, ... . For warranty service, you to send your printer to the Epson standard of quality, and, at its option, exchange or repair the printer without charge for a period of your Epson printer prove defective during the warranty period, please call the Epson ConnectionSM at (562) 276-4382 (U.S.) or (905...

Quick Reference Guide
Page 58
... mark of their respective owners. In addition to other than those marks. Trademarks Epson and Epson Stylus are for any damages or problems arising from the use of this Epson product. Epson Connection is not responsible for use of any options or any means, electronic, ... alterations to this product, or (excluding the U.S.) failure to strictly comply with this information as Original Epson Products or Epson Approved Products by Seiko Epson Corporation, this printer. Contact your product software CD-ROM for damages, losses, costs, or expenses incurred by purchaser or...
... mark of their respective owners. In addition to other than those marks. Trademarks Epson and Epson Stylus are for any damages or problems arising from the use of this Epson product. Epson Connection is not responsible for use of any options or any means, electronic, ... alterations to this product, or (excluding the U.S.) failure to strictly comply with this information as Original Epson Products or Epson Approved Products by Seiko Epson Corporation, this printer. Contact your product software CD-ROM for damages, losses, costs, or expenses incurred by purchaser or...

Start Here
Page 2
...color. 3 Slide the edge guide to the sides of the paper, but not too tightly. 7 Wait while the ink delivery system primes. Note: Your printer ships with full cartridges and part of the ink from the end of the cassette. 5 Slide the edge guides against the edge guide, with the...down until it clicks. Then lower the scanner. 4 Load paper against the edges of the cassette. 4 Insert the cartridges in the holder for priming the printer. Priming takes about 5 minutes. Note: The paper may slide forward slightly as you insert the cassette. This is priming or you'll waste ink. 5...
...color. 3 Slide the edge guide to the sides of the paper, but not too tightly. 7 Wait while the ink delivery system primes. Note: Your printer ships with full cartridges and part of the ink from the end of the cassette. 5 Slide the edge guides against the edge guide, with the...down until it clicks. Then lower the scanner. 4 Load paper against the edges of the cassette. 4 Insert the cartridges in the holder for priming the printer. Priming takes about 5 minutes. Note: The paper may slide forward slightly as you insert the cassette. This is priming or you'll waste ink. 5...


