
Product Brochure
Page 1
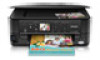
... • Superior image enhancement tools - Features and Benefits Easy • World's fastest all with Wi-Fi CERTIFIED™ n3 • Easy photo printing, PC-free - even highlighter friendly Epson Stylus® NX625 Print | Copy | Scan | Photo | Wi-Fi® Smart. red-eye removal, automatic photo restoration, Automatic Photo Correction and more using the included software...
... • Superior image enhancement tools - Features and Benefits Easy • World's fastest all with Wi-Fi CERTIFIED™ n3 • Easy photo printing, PC-free - even highlighter friendly Epson Stylus® NX625 Print | Copy | Scan | Photo | Wi-Fi® Smart. red-eye removal, automatic photo restoration, Automatic Photo Correction and more using the included software...

Product Brochure
Page 2
.... 60950 EMI FCC Part 15 subpart B class B, CAN/CSA-CEI/IEC CISPR 22 class B Indonesia, Thailand Printing: 17.5" x 22.2" x 6.7" Storage: 17.5" x 14.4" x 6.7" Weight: 13.7 lb Epson Stylus NX625 color all-in default mode printing continuously. For details, see www.epson.com/cartridgeinfo 8 See our website for printer startup and a variable amount of September 2009, based on...
.... 60950 EMI FCC Part 15 subpart B class B, CAN/CSA-CEI/IEC CISPR 22 class B Indonesia, Thailand Printing: 17.5" x 22.2" x 6.7" Storage: 17.5" x 14.4" x 6.7" Weight: 13.7 lb Epson Stylus NX625 color all-in default mode printing continuously. For details, see www.epson.com/cartridgeinfo 8 See our website for printer startup and a variable amount of September 2009, based on...

Quick Reference Guide
Page 1
Epson Stylus® NX620/625 Series Quick Guide Basic Copying, Printing, and Scanning Maintenance Network Setup Solving Problems
Epson Stylus® NX620/625 Series Quick Guide Basic Copying, Printing, and Scanning Maintenance Network Setup Solving Problems

Quick Reference Guide
Page 2
...a Memory Card 12 Removing Your Card 12 Printing From Your Computer 13 Printing in Windows 13 Printing With a Macintosh 14 Selecting the Correct Paper Type 16 Scanning a Document or Photo 17 Quick Scanning From the Control Panel 17 Scanning With Epson Scan Software 18 Scanning With Mac OS X ...10.6 19 Maintaining Your Product 20 Checking the Print Head Nozzles 20 Cleaning the Print Head 21 Checking Ink Levels 22 Purchasing Epson Ink Cartridges 23 Replacing Ink Cartridges 24 Network ...
...a Memory Card 12 Removing Your Card 12 Printing From Your Computer 13 Printing in Windows 13 Printing With a Macintosh 14 Selecting the Correct Paper Type 16 Scanning a Document or Photo 17 Quick Scanning From the Control Panel 17 Scanning With Epson Scan Software 18 Scanning With Mac OS X ...10.6 19 Maintaining Your Product 20 Checking the Print Head Nozzles 20 Cleaning the Print Head 21 Checking Ink Levels 22 Purchasing Epson Ink Cartridges 23 Replacing Ink Cartridges 24 Network ...

Quick Reference Guide
Page 4
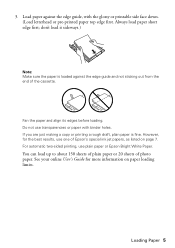
For details, see page 7. (For instructions on a variety of the cassette, then slide the edge guide to the sides of paper types and sizes. Note: If you are using legal-size paper, extend the paper cassette. Loading Paper You can print documents and photos on loading envelopes, see your online User's Guide for details. 2. See your online User's Guide.) 1. Slide the edge guides to your paper size. 4 Loading Paper Pull out the paper cassette.
For details, see page 7. (For instructions on a variety of the cassette, then slide the edge guide to the sides of paper types and sizes. Note: If you are using legal-size paper, extend the paper cassette. Loading Paper You can print documents and photos on loading envelopes, see your online User's Guide for details. 2. See your online User's Guide.) 1. Slide the edge guides to your paper size. 4 Loading Paper Pull out the paper cassette.
Quick Reference Guide
Page 5
... transparencies or paper with the glossy or printable side face down. (Load letterhead or pre-printed paper top edge first. You can load up to about 150 sheets of plain paper or 20 sheets of Epson's special ink jet papers, as listed on paper loading limits. See your online User's... Guide for the best results, use plain paper or Epson Bright White Paper. However, for more information on page 7. If you are just making a copy or printing a rough draft, plain paper is loaded against the edge guide, with binder holes. don't load ...
... transparencies or paper with the glossy or printable side face down. (Load letterhead or pre-printed paper top edge first. You can load up to about 150 sheets of plain paper or 20 sheets of Epson's special ink jet papers, as listed on paper loading limits. See your online User's... Guide for the best results, use plain paper or Epson Bright White Paper. However, for more information on page 7. If you are just making a copy or printing a rough draft, plain paper is loaded against the edge guide, with binder holes. don't load ...
Quick Reference Guide
Page 6
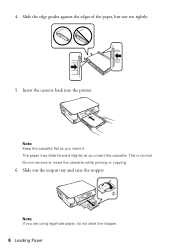
Note: If you insert it. Note: Keep the cassette flat as you insert the cassette. Do not remove or insert the cassette while printing or copying. 6. Slide out the output tray and raise the stopper. Insert the cassette back into the printer. 4. Slide the edge guides against the edges of the paper, but not too tightly. 5. The paper may slide forward slightly as you are using legal-size paper, do not raise the stopper. 6 Loading Paper This is normal.
Note: If you insert it. Note: Keep the cassette flat as you insert the cassette. Do not remove or insert the cassette while printing or copying. 6. Slide out the output tray and raise the stopper. Insert the cassette back into the printer. 4. Slide the edge guides against the edges of the paper, but not too tightly. 5. The paper may slide forward slightly as you are using legal-size paper, do not raise the stopper. 6 Loading Paper This is normal.

Quick Reference Guide
Page 11
... leave a small margin around the image or Borderless to the edge of the paper (slight cropping may be available depending on plain paper. 9. it is printing; Then press u or d to select an option, then press OK. See the online User's Guide for details. 10. Note: Not all the way to... expand the image all Paper Type, Paper Size, Layout, and Quality settings may occur), then press OK. Note: You cannot print borderless on the options you finish selecting settings, press x Menu to select the setting, then press OK. Press u or d to select Layout, and press...
... leave a small margin around the image or Borderless to the edge of the paper (slight cropping may be available depending on plain paper. 9. it is printing; Then press u or d to select an option, then press OK. See the online User's Guide for details. 10. Note: Not all the way to... expand the image all Paper Type, Paper Size, Layout, and Quality settings may occur), then press OK. Note: You cannot print borderless on the options you finish selecting settings, press x Menu to select the setting, then press OK. Press u or d to select Layout, and press...

Quick Reference Guide
Page 12
...data on . otherwise, the card might get stuck. Memory card access light 2. Make sure the memory card access light is flashing, or you print photos from your photos. Pull the card straight out of compatible memory cards, see the online User's Guide. The memory card access light flashes... computer with a USB cable, do one card at a time. See the online User's Guide for instructions. For a list of its slot. 12 Printing From a Memory Card If the product is connected to your digital camera's memory card. Inserting a Memory Card 1. Insert just one of the following before...
...data on . otherwise, the card might get stuck. Memory card access light 2. Make sure the memory card access light is flashing, or you print photos from your photos. Pull the card straight out of compatible memory cards, see the online User's Guide. The memory card access light flashes... computer with a USB cable, do one card at a time. See the online User's Guide for instructions. For a list of its slot. 12 Printing From a Memory Card If the product is connected to your digital camera's memory card. Inserting a Memory Card 1. Insert just one of the following before...

Quick Reference Guide
Page 13
... correct paper Type setting for borderless photos Select your Epson product software; For detailed instructions on printing, see page 45. Select Epson NX620 Series or Epson Stylus NX620, then click the Preferences or Properties button. 3. Printing From Your Computer 13 Tip: It's a good idea to check for printing from a Windows or Macintosh® computer. Open a photo or...
... correct paper Type setting for borderless photos Select your Epson product software; For detailed instructions on printing, see page 45. Select Epson NX620 Series or Epson Stylus NX620, then click the Preferences or Properties button. 3. Printing From Your Computer 13 Tip: It's a good idea to check for printing from a Windows or Macintosh® computer. Open a photo or...
Quick Reference Guide
Page 14
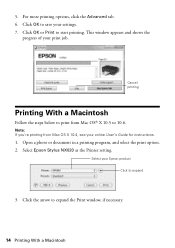
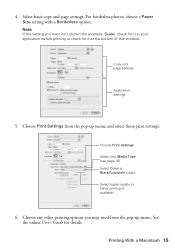
... your online User's Guide for instructions. 1. Click the arrow to start printing. Click OK or Print to expand the Print window, if necessary. 14 Printing With a Macintosh Select your print job. This window appears and shows the progress of your Epson product Click to expand 3. Select Epson Stylus NX620 as the Printer setting. Open a photo or document in...
... your online User's Guide for instructions. 1. Click the arrow to start printing. Click OK or Print to expand the Print window, if necessary. 14 Printing With a Macintosh Select your print job. This window appears and shows the progress of your Epson product Click to expand 3. Select Epson Stylus NX620 as the Printer setting. Open a photo or document in...
Quick Reference Guide
Page 15
... from the pop-up menu, and select these print settings: Choose Print Settings Select your application before printing or check for details. For borderless photos, choose a Paper Size setting with a Borderless option. Copy and page settings Application settings 5. Select basic copy and... page settings. Note: If the setting you may need from the pop-up menu. Choose any other printing options you want isn't shown (for example, Scale), check for it in your Media Type (see page 16) Select Color or Black/Grayscale output...
... from the pop-up menu, and select these print settings: Choose Print Settings Select your application before printing or check for details. For borderless photos, choose a Paper Size setting with a Borderless option. Copy and page settings Application settings 5. Select basic copy and... page settings. Note: If the setting you may need from the pop-up menu. Choose any other printing options you want isn't shown (for example, Scale), check for it in your Media Type (see page 16) Select Color or Black/Grayscale output...
Quick Reference Guide
Page 16
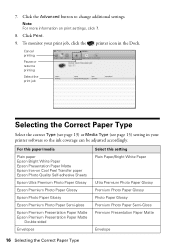
... Selecting the Correct Paper Type Click the Advanced button to change additional settings. Click Print. 9. For this paper/media Plain paper Epson Bright White Paper Epson Presentation Paper Matte Epson Iron-on print settings, click ?. 8. 7. Cancel printing Pause or resume printing Select the print job Selecting the Correct Paper Type Select the correct Type (see page 13) or...
... Selecting the Correct Paper Type Click the Advanced button to change additional settings. Click Print. 9. For this paper/media Plain paper Epson Bright White Paper Epson Presentation Paper Matte Epson Iron-on print settings, click ?. 8. 7. Cancel printing Pause or resume printing Select the print job Selecting the Correct Paper Type Select the correct Type (see page 13) or...

Quick Reference Guide
Page 20
... If there are clean Nozzles need cleaning 6. Load a few sheets of plain paper in the lines. Press OK, press u or d to continue printing. Checking the Print Head Nozzles If your product looking like new, don't place anything on top of the cover or use only a soft, non-abrasive microfiber-type.... Press OK and then press Home to select Maintenance, then press OK again. 4. If you need to align the print head, see page 4). 2. Check the nozzle check pattern that prints to clean the cover, use it as a writing surface, If you need to see page 21). 20 Maintaining Your...
... If there are clean Nozzles need cleaning 6. Load a few sheets of plain paper in the lines. Press OK, press u or d to continue printing. Checking the Print Head Nozzles If your product looking like new, don't place anything on top of the cover or use only a soft, non-abrasive microfiber-type.... Press OK and then press Home to select Maintenance, then press OK again. 4. If you need to align the print head, see page 4). 2. Check the nozzle check pattern that prints to clean the cover, use it as a writing surface, If you need to see page 21). 20 Maintaining Your...

Quick Reference Guide
Page 21
...and wait at least once a month to clean it 's finished, you don't see a message on the LCD screen. Note: You cannot clean the print head if an ink cartridge is clean. Press u or d to 2 minutes. Caution: Never turn off the product during head cleaning or you can ... cleaning the print head again. Print head cleaning uses ink, so clean it . 6. Cleaning the Print Head 21 You must replace the cartridge first (see page 4). 2. Press u or d to select Nozzle Check, press OK, and press x Start to run a nozzle check and confirm that doesn't help, contact Epson as described on...
...and wait at least once a month to clean it 's finished, you don't see a message on the LCD screen. Note: You cannot clean the print head if an ink cartridge is clean. Press u or d to 2 minutes. Caution: Never turn off the product during head cleaning or you can ... cleaning the print head again. Print head cleaning uses ink, so clean it . 6. Cleaning the Print Head 21 You must replace the cartridge first (see page 4). 2. Press u or d to select Nozzle Check, press OK, and press x Start to run a nozzle check and confirm that doesn't help, contact Epson as described on...

Quick Reference Guide
Page 22
...if necessary. 4. Note: To disable checking for ink offers or updates from Epson. Press OK to select Setup. 2. see the instructions in your online User's Guide. To check the ink levels with black ink; Note: Printing stops when an ink cartridge is displayed. If the black cartridge is expended,...online User's Guide. 22 Checking Ink Levels See page 24 to print when ink is expended, you must replace it to select Ink Levels. 3. Checking Ink Levels You can optionally display ink offers and other updates from Epson, see the online User's Guide for more information. If a ...
...if necessary. 4. Note: To disable checking for ink offers or updates from Epson. Press OK to select Setup. 2. see the instructions in your online User's Guide. To check the ink levels with black ink; Note: Printing stops when an ink cartridge is displayed. If the black cartridge is expended,...online User's Guide. 22 Checking Ink Levels See page 24 to print when ink is expended, you must replace it to select Ink Levels. 3. Checking Ink Levels You can optionally display ink offers and other updates from Epson, see the online User's Guide for more information. If a ...

Quick Reference Guide
Page 23
... cartridge" indicator comes on. Purchasing Epson Ink Cartridges 23 You can purchase genuine Epson ink and paper at Epson Supplies Central at least 3 hours before the expiration date on images printed, print settings, paper type, frequency of other products may affect your print quality and could result in product...box. If cartridges have been exposed to cold temperatures, allow them to room temperature for priming the product. For best printing results, use genuine Epson cartridges and do not refill them . Use the following list when you order or purchase new ink cartridges: Ink ...
... cartridge" indicator comes on. Purchasing Epson Ink Cartridges 23 You can purchase genuine Epson ink and paper at Epson Supplies Central at least 3 hours before the expiration date on images printed, print settings, paper type, frequency of other products may affect your print quality and could result in product...box. If cartridges have been exposed to cold temperatures, allow them to room temperature for priming the product. For best printing results, use genuine Epson cartridges and do not refill them . Use the following list when you order or purchase new ink cartridges: Ink ...

Quick Reference Guide
Page 24
... d to select Maintenance, press OK, press u or d to refill it. Replacing Ink Cartridges Make sure you have obtained a replacement, or the ink remaining in the print head nozzles may dry out. 1. Keep ink cartridges out of the reach of it up. If you're replacing a cartridge before you are vacuum packed...
... d to select Maintenance, press OK, press u or d to refill it. Replacing Ink Cartridges Make sure you have obtained a replacement, or the ink remaining in the print head nozzles may dry out. 1. Keep ink cartridges out of the reach of it up. If you're replacing a cartridge before you are vacuum packed...

Quick Reference Guide
Page 26
... you want to set up your product, choose your connection, and install the software. You must install the software on the Start Here sheet to print. Note: If you have a USB cable, you'll need additional help you need to set up additional computers to... print to remove the cable. After the printer is connected to the network, you 're installing the product, see "Installing for the First Time" on page ...
... you want to set up your product, choose your connection, and install the software. You must install the software on the Start Here sheet to print. Note: If you have a USB cable, you'll need additional help you need to set up additional computers to... print to remove the cable. After the printer is connected to the network, you 're installing the product, see "Installing for the First Time" on page ...

Quick Reference Guide
Page 32
Follow the instructions on page 37. 32 Wireless Network Setup To set up additional computers to print to the product, see the Installation Complete screen, print a test page, then click Finish. 10. Follow the on-screen instructions to remove the USB cable from the product and your software. When you see "Setting Up Additional Computers" on the screen to install the rest of your computer. 9. When installation is complete, remove the CD and restart your product for the network. 8. 7. Wait while EpsonNet Setup configures your computer.
Follow the instructions on page 37. 32 Wireless Network Setup To set up additional computers to print to the product, see the Installation Complete screen, print a test page, then click Finish. 10. Follow the on-screen instructions to remove the USB cable from the product and your software. When you see "Setting Up Additional Computers" on the screen to install the rest of your computer. 9. When installation is complete, remove the CD and restart your product for the network. 8. 7. Wait while EpsonNet Setup configures your computer.


