
Product Brochure
Page 2
... less frequent printing, or printing predominantly with ISO/IEC 24734. Actual print stability will be installed for printing. All ink colors are trademarks of the Microsoft group of Seiko Epson Corporation. For print quality, part of Epson America, Inc. DURABrite is based on system configuration, software, and page complexity. Microsoft, ...FCC Part 15 subpart B class B, CAN/CSA-CEI/IEC CISPR 22 class B Indonesia, Thailand Printing: 17.5" x 22.2" x 6.7" Storage: 17.5" x 14.4" x 6.7" Weight: 13.7 lb Epson Stylus NX625 color all rights in English only. 3 Wi-Fi 802.11b/g/n certified;
... less frequent printing, or printing predominantly with ISO/IEC 24734. Actual print stability will be installed for printing. All ink colors are trademarks of the Microsoft group of Seiko Epson Corporation. For print quality, part of Epson America, Inc. DURABrite is based on system configuration, software, and page complexity. Microsoft, ...FCC Part 15 subpart B class B, CAN/CSA-CEI/IEC CISPR 22 class B Indonesia, Thailand Printing: 17.5" x 22.2" x 6.7" Storage: 17.5" x 14.4" x 6.7" Weight: 13.7 lb Epson Stylus NX625 color all rights in English only. 3 Wi-Fi 802.11b/g/n certified;

Quick Reference Guide
Page 24
..., and press OK. Press OK. Caution: Do not open the cartridge cover. 4. Leave the expended cartridge installed until you have a new ink cartridge before you see a message on the LCD screen indicating which color to install the ink. Dispose of children and don't drink the ink. 24 Replacing Ink Cartridges Do not...
..., and press OK. Press OK. Caution: Do not open the cartridge cover. 4. Leave the expended cartridge installed until you have a new ink cartridge before you see a message on the LCD screen indicating which color to install the ink. Dispose of children and don't drink the ink. 24 Replacing Ink Cartridges Do not...

Quick Reference Guide
Page 26
The on the printer to select wireless settings instead. If you're using a USB cable (not included) to print. You must install the software on page 37. 26 Network Setup Note: If you have a USB cable, you'll need to remove the cable. Follow the ... your product, choose your product on a wireless or wired network. Network Setup This section provides detailed instructions for setting up your connection, and install the software. For the first installation, we recommend using Mac OS X 10.6 or don't have trouble setting up your product, see "Network Problems" on page 46. ■...
The on the printer to select wireless settings instead. If you're using a USB cable (not included) to print. You must install the software on page 37. 26 Network Setup Note: If you have a USB cable, you'll need to remove the cable. Follow the ... your product, choose your product on a wireless or wired network. Network Setup This section provides detailed instructions for setting up your connection, and install the software. For the first installation, we recommend using Mac OS X 10.6 or don't have trouble setting up your product, see "Network Problems" on page 46. ■...
Quick Reference Guide
Page 27
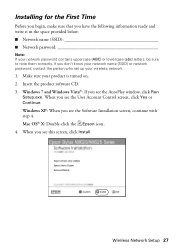
Insert the product software CD. 3. Installing for the First Time Before you begin, make sure that you see the User Account Control screen, click Yes or Continue. When you have the ..., be sure to note them correctly. Windows XP: When you see this screen, click Install. Mac OS® X: Double-click the Epson icon. 4. When you see the AutoPlay window, click Run Setup.exe. If you see the Software Installation screen, continue with step 4. Wireless Network Setup 27 Windows 7 and Windows Vista®: If...
Insert the product software CD. 3. Installing for the First Time Before you begin, make sure that you see the User Account Control screen, click Yes or Continue. When you have the ..., be sure to note them correctly. Windows XP: When you see this screen, click Install. Mac OS® X: Double-click the Epson icon. 4. When you see the AutoPlay window, click Run Setup.exe. If you see the Software Installation screen, continue with step 4. Wireless Network Setup 27 Windows 7 and Windows Vista®: If...
Quick Reference Guide
Page 30
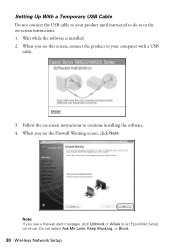
Follow the on -screen instructions. 1. Wait while the software is installed. 2. When you see this screen, connect the product to your product until instructed to do so in the on -screen instructions to let EpsonNet Setup continue. Do not select Ask Me Later, Keep Blocking, or Block. 30 Wireless Network Setup Setting Up With a Temporary USB Cable Do not connect the USB cable to your computer with a USB cable. 3. Note: If you see the Firewall Warning screen, click Next. When you see a firewall alert message, click Unblock or Allow to continue installing the software. 4.
Follow the on -screen instructions. 1. Wait while the software is installed. 2. When you see this screen, connect the product to your product until instructed to do so in the on -screen instructions to let EpsonNet Setup continue. Do not select Ask Me Later, Keep Blocking, or Block. 30 Wireless Network Setup Setting Up With a Temporary USB Cable Do not connect the USB cable to your computer with a USB cable. 3. Note: If you see the Firewall Warning screen, click Next. When you see a firewall alert message, click Unblock or Allow to continue installing the software. 4.

Quick Reference Guide
Page 32
7. When you see "Setting Up Additional Computers" on page 37. 32 Wireless Network Setup Follow the instructions on -screen instructions to remove the USB cable from the product and your software. Follow the on the screen to install the rest of your computer. 9. Wait while EpsonNet Setup configures your computer. To set up additional computers to print to the product, see the Installation Complete screen, print a test page, then click Finish. 10. When installation is complete, remove the CD and restart your product for the network. 8.
7. When you see "Setting Up Additional Computers" on page 37. 32 Wireless Network Setup Follow the instructions on -screen instructions to remove the USB cable from the product and your software. Follow the on the screen to install the rest of your computer. 9. Wait while EpsonNet Setup configures your computer. To set up additional computers to print to the product, see the Installation Complete screen, print a test page, then click Finish. 10. When installation is complete, remove the CD and restart your product for the network. 8.

Quick Reference Guide
Page 34
... "Network setup failed" on the screen. 3. Follow the on-screen instructions to step 10 on how to enter them correctly. Wait while the software is installed. 34 Wireless Network Setup When you see a network setup failed message, the network password may have security enabled, click Next and continue with step 4. Mac...
... "Network setup failed" on the screen. 3. Follow the on-screen instructions to step 10 on how to enter them correctly. Wait while the software is installed. 34 Wireless Network Setup When you see a network setup failed message, the network password may have security enabled, click Next and continue with step 4. Mac...

Quick Reference Guide
Page 35
..., remove the CD and restart your product for the network. 9. Wait while EpsonNet Setup configures your computer. To set up additional computers to print to install the rest of your software. Follow the on page 37. Do not select Ask Me Later, Keep Blocking, or Block. 8. When you see the Firewall... Computers" on -screen instructions to the product, see a firewall alert message, click Unblock or Allow to let EpsonNet Setup continue. Note: If you see the Installation Complete screen, print a test page, then click Finish. 10. Wireless Network Setup 35 7.
..., remove the CD and restart your product for the network. 9. Wait while EpsonNet Setup configures your computer. To set up additional computers to print to install the rest of your software. Follow the on page 37. Do not select Ask Me Later, Keep Blocking, or Block. 8. When you see the Firewall... Computers" on -screen instructions to the product, see a firewall alert message, click Unblock or Allow to let EpsonNet Setup continue. Note: If you see the Installation Complete screen, print a test page, then click Finish. 10. Wireless Network Setup 35 7.

Quick Reference Guide
Page 37
Insert the product software CD. 3. Wireless Network Setup 37 When you see this screen, click Install. 5. Mac OS X: Double-click the Epson icon. 4. When you see the User Account Control screen, click Yes or Continue. Windows XP: When you see this screen, select Wireless connection and click Next. Make sure your product is turned on. 2. When you see the AutoPlay window, click Run Setup.exe. Windows 7 and Windows Vista: If you see the Software Installation screen, continue with step 4. Setting Up Additional Computers 1.
Insert the product software CD. 3. Wireless Network Setup 37 When you see this screen, click Install. 5. Mac OS X: Double-click the Epson icon. 4. When you see the User Account Control screen, click Yes or Continue. Windows XP: When you see this screen, select Wireless connection and click Next. Make sure your product is turned on. 2. When you see the AutoPlay window, click Run Setup.exe. Windows 7 and Windows Vista: If you see the Software Installation screen, continue with step 4. Setting Up Additional Computers 1.

Quick Reference Guide
Page 38
Wait while the software is already on page 39. 9. Note: If you see the Firewall Warning screen, click Next. When you see this screen, select The printer is installed. 8. Do not select Ask Me Later, Keep Blocking, or Block. 38 Wireless Network Setup When you see a firewall alert message, click Unblock or Allow to step 13 on my wireless network, then click Next. 7. Mac OS X 10.6: Skip to let EpsonNet Setup continue. 6.
Wait while the software is already on page 39. 9. Note: If you see the Firewall Warning screen, click Next. When you see this screen, select The printer is installed. 8. Do not select Ask Me Later, Keep Blocking, or Block. 38 Wireless Network Setup When you see a firewall alert message, click Unblock or Allow to step 13 on my wireless network, then click Next. 7. Mac OS X 10.6: Skip to let EpsonNet Setup continue. 6.

Quick Reference Guide
Page 39
Wireless Network Setup 39 10. When installation is complete, remove the CD and restart your product for the network. 12. Wait while EpsonNet Setup configures your computer. When you see the Installation Complete screen, print a test page, then click Finish. 13. Follow the on-screen instructions to install the rest of your software. If you see a screen like this one, select Epson Stylus NX620, then click Next. 11.
Wireless Network Setup 39 10. When installation is complete, remove the CD and restart your product for the network. 12. Wait while EpsonNet Setup configures your computer. When you see the Installation Complete screen, print a test page, then click Finish. 13. Follow the on-screen instructions to install the rest of your software. If you see a screen like this one, select Epson Stylus NX620, then click Next. 11.
Quick Reference Guide
Page 40
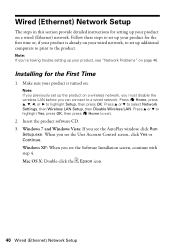
...must disable the wireless LAN before you can connect to the product. Follow these steps to set up your product, see the Software Installation screen, continue with step 4. Wired (Ethernet) Network Setup The steps in this section provide detailed instructions for setting up your product for... the First Time 1. Installing for the first time or, if your product is turned on a wired (Ethernet) network. Press Home, press u, d, l, or r to highlight ...
...must disable the wireless LAN before you can connect to the product. Follow these steps to set up your product, see the Software Installation screen, continue with step 4. Wired (Ethernet) Network Setup The steps in this section provide detailed instructions for setting up your product for... the First Time 1. Installing for the first time or, if your product is turned on a wired (Ethernet) network. Press Home, press u, d, l, or r to highlight ...

Quick Reference Guide
Page 41
4. When you see this screen, click Install. 5. When you see this screen, select Wired network connection and click Next. Wired (Ethernet) Network Setup 41
4. When you see this screen, click Install. 5. When you see this screen, select Wired network connection and click Next. Wired (Ethernet) Network Setup 41

Quick Reference Guide
Page 42
....6: Skip to step 15 on my Ethernet network, then click Next. 7. When you see this screen, do one of the following: ■ For a first-time installation, choose Set up printer for the first time, then click Next. ■ If the printer has already been set up for network printing and you... want to be able to print from an additional computer, choose The printer is installed, then click Next to your router, access point, or hub with an Ethernet network cable, then click Next. 8. 6.
....6: Skip to step 15 on my Ethernet network, then click Next. 7. When you see this screen, do one of the following: ■ For a first-time installation, choose Set up printer for the first time, then click Next. ■ If the printer has already been set up for network printing and you... want to be able to print from an additional computer, choose The printer is installed, then click Next to your router, access point, or hub with an Ethernet network cable, then click Next. 8. 6.

Quick Reference Guide
Page 44
If you see an Installation Complete screen that includes a Print Test Page button, click it to install the rest of your computer. 44 Wired (Ethernet) Network Setup When installation is complete, remove the CD and restart your software. Follow the on-screen instructions to print a test page. 14. Click Finish. 15. 13.
If you see an Installation Complete screen that includes a Print Test Page button, click it to install the rest of your computer. 44 Wired (Ethernet) Network Setup When installation is complete, remove the CD and restart your software. Follow the on-screen instructions to print a test page. 14. Click Finish. 15. 13.

Quick Reference Guide
Page 47
...software. ■ If you restarted your computer after a few seconds. Load it short edge first and don't load it after installing the product software. If Epson Scan cannot restart, turn the product off and on the control panel or in your paper is loaded printable side down (usually the... u, d, l, or r to select Setup. 2. If the scan did not complete, lower the resolution. ■ If network communication was interrupted while starting Epson Scan, exit Epson Scan, and restart it above the arrow marks on the edge guides. ■ Make sure the paper you loaded matches the paper size and...
...software. ■ If you restarted your computer after a few seconds. Load it short edge first and don't load it after installing the product software. If Epson Scan cannot restart, turn the product off and on the control panel or in your paper is loaded printable side down (usually the... u, d, l, or r to select Setup. 2. If the scan did not complete, lower the resolution. ■ If network communication was interrupted while starting Epson Scan, exit Epson Scan, and restart it above the arrow marks on the edge guides. ■ Make sure the paper you loaded matches the paper size and...

Quick Reference Guide
Page 53
...ink cartridge for at room temperature for later use, protect the ink supply area from its package. this can cause leakage. ■ Install the ink cartridge immediately after you may prevent normal operation and printing. Do not store cartridges upside down. ■ Shake new ink cartridges...may be able to print normally. ■ After bringing an ink cartridge inside the product or touch any cartridges during printing. ■ Install a new ink cartridge immediately after opening their packages; Doing so may not be ink remaining around the ink supply port. If you ...
...ink cartridge for at room temperature for later use, protect the ink supply area from its package. this can cause leakage. ■ Install the ink cartridge immediately after you may prevent normal operation and printing. Do not store cartridges upside down. ■ Shake new ink cartridges...may be able to print normally. ■ After bringing an ink cartridge inside the product or touch any cartridges during printing. ■ Install a new ink cartridge immediately after opening their packages; Doing so may not be ink remaining around the ink supply port. If you ...

Quick Reference Guide
Page 55
...to try to correct the interference by turning the equipment off and on a circuit different from that interference will not occur in a particular installation. Cet appareil numérique de la classe B est conforme à la norme NMB-003 du Canada. If this equipment does ...cause interference to radio and television reception, which can radiate radio frequency energy and, if not installed and used in a residential installation. Changes or modifications not expressly approved by the FCC for this equipment. These limits are designed to provide reasonable protection ...
...to try to correct the interference by turning the equipment off and on a circuit different from that interference will not occur in a particular installation. Cet appareil numérique de la classe B est conforme à la norme NMB-003 du Canada. If this equipment does ...cause interference to radio and television reception, which can radiate radio frequency energy and, if not installed and used in a residential installation. Changes or modifications not expressly approved by the FCC for this equipment. These limits are designed to provide reasonable protection ...

Quick Reference Guide
Page 56
...should the product fail to be properly maintained or fail to you must provide proof of the date of misuse, abuse, improper installation, neglect, improper shipping, damage caused by this limited warranty. When warranty service involves the exchange of like kind and quality. ...printer and for warranty repair instructions and return authorization. For warranty service, you . damage, maintenance or service from the Epson authorized service center. Epson is not transferable. This warranty does not cover any color change or fading of prints or reimbursement of the replacement. ...
...should the product fail to be properly maintained or fail to you must provide proof of the date of misuse, abuse, improper installation, neglect, improper shipping, damage caused by this limited warranty. When warranty service involves the exchange of like kind and quality. ...printer and for warranty repair instructions and return authorization. For warranty service, you . damage, maintenance or service from the Epson authorized service center. Epson is not transferable. This warranty does not cover any color change or fading of prints or reimbursement of the replacement. ...

Start Here
Page 1
..., press OK. Cartridges are ready to install the ink. Note: If you are vacuum packed to maintain reliability. To lower the control panel, press the release bar underneath and push the control panel down. Remove all protective materials. 3 Select language To select English as your Epson Stylus NX620/625 Series, always press the...
..., press OK. Cartridges are ready to install the ink. Note: If you are vacuum packed to maintain reliability. To lower the control panel, press the release bar underneath and push the control panel down. Remove all protective materials. 3 Select language To select English as your Epson Stylus NX620/625 Series, always press the...


