Network Installation Guide
Page 2
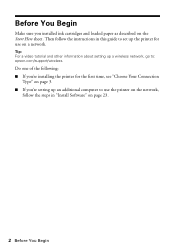
Do one of the following: ■ If you're installing the printer for use the printer on the network, follow the steps in this guide to set up a wireless network, go to use on a network. Before You Begin Make sure you 're setting up an additional computer to : epson.com/support/wireless. Tip...: For a video tutorial and other information about setting up the printer for the first time, see "Choose Your Connection Type" on page 3. ■ If you installed ink...
Do one of the following: ■ If you're installing the printer for use the printer on the network, follow the steps in this guide to set up a wireless network, go to use on a network. Before You Begin Make sure you 're setting up an additional computer to : epson.com/support/wireless. Tip...: For a video tutorial and other information about setting up the printer for the first time, see "Choose Your Connection Type" on page 3. ■ If you installed ink...
Network Installation Guide
Page 3
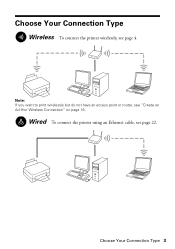
Note: If you want to print wirelessly but do not have an access point or router, see page 22. Wired To connect the printer using an Ethernet cable, see "Create an Ad-Hoc Wireless Connection" on page 16. Choose Your Connection Type 3 Choose Your Connection Type Wireless To connect the printer wirelessly, see page 4.
Note: If you want to print wirelessly but do not have an access point or router, see page 22. Wired To connect the printer using an Ethernet cable, see "Create an Ad-Hoc Wireless Connection" on page 16. Choose Your Connection Type 3 Choose Your Connection Type Wireless To connect the printer wirelessly, see page 4.
Network Installation Guide
Page 4
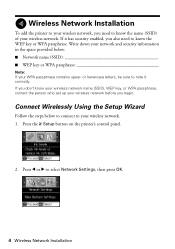
... below : ■ Network name (SSID WEP key or WPA passphrase Note: If your wireless network. 1. If it correctly. Press l or r to select Network Settings, then press OK. 4 Wireless Network Installation Write down your network and security information in the space provided below to connect... you don't know your wireless network name (SSID), WEP key, or WPA passphrase, contact the person who set up your wireless network before you begin. Press the F Setup button on the printer's control panel. 2. Wireless Network Installation To add the printer to your wireless network, you need to ...
... below : ■ Network name (SSID WEP key or WPA passphrase Note: If your wireless network. 1. If it correctly. Press l or r to select Network Settings, then press OK. 4 Wireless Network Installation Write down your network and security information in the space provided below to connect... you don't know your wireless network name (SSID), WEP key, or WPA passphrase, contact the person who set up your wireless network before you begin. Press the F Setup button on the printer's control panel. 2. Wireless Network Installation To add the printer to your wireless network, you need to ...
Network Installation Guide
Page 5
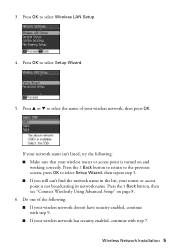
...or d to select Setup Wizard, then repeat step 5. ■ If you still can't find the network name in the list, your wireless network, then press OK. Wireless Network Installation 5 Press the y Back button to return to the previous screen, press OK to select the name of the following : &#...9632; Make sure that your wireless network has security enabled, continue with step 9. ■ If your wireless router or access point is not broadcasting its network name. Do one of your router or access point is turned on page 8. 6.
...or d to select Setup Wizard, then repeat step 5. ■ If you still can't find the network name in the list, your wireless network, then press OK. Wireless Network Installation 5 Press the y Back button to return to the previous screen, press OK to select the name of the following : &#...9632; Make sure that your wireless network has security enabled, continue with step 9. ■ If your wireless router or access point is not broadcasting its network name. Do one of your router or access point is turned on page 8. 6.
Network Installation Guide
Page 6
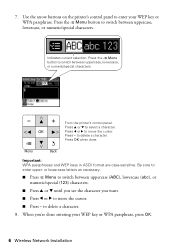
Indicates current selection. or lowercase letters as necessary. ■ Press x Menu to move the cursor. From the printer's control panel: Press u or d to delete a character. 8. Important: WPA passphrases and WEP keys in ASCII format are case-sensitive. to select a ... the cursor. ■ Press - Press OK when done. Use the arrow buttons on the printer's control panel to enter upper- Be sure to enter your WEP key or WPA passphrase, press OK. 6 Wireless Network Installation Press - to switch between uppercase, lowercase, or numeric/special characters. Press the x...
Indicates current selection. or lowercase letters as necessary. ■ Press x Menu to move the cursor. From the printer's control panel: Press u or d to delete a character. 8. Important: WPA passphrases and WEP keys in ASCII format are case-sensitive. to select a ... the cursor. ■ Press - Press OK when done. Use the arrow buttons on the printer's control panel to enter upper- Be sure to enter your WEP key or WPA passphrase, press OK. 6 Wireless Network Installation Press - to switch between uppercase, lowercase, or numeric/special characters. Press the x...

Network Installation Guide
Page 7
... a screen like this can take up to the Network Settings menu. 11. Note: If the printer doesn't connect to your network settings are correct. If the printer still doesn't connect to your wireless network (this one, verify that your wireless network after 90 seconds, the WEP key or WPA passphrase may have verified that the...
... a screen like this can take up to the Network Settings menu. 11. Note: If the printer doesn't connect to your network settings are correct. If the printer still doesn't connect to your wireless network (this one, verify that your wireless network after 90 seconds, the WEP key or WPA passphrase may have verified that the...
Network Installation Guide
Page 8
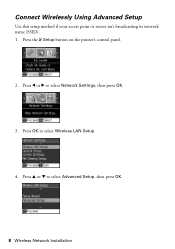
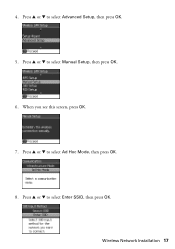
Connect Wirelessly Using Advanced Setup Use this setup method if your access point or router isn't broadcasting its network name (SSID). 1. Press u or d to select Wireless LAN Setup. 4. Press the F Setup button on the printer's control panel. 2. Press OK to select Advanced Setup, then press OK. 8 Wireless Network Installation Press l or r to select Network Settings, then press OK. 3.
Connect Wirelessly Using Advanced Setup Use this setup method if your access point or router isn't broadcasting its network name (SSID). 1. Press u or d to select Wireless LAN Setup. 4. Press the F Setup button on the printer's control panel. 2. Press OK to select Advanced Setup, then press OK. 8 Wireless Network Installation Press l or r to select Network Settings, then press OK. 3.
Network Installation Guide
Page 9
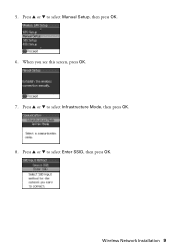
When you see this screen, press OK. 7. Press u or d to select Infrastructure Mode, then press OK. 8. Press u or d to select Enter SSID, then press OK. Wireless Network Installation 9 5. Press u or d to select Manual Setup, then press OK. 6.
When you see this screen, press OK. 7. Press u or d to select Infrastructure Mode, then press OK. 8. Press u or d to select Enter SSID, then press OK. Wireless Network Installation 9 5. Press u or d to select Manual Setup, then press OK. 6.

Network Installation Guide
Page 10
...ABC), lowercase (abc), or numeric/special (123) characters. ■ Press u or d until you see the character you 're done entering your wireless network name (SSID). Press - Important: Network names are case-sensitive. Press OK when done. or lowercase letters as necessary. ■ Press x ...to enter upper- Be sure to delete a character. Press the x Menu button to enter your wireless network name, press OK. 10 Wireless Network Installation Press the x Menu button to move the cursor. From the printer's control panel: Press u or d to delete a character. 10. to select a character. ...
...ABC), lowercase (abc), or numeric/special (123) characters. ■ Press u or d until you see the character you 're done entering your wireless network name (SSID). Press - Important: Network names are case-sensitive. Press OK when done. or lowercase letters as necessary. ■ Press x ...to enter upper- Be sure to delete a character. Press the x Menu button to enter your wireless network name, press OK. 10 Wireless Network Installation Press the x Menu button to move the cursor. From the printer's control panel: Press u or d to delete a character. 10. to select a character. ...
Network Installation Guide
Page 11
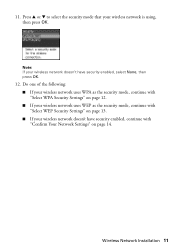
... "Confirm Your Network Settings" on page 14. Wireless Network Installation 11 Press u or d to select the security mode that your wireless network doesn't have security enabled, select None, then press OK. 12. Do one of the following: ■ If your wireless network uses WPA as the security mode, continue... with "Select WPA Security Settings" on page 12. ■ If your wireless network uses WEP as the security mode, continue with "Select ...
... "Confirm Your Network Settings" on page 14. Wireless Network Installation 11 Press u or d to select the security mode that your wireless network doesn't have security enabled, select None, then press OK. 12. Do one of the following: ■ If your wireless network uses WPA as the security mode, continue... with "Select WPA Security Settings" on page 12. ■ If your wireless network uses WEP as the security mode, continue with "Select ...
Network Installation Guide
Page 12
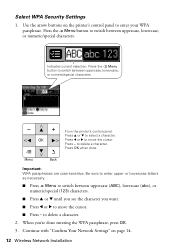
... enter upper- Important: WPA passphrases are case-sensitive. Press the x Menu button to enter your WPA passphrase. Continue with "Confirm Your Network Settings" on the printer's control panel to switch between uppercase (ABC), lowercase (abc), or numeric/special (123) characters. ■ Press u or d until you see the character you 're done...
... enter upper- Important: WPA passphrases are case-sensitive. Press the x Menu button to enter your WPA passphrase. Continue with "Confirm Your Network Settings" on the printer's control panel to switch between uppercase (ABC), lowercase (abc), or numeric/special (123) characters. ■ Press u or d until you see the character you 're done...
Network Installation Guide
Page 13
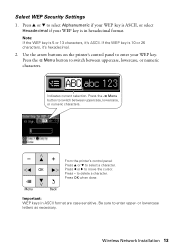
... Press l or r to delete a character. to move the cursor. Press OK when done. Select WEP Security Settings 1. Use the arrow buttons on the printer's control panel to select Alphanumeric if your WEP key is ASCII, or select Hexadecimal if your WEP key. From the... printer's control panel: Press u or d to enter upper- Important: WEP keys in hexadecimal format. Be sure to select a character. or lowercase letters as necessary. Press - Wireless Network Installation 13 If the WEP key is in ASCII format are ...
... Press l or r to delete a character. to move the cursor. Press OK when done. Select WEP Security Settings 1. Use the arrow buttons on the printer's control panel to select Alphanumeric if your WEP key is ASCII, or select Hexadecimal if your WEP key. From the... printer's control panel: Press u or d to enter upper- Important: WEP keys in hexadecimal format. Be sure to select a character. or lowercase letters as necessary. Press - Wireless Network Installation 13 If the WEP key is in ASCII format are ...
Network Installation Guide
Page 14
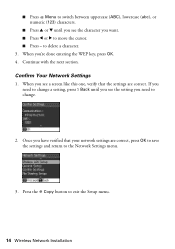
.... ■ Press u or d until you see the setting you need to the Network Settings menu. 3. Confirm Your Network Settings 1. to exit the Setup menu. 14 Wireless Network Installation When you have verified that the settings are correct, press OK to save the settings and return to change . 2. Press the r Copy button... section. If you 're done entering the WEP key, press OK. 4. When you need to change a setting, press y Back until you see a screen like this one, verify that your network settings are correct.
.... ■ Press u or d until you see the setting you need to the Network Settings menu. 3. Confirm Your Network Settings 1. to exit the Setup menu. 14 Wireless Network Installation When you have verified that the settings are correct, press OK to save the settings and return to change . 2. Press the r Copy button... section. If you 're done entering the WEP key, press OK. 4. When you need to change a setting, press y Back until you see a screen like this one, verify that your network settings are correct.
Network Installation Guide
Page 15
... 8 to 90 seconds). Continue with "Install Software" on the printer's control panel. Note: If the printer doesn't connect to your wireless network (this can take up to select your wireless network, see a green WiFi light on page 23. If the printer still doesn't connect to your wireless network after 90 seconds, the SSID, WEP key, or...
... 8 to 90 seconds). Continue with "Install Software" on the printer's control panel. Note: If the printer doesn't connect to your wireless network (this can take up to select your wireless network, see a green WiFi light on page 23. If the printer still doesn't connect to your wireless network after 90 seconds, the SSID, WEP key, or...

Network Installation Guide
Page 16
..., then press OK. 3. See "Connect Wirelessly Using the Setup Wizard" on page 4 or "Wired (Ethernet) Installation" on the printer's control panel. 2. Important: For Windows® users: If your computer is complete, reconnect your printer this setup method if you need to disconnect... it before installing software. Create an Ad-Hoc Wireless Connection Use this way. For Macintosh&#...
..., then press OK. 3. See "Connect Wirelessly Using the Setup Wizard" on page 4 or "Wired (Ethernet) Installation" on the printer's control panel. 2. Important: For Windows® users: If your computer is complete, reconnect your printer this setup method if you need to disconnect... it before installing software. Create an Ad-Hoc Wireless Connection Use this way. For Macintosh&#...
Network Installation Guide
Page 17
4. Press u or d to select Ad Hoc Mode, then press OK. 8. Press u or d to select Advanced Setup, then press OK. 5. Wireless Network Installation 17 When you see this screen, press OK. 7. Press u or d to select Enter SSID, then press OK. Press u or d to select Manual Setup, then press OK. 6.
4. Press u or d to select Ad Hoc Mode, then press OK. 8. Press u or d to select Advanced Setup, then press OK. 5. Wireless Network Installation 17 When you see this screen, press OK. 7. Press u or d to select Enter SSID, then press OK. Press u or d to select Manual Setup, then press OK. 6.

Network Installation Guide
Page 18
Press - Press OK when done. Indicates current selection. From the printer's control panel: Press u or d to move the cursor. ■ Press - Important: Network names are case-sensitive. Press l or r to select a character. or ...abc), or numeric/special (123) characters. ■ Press u or d until you see the character you want. ■ Press l or r to identify your printer. to delete a character. 18 Wireless Network Installation 9. Press the x Menu button to enter upper- Be sure to switch between uppercase, lowercase, or numeric/special characters. Use the arrow...
Press - Press OK when done. Indicates current selection. From the printer's control panel: Press u or d to move the cursor. ■ Press - Important: Network names are case-sensitive. Press l or r to select a character. or ...abc), or numeric/special (123) characters. ■ Press u or d until you see the character you want. ■ Press l or r to identify your printer. to delete a character. 18 Wireless Network Installation 9. Press the x Menu button to enter upper- Be sure to switch between uppercase, lowercase, or numeric/special characters. Use the arrow...
Network Installation Guide
Page 19
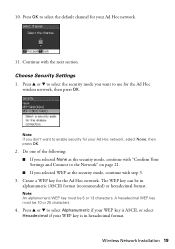
...hexadecimal format. Note: An alphanumeric WEP key must be 10 or 25 characters. 4. A hexadecimal WEP key must be in hexadecimal format. Wireless Network Installation 19 Do one of the following: ■ If you selected None as the security mode, continue with "Confirm Your Settings and Connect to enable security ...for the Ad Hoc wireless network, then press OK. Press OK to select Alphanumeric if your WEP key is ASCII, or ...
...hexadecimal format. Note: An alphanumeric WEP key must be 10 or 25 characters. 4. A hexadecimal WEP key must be in hexadecimal format. Wireless Network Installation 19 Do one of the following: ■ If you selected None as the security mode, continue with "Confirm Your Settings and Connect to enable security ...for the Ad Hoc wireless network, then press OK. Press OK to select Alphanumeric if your WEP key is ASCII, or ...
Network Installation Guide
Page 20
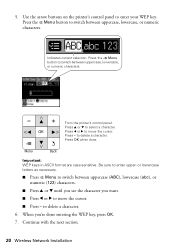
.... to enter your WEP key. or lowercase letters as necessary. ■ Press x Menu to move the cursor. ■ Press - Use the arrow buttons on the printer's control panel to delete a character. Press the x Menu button to move the cursor. Important: WEP keys in ASCII format are case-sensitive. Be sure to...) characters. ■ Press u or d until you see the character you 're done entering the WEP key, press OK. 7. Press - Continue with the next section. 20 Wireless Network Installation 5. From the printer's control panel: Press u or d to delete a character. 6.
.... to enter your WEP key. or lowercase letters as necessary. ■ Press x Menu to move the cursor. ■ Press - Use the arrow buttons on the printer's control panel to delete a character. Press the x Menu button to move the cursor. Important: WEP keys in ASCII format are case-sensitive. Be sure to...) characters. ■ Press u or d until you see the character you 're done entering the WEP key, press OK. 7. Press - Continue with the next section. 20 Wireless Network Installation 5. From the printer's control panel: Press u or d to delete a character. 6.
Network Installation Guide
Page 21
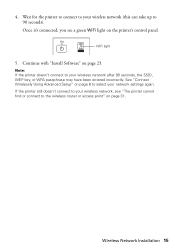
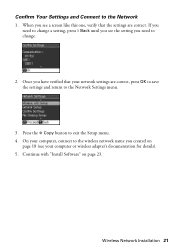
... to change a setting, press y Back until you see a screen like this one, verify that your network settings are correct. Once you need to the Network Settings menu. 3. Continue with "Install Software" on page 18 (see your computer, connect to the wireless network name you see the setting you have verified that the...
... to change a setting, press y Back until you see a screen like this one, verify that your network settings are correct. Once you need to the Network Settings menu. 3. Continue with "Install Software" on page 18 (see your computer, connect to the wireless network name you see the setting you have verified that the...


