Network Installation Guide
Page 3
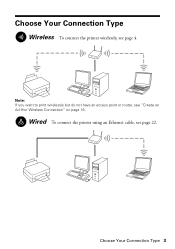
Wired To connect the printer using an Ethernet cable, see page 4. Choose Your Connection Type 3 Choose Your Connection Type Wireless To connect the printer wirelessly, see page 22. Note: If you want to print wirelessly but do not have an access point or router, see "Create an Ad-Hoc Wireless Connection" on page 16.
Wired To connect the printer using an Ethernet cable, see page 4. Choose Your Connection Type 3 Choose Your Connection Type Wireless To connect the printer wirelessly, see page 22. Note: If you want to print wirelessly but do not have an access point or router, see "Create an Ad-Hoc Wireless Connection" on page 16.

Network Installation Guide
Page 16
...the Setup Wizard" on page 4 or "Wired (Ethernet) Installation" on the printer's control panel. 2. Important: For Windows® users: If your computer is complete, reconnect your printer. 1. Press the F Setup button on page 22 to print wirelessly but do not have an access point or router. Press OK to select... Network Settings, then press OK. 3. When setup is connected to a network with an Ethernet cable, you cannot set up your printer this setup method if you need ...
...the Setup Wizard" on page 4 or "Wired (Ethernet) Installation" on the printer's control panel. 2. Important: For Windows® users: If your computer is complete, reconnect your printer. 1. Press the F Setup button on page 22 to print wirelessly but do not have an access point or router. Press OK to select... Network Settings, then press OK. 3. When setup is connected to a network with an Ethernet cable, you cannot set up your printer this setup method if you need ...
Network Installation Guide
Page 28
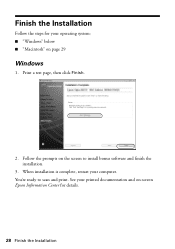
You're ready to install bonus software and finish the installation. 3. When installation is complete, restart your operating system: ■ "Windows" below ■ "Macintosh" on the screen to scan and print. Print a test page, then click Finish. 2. Finish the Installation Follow the steps for details. 28 Finish the Installation See your printed documentation and on-screen Epson Information Center for your computer. Follow the prompts on page 29 Windows 1.
You're ready to install bonus software and finish the installation. 3. When installation is complete, restart your operating system: ■ "Windows" below ■ "Macintosh" on the screen to scan and print. Print a test page, then click Finish. 2. Finish the Installation Follow the steps for details. 28 Finish the Installation See your printed documentation and on-screen Epson Information Center for your computer. Follow the prompts on page 29 Windows 1.

Network Installation Guide
Page 30
See your computer. Follow the prompts on the screen to find the EPSON TCPIP printer on the network. 6. When installation is complete, restart your printed documentation and on the right side of the screen to scan and print. When you see this screen, click Add Printer. 5. Note: It may take up to 90 seconds for details. 30 Finish the Installation Follow the steps on -screen Epson Information Center for your EPSON TCPIP printer. 4. You're ready to add your computer to print a test page, install bonus software, and finish the installation. 7.
See your computer. Follow the prompts on the screen to find the EPSON TCPIP printer on the network. 6. When installation is complete, restart your printed documentation and on the right side of the screen to scan and print. When you see this screen, click Add Printer. 5. Note: It may take up to 90 seconds for details. 30 Finish the Installation Follow the steps on -screen Epson Information Center for your EPSON TCPIP printer. 4. You're ready to add your computer to print a test page, install bonus software, and finish the installation. 7.
Network Installation Guide
Page 31
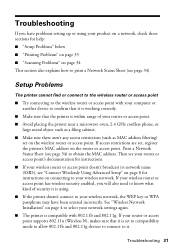
...9632; "Setup Problems" below ■ "Printing Problems" on page 33 ■ "Scanning Problems" on the router or access point. See "Wireless Network Installation" on the wireless router or access point. If your router or access point. ■ Avoid placing the printer near a microwave oven, 2.4 GHz cordless... enabled, you have been entered incorrectly. If your network settings again. ■ The printer is within range of security it . Troubleshooting 31 Troubleshooting If you will also need to print a Network Status Sheet (see page 34). If access restrictions are set on page 4...
...9632; "Setup Problems" below ■ "Printing Problems" on page 33 ■ "Scanning Problems" on the router or access point. See "Wireless Network Installation" on the wireless router or access point. If your router or access point. ■ Avoid placing the printer near a microwave oven, 2.4 GHz cordless... enabled, you have been entered incorrectly. If your network settings again. ■ The printer is within range of security it . Troubleshooting 31 Troubleshooting If you will also need to print a Network Status Sheet (see page 34). If access restrictions are set on page 4...
Network Installation Guide
Page 33
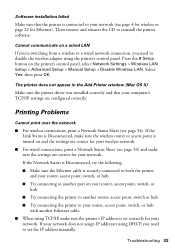
... Status is Disconnected, try the following: ■ Make sure the Ethernet cable is set the IP address manually. Printing Problems Cannot print over the network ■ For wireless connections, print a Network Status Sheet (see page 4 for wireless or page 22 for Ethernet). Select Yes, then press OK.... another port on a wired LAN If you're switching from a wireless to a wired network connection, you need to reinstall the printer software. Software installation failed Make sure that your computer's TCP/IP settings are correct for your network. If the Link Status is Disconnected...
... Status is Disconnected, try the following: ■ Make sure the Ethernet cable is set the IP address manually. Printing Problems Cannot print over the network ■ For wireless connections, print a Network Status Sheet (see page 4 for wireless or page 22 for Ethernet). Select Yes, then press OK.... another port on a wired LAN If you're switching from a wireless to a wired network connection, you need to reinstall the printer software. Software installation failed Make sure that your computer's TCP/IP settings are correct for your network. If the Link Status is Disconnected...
Network Installation Guide
Page 34
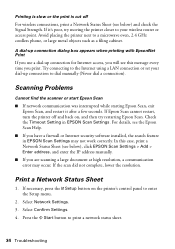
... find the scanner or start Epson Scan ■ If network communication was interrupted while starting Epson Scan, exit Epson Scan, and restart it 's poor, try restarting Epson Scan. Select Network Settings. 3. Printing is slow or the print is cut off and back on the printer's control panel to a microwave..., a communication error may not work correctly. Check the Timeout Setting in EPSON Scan Settings may occur. If necessary, press the F Setup button on , and then try moving the printer closer to print a network status sheet. 34 Troubleshooting Press the x Start button to your...
... find the scanner or start Epson Scan ■ If network communication was interrupted while starting Epson Scan, exit Epson Scan, and restart it 's poor, try restarting Epson Scan. Select Network Settings. 3. Printing is slow or the print is cut off and back on the printer's control panel to a microwave..., a communication error may not work correctly. Check the Timeout Setting in EPSON Scan Settings may occur. If necessary, press the F Setup button on , and then try moving the printer closer to print a network status sheet. 34 Troubleshooting Press the x Start button to your...

Network Installation Guide
Page 36
CPD-27300R1 Printed in XXXXXX
CPD-27300R1 Printed in XXXXXX
Quick Guide
Page 1
Epson Stylus® NX510 Series Quick Guide Basic Copying, Printing, and Scanning Maintenance Solving Problems
Epson Stylus® NX510 Series Quick Guide Basic Copying, Printing, and Scanning Maintenance Solving Problems
Quick Guide
Page 2
...Individual Photos for Printing 16 Selecting All Photos for Printing 17 Printing Photos From an Index Sheet 18 Memory Card Print Settings 20 Printing From Your Computer 21 Printing in Windows 21 Printing With a ...Macintosh 23 Selecting the Correct Paper Type 28 Scanning a Document or Photo 29 Basic Scanning 29 Restoring and Correcting Photos 30 Maintaining Your Printer 31 Checking the Print Head Nozzles 31 Cleaning the Print...
...Individual Photos for Printing 16 Selecting All Photos for Printing 17 Printing Photos From an Index Sheet 18 Memory Card Print Settings 20 Printing From Your Computer 21 Printing in Windows 21 Printing With a ...Macintosh 23 Selecting the Correct Paper Type 28 Scanning a Document or Photo 29 Basic Scanning 29 Restoring and Correcting Photos 30 Maintaining Your Printer 31 Checking the Print Head Nozzles 31 Cleaning the Print...
Quick Guide
Page 4
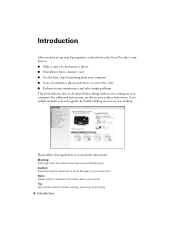
...these things without ever turning on your computer! For additional instructions, see the on-screen Epson Information Center (which includes your user's guide) by double-clicking its icon on your printer. Caution: Cautions must be observed to avoid damage to your equipment. Introduction After you have... set up your Epson printer as you how to do most of a document or photo ■ Print photos from a memory card ■ Get ...
...these things without ever turning on your computer! For additional instructions, see the on-screen Epson Information Center (which includes your user's guide) by double-clicking its icon on your printer. Caution: Cautions must be observed to avoid damage to your equipment. Introduction After you have... set up your Epson printer as you how to do most of a document or photo ■ Print photos from a memory card ■ Get ...
Quick Guide
Page 5
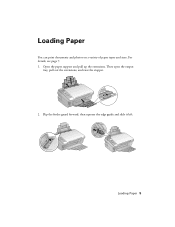
For details, see page 7. 1. Loading Paper 5 Loading Paper You can print documents and photos on a variety of paper types and sizes. Open the paper support and pull up the extensions. Flip the feeder guard forward, then squeeze the edge guide and slide it left. Then open the output tray, pull out the extensions, and raise the stopper. 2.
For details, see page 7. 1. Loading Paper 5 Loading Paper You can print documents and photos on a variety of paper types and sizes. Open the paper support and pull up the extensions. Flip the feeder guard forward, then squeeze the edge guide and slide it left. Then open the output tray, pull out the extensions, and raise the stopper. 2.
Quick Guide
Page 6
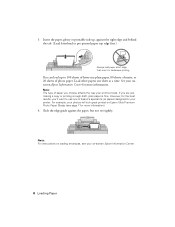
... and behind the tab. (Load letterhead or pre-printed paper top edge first.) Always load paper short edge first, even for more information). 4. Note: For instructions on -screen Epson Information Center. 6 Loading Paper Load other papers one of paper you choose affects the way your printer. 3. See your on loading envelopes, see page 7 for...
... and behind the tab. (Load letterhead or pre-printed paper top edge first.) Always load paper short edge first, even for more information). 4. Note: For instructions on -screen Epson Information Center. 6 Loading Paper Load other papers one of paper you choose affects the way your printer. 3. See your on loading envelopes, see page 7 for...
Quick Guide
Page 10
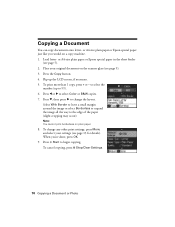
...(up the LCD screen, if necessary. 5. Note: You cannot print borderless on a copy machine. 1. Press x Start to 99). 6. or A4-size plain paper or Epson special paper just like you 're done, press OK. 9. or A4-size plain paper or Epson special paper in the sheet feeder (see page 9). 3. Flip ...up to begin copying. To print more than 1 copy, press + or - To cancel copying, press y Stop/Clear Settings. 10 Copying a Document or Photo Place your ...
...(up the LCD screen, if necessary. 5. Note: You cannot print borderless on a copy machine. 1. Press x Start to 99). 6. or A4-size plain paper or Epson special paper just like you 're done, press OK. 9. or A4-size plain paper or Epson special paper in the sheet feeder (see page 9). 3. Flip ...up to begin copying. To print more than 1 copy, press + or - To cancel copying, press y Stop/Clear Settings. 10 Copying a Document or Photo Place your ...
Quick Guide
Page 11
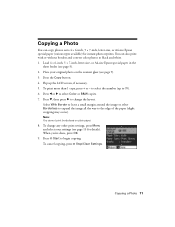
...way to the edge of the paper (slight cropping may occur). To change the layout. To cancel copying, press y Stop/Clear Settings. Note: You cannot print borderless on the scanner glass (see page 5). 2. When you're done, press OK. 9. Load 4 × 6-inch, 5 × 7-inch, letter-size...215; 6-inch, 5 × 7-inch, letter-size, or A4-size Epson special paper (various types available) for details). Place your settings (see page 13 for instant photo reprints. Flip up to 99). 6. Press d, then press r to change any other print settings, press Menu and select your original photo on plain paper...
...way to the edge of the paper (slight cropping may occur). To change the layout. To cancel copying, press y Stop/Clear Settings. Note: You cannot print borderless on the scanner glass (see page 5). 2. When you're done, press OK. 9. Load 4 × 6-inch, 5 × 7-inch, letter-size...215; 6-inch, 5 × 7-inch, letter-size, or A4-size Epson special paper (various types available) for details). Place your settings (see page 13 for instant photo reprints. Flip up to 99). 6. Press d, then press r to change any other print settings, press Menu and select your original photo on plain paper...

Quick Guide
Page 12
...photo on your computer. 1. You can restore old, faded photos to select the number. 7. If you 're done, press OK. 9. To change print settings, press Menu and select your settings (see these settings over a preview of your photos to zoom in on Color Restoration.) 5. Press the Photo... To resize the image area, press + or -. ■ To move the image area, use the NX510 Series software on the scanner glass. 3. Load 4 × 6-inch, 5 × 7-inch, letter-size, or A4-size Epson special paper. 2. You see page 13). Restoring and Cropping Photos You can also crop your photo: ...
...photo on your computer. 1. You can restore old, faded photos to select the number. 7. If you 're done, press OK. 9. To change print settings, press Menu and select your settings (see these settings over a preview of your photos to zoom in on Color Restoration.) 5. Press the Photo... To resize the image area, press + or -. ■ To move the image area, use the NX510 Series software on the scanner glass. 3. Load 4 × 6-inch, 5 × 7-inch, letter-size, or A4-size Epson special paper. 2. You see page 13). Restoring and Cropping Photos You can also crop your photo: ...
Quick Guide
Page 13
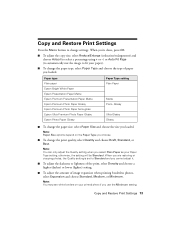
Paper type Plain paper Epson Bright White Paper Epson Presentation Paper Matte Epson Premium Presentation Paper Matte Epson Premium Photo Paper Glossy Epson Premium Photo Paper Semi-gloss Epson Ultra Premium Photo Paper Glossy Epson Photo Paper Glossy Paper Type setting Plain Paper Matte Prem. otherwise, the setting will ... loaded. Note: You can only adjust the Quality setting when you cannot adjust it. ■ To adjust the darkness or lightness of the print, select Density and choose a higher (darker) or lower (lighter) setting. ■ To adjust the amount of paper you 're done,...
Paper type Plain paper Epson Bright White Paper Epson Presentation Paper Matte Epson Premium Presentation Paper Matte Epson Premium Photo Paper Glossy Epson Premium Photo Paper Semi-gloss Epson Ultra Premium Photo Paper Glossy Epson Photo Paper Glossy Paper Type setting Plain Paper Matte Prem. otherwise, the setting will ... loaded. Note: You can only adjust the Quality setting when you cannot adjust it. ■ To adjust the darkness or lightness of the print, select Density and choose a higher (darker) or lower (lighter) setting. ■ To adjust the amount of paper you 're done,...
Quick Guide
Page 14
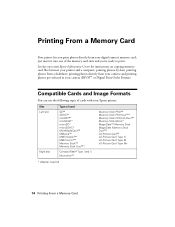
... Center for instructions on copying memory card files between your Epson printer: Slot Left slot Right slot Type of card SD™ SDHC™ miniSD™* miniSDHC* microSD* microSDHC* MultiMediaCard™ MMplus™ MMCmobile™* MMCmicro™* ...;* xD-Picture Card™ xD-Picture Card Type H xD-Picture Card Type M xD-Picture Card Type M+ * Adapter required 14 Printing From a Memory Card just insert it into one of cards with your printer and a computer; Compatible Cards and Image Formats You can use the following types of the memory card slots and you...
... Center for instructions on copying memory card files between your Epson printer: Slot Left slot Right slot Type of card SD™ SDHC™ miniSD™* miniSDHC* microSD* microSDHC* MultiMediaCard™ MMplus™ MMCmobile™* MMCmicro™* ...;* xD-Picture Card™ xD-Picture Card Type H xD-Picture Card Type M xD-Picture Card Type M+ * Adapter required 14 Printing From a Memory Card just insert it into one of cards with your printer and a computer; Compatible Cards and Image Formats You can use the following types of the memory card slots and you...
Quick Guide
Page 15
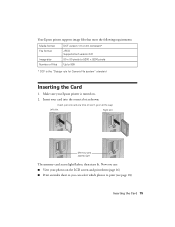
...9200 pixels Up to 999 * DCF is turned on the LCD screen and print them (page 16) ■ Print an index sheet so you can select which photos to print (see page 18) Inserting the Card 15 Make sure your Epson printer is the "Design rule for Camera File system" standard Inserting the Card 1.... Now you can : ■ View your card into the correct slot as shown: Insert just one card at a time (it won't...
...9200 pixels Up to 999 * DCF is turned on the LCD screen and print them (page 16) ■ Print an index sheet so you can select which photos to print (see page 18) Inserting the Card 15 Make sure your Epson printer is the "Design rule for Camera File system" standard Inserting the Card 1.... Now you can : ■ View your card into the correct slot as shown: Insert just one card at a time (it won't...
Quick Guide
Page 16
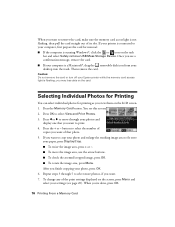
... To rotate the image area, press Menu. To change any of copies you want. 7. Caution: Do not remove the card or turn off your Epson printer while the memory card access light is running Windows®, click the or icon on the LCD screen. 1. Press the + or - button to ...select the number of the print settings displayed on the card. Repeat steps 3 through your photos and display one that photo. 5. If you 're done, press OK. 16 Printing From a Memory Card Once you see a confirmation message, remove the card. ■ ...
... To rotate the image area, press Menu. To change any of copies you want. 7. Caution: Do not remove the card or turn off your Epson printer while the memory card access light is running Windows®, click the or icon on the LCD screen. 1. Press the + or - button to ...select the number of the print settings displayed on the card. Repeat steps 3 through your photos and display one that photo. 5. If you 're done, press OK. 16 Printing From a Memory Card Once you see a confirmation message, remove the card. ■ ...


