Product Brochure
Page 1
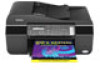
High-capacity Black ink cartridges available • Replace only the color you can count on - Epson Stylus® NX305 Print | Copy | Scan | Fax Smart. durable, long-lasting prints with included OCR software • Worry-free handling - all with high-quality scanning - instantly fax to multiple recipients, store up to 60 fax numbers • ...% • Archive documents/photos with one ink set • Product protection you need right at home • Superior, laser quality documents and lab quality photos - print, copy, scan and fax -
High-capacity Black ink cartridges available • Replace only the color you can count on - Epson Stylus® NX305 Print | Copy | Scan | Fax Smart. durable, long-lasting prints with included OCR software • Worry-free handling - all with high-quality scanning - instantly fax to multiple recipients, store up to 60 fax numbers • ...% • Archive documents/photos with one ink set • Product protection you need right at home • Superior, laser quality documents and lab quality photos - print, copy, scan and fax -
Product Brochure
Page 2
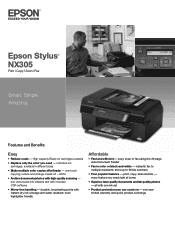
... EMI FCC Part 15 subpart B class B, CAN/CSA-CEI/IEC CISPR 22 class B FCC Part 68 (U.S.A.), IC/CS03 (Canada) Indonesia Printing: 18.1" x 21.3" x 11.9" Storage: 18.1" x 16.2" x 9.3" Weight: 15.9 lb Epson Stylus NX305 all-in-one, instruction booklet, CD-ROM with drivers, USB cable, power cord, four DURABrite® Ultra Ink cartridges (one maintenance...
... EMI FCC Part 15 subpart B class B, CAN/CSA-CEI/IEC CISPR 22 class B FCC Part 68 (U.S.A.), IC/CS03 (Canada) Indonesia Printing: 18.1" x 21.3" x 11.9" Storage: 18.1" x 16.2" x 9.3" Weight: 15.9 lb Epson Stylus NX305 all-in-one, instruction booklet, CD-ROM with drivers, USB cable, power cord, four DURABrite® Ultra Ink cartridges (one maintenance...
Quick Guide
Page 1
Epson Stylus® NX300/305 Series Quick Guide Basic Printing, Copying, Scanning, and Faxing Maintaining Your All-in-One Solving Problems
Epson Stylus® NX300/305 Series Quick Guide Basic Printing, Copying, Scanning, and Faxing Maintaining Your All-in-One Solving Problems
Quick Guide
Page 2
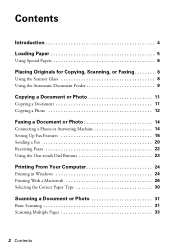
... or Answering Machine 14 Setting Up Fax Features 16 Sending a Fax 20 Receiving Faxes 22 Using the One-touch Dial Buttons 23 Printing From Your Computer 24 Printing in Windows 24 Printing With a Macintosh 26 Selecting the Correct Paper Type 30 Scanning a Document or Photo 31 Basic Scanning 31 Scanning Multiple Pages 33...
... or Answering Machine 14 Setting Up Fax Features 16 Sending a Fax 20 Receiving Faxes 22 Using the One-touch Dial Buttons 23 Printing From Your Computer 24 Printing in Windows 24 Printing With a Macintosh 26 Selecting the Correct Paper Type 30 Scanning a Document or Photo 31 Basic Scanning 31 Scanning Multiple Pages 33...
Quick Guide
Page 3
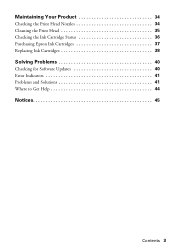
Maintaining Your Product 34 Checking the Print Head Nozzles 34 Cleaning the Print Head 35 Checking the Ink Cartridge Status 36 Purchasing Epson Ink Cartridges 37 Replacing Ink Cartridges 38 Solving Problems 40 Checking for Software Updates 40 Error Indicators 41 Problems and Solutions 41 Where to Get Help 44 Notices 45 Contents 3
Maintaining Your Product 34 Checking the Print Head Nozzles 34 Cleaning the Print Head 35 Checking the Ink Cartridge Status 36 Purchasing Epson Ink Cartridges 37 Replacing Ink Cartridges 38 Solving Problems 40 Checking for Software Updates 40 Error Indicators 41 Problems and Solutions 41 Where to Get Help 44 Notices 45 Contents 3
Quick Guide
Page 4
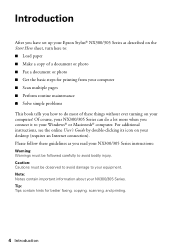
... copy of a document or photo ■ Fax a document or photo ■ Get the basic steps for better faxing, copying, scanning, and printing. 4 Introduction For additional instructions, see the online User's Guide by double-clicking its icon on your computer! Caution: Cautions must be observed to avoid... Notes contain important information about your Windows® or Macintosh® computer. Introduction After you have set up your Epson Stylus® NX300/305 Series as you read your NX300/305 Series instructions: Warning: Warnings must be followed carefully to avoid bodily injury....
... copy of a document or photo ■ Fax a document or photo ■ Get the basic steps for better faxing, copying, scanning, and printing. 4 Introduction For additional instructions, see the online User's Guide by double-clicking its icon on your computer! Caution: Cautions must be observed to avoid... Notes contain important information about your Windows® or Macintosh® computer. Introduction After you have set up your Epson Stylus® NX300/305 Series as you read your NX300/305 Series instructions: Warning: Warnings must be followed carefully to avoid bodily injury....
Quick Guide
Page 5
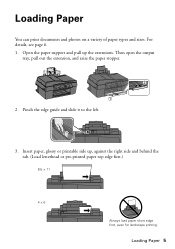
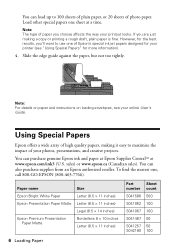
Pinch the edge guide and slide it to the left. 3. Open the paper support and pull up , against the right side and behind the tab. (Load letterhead or pre-printed paper top edge first.) 8½ × 11 4 × 6 Always load paper short edge first, even for landscape printing. Loading Paper 5 Then open the output tray, pull out the extension, and raise the paper stopper. 2. For details, see page 6. 1. Insert paper, glossy or printable side up the extensions. Loading Paper You can print documents and photos on a variety of paper types and sizes.
Pinch the edge guide and slide it to the left. 3. Open the paper support and pull up , against the right side and behind the tab. (Load letterhead or pre-printed paper top edge first.) 8½ × 11 4 × 6 Always load paper short edge first, even for landscape printing. Loading Paper 5 Then open the output tray, pull out the extension, and raise the paper stopper. 2. For details, see page 6. 1. Insert paper, glossy or printable side up the extensions. Loading Paper You can print documents and photos on a variety of paper types and sizes.
Quick Guide
Page 6
... use one of high quality papers, making a copy or printing a rough draft, plain paper is fine. Slide the edge guide against the paper, but not too tightly. Using Special Papers Epson offers a wide array of Epson's special ink jet papers designed for more information). 4. sales...) or www.epson.ca (Canadian sales). Load other special papers one , call 800-GO-EPSON (800-463-7766). You can purchase genuine Epson ink and paper at Epson Supplies CentralSM at a time. Paper name Epson Bright White Paper Epson Presentation Paper Matte Epson Premium Presentation Paper Matte Size ...
... use one of high quality papers, making a copy or printing a rough draft, plain paper is fine. Slide the edge guide against the paper, but not too tightly. Using Special Papers Epson offers a wide array of Epson's special ink jet papers designed for more information). 4. sales...) or www.epson.ca (Canadian sales). Load other special papers one , call 800-GO-EPSON (800-463-7766). You can purchase genuine Epson ink and paper at Epson Supplies CentralSM at a time. Paper name Epson Bright White Paper Epson Presentation Paper Matte Epson Premium Presentation Paper Matte Size ...

Quick Guide
Page 10
Slide the edge guide against the originals. Note: When you copy a legal-size document, the image will be cropped to fit lettersize paper. 10 Placing Originals for your printed copies. If you use the Copy function, letter-size paper is automatically selected for Copying, Scanning, or Faxing 5. Once they're loaded, you can copy, scan, or fax.
Slide the edge guide against the originals. Note: When you copy a legal-size document, the image will be cropped to fit lettersize paper. 10 Placing Originals for your printed copies. If you use the Copy function, letter-size paper is automatically selected for Copying, Scanning, or Faxing 5. Once they're loaded, you can copy, scan, or fax.
Quick Guide
Page 11
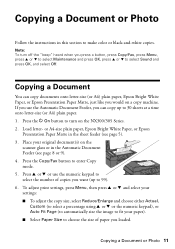
...select Off. Press u or d or use the Automatic Document Feeder, you can copy documents onto letter-size (or A4) plain paper, Epson Bright White Paper, or Epson Presentation Paper Matte, just like you press a button, press Copy/Fax, press Menu, press u or d to select Maintenance and press OK..."beep" heard when you would on the NX300/305 Series. 2. or A4-size plain paper, Epson Bright White Paper, or Epson Presentation Paper Matte in the Automatic Document Feeder (see page 5). 3. To adjust print settings, press Menu, then press u or d and select your settings: ■ To adjust the...
...select Off. Press u or d or use the Automatic Document Feeder, you can copy documents onto letter-size (or A4) plain paper, Epson Bright White Paper, or Epson Presentation Paper Matte, just like you press a button, press Copy/Fax, press Menu, press u or d to select Maintenance and press OK..."beep" heard when you would on the NX300/305 Series. 2. or A4-size plain paper, Epson Bright White Paper, or Epson Presentation Paper Matte in the Automatic Document Feeder (see page 5). 3. To adjust print settings, press Menu, then press u or d and select your settings: ■ To adjust the...
Quick Guide
Page 12
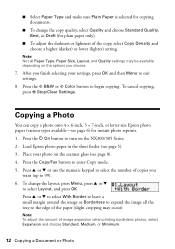
... paper (various types available-see page 6) for plain paper only). ■ To adjust the darkness or lightness of image expansion when printing borderless photos, select Expansion and choose Standard, Medium, or Minimum. 12 Copying a Document or Photo To cancel copying, press y Stop/Clear Settings. Press the... leave a small margin around the image or Borderless to expand the image all Paper Type, Paper Size, Layout, and Quality settings may occur). Load Epson photo paper in the sheet feeder (see page 8). 4. Press u or d or use the numeric keypad to select the number of the paper ...
... paper (various types available-see page 6) for plain paper only). ■ To adjust the darkness or lightness of image expansion when printing borderless photos, select Expansion and choose Standard, Medium, or Minimum. 12 Copying a Document or Photo To cancel copying, press y Stop/Clear Settings. Press the... leave a small margin around the image or Borderless to expand the image all Paper Type, Paper Size, Layout, and Quality settings may occur). Load Epson photo paper in the sheet feeder (see page 8). 4. Press u or d or use the numeric keypad to select the number of the paper ...
Quick Guide
Page 13
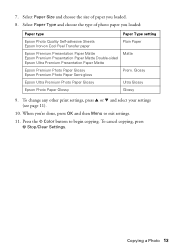
... Paper Semi-gloss Prem. When you loaded. 8. Glossy Epson Ultra Premium Photo Paper Glossy Ultra Glossy Epson Photo Paper Glossy Glossy 9. Select Paper Type and choose the type of paper you 're done, press OK and then Menu to begin copying. To change any other print settings, press u or d and select your settings...
... Paper Semi-gloss Prem. When you loaded. 8. Glossy Epson Ultra Premium Photo Paper Glossy Ultra Glossy Epson Photo Paper Glossy Glossy 9. Select Paper Type and choose the type of paper you 're done, press OK and then Menu to begin copying. To change any other print settings, press u or d and select your settings...
Quick Guide
Page 16
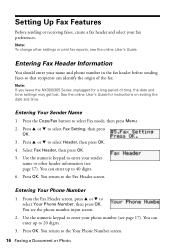
Setting Up Fax Features Before sending or receiving faxes, create a fax header and select your sender name or other settings or print fax reports, see the phone number input screen. 2. Press u or d to select Your Phone Number, then press OK. Use the numeric keypad to enter your ...
Setting Up Fax Features Before sending or receiving faxes, create a fax header and select your sender name or other settings or print fax reports, see the phone number input screen. 2. Press u or d to select Your Phone Number, then press OK. Use the numeric keypad to enter your ...

Quick Guide
Page 18
... or Standard for every fax you loaded (letter, legal, or A4). Indicates when the NX300/305 Series prints a report on multiple sheets (Off). Press u or d to print reports for basic faxes. Adjust any of the following settings: Setting and options Resolution Contrast Paper Size Auto ...Reduction Last Transmission Report Description Sets the scan resolution and print quality of the image, negative values decrease the contrast. Indicates the size of incoming and outgoing faxes, select the paper size ...
... or Standard for every fax you loaded (letter, legal, or A4). Indicates when the NX300/305 Series prints a report on multiple sheets (Off). Press u or d to print reports for basic faxes. Adjust any of the following settings: Setting and options Resolution Contrast Paper Size Auto ...Reduction Last Transmission Report Description Sets the scan resolution and print quality of the image, negative values decrease the contrast. Indicates the size of incoming and outgoing faxes, select the paper size ...

Quick Guide
Page 19
... an existing list, select Edit or Delete instead. 5. Press u or d to select Create, then press OK. Use the numeric keypad to identify the recipients, and print a list for faxing. Press u or d to select Fax mode, then press Menu. 2. Press the Copy/Fax button to select Group Dial Setup, then press OK...
... an existing list, select Edit or Delete instead. 5. Press u or d to select Create, then press OK. Use the numeric keypad to identify the recipients, and print a list for faxing. Press u or d to select Fax mode, then press Menu. 2. Press the Copy/Fax button to select Group Dial Setup, then press OK...
Quick Guide
Page 20
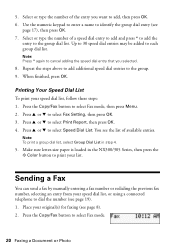
... a fax number or redialing the previous fax number, selecting an entry from your list. Up to 30 speed dial entries may be added to select Print Report, then press OK. 4. Note: Press * again to cancel adding the speed dial entry that you want to dial the number (see page 8). ...select Fax mode, then press Menu. 2. Select or type the number of the entry you selected. 8. Press u or d to the group. 9. Printing Your Speed Dial List To print your original(s) for faxing (see page 19). 1. Repeat the steps above to add additional speed dial entries to select Fax Setting, then press...
... a fax number or redialing the previous fax number, selecting an entry from your list. Up to 30 speed dial entries may be added to select Print Report, then press OK. 4. Note: Press * again to cancel adding the speed dial entry that you want to dial the number (see page 8). ...select Fax mode, then press Menu. 2. Select or type the number of the entry you selected. 8. Press u or d to the group. 9. Printing Your Speed Dial List To print your original(s) for faxing (see page 19). 1. Repeat the steps above to add additional speed dial entries to select Fax Setting, then press...
Quick Guide
Page 21
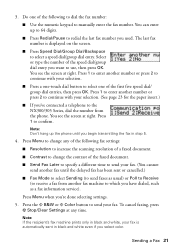
... Menu to send your fax is displayed on the screen. ■ Press Speed Dial/Group Dial/Backspace to confirm. Note: If the recipient's fax machine prints only in step 5. 4.
... Menu to send your fax is displayed on the screen. ■ Press Speed Dial/Group Dial/Backspace to confirm. Note: If the recipient's fax machine prints only in step 5. 4.
Quick Guide
Page 22
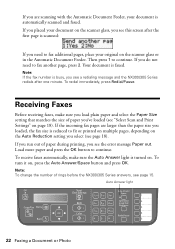
... Auto Reduction setting you select (see the error message Paper out. To turn it on page 18). Note: To change the number of paper during printing, you see page 18). Auto Answer light Stop/ Clear Settings Auto Answer/ Space Copy/Fax B&W Color Speed Dial Group Dial/ Backspace Redial/Pause 22 Faxing... paper you've loaded (see page 15. If you are larger than the paper size you loaded, the fax size is reduced to fit or printed on multiple pages, depending on . If you run out of rings before the NX300/305 Series answers, see "Select Scan and...
... Auto Reduction setting you select (see the error message Paper out. To turn it on page 18). Note: To change the number of paper during printing, you see page 18). Auto Answer light Stop/ Clear Settings Auto Answer/ Space Copy/Fax B&W Color Speed Dial Group Dial/ Backspace Redial/Pause 22 Faxing... paper you've loaded (see page 15. If you are larger than the paper size you loaded, the fax size is reduced to fit or printed on multiple pages, depending on . If you run out of rings before the NX300/305 Series answers, see "Select Scan and...
Quick Guide
Page 23
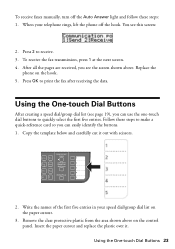
Press 2 to print the fax after receiving the data. After all the pages are received, you see the screen shown above on the control panel. Auto Answer/ Space ...
Press 2 to print the fax after receiving the data. After all the pages are received, you see the screen shown above on the control panel. Auto Answer/ Space ...
Quick Guide
Page 24
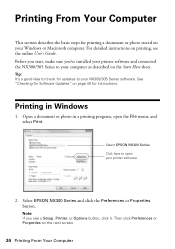
...on the Start Here sheet. See "Checking for Software Updates" on page 40 for updates to open the File menu, and select Print. Select EPSON NX300 Series Click here to your printer software 2. Note: If you 've installed your printer software and connected the NX300/305 ... good idea to check for instructions. Open a document or photo in Windows 1. Then click Preferences or Properties on printing, see a Setup, Printer, or Options button, click it. Select EPSON NX300 Series and click the Preferences or Properties button. Before you start, make sure you see the online User's ...
...on the Start Here sheet. See "Checking for Software Updates" on page 40 for updates to open the File menu, and select Print. Select EPSON NX300 Series Click here to your printer software 2. Note: If you 've installed your printer software and connected the NX300/305 ... good idea to check for instructions. Open a document or photo in Windows 1. Then click Preferences or Properties on printing, see a Setup, Printer, or Options button, click it. Select EPSON NX300 Series and click the Preferences or Properties button. Before you start, make sure you see the online User's ...


