Product Brochure
Page 1
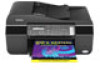
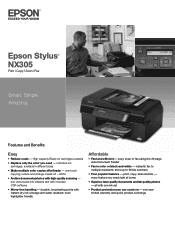
... Benefits Easy • Reduce costs - every feature you need right at home • Superior, laser quality documents and lab quality photos - Amazing. Simple. Epson Stylus® NX305 Print | Copy | Scan | Fax Smart. High-capacity Black ink cartridges available • Replace only the color you need - individual ink cartridges, available in color or black-and...
... Benefits Easy • Reduce costs - every feature you need right at home • Superior, laser quality documents and lab quality photos - Amazing. Simple. Epson Stylus® NX305 Print | Copy | Scan | Fax Smart. High-capacity Black ink cartridges available • Replace only the color you need - individual ink cartridges, available in color or black-and...
Product Brochure
Page 2
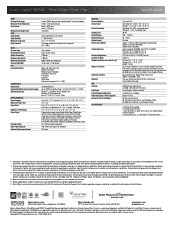
... on the new international standard for a Better Future is an innovative partnership of ink remains in these marks. Epson disclaims any and all -in accordance with one color. Epson Stylus® NX305 Print | Copy | Scan | Fax Specifications PRINT Printing Technology Maximum Print Resolution Print Speed† Minimum Ink Droplet Size COPY Copy Quality Copy Quantity...
... on the new international standard for a Better Future is an innovative partnership of ink remains in these marks. Epson disclaims any and all -in accordance with one color. Epson Stylus® NX305 Print | Copy | Scan | Fax Specifications PRINT Printing Technology Maximum Print Resolution Print Speed† Minimum Ink Droplet Size COPY Copy Quality Copy Quantity...
Quick Guide
Page 1
Epson Stylus® NX300/305 Series Quick Guide Basic Printing, Copying, Scanning, and Faxing Maintaining Your All-in-One Solving Problems
Epson Stylus® NX300/305 Series Quick Guide Basic Printing, Copying, Scanning, and Faxing Maintaining Your All-in-One Solving Problems
Quick Guide
Page 2
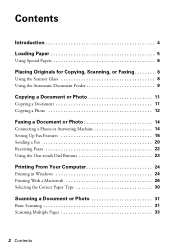
... 8 Using the Automatic Document Feeder 9 Copying a Document or Photo 11 Copying a Document 11 Copying a Photo 12 Faxing a Document or Photo 14 Connecting a Phone or Answering Machine 14 Setting Up Fax Features 16 Sending a Fax 20 Receiving Faxes 22 Using the One-touch Dial Buttons 23 Printing From Your Computer 24 Printing in Windows 24...
... 8 Using the Automatic Document Feeder 9 Copying a Document or Photo 11 Copying a Document 11 Copying a Photo 12 Faxing a Document or Photo 14 Connecting a Phone or Answering Machine 14 Setting Up Fax Features 16 Sending a Fax 20 Receiving Faxes 22 Using the One-touch Dial Buttons 23 Printing From Your Computer 24 Printing in Windows 24...
Quick Guide
Page 4
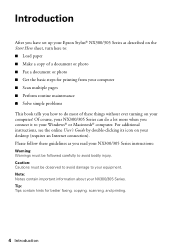
... your NX300/305 Series. Note: Notes contain important information about your desktop (requires an Internet connection). Introduction After you have set up your Epson Stylus® NX300/305 Series as you connect it to your NX300/305 Series can do most of a document or photo ■...; Fax a document or photo ■ Get the basic steps for better faxing, copying, scanning, and printing. 4 Introduction Please follow these guidelines as described on the Start Here sheet, turn here to...
... your NX300/305 Series. Note: Notes contain important information about your desktop (requires an Internet connection). Introduction After you have set up your Epson Stylus® NX300/305 Series as you connect it to your NX300/305 Series can do most of a document or photo ■...; Fax a document or photo ■ Get the basic steps for better faxing, copying, scanning, and printing. 4 Introduction Please follow these guidelines as described on the Start Here sheet, turn here to...
Quick Guide
Page 8
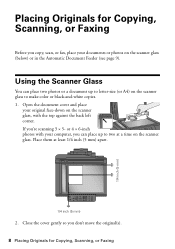
...inch (5 mm) 2. Place them at a time on the scanner glass, with your original face-down on the scanner glass. Placing Originals for Copying, Scanning, or Faxing 1/4 inch (5 mm) Using the Scanner Glass You can place up to make color or black-and-white copies. 1. If you don't move the original(s). 8 ...Placing Originals for Copying, Scanning, or Faxing Before you copy, scan, or fax, place your documents or photos on the scanner glass to letter-size (or A4) on the scanner glass (below) or in the ...
...inch (5 mm) 2. Place them at a time on the scanner glass, with your original face-down on the scanner glass. Placing Originals for Copying, Scanning, or Faxing 1/4 inch (5 mm) Using the Scanner Glass You can place up to make color or black-and-white copies. 1. If you don't move the original(s). 8 ...Placing Originals for Copying, Scanning, or Faxing Before you copy, scan, or fax, place your documents or photos on the scanner glass to letter-size (or A4) on the scanner glass (below) or in the ...

Quick Guide
Page 10
Once they're loaded, you copy a legal-size document, the image will be cropped to fit lettersize paper. 10 Placing Originals for your printed copies. If you can copy, scan, or fax. 5. Note: When you use the Copy function, letter-size paper is automatically selected for Copying, Scanning, or Faxing Slide the edge guide against the originals.
Once they're loaded, you copy a legal-size document, the image will be cropped to fit lettersize paper. 10 Placing Originals for your printed copies. If you can copy, scan, or fax. 5. Note: When you use the Copy function, letter-size paper is automatically selected for Copying, Scanning, or Faxing Slide the edge guide against the originals.
Quick Guide
Page 11
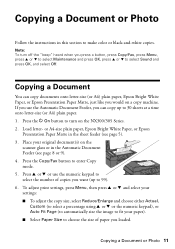
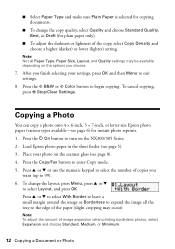
...u or d or use the Automatic Document Feeder, you can copy documents onto letter-size (or A4) plain paper, Epson Bright White Paper, or Epson Presentation Paper Matte, just like you press a button, press Copy/Fax, press Menu, press u or d to select Maintenance and press OK, press u or d to fit your original... to enter Copy mode. 5. Copying a Document or Photo 11 Note: To turn on the NX300/305 Series. 2. Load letter- Press the Copy/Fax button to make color or black-and-white copies. Place your paper). ■ Select Paper Size to 99). 6. To adjust print settings, press Menu...
...u or d or use the Automatic Document Feeder, you can copy documents onto letter-size (or A4) plain paper, Epson Bright White Paper, or Epson Presentation Paper Matte, just like you press a button, press Copy/Fax, press Menu, press u or d to select Maintenance and press OK, press u or d to fit your original... to enter Copy mode. 5. Copying a Document or Photo 11 Note: To turn on the NX300/305 Series. 2. Load letter- Press the Copy/Fax button to make color or black-and-white copies. Place your paper). ■ Select Paper Size to 99). 6. To adjust print settings, press Menu...
Quick Guide
Page 12
... y Stop/Clear Settings. Press the P On button to the edge of copies you want (up to enter Copy mode. 5. Load Epson photo paper in the sheet feeder (see page 8). 4. Press the Copy/Fax button to 99). 6. Press u or d or use the numeric keypad to select the number of the paper (slight cropping...
... y Stop/Clear Settings. Press the P On button to the edge of copies you want (up to enter Copy mode. 5. Load Epson photo paper in the sheet feeder (see page 8). 4. Press the Copy/Fax button to 99). 6. Press u or d or use the numeric keypad to select the number of the paper (slight cropping...
Quick Guide
Page 14
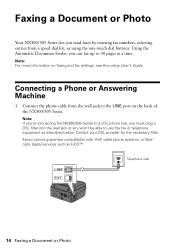
...the one-touch dial buttons. Epson cannot guarantee compatibility with VoIP, cable phone systems, or fiberoptic digital services such as described below. Telephone wall 14 Faxing a Document or Photo Using the Automatic Document Feeder, you won't be able to use the fax or telephone equipment as FiOS&#...8482;. Connecting a Phone or Answering Machine 1. Faxing a Document or Photo Your NX300/305 Series lets you send faxes by entering fax numbers, selecting entries from the wall jack to the LINE port on faxing and fax settings, see the online User's Guide. Contact your DSL ...
...the one-touch dial buttons. Epson cannot guarantee compatibility with VoIP, cable phone systems, or fiberoptic digital services such as described below. Telephone wall 14 Faxing a Document or Photo Using the Automatic Document Feeder, you won't be able to use the fax or telephone equipment as FiOS&#...8482;. Connecting a Phone or Answering Machine 1. Faxing a Document or Photo Your NX300/305 Series lets you send faxes by entering fax numbers, selecting entries from the wall jack to the LINE port on faxing and fax settings, see the online User's Guide. Contact your DSL ...
Quick Guide
Page 15
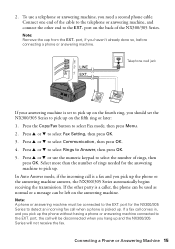
... transmission. Note: A phone or answering machine must be disconnected when you pick up and the NX300/305 Series will be connected to pick up . If a fax call is a caller, the phone can be used as normal or a message can be left on the fifth ring or later: 1. port for the answering... machine to the EXT. Telephone wall jack If your answering machine is picked up . Press u or d to select Rings to select Fax Setting, then press OK. 3. port, the call when a phone is set to pick up on the back of rings needed for the NX300/305 Series...
... transmission. Note: A phone or answering machine must be disconnected when you pick up and the NX300/305 Series will be connected to pick up . If a fax call is a caller, the phone can be used as normal or a message can be left on the fifth ring or later: 1. port for the answering... machine to the EXT. Telephone wall jack If your answering machine is picked up . Press u or d to select Rings to select Fax Setting, then press OK. 3. port, the call when a phone is set to pick up on the back of rings needed for the NX300/305 Series...
Quick Guide
Page 16
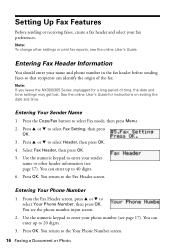
... see the online User's Guide. You can enter up to select Fax Setting, then press OK. 3. You return to 40 digits. 6. Entering Fax Header Information You should enter your sender name or other settings or print fax reports, see the phone number input screen. 2. Entering Your Sender ...Series unplugged for instructions on setting the date and time. You return to select Fax mode, then press Menu. 2. Press the Copy/Fax button to the Fax Header screen. Setting Up Fax Features Before sending or receiving faxes, create a fax header and select your phone number (see page 17). Select...
... see the online User's Guide. You can enter up to select Fax Setting, then press OK. 3. You return to 40 digits. 6. Entering Fax Header Information You should enter your sender name or other settings or print fax reports, see the phone number input screen. 2. Entering Your Sender ...Series unplugged for instructions on setting the date and time. You return to select Fax mode, then press Menu. 2. Press the Copy/Fax button to the Fax Header screen. Setting Up Fax Features Before sending or receiving faxes, create a fax header and select your phone number (see page 17). Select...

Quick Guide
Page 17
..., press a keypad number repeatedly to the left or right. Deletes a character and moves the cursor one character to the left . ■ To enter a fax number, use the numeric keypad. Press 1symb to enter these guidelines: ■ To move the cursor, add a space, or delete a character: Button l... Function Moves the cursor to the right. Use the # button to type the + symbol when entering a phone number in Fax mode, follow these special characters Setting Up Fax Features 17 Inserts a space and moves the cursor one space to switch between uppercase, lowercase, or numbers.
..., press a keypad number repeatedly to the left or right. Deletes a character and moves the cursor one character to the left . ■ To enter a fax number, use the numeric keypad. Press 1symb to enter these guidelines: ■ To move the cursor, add a space, or delete a character: Button l... Function Moves the cursor to the right. Use the # button to type the + symbol when entering a phone number in Fax mode, follow these special characters Setting Up Fax Features 17 Inserts a space and moves the cursor one space to switch between uppercase, lowercase, or numbers.

Quick Guide
Page 18
... paper size loaded in your NX300/305 Series, select the size at their original size on multiple sheets (Off). Press the Copy/Fax button to select Fax Setting, then press OK. 3. Adjust any of the following settings: Setting and options Resolution Contrast Paper Size Auto Reduction Last Transmission ... the size of paper you want. 1. Select Fine for small print or detailed line art, Photo for pictures, or Standard for every fax you send. 18 Faxing a Document or Photo Sets the contrast when scanning and printing. Indicates when the NX300/305 Series prints a report on the last transmitted...
... paper size loaded in your NX300/305 Series, select the size at their original size on multiple sheets (Off). Press the Copy/Fax button to select Fax Setting, then press OK. 3. Adjust any of the following settings: Setting and options Resolution Contrast Paper Size Auto Reduction Last Transmission ... the size of paper you want. 1. Select Fine for small print or detailed line art, Photo for pictures, or Standard for every fax you send. 18 Faxing a Document or Photo Sets the contrast when scanning and printing. Indicates when the NX300/305 Series prints a report on the last transmitted...

Quick Guide
Page 19
..., then press OK. You see the list of available entries. Creating a Speed Dial List 1. You see the list of available entries. You return to select Fax mode, then press Menu. 2. Creating a Group Dial List 1. Note: To edit or delete an entry from an existing list, select Edit or Delete instead. 5.... You can quickly select them for easy reference (see page 20). Press the Copy/Fax button to the Create menu. 8. Note: To edit or delete an entry from an existing list, select Edit or Delete instead. To add another ...
..., then press OK. You see the list of available entries. Creating a Speed Dial List 1. You see the list of available entries. You return to select Fax mode, then press Menu. 2. Creating a Group Dial List 1. Note: To edit or delete an entry from an existing list, select Edit or Delete instead. 5.... You can quickly select them for easy reference (see page 20). Press the Copy/Fax button to the Create menu. 8. Note: To edit or delete an entry from an existing list, select Edit or Delete instead. To add another ...
Quick Guide
Page 20
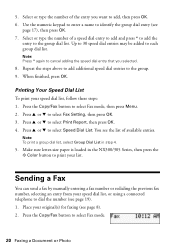
...the entry you selected. 8. Select or type the number of available entries. When finished, press OK. Sending a Fax You can send a fax by manually entering a fax number or redialing the previous fax number, selecting an entry from your speed dial list, follow these steps: 1. Repeat the steps above to add... additional speed dial entries to add, then press OK. 6. Make sure letter-size paper is loaded in step 4. 5. Press u or d to select Fax mode, then press Menu. 2. Place your list. You see page 17), then press OK. 7. Use the numeric keypad to enter a name to print...
...the entry you selected. 8. Select or type the number of available entries. When finished, press OK. Sending a Fax You can send a fax by manually entering a fax number or redialing the previous fax number, selecting an entry from your speed dial list, follow these steps: 1. Repeat the steps above to add... additional speed dial entries to add, then press OK. 6. Make sure letter-size paper is loaded in step 4. 5. Press u or d to select Fax mode, then press Menu. 2. Place your list. You see page 17), then press OK. 7. Use the numeric keypad to enter a name to print...
Quick Guide
Page 21
...'re done selecting settings. 5. Press 1 to the NX300/305 Series, dial the number from another number or press 2 to continue with your fax. Note: Don't hang up to 64 digits. ■ Press Redial/Pause to select one of the speed dial/group dial entry you select ... up the phone until the delayed fax has been sent or cancelled.) ■ Fax Mode to select Sending (to send faxes as a fax information service). Press 1 to enter another fax machine to manually enter the fax number. To cancel faxing, press y Stop/Clear Settings at right. Sending a Fax 21 Select or type the number...
...'re done selecting settings. 5. Press 1 to the NX300/305 Series, dial the number from another number or press 2 to continue with your fax. Note: Don't hang up to 64 digits. ■ Press Redial/Pause to select one of the speed dial/group dial entry you select ... up the phone until the delayed fax has been sent or cancelled.) ■ Fax Mode to select Sending (to send faxes as a fax information service). Press 1 to enter another fax machine to manually enter the fax number. To cancel faxing, press y Stop/Clear Settings at right. Sending a Fax 21 Select or type the number...
Quick Guide
Page 22
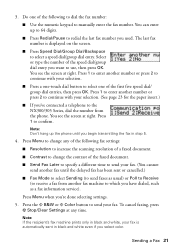
.../Space button and press OK. Auto Answer light Stop/ Clear Settings Auto Answer/ Space Copy/Fax B&W Color Speed Dial Group Dial/ Backspace Redial/Pause 22 Faxing a Document or Photo Receiving Faxes Before receiving faxes, make sure the Auto Answer light is busy, you see page 15. If the incoming... immediately, press Redial/Pause. Load more paper and press the OK button to fax additional pages, place your document on the scanner glass or in the Automatic Document Feeder. To receive faxes automatically, make sure you load plain paper and select the Paper Size setting that...
.../Space button and press OK. Auto Answer light Stop/ Clear Settings Auto Answer/ Space Copy/Fax B&W Color Speed Dial Group Dial/ Backspace Redial/Pause 22 Faxing a Document or Photo Receiving Faxes Before receiving faxes, make sure the Auto Answer light is busy, you see page 15. If the incoming... immediately, press Redial/Pause. Load more paper and press the OK button to fax additional pages, place your document on the scanner glass or in the Automatic Document Feeder. To receive faxes automatically, make sure you load plain paper and select the Paper Size setting that...
Quick Guide
Page 23
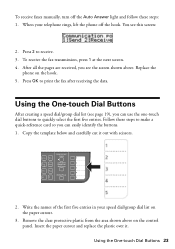
Press 2 to make a quick-reference card so you can use the one-touch dial buttons to print the fax after receiving the data. Remove the clear protective plastic from the area shown above . Insert the paper cutout and replace the plastic over it out ... phone off the Auto Answer light and follow these steps to receive. 3. When your speed dial/group dial list on the hook. 5. To receive the fax transmission, press 1 at the next screen. 4. Press OK to quickly select the first five entries. You see the screen shown above on the control panel...
Press 2 to make a quick-reference card so you can use the one-touch dial buttons to print the fax after receiving the data. Remove the clear protective plastic from the area shown above . Insert the paper cutout and replace the plastic over it out ... phone off the Auto Answer light and follow these steps to receive. 3. When your speed dial/group dial list on the hook. 5. To receive the fax transmission, press 1 at the next screen. 4. Press OK to quickly select the first five entries. You see the screen shown above on the control panel...
Quick Guide
Page 33
...how you can scan a document and save it in Windows Explorer or Macintosh Finder. Click the Preview button to editable text (OCR): 300 dpi ■ Fax: 200 dpi 8. Click Scan. 11. Select the Image Type. 5. Select the name, location, and format (such as the Document Source setting. 6.... Document Feeder, you will use the scanned image: ■ E-mail, view on a computer screen, or post on the file format you select, Epson Scan may create one file for your document in the Automatic Document Feeder (see the online User's Guide. 1. Note: For detailed scanning instructions, see...
...how you can scan a document and save it in Windows Explorer or Macintosh Finder. Click the Preview button to editable text (OCR): 300 dpi ■ Fax: 200 dpi 8. Click Scan. 11. Select the Image Type. 5. Select the name, location, and format (such as the Document Source setting. 6.... Document Feeder, you will use the scanned image: ■ E-mail, view on a computer screen, or post on the file format you select, Epson Scan may create one file for your document in the Automatic Document Feeder (see the online User's Guide. 1. Note: For detailed scanning instructions, see...


