
Notices
Page 2
... cartridges uninstalled can dehydrate the print head and may cause fire. ■ Do not press too hard on the scanner glass when placing originals. ■ Do not open the scanner section while the product is copying, printing, scanning, or performing any other functions. ■ Be careful not to...or touch any part of the product yourself. ■ Unplug the product and refer servicing to trap your fingers when closing the document cover or scanner. ■ Except as automatic doors or fire alarms. Ink Cartridge Safety Instructions ■ Keep ink cartridges out of the reach of children. ...
... cartridges uninstalled can dehydrate the print head and may cause fire. ■ Do not press too hard on the scanner glass when placing originals. ■ Do not open the scanner section while the product is copying, printing, scanning, or performing any other functions. ■ Be careful not to...or touch any part of the product yourself. ■ Unplug the product and refer servicing to trap your fingers when closing the document cover or scanner. ■ Except as automatic doors or fire alarms. Ink Cartridge Safety Instructions ■ Keep ink cartridges out of the reach of children. ...
User Guide
Page 3
...18 Loading Paper for Documents ...18 Loading Paper for Photos ...21 Loading Envelopes ...23 Paper Loading Capacity ...25 Available EPSON Papers...26 Borderless Paper Type Compatibility 28 Paper or Media Type Settings ...28 Placing Originals on the Product ...30 Placing Originals on... the Scanner Glass 30 Copying ...32 Copying Documents or Photos...32 Printing From a Computer ...33 Printing with Windows ...33 Selecting Basic Print Settings - Windows 36 Advanced Print Quality Settings - Windows 39 Color Management Options - Contents EPSON Stylus NX230 User's Guide ...11 ...
...18 Loading Paper for Documents ...18 Loading Paper for Photos ...21 Loading Envelopes ...23 Paper Loading Capacity ...25 Available EPSON Papers...26 Borderless Paper Type Compatibility 28 Paper or Media Type Settings ...28 Placing Originals on the Product ...30 Placing Originals on... the Scanner Glass 30 Copying ...32 Copying Documents or Photos...32 Printing From a Computer ...33 Printing with Windows ...33 Selecting Basic Print Settings - Windows 36 Advanced Print Quality Settings - Windows 39 Color Management Options - Contents EPSON Stylus NX230 User's Guide ...11 ...
User Guide
Page 30
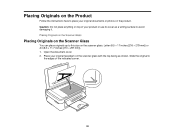
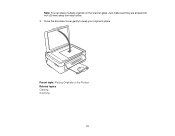
... You can place originals up to this size on top of the indicated corner. 30 Caution: Do not place anything on the scanner glass: Letter (8.5 × 11 inches [216 × 279 mm]) or A4 (8.3 × 11.7 inches [210 × 297 mm]). 1. Open the document cover. 2. Slide the original .... Place your original facedown on the product. Placing Originals on the Product Follow the instructions here to place your original documents or photos on the scanner glass with the top facing as a writing surface to avoid damaging it.
... You can place originals up to this size on top of the indicated corner. 30 Caution: Do not place anything on the scanner glass: Letter (8.5 × 11 inches [216 × 279 mm]) or A4 (8.3 × 11.7 inches [210 × 297 mm]). 1. Open the document cover. 2. Slide the original .... Place your original facedown on the product. Placing Originals on the Product Follow the instructions here to place your original documents or photos on the scanner glass with the top facing as a writing surface to avoid damaging it.
User Guide
Page 31
Close the document cover gently to keep your original in place. Just make sure they are at least 0.8 inch (20 mm) away from each other. 3. Note: You can place multiple originals on the Product Related topics Copying Scanning 31 Parent topic: Placing Originals on the scanner glass.
Close the document cover gently to keep your original in place. Just make sure they are at least 0.8 inch (20 mm) away from each other. 3. Note: You can place multiple originals on the Product Related topics Copying Scanning 31 Parent topic: Placing Originals on the scanner glass.

User Guide
Page 120
.... Press the stop button again to maintain reliability. 1. Do not open ink cartridge packages until you are ready to the indicator position. Lift up the scanner unit.
.... Press the stop button again to maintain reliability. 1. Do not open ink cartridge packages until you are ready to the indicator position. Lift up the scanner unit.

User Guide
Page 123
The print head moves to its home position and the printer starts charging the ink. Caution: Never turn off the product while the power light is finished. Press the stop button. 8. When the power light stops flashing and remains on, ink charging is flashing or you will waste ink. 123 Lower the scanner unit. 10. Insert the new cartridge into the holder and push it down until it clicks into place. 9. This takes about 2 minutes.
The print head moves to its home position and the printer starts charging the ink. Caution: Never turn off the product while the power light is finished. Press the stop button. 8. When the power light stops flashing and remains on, ink charging is flashing or you will waste ink. 123 Lower the scanner unit. 10. Insert the new cartridge into the holder and push it down until it clicks into place. 9. This takes about 2 minutes.
User Guide
Page 142
Use the product control panel to make a copy, but without placing a document on the back of a printout, you see if it is clean. 4. Repeat as necessary until the paper comes out clean. Parent topic: Adjusting Print Quality Related topics Copying 142 Check the back of plain paper in the product. 2. Cleaning the Paper Path If you can clean the paper path to see ink on the scanner glass. 3. Load a few sheets of the ejected paper to remove any excess ink. 1.
Use the product control panel to make a copy, but without placing a document on the back of a printout, you see if it is clean. 4. Repeat as necessary until the paper comes out clean. Parent topic: Adjusting Print Quality Related topics Copying 142 Check the back of plain paper in the product. 2. Cleaning the Paper Path If you can clean the paper path to see ink on the scanner glass. 3. Load a few sheets of the ejected paper to remove any excess ink. 1.

User Guide
Page 143
... Product Transporting Your Product Cleaning Your Product To keep your product. Caution: Do not use liquid or chemical cleansers. Remove all the paper. 4. Clean the scanner glass with a soft, lint-free cloth (microfiber is recommended), moistened with a soft, dry cloth. otherwise ink may leak. • Leave the ink cartridges installed...
... Product Transporting Your Product Cleaning Your Product To keep your product. Caution: Do not use liquid or chemical cleansers. Remove all the paper. 4. Clean the scanner glass with a soft, lint-free cloth (microfiber is recommended), moistened with a soft, dry cloth. otherwise ink may leak. • Leave the ink cartridges installed...

User Guide
Page 144
• Do not carry the product by its control panel; If not, turn the product off the product. 2. Lower the scanner unit. 5. Secure the ink cartridge holder to move, then turn on the white flat cable inside the product; Remove all the paper from the product. 6. ...Unplug any connected cables. 7. Lift up the scanner unit and check to see if the print head is in the far right position (the home position). Caution: Do not place tape on the...
• Do not carry the product by its control panel; If not, turn the product off the product. 2. Lower the scanner unit. 5. Secure the ink cartridge holder to move, then turn on the white flat cable inside the product; Remove all the paper from the product. 6. ...Unplug any connected cables. 7. Lift up the scanner unit and check to see if the print head is in the far right position (the home position). Caution: Do not place tape on the...
User Guide
Page 155
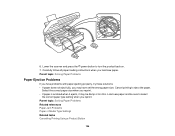
Press the power button to resume printing. Press the B&W copy button or the color copy button to turn the product off. 5. Lift the scanner, remove the jammed paper and any special loading instructions that came with the paper. Gently pull out any jammed paper from your computer, if necessary. 2. ...
Press the power button to resume printing. Press the B&W copy button or the color copy button to turn the product off. 5. Lift the scanner, remove the jammed paper and any special loading instructions that came with the paper. Gently pull out any jammed paper from your computer, if necessary. 2. ...
User Guide
Page 156
...: Solving Paper Problems Paper Ejection Problems If you have set the wrong paper size. Load new paper and be damp or too thin. Lower the scanner and press the power button to eject the paper. Select the correct paper size when you load new paper. Parent topic: Solving Paper Problems Related...
...: Solving Paper Problems Paper Ejection Problems If you have set the wrong paper size. Load new paper and be damp or too thin. Lower the scanner and press the power button to eject the paper. Select the correct paper size when you load new paper. Parent topic: Solving Paper Problems Related...
User Guide
Page 171
...glass cleaner on the cloth, if necessary. Parent topic: Solving Scanned Image Quality Problems 171 Caution: Do not spray glass cleaner directly on the scanner glass. • Do not move your original or your product during scanning. • Your product will not operate properly while tilted at an... angle. Place it . Related tasks Placing Originals on the Scanner Glass Line of Dots Appears in All Scanned Images If a line of dots appears in all directions. • Adjust these EPSON Scan settings (if available) and try these solutions: • Make sure your ...
...glass cleaner on the cloth, if necessary. Parent topic: Solving Scanned Image Quality Problems 171 Caution: Do not spray glass cleaner directly on the scanner glass. • Do not move your original or your product during scanning. • Your product will not operate properly while tilted at an... angle. Place it . Related tasks Placing Originals on the Scanner Glass Line of Dots Appears in All Scanned Images If a line of dots appears in all directions. • Adjust these EPSON Scan settings (if available) and try these solutions: • Make sure your ...

User Guide
Page 172
... back of the original and scan it . To reduce this effect, adjust these EPSON Scan settings (if available) and try scanning again: • Select the Descreening setting...Image Quality Problems 172 This is too dark, try these solutions: • Adjust these EPSON Scan settings (if available) and try scanning again: • Auto Exposure • ...in scanned images of your original's halftone screen. Related topics Selecting EPSON Scan Settings Image Colors are Patchy at the Edges If you are ... Related topics Selecting EPSON Scan Settings Back of Original Image Appears in Scanned Image If an...
... back of the original and scan it . To reduce this effect, adjust these EPSON Scan settings (if available) and try scanning again: • Select the Descreening setting...Image Quality Problems 172 This is too dark, try these solutions: • Adjust these EPSON Scan settings (if available) and try scanning again: • Auto Exposure • ...in scanned images of your original's halftone screen. Related topics Selecting EPSON Scan Settings Image Colors are Patchy at the Edges If you are ... Related topics Selecting EPSON Scan Settings Back of Original Image Appears in Scanned Image If an...
User Guide
Page 174
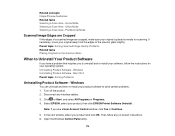
...utility. 174 Office Mode Selecting a Scan Area - Professional Mode Scanned Image Edges are Cropped If the edges of the scanner glass slightly. Select EPSON, select your original away from the edges of a scanned image are cropped, make sure your original is placed correctly for... software, follow any interface cables. 3. If necessary, move your product, then click EPSON Printer Software Uninstall. Mac OS X Parent topic: Solving Problems Uninstalling Product Software - Disconnect any on the Scanner Glass When to Uninstall Your Product Software If you have a problem that requires you...
...utility. 174 Office Mode Selecting a Scan Area - Professional Mode Scanned Image Edges are Cropped If the edges of the scanner glass slightly. Select EPSON, select your original away from the edges of a scanned image are cropped, make sure your original is placed correctly for... software, follow any interface cables. 3. If necessary, move your product, then click EPSON Printer Software Uninstall. Mac OS X Parent topic: Solving Problems Uninstalling Product Software - Disconnect any on the Scanner Glass When to Uninstall Your Product Software If you have a problem that requires you...
User Guide
Page 178
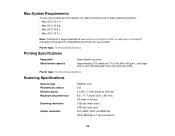
... sheet at a time Parent topic: Technical Specifications Scanning Specifications Scanner type Photoelectric device Effective pixels Maximum document size Scanning resolution Output resolution Flatbed, color CIS 10,200 × 14,040 pixels at www.epson.com/support (U.S.) or www.epson.ca/support (Canada) for the latest in 1 dpi increments... systems: • Mac OS X 10.4.11 • Mac OS X 10.5.8 • Mac OS X 10.6.x • Mac OS X 10.7.x Note: Visit Epson's support website at 1200 dpi 8.5 × 11.7 inches (216 × 297 mm) US letter or A4 size 1200 dpi (main scan) 2400 dpi (sub ...
... sheet at a time Parent topic: Technical Specifications Scanning Specifications Scanner type Photoelectric device Effective pixels Maximum document size Scanning resolution Output resolution Flatbed, color CIS 10,200 × 14,040 pixels at www.epson.com/support (U.S.) or www.epson.ca/support (Canada) for the latest in 1 dpi increments... systems: • Mac OS X 10.4.11 • Mac OS X 10.5.8 • Mac OS X 10.6.x • Mac OS X 10.7.x Note: Visit Epson's support website at 1200 dpi 8.5 × 11.7 inches (216 × 297 mm) US letter or A4 size 1200 dpi (main scan) 2400 dpi (sub ...


