
Epson Scan ICM Updater v1.20 (PSB.2008.07.001)
Page 1
... in Epson Scan when Adobe's Color Management Module (CMM) has also been installed on the computer. Note: Installation completes in the Configuration menu). Description of Change: ICM module updater for Windows XP/XP x64 / Vista (32bit & 64bit) This bulletin was created to and including 3.4xA Note: Scanners/All-in-One's using Epson Scan 3.5xA...
... in Epson Scan when Adobe's Color Management Module (CMM) has also been installed on the computer. Note: Installation completes in the Configuration menu). Description of Change: ICM module updater for Windows XP/XP x64 / Vista (32bit & 64bit) This bulletin was created to and including 3.4xA Note: Scanners/All-in-One's using Epson Scan 3.5xA...

Basics Guide
Page 4
...45 Inserting a CD or DVD 46 Printing Photos on a CD or DVD 48 Copying onto a CD/DVD 51 Returning the Front Tray to the Paper Position 54 Printing a CD/DVD Jewel Case Insert 55 Printing From Your Computer 56 Printing With Windows 56 Printing From a Macintosh 59 Selecting ...the Correct Paper Type 62 Scanning a Photo or Document 63 Scanning to Your Computer 63 Scanning to a Memory Card 66 Backing Up Your Photos 67 Maintaining Your RX580 69 Checking the Print Head Nozzles 69 Cleaning...
...45 Inserting a CD or DVD 46 Printing Photos on a CD or DVD 48 Copying onto a CD/DVD 51 Returning the Front Tray to the Paper Position 54 Printing a CD/DVD Jewel Case Insert 55 Printing From Your Computer 56 Printing With Windows 56 Printing From a Macintosh 59 Selecting ...the Correct Paper Type 62 Scanning a Photo or Document 63 Scanning to Your Computer 63 Scanning to a Memory Card 66 Backing Up Your Photos 67 Maintaining Your RX580 69 Checking the Print Head Nozzles 69 Cleaning...
Basics Guide
Page 5
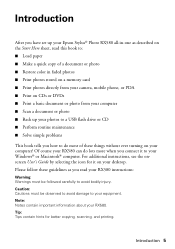
...Tip: Tips contain hints for it to your Windows® or Macintosh® computer. Of course your RX580 can do most of these guidelines as you connect it on your desktop. Introduction After you have set up your Epson Stylus® Photo RX580 all-in-one as described on the Start... Here sheet, read this book to: ■ Load paper ■ Make a quick copy of a document or photo ■ Restore color in faded photos ■ Print photos stored on a memory card ■ Print photos directly from your camera...
...Tip: Tips contain hints for it to your Windows® or Macintosh® computer. Of course your RX580 can do most of these guidelines as you connect it on your desktop. Introduction After you have set up your Epson Stylus® Photo RX580 all-in-one as described on the Start... Here sheet, read this book to: ■ Load paper ■ Make a quick copy of a document or photo ■ Restore color in faded photos ■ Print photos stored on a memory card ■ Print photos directly from your camera...
Basics Guide
Page 23
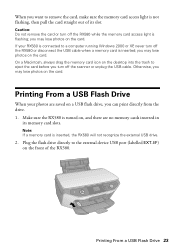
Otherwise, you may lose photos on the card. Plug the flash drive directly to a computer running Windows 2000 or XP, never turn off the RX580 while the memory card access light is flashing; Caution: Do not remove the card or turn off the scanner or unplug the USB cable. Printing ... USB drive. 2. Note: If a memory card is connected to the external device USB port (labelled EXT.I/F) on the card. you may lose photos on the card. Make sure the RX580 is turned on, and there are saved on the desktop into the trash to eject the card before you turn off the...
Otherwise, you may lose photos on the card. Plug the flash drive directly to a computer running Windows 2000 or XP, never turn off the RX580 while the memory card access light is flashing; Caution: Do not remove the card or turn off the scanner or unplug the USB cable. Printing ... USB drive. 2. Note: If a memory card is connected to the external device USB port (labelled EXT.I/F) on the card. you may lose photos on the card. Make sure the RX580 is turned on, and there are saved on the desktop into the trash to eject the card before you turn off the...

Basics Guide
Page 56
...the correct paper type setting in the printer driver. (See page 62 for printing a photo or document stored on -screen User's Guide. Open the photo or document in these sections: ■ "Printing With Windows" (below) ■ "Printing From a Macintosh" on page 59 ■ "Selecting...you start, make sure you've installed your printer software and connected the RX580 to open your computer as described on page 62 Printing With Windows 1. Load paper (see a window like this one: Select EPSON Stylus Photo RX580 Series Click here to your printer software and change settings 56 Printing From ...
...the correct paper type setting in the printer driver. (See page 62 for printing a photo or document stored on -screen User's Guide. Open the photo or document in these sections: ■ "Printing With Windows" (below) ■ "Printing From a Macintosh" on page 59 ■ "Selecting...you start, make sure you've installed your printer software and connected the RX580 to open your computer as described on page 62 Printing With Windows 1. Load paper (see a window like this one: Select EPSON Stylus Photo RX580 Series Click here to your printer software and change settings 56 Printing From ...
Basics Guide
Page 57
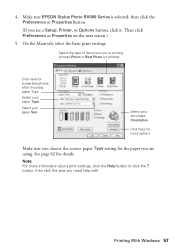
....) 5. button, then click the area you see a Setup, Printer, or Options button, click it. Printing With Windows 57 See page 62 for the paper you choose the correct paper Type setting for details. Make sure EPSON Stylus Photo RX580 Series is selected, then click the Preferences or Properties button. (If you need help with. On...
....) 5. button, then click the area you see a Setup, Printer, or Options button, click it. Printing With Windows 57 See page 62 for the paper you choose the correct paper Type setting for details. Make sure EPSON Stylus Photo RX580 Series is selected, then click the Preferences or Properties button. (If you need help with. On...

Basics Guide
Page 58
Click OK to start printing. This window appears and shows the progress of your settings, then click OK or Print to save your print job. Then select the following settings as necessary: Select a color management method (To choose No Color Adjustment, click ICM first) Select Paper & Quality...8. For more printing options, click the Advanced button. For more information about advanced settings, or instructions on selected papers, you select Photo RPM, printing will take longer. Click to pause or resume printing 58 Printing From Your Computer Click to cancel printing Click to change...
Click OK to start printing. This window appears and shows the progress of your settings, then click OK or Print to save your print job. Then select the following settings as necessary: Select a color management method (To choose No Color Adjustment, click ICM first) Select Paper & Quality...8. For more printing options, click the Advanced button. For more information about advanced settings, or instructions on selected papers, you select Photo RPM, printing will take longer. Click to pause or resume printing 58 Printing From Your Computer Click to cancel printing Click to change...

Basics Guide
Page 59
Open the File menu and select Page Setup. Open the File menu and select Print. Load paper (see a window like this one: Select Stylus Photo RX580 Select Print Settings Printing From a Macintosh 59 Open the photo or document in the Paper Size list for your paper size (US Letter, 8 x 10, 5 x 7, or 4 x... 6). 4. Make the following settings: Select Stylus Photo RX580 Select your Paper Size* Select your application. 3. Click OK to print. 1. You see page 7). 2. Borderless option in your document or image orientation...
Open the File menu and select Page Setup. Open the File menu and select Print. Load paper (see a window like this one: Select Stylus Photo RX580 Select Print Settings Printing From a Macintosh 59 Open the photo or document in the Paper Size list for your paper size (US Letter, 8 x 10, 5 x 7, or 4 x... 6). 4. Make the following settings: Select Stylus Photo RX580 Select your Paper Size* Select your application. 3. Click OK to print. 1. You see page 7). 2. Borderless option in your document or image orientation...

Basics Guide
Page 61
... will take longer with this : Pause printing Resume printing Cancel printing Select the print job 11. For more information on selected papers, you can select Photo RPM (5760 × 1440) from the Print Quality pop-up menu. 8. Click Print. 10. Printing From a Macintosh 61 If you 're ... print job, click the printer icon when it appears in the Printer List window. Click the Advanced button to change additional settings. When you 're using Mac OS X 10.2.x, click the Print Center icon instead, then double-click EPSON Stylus Photo RX580 in the dock on the bottom of your desktop.
... will take longer with this : Pause printing Resume printing Cancel printing Select the print job 11. For more information on selected papers, you can select Photo RPM (5760 × 1440) from the Print Quality pop-up menu. 8. Click Print. 10. Printing From a Macintosh 61 If you 're ... print job, click the printer icon when it appears in the Printer List window. Click the Advanced button to change additional settings. When you 're using Mac OS X 10.2.x, click the Print Center icon instead, then double-click EPSON Stylus Photo RX580 in the dock on the bottom of your desktop.

Basics Guide
Page 64
...Epson Scan: ■ Windows: Double-click the Epson Scan icon on your original face-down on the glass, in the Applications folder. ■ You can scan from any TWAIN-compliant application-such as ArcSoft PhotoImpressionTM-using Epson Scan. Close the document cover gently so that your image to start Epson...place your desktop. ■ Macintosh: Double-click Epson Scan in the upper left corner. 2. Do one of the following to a file. 1. Open the File menu, choose Get Photo, then click the Camera/Scanner icon. 64 Scanning a Photo or Document You can scan from ArcSoft PhotoImpression....
...Epson Scan: ■ Windows: Double-click the Epson Scan icon on your original face-down on the glass, in the Applications folder. ■ You can scan from any TWAIN-compliant application-such as ArcSoft PhotoImpressionTM-using Epson Scan. Close the document cover gently so that your image to start Epson...place your desktop. ■ Macintosh: Double-click Epson Scan in the upper left corner. 2. Do one of the following to a file. 1. Open the File menu, choose Get Photo, then click the Camera/Scanner icon. 64 Scanning a Photo or Document You can scan from ArcSoft PhotoImpression....

Basics Guide
Page 65
... you scan, click the Customize button, then check the Color Restoration box. You see the Epson Scan settings window. (You can change the mode using the Mode selector in the upper right corner is automatically saved as you are scanning from an application (such ...'s Guide for more information. If the Mode setting in the upper right corner. Note: If you see the Epson Scan standby window: 4. If you are in Home or Professional Mode, you want to automatically restore a color photo as a JPEG file in your on -screen User's Guide.) Scanning to Full Auto Mode, click the Scan...
... you scan, click the Customize button, then check the Color Restoration box. You see the Epson Scan settings window. (You can change the mode using the Mode selector in the upper right corner is automatically saved as you are scanning from an application (such ...'s Guide for more information. If the Mode setting in the upper right corner. Note: If you see the Epson Scan standby window: 4. If you are in Home or Professional Mode, you want to automatically restore a color photo as a JPEG file in your on -screen User's Guide.) Scanning to Full Auto Mode, click the Scan...

Basics Guide
Page 91
...on glass, 12 to 13, 52 P Paper Epson, 10, 28 feeding problems, 80 loading, 7 to 9 special types, 10 storing prints, 11 Paper Type setting control panel, 28 Macintosh and Windows, 62 PDA, printing from, 43 to 44 ...26 printing by date, 27 restoring color, 18 to 19 scanning, 63 to 66 sizing, 17, 36 to 37 storing, 11 viewing, 24 viewing and printing, 25 PictBridge, 41 Premium photo papers, 10 Print head aligning, 77...PDA, 43 to 44 in Windows, 56 to 58 index sheet, 31 on a Macintosh, 59 to 61 on CDs and DVDs, 45 to 51 photos, 20 to 40 photos by date, 27 problems, 80 selecting photos, 25 to 33 view and ...
...on glass, 12 to 13, 52 P Paper Epson, 10, 28 feeding problems, 80 loading, 7 to 9 special types, 10 storing prints, 11 Paper Type setting control panel, 28 Macintosh and Windows, 62 PDA, printing from, 43 to 44 ...26 printing by date, 27 restoring color, 18 to 19 scanning, 63 to 66 sizing, 17, 36 to 37 storing, 11 viewing, 24 viewing and printing, 25 PictBridge, 41 Premium photo papers, 10 Print head aligning, 77...PDA, 43 to 44 in Windows, 56 to 58 index sheet, 31 on a Macintosh, 59 to 61 on CDs and DVDs, 45 to 51 photos, 20 to 40 photos by date, 27 problems, 80 selecting photos, 25 to 33 view and ...

Basics Guide
Page 92
... 35 Troubleshooting, 78 to 81 Type setting, Windows, 57, 62 U Ultra Premium photo papers, 10 USB device backing up photos, 67 to 68 printing from, 23 to 24 V Viewing photos, 24 W Warranty, 86 to 88 Windows color management settings, 58 Paper Type setting, 62 printing with, 56 to 58 starting Epson Scan, 64 Type setting, 57 Z Zip...
... 35 Troubleshooting, 78 to 81 Type setting, Windows, 57, 62 U Ultra Premium photo papers, 10 USB device backing up photos, 67 to 68 printing from, 23 to 24 V Viewing photos, 24 W Warranty, 86 to 88 Windows color management settings, 58 Paper Type setting, 62 printing with, 56 to 58 starting Epson Scan, 64 Type setting, 57 Z Zip...

Product Information Guide
Page 10
... a list of options. Make sure you have paper loaded, then press the x Start button to print your RX580 is connected to a computer running Windows 2000 or XP, never turn off the RX580 while the memory card access light is turned on . 4. Inserting the Card 1. Do not insert more than ...; Open the memory card slot cover. The color and lighting in the slot. You can also crop your photos, manually adjust the brightness and contrast, and correct red eyes-all without using your memory card as described on the card. Epson Stylus Photo RX580 11/06 You can use the cards and ...
... a list of options. Make sure you have paper loaded, then press the x Start button to print your RX580 is connected to a computer running Windows 2000 or XP, never turn off the RX580 while the memory card access light is turned on . 4. Inserting the Card 1. Do not insert more than ...; Open the memory card slot cover. The color and lighting in the slot. You can also crop your photos, manually adjust the brightness and contrast, and correct red eyes-all without using your memory card as described on the card. Epson Stylus Photo RX580 11/06 You can use the cards and ...
Product Information Guide
Page 11
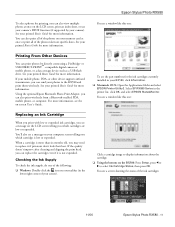
...see a window like this one: Replacing an Ink Cartridge When you print with low or expended ink cartridges, you see the part numbers for more information. See your printed Basics Guide for printing, you can also print all of the ink cartridges: 11/06 Epson Stylus Photo RX580 - 11... or USB DIRECT-PRINT™-compatible digital camera or mobile phone, or a data storage device such as a USB flash drive. Epson Stylus Photo RX580 To select photos for more information. When a cartridge is more than six ...
...see a window like this one: Replacing an Ink Cartridge When you print with low or expended ink cartridges, you see the part numbers for more information. See your printed Basics Guide for printing, you can also print all of the ink cartridges: 11/06 Epson Stylus Photo RX580 - 11... or USB DIRECT-PRINT™-compatible digital camera or mobile phone, or a data storage device such as a USB flash drive. Epson Stylus Photo RX580 To select photos for more information. When a cartridge is more than six ...


