Basics Guide
Page 40
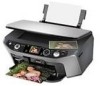
... paper that you need to cancel printing, press the y Stop/Clear Settings button. See your preselected photos. 4. Press the x Print Settings button and select settings as described on page 7. 2. Press the...your camera's manual for instructions. 5. Press the Setup button. 2. Note: If you can insert the cards into envelopes and mail them . You see this screen: 3. Printing Camera-Selected DPOF Photos If your camera. Press OK to print. ... Default Settings Follow these steps to return all the RX580 settings to their factory defaults. 40 Printing From a Memory Card
... paper that you need to cancel printing, press the y Stop/Clear Settings button. See your preselected photos. 4. Press the x Print Settings button and select settings as described on page 7. 2. Press the...your camera's manual for instructions. 5. Press the Setup button. 2. Note: If you can insert the cards into envelopes and mail them . You see this screen: 3. Printing Camera-Selected DPOF Photos If your camera. Press OK to print. ... Default Settings Follow these steps to return all the RX580 settings to their factory defaults. 40 Printing From a Memory Card
Basics Guide
Page 41
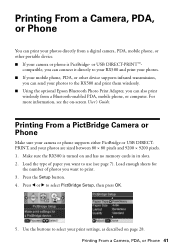
...transmission, you can connect it directly to your RX580 and print your photos. ■ If your mobile phone, PDA, or other portable device. ■ If your photos to the RX580 and print them wirelessly. ■ Using the optional Epson Bluetooth Photo Print Adapter, you want to print. 3.... Press l or r to select your photos are sized between 80 × 80 pixels and 9200 × 9200 pixels. 1. Use the buttons to select PictBridge Setup, then...
...transmission, you can connect it directly to your RX580 and print your photos. ■ If your mobile phone, PDA, or other portable device. ■ If your photos to the RX580 and print them wirelessly. ■ Using the optional Epson Bluetooth Photo Print Adapter, you want to print. 3.... Press l or r to select your photos are sized between 80 × 80 pixels and 9200 × 9200 pixels. 1. Use the buttons to select PictBridge Setup, then...

Basics Guide
Page 43
...saying the connected device cannot be supported. Depending on page 28. 6. Use the buttons to the RX580 and print them directly from your camera. To reset all settings to print. 3. Epson cannot guarantee the compatibility of paper you want to their defaults, see page 7). Load enough sheets... phone or PDA. Make sure your print settings, as described on the RX580 settings and your digital camera settings, some of photos you cannot print them the first time you want, press OK. Press the Setup button. 4. After you select the settings you print from a memory card...
...saying the connected device cannot be supported. Depending on page 28. 6. Use the buttons to the RX580 and print them directly from your camera. To reset all settings to print. 3. Epson cannot guarantee the compatibility of paper you want to their defaults, see page 7). Load enough sheets... phone or PDA. Make sure your print settings, as described on the RX580 settings and your digital camera settings, some of photos you cannot print them the first time you want, press OK. Press the Setup button. 4. After you select the settings you print from a memory card...

Basics Guide
Page 51
...any direction. Note: The RX580 does not copy music, video, or other CD/DVD contents. 1. Copying onto a CD/DVD 51 Press the Setup button. 2. Press d, u, l, or r to adjust the position up to select Print Position, then press OK. 3. Adjusting the Print Position If your photo is not centered on page... 46. Note: The RX580 remembers this setting even after it has been turned off...
...any direction. Note: The RX580 does not copy music, video, or other CD/DVD contents. 1. Copying onto a CD/DVD 51 Press the Setup button. 2. Press d, u, l, or r to adjust the position up to select Print Position, then press OK. 3. Adjusting the Print Position If your photo is not centered on page... 46. Note: The RX580 remembers this setting even after it has been turned off...
Basics Guide
Page 57
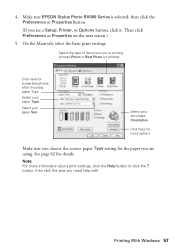
...On the Main tab, select the basic print settings: Select the type of document you're printing (choose Photo or Best Photo for photos) Click here for borderless photos, after choosing paper Type Select your paper Type Select your paper Size Select your document Orientation Click here for ... 57 Note: For more options Make sure you are using. Make sure EPSON Stylus Photo RX580 Series is selected, then click the Preferences or Properties button. (If you need help with. button, then click the area you see a Setup, Printer, or Options button, click it. 4. Then click Preferences or...
...On the Main tab, select the basic print settings: Select the type of document you're printing (choose Photo or Best Photo for photos) Click here for borderless photos, after choosing paper Type Select your paper Type Select your paper Size Select your document Orientation Click here for ... 57 Note: For more options Make sure you are using. Make sure EPSON Stylus Photo RX580 Series is selected, then click the Preferences or Properties button. (If you need help with. button, then click the area you see a Setup, Printer, or Options button, click it. 4. Then click Preferences or...

Basics Guide
Page 59
... File menu and select Page Setup. Click OK to print. 1. Load paper (see a window like this one: Select Stylus Photo RX580 Select Print Settings Printing From a Macintosh 59 Open the File menu and select Print. Make the following settings: Select Stylus Photo RX580 Select your Paper Size* Select... your paper size (US Letter, 8 x 10, 5 x 7, or 4 x 6). 4. Borderless option in your application. 3. Open the photo or document in the Paper Size list for your document or...
... File menu and select Page Setup. Click OK to print. 1. Load paper (see a window like this one: Select Stylus Photo RX580 Select Print Settings Printing From a Macintosh 59 Open the File menu and select Print. Make the following settings: Select Stylus Photo RX580 Select your Paper Size* Select... your paper size (US Letter, 8 x 10, 5 x 7, or 4 x 6). 4. Borderless option in your application. 3. Open the photo or document in the Paper Size list for your document or...

Basics Guide
Page 68
... After you save files on how many photos there are copied to print photos in a new folder. All the photos on the right: 6. Press OK again to access photos outside of the folders. 68 Backing Up Your Photos However, the RX580 will be able to display the message ...shown below on your memory card are , this may take several minutes. You can back up files on . 7. Press the Setup...
... After you save files on how many photos there are copied to print photos in a new folder. All the photos on the right: 6. Press OK again to access photos outside of the folders. 68 Backing Up Your Photos However, the RX580 will be able to display the message ...shown below on your memory card are , this may take several minutes. You can back up files on . 7. Press the Setup...
Basics Guide
Page 69
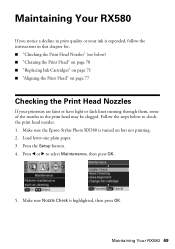
... 70 ■ "Replacing Ink Cartridges" on page 71 ■ "Aligning the Print Head" on but not printing. 2. Press the Setup button. 4. Maintaining Your RX580 If you notice a decline in print quality or your printouts are faint or have light or dark lines running through them, some of ... this chapter for: ■ "Checking the Print Head Nozzles" (see below to select Maintenance, then press OK. 5. Maintaining Your RX580 69 Make sure the Epson Stylus Photo RX580 is turned on page 77 Checking the Print Head Nozzles If your ink is highlighted, then press OK. Load letter-size plain paper...
... 70 ■ "Replacing Ink Cartridges" on page 71 ■ "Aligning the Print Head" on but not printing. 2. Press the Setup button. 4. Maintaining Your RX580 If you notice a decline in print quality or your printouts are faint or have light or dark lines running through them, some of ... this chapter for: ■ "Checking the Print Head Nozzles" (see below to select Maintenance, then press OK. 5. Maintaining Your RX580 69 Make sure the Epson Stylus Photo RX580 is turned on page 77 Checking the Print Head Nozzles If your ink is highlighted, then press OK. Load letter-size plain paper...
Basics Guide
Page 70
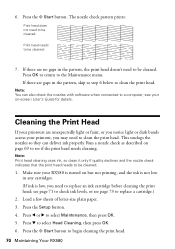
... to be cleaned: 7. Press OK to return to begin cleaning the print head. 70 Maintaining Your RX580 Note: Print head cleaning uses ink, so clean it only if quality declines and the nozzle check ...indicates that the print head needs to clean the print head. Press the Setup button. 4. Cleaning the Print Head If your printouts are gaps in any cartridges. (If ink is low..., you notice light or dark bands across your on-screen User's Guide for details. Make sure your RX580 is not low in the pattern, skip to step 6 below to check ink levels, or see if...
... to be cleaned: 7. Press OK to return to begin cleaning the print head. 70 Maintaining Your RX580 Note: Print head cleaning uses ink, so clean it only if quality declines and the nozzle check ...indicates that the print head needs to clean the print head. Press the Setup button. 4. Cleaning the Print Head If your printouts are gaps in any cartridges. (If ink is low..., you notice light or dark bands across your on-screen User's Guide for details. Make sure your RX580 is not low in the pattern, skip to step 6 below to check ink levels, or see if...
Basics Guide
Page 71
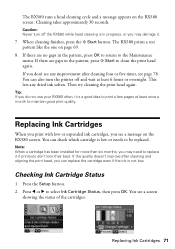
... Note: When a cartridge has been installed for more than six months, you do not use your RX580 often, it is a good idea to print a few pages at least 6 hours or overnight. Press the Setup button. 2. Cleaning takes approximately 30 seconds. Then try cleaning the print head again. Checking Ink Cartridge... four or five times, see a screen showing the status of the cartridges: Replacing Ink Cartridges 71 Caution: Never turn the printer off the RX580 while head cleaning is in the pattern, press x Start to the Maintenance menu. You can also turn off and wait at least once a...
... Note: When a cartridge has been installed for more than six months, you do not use your RX580 often, it is a good idea to print a few pages at least 6 hours or overnight. Press the Setup button. 2. Cleaning takes approximately 30 seconds. Then try cleaning the print head again. Checking Ink Cartridge... four or five times, see a screen showing the status of the cartridges: Replacing Ink Cartridges 71 Caution: Never turn the printer off the RX580 while head cleaning is in the pattern, press x Start to the Maintenance menu. You can also turn off and wait at least once a...

Basics Guide
Page 73
...a new ink cartridge before you can purchase genuine Epson ink and paper from an Epson authorized reseller. Press Setup, press l or r to be replaced. If an ink cartridge is low, the RX580 displays a message when you are vacuum packed to your RX580 not covered by Epson's warranty. Press u or d to install the ... select Maintenance, then press OK. Replacing Ink Cartridges 73 To find the nearest reseller, call 800-GO-EPSON (800-463-7766). Other products may dry out. Make sure the RX580 is turned on, the CD/DVD tray is not inserted, and the front tray is closed, then lift...
...a new ink cartridge before you can purchase genuine Epson ink and paper from an Epson authorized reseller. Press Setup, press l or r to be replaced. If an ink cartridge is low, the RX580 displays a message when you are vacuum packed to your RX580 not covered by Epson's warranty. Press u or d to install the ... select Maintenance, then press OK. Replacing Ink Cartridges 73 To find the nearest reseller, call 800-GO-EPSON (800-463-7766). Other products may dry out. Make sure the RX580 is turned on, the CD/DVD tray is not inserted, and the front tray is closed, then lift...

Basics Guide
Page 77
...patterns are done, press OK. You may need to select the number for that square. 9. Press OK. 10. When you are printed. 7. Press the Setup button. 4. Press the x Start button. Aligning the Print Head 77 Aligning the Print Head If your prints look grainy or blurry, or you notice that... is most even, with no streaks or lines. Make sure the RX580 is not inserted. 1. Press u or d to use a magnifying glass. 8. Press d to select Maintenance, then press OK. 5. Four rows of plain, letter-size paper. 3. Note...
...patterns are done, press OK. You may need to select the number for that square. 9. Press OK. 10. When you are printed. 7. Press the Setup button. 4. Press the x Start button. Aligning the Print Head 77 Aligning the Print Head If your prints look grainy or blurry, or you notice that... is most even, with no streaks or lines. Make sure the RX580 is not inserted. 1. Press u or d to use a magnifying glass. 8. Press d to select Maintenance, then press OK. 5. Four rows of plain, letter-size paper. 3. Note...

Basics Guide
Page 92
... printing, 80 screen, 80 Q Quality setting, 29 R Red eyes, removing, 34 Replacing ink cartridges, 71 to 76 Resetting default settings, 40 Restoring color, 18 to 19, 63 S Safety instructions, 83 to 84 Saturation, 35 Scanning, 63 to 66 Screen error messages, 78 to 79 problems, 80 safety... instructions, 84 using, 6 Sepia, 35 Setup button, 6 Sharpness, 35 Sizing photos, 17, 36 to 37 Software ArcSoft PhotoImpression, 64, 82 Epson Print CD, 45 Epson Scan, 63 to 65 Specialty Print button, 6 Stop/Clear Settings button, 6 Stopping printing, 26, 58...
... printing, 80 screen, 80 Q Quality setting, 29 R Red eyes, removing, 34 Replacing ink cartridges, 71 to 76 Resetting default settings, 40 Restoring color, 18 to 19, 63 S Safety instructions, 83 to 84 Saturation, 35 Scanning, 63 to 66 Screen error messages, 78 to 79 problems, 80 safety... instructions, 84 using, 6 Sepia, 35 Setup button, 6 Sharpness, 35 Sizing photos, 17, 36 to 37 Software ArcSoft PhotoImpression, 64, 82 Epson Print CD, 45 Epson Scan, 63 to 65 Specialty Print button, 6 Stop/Clear Settings button, 6 Stopping printing, 26, 58...
Product Information Guide
Page 11
...the icon on your taskbar (in the printer list, click OK, and select EPSON StatusMonitor. Epson Stylus Photo RX580 To select photos for printing, you can also view multiple photos at once or print all of the photos on your printed Basics Guide for more information, see the on-screen User's Guide...print wirelessly from a Bluetooth-enabled PDA, mobile phone, or computer. See your memory card at once on the RX580: Press Setup, press l or r to replace it is low or expended. Select SP RX580 Series in the lower right corner of the ink cartridges: 11/06 Epson Stylus Photo RX580 - 11
...the icon on your taskbar (in the printer list, click OK, and select EPSON StatusMonitor. Epson Stylus Photo RX580 To select photos for printing, you can also view multiple photos at once or print all of the photos on your printed Basics Guide for more information, see the on-screen User's Guide...print wirelessly from a Bluetooth-enabled PDA, mobile phone, or computer. See your memory card at once on the RX580: Press Setup, press l or r to replace it is low or expended. Select SP RX580 Series in the lower right corner of the ink cartridges: 11/06 Epson Stylus Photo RX580 - 11
Product Information Guide
Page 12
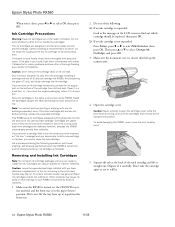
... damage to your eyes, flush them . To avoid damaging the RX580, never move the print head by Epson's warranty. 1. Epson Stylus Photo RX580 11/06 The ink cartridges are removed and reinserted. Installing a ... with one of the following operations: print head cleaning, self-cleaning (performed when the RX580 is not expended: Press Setup, press l or r to the replacement position. If ink gets in a small box... ink will leak. Avoid touching the green IC chip, as the RX580. Place it . 12 - the label identifying the color should be on , the CD/DVD tray is not inserted, and...
... damage to your eyes, flush them . To avoid damaging the RX580, never move the print head by Epson's warranty. 1. Epson Stylus Photo RX580 11/06 The ink cartridges are removed and reinserted. Installing a ... with one of the following operations: print head cleaning, self-cleaning (performed when the RX580 is not expended: Press Setup, press l or r to the replacement position. If ink gets in a small box... ink will leak. Avoid touching the green IC chip, as the RX580. Place it . 12 - the label identifying the color should be on , the CD/DVD tray is not inserted, and...

Product Information Guide
Page 14
...CD/DVD tray is not inserted in the paper (lower) position. Before you notice light or dark bands across your printout or colors are faint, follow the steps in your printout, you may need to select Head Cleaning, then press OK. 5. For more ... to replace a cartridge as described on the LCD screen. Epson Stylus Photo RX580 12. Press OK. Replace the appropriate ink cartridge first. Press the Setup button. 4. Press the x Start button. Cleaning takes several seconds. Caution: Never turn off your RX580 often, it . You may have moved slightly when you cannot...
...CD/DVD tray is not inserted in the paper (lower) position. Before you notice light or dark bands across your printout or colors are faint, follow the steps in your printout, you may need to select Head Cleaning, then press OK. 5. For more ... to replace a cartridge as described on the LCD screen. Epson Stylus Photo RX580 12. Press OK. Replace the appropriate ink cartridge first. Press the Setup button. 4. Press the x Start button. Cleaning takes several seconds. Caution: Never turn off your RX580 often, it . You may have moved slightly when you cannot...

Product Information Guide
Page 15
... down. Before you need to select the number for at the printed squares in the memory card slots. 11/06 Epson Stylus Photo RX580 - 15 Press Setup. 4. Press r, then press u or d to align the print head. Epson Stylus Photo RX580 6. When the message "Print head cleaning complete" appears on the LCD screen, make sure the front tray is loaded...
... down. Before you need to select the number for at the printed squares in the memory card slots. 11/06 Epson Stylus Photo RX580 - 15 Press Setup. 4. Press r, then press u or d to align the print head. Epson Stylus Photo RX580 6. When the message "Print head cleaning complete" appears on the LCD screen, make sure the front tray is loaded...


