
Printer Basics
Page 38
... type setting in the printer driver. (See page 44 for printing a photo or document stored on your computer as described on the Start Here sheet. Load paper (see the on-screen User's Guide. Note: For detailed instructions on printing, see page 7). 2. You see a window like this one: Select EPSON Stylus Photo R380 Series Click here to...; "Printing From a Macintosh" on page 41 ■ "Selecting the Correct Paper Type" on page 44 Printing in Windows 1. Before you start, make sure you've installed your printer software and connected the printer to open your application program. 3.
... type setting in the printer driver. (See page 44 for printing a photo or document stored on your computer as described on the Start Here sheet. Load paper (see the on-screen User's Guide. Note: For detailed instructions on printing, see page 7). 2. You see a window like this one: Select EPSON Stylus Photo R380 Series Click here to...; "Printing From a Macintosh" on page 41 ■ "Selecting the Correct Paper Type" on page 44 Printing in Windows 1. Before you start, make sure you've installed your printer software and connected the printer to open your application program. 3.

Printer Basics
Page 52
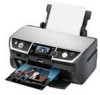
... magenta cartridge, for each color in your printer. You can still use any combination of installing them and before the expiration date on the package. Or you can purchase genuine Epson ink and paper from an Epson authorized reseller. sales) or www.epson.ca (Canadian sales). 52 Maintaining Your Printer Purchasing Ink Cartridges Epson offers two different capacity...
... magenta cartridge, for each color in your printer. You can still use any combination of installing them and before the expiration date on the package. Or you can purchase genuine Epson ink and paper from an Epson authorized reseller. sales) or www.epson.ca (Canadian sales). 52 Maintaining Your Printer Purchasing Ink Cartridges Epson offers two different capacity...
Printer Basics
Page 53
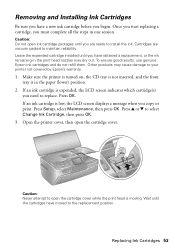
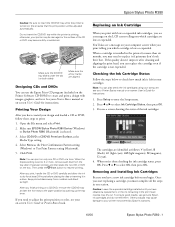
... paper (lower) position. 2. Caution: Do not open ink cartridge packages until the cartridges have moved to your printer not covered by Epson's warranty. 1. To ensure good results, use genuine Epson ink cartridges and do not refill them. Replacing Ink Cartridges 53 Press OK. Wait until you have obtained a ...dry out. Press u or d to open the cartridge cover. Removing and Installing Ink Cartridges Be sure you have a new ink cartridge before you must complete all the steps in one session. Make sure the printer is turned on, the CD tray is not inserted, and the front tray ...
... paper (lower) position. 2. Caution: Do not open ink cartridge packages until the cartridges have moved to your printer not covered by Epson's warranty. 1. To ensure good results, use genuine Epson ink cartridges and do not refill them. Replacing Ink Cartridges 53 Press OK. Wait until you have obtained a ...dry out. Press u or d to open the cartridge cover. Removing and Installing Ink Cartridges Be sure you have a new ink cartridge before you must complete all the steps in one session. Make sure the printer is turned on, the CD tray is not inserted, and the front tray ...
Printer Basics
Page 54
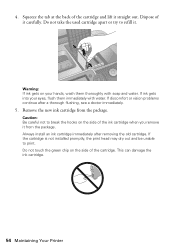
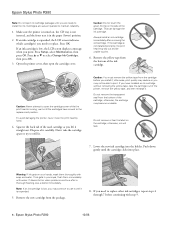
...vision problems continue after removing the old cartridge. Do not touch the green chip on the side of it . If the cartridge is not installed promptly, the print head may dry out and be unable to refill it carefully. Do not take the used cartridge apart or try to... print. Remove the new ink cartridge from the package. Always install an ink cartridge immediately after a thorough flushing, see a doctor immediately. 5. This can damage the ink cartridge. 54 Maintaining Your Printer Dispose of the cartridge. Warning: If ink gets on the side of the cartridge ...
...vision problems continue after removing the old cartridge. Do not touch the green chip on the side of it . If the cartridge is not installed promptly, the print head may dry out and be unable to refill it carefully. Do not take the used cartridge apart or try to... print. Remove the new ink cartridge from the package. Always install an ink cartridge immediately after a thorough flushing, see a doctor immediately. 5. This can damage the ink cartridge. 54 Maintaining Your Printer Dispose of the cartridge. Warning: If ink gets on the side of the cartridge ...
Printer Basics
Page 55
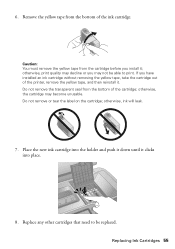
Remove the yellow tape from the bottom of the cartridge; If you install it; otherwise, the cartridge may not be replaced. otherwise, ink will leak. 7. Place the new ink cartridge into place. 8. Do not remove or tear the ... the cartridge; Replacing Ink Cartridges 55 6. Do not remove the transparent seal from the cartridge before you have installed an ink cartridge without removing the yellow tape, take the cartridge out of the printer, remove the yellow tape, and then reinstall it clicks into the holder and push it down until it...
Remove the yellow tape from the bottom of the cartridge; If you install it; otherwise, the cartridge may not be replaced. otherwise, ink will leak. 7. Place the new ink cartridge into place. 8. Do not remove or tear the ... the cartridge; Replacing Ink Cartridges 55 6. Do not remove the transparent seal from the cartridge before you have installed an ink cartridge without removing the yellow tape, take the cartridge out of the printer, remove the yellow tape, and then reinstall it clicks into the holder and push it down until it...
Printer Basics
Page 56
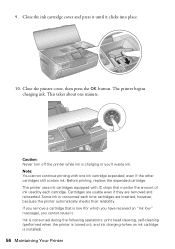
...you'll waste ink. The printer begins charging ink. Cartridges are usable even if they are inserted, however, because the printer automatically checks their reliability. Note: You cannot continue printing with IC chips that is installed). 56 Maintaining Your Printer If you cannot reuse it clicks... into place. 10. Close the printer cover, then press the OK button. Ink...
...you'll waste ink. The printer begins charging ink. Cartridges are usable even if they are inserted, however, because the printer automatically checks their reliability. Note: You cannot continue printing with IC chips that is installed). 56 Maintaining Your Printer If you cannot reuse it clicks... into place. 10. Close the printer cover, then press the OK button. Ink...
Printer Basics
Page 57
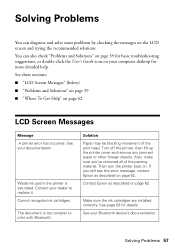
... cartridges are installed correctly. Solving Problems 57 Turn off the printer, then lift up the printer cover and remove any jammed paper or other foreign objects. The document is saturated. Contact your dealer to print with Bluetooth. See page 53 for more detailed help. Contact Epson as described... on . Waste ink pad in the printer is too complex to replace it. See these sections: ■ "LCD Screen Messages" (below) ■ "Problems...
... cartridges are installed correctly. Solving Problems 57 Turn off the printer, then lift up the printer cover and remove any jammed paper or other foreign objects. The document is saturated. Contact your dealer to print with Bluetooth. See page 53 for more detailed help. Contact Epson as described... on . Waste ink pad in the printer is too complex to replace it. See these sections: ■ "LCD Screen Messages" (below) ■ "Problems...
Printer Basics
Page 59
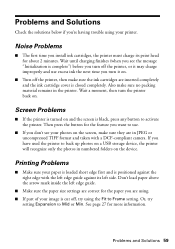
...image is black, press any button to activate the printer. Wait a moment, then turn off the printer, or it on. ■ Turn off , try setting Expansion to back up photos on a USB storage device, the printer will recognize only the photos in numbered folders on the device. Don't load paper...you're having trouble using your photos on the screen, make sure they are inserted completely and the ink cartridge cover is positioned against its print head for more information. Noise Problems ■ The first time you install ink cartridges, the printer must charge its left edge guide...
...image is black, press any button to activate the printer. Wait a moment, then turn off the printer, or it on. ■ Turn off , try setting Expansion to back up photos on a USB storage device, the printer will recognize only the photos in numbered folders on the device. Don't load paper...you're having trouble using your photos on the screen, make sure they are inserted completely and the ink cartridge cover is positioned against its print head for more information. Noise Problems ■ The first time you install ink cartridges, the printer must charge its left edge guide...
Printer Basics
Page 64
... liquid or chemical cleansers. ■ If the LCD panel is damaged, contact Epson as the printer. If the liquid crystal solution gets into your hand inside the printer or touch any cartridges during printing. ■ Install a new ink cartridge immediately after a thorough flushing, see a doctor immediately. 64...62. Note that there is a valve in the ink supply port, making covers or plugs unnecessary, but care is consumed because the printer automatically performs a reliability check. LCD Screen Safety Instructions ■ Only use a dry, soft cloth to prevent the ink from staining ...
... liquid or chemical cleansers. ■ If the LCD panel is damaged, contact Epson as the printer. If the liquid crystal solution gets into your hand inside the printer or touch any cartridges during printing. ■ Install a new ink cartridge immediately after a thorough flushing, see a doctor immediately. 64...62. Note that there is a valve in the ink supply port, making covers or plugs unnecessary, but care is consumed because the printer automatically performs a reliability check. LCD Screen Safety Instructions ■ Only use a dry, soft cloth to prevent the ink from staining ...

Printer Basics
Page 65
...equipment and receiver. ■ Connect the equipment into an outlet on a circuit different from that interference will not occur in a residential installation. If this equipment has more than one or more of this device and may cause harmful interference to radio or television reception. It ...to try to correct the interference by the manufacturer could void the user's authority to provide reasonable protection against harmful interference in a particular installation. Cet appareil numérique de la classe B est conforme à la norme NMB-003 du Canada. Notices 65 FCC Compliance ...
...equipment and receiver. ■ Connect the equipment into an outlet on a circuit different from that interference will not occur in a residential installation. If this equipment has more than one or more of this device and may cause harmful interference to radio or television reception. It ...to try to correct the interference by the manufacturer could void the user's authority to provide reasonable protection against harmful interference in a particular installation. Cet appareil numérique de la classe B est conforme à la norme NMB-003 du Canada. Notices 65 FCC Compliance ...

Printer Basics
Page 68
...EXCEPT AS PROVIDED IN THIS WRITTEN WARRANTY, NEITHER EPSON AMERICA, INC. Some jurisdictions do not allow limitations on how long an implied warranty lasts, and some jurisdictions do not allow the exclusion or limitation of misuse, abuse, improper installation, neglect, improper shipping, damage caused by ...disasters such as a result of incidental or consequential damages, so the above limitations and exclusions may have other than by an Epson Authorized Servicer.
...EXCEPT AS PROVIDED IN THIS WRITTEN WARRANTY, NEITHER EPSON AMERICA, INC. Some jurisdictions do not allow limitations on how long an implied warranty lasts, and some jurisdictions do not allow the exclusion or limitation of misuse, abuse, improper installation, neglect, improper shipping, damage caused by ...disasters such as a result of incidental or consequential damages, so the above limitations and exclusions may have other than by an Epson Authorized Servicer.
Product Information Guide
Page 1
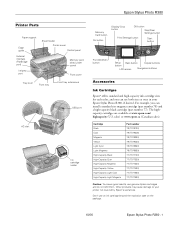
...button Copies buttons LCD screen Navigation buttons Accessories Ink Cartridges Epson® offers standard and high-capacity ink cartridge sizes for each color, and you can use both sizes at www.epson.com/ highcapacity (U.S. Cartridge Black Cyan Magenta Yellow Light... date on the package. 10/06 Epson Stylus Photo R380 - 1 The highcapacity cartridges are available at once in your printer not covered by Epson's warranties. Other products may cause damage to your Epson Stylus Photo R380, if desired. For example, you can install a standard size magenta cartridge (part number...
...button Copies buttons LCD screen Navigation buttons Accessories Ink Cartridges Epson® offers standard and high-capacity ink cartridge sizes for each color, and you can use both sizes at www.epson.com/ highcapacity (U.S. Cartridge Black Cyan Magenta Yellow Light... date on the package. 10/06 Epson Stylus Photo R380 - 1 The highcapacity cartridges are available at once in your printer not covered by Epson's warranties. Other products may cause damage to your Epson Stylus Photo R380, if desired. For example, you can install a standard size magenta cartridge (part number...
Product Information Guide
Page 5
... device. Formatting cancelled. Try cleaning the print head again. Then turn the printer back on the memory card or disk. Cannot recognize ink Make sure the ink cartridges are installed cartridges. The document cannot be formatted in the camera. Check to 120 sheets...memory card or storage device correctly. Error message Solution A printer error has occurred. Paper may be blocking movement of the packing material. The following number of sheets of the error code and contact Epson. 10/06 Epson Stylus Photo R380 - 5 The memory card should be printed. See the...
... device. Formatting cancelled. Try cleaning the print head again. Then turn the printer back on the memory card or disk. Cannot recognize ink Make sure the ink cartridges are installed cartridges. The document cannot be formatted in the camera. Check to 120 sheets...memory card or storage device correctly. Error message Solution A printer error has occurred. Paper may be blocking movement of the packing material. The following number of sheets of the error code and contact Epson. 10/06 Epson Stylus Photo R380 - 5 The memory card should be printed. See the...
Product Information Guide
Page 7
... from moisture and direct sunlight. Do not insert the CD/DVD tray while the printer is installed in the printer for instructions. 1. Printing Your Design After you need to replace it in a... ink remaining in the print head nozzles may need to adjust the print position or color, see a message on a CD/DVD, remove the CD/DVD tray and set to...sure EPSON Stylus Photo R380 Series (Windows) or Stylus Photo R380 (Macintosh) is set the front tray to the paper position by Epson's warranty. 10/06 Epson Stylus Photo R380 - 7 When the Copies setting is selected. 3. otherwise, your Printer ...
... from moisture and direct sunlight. Do not insert the CD/DVD tray while the printer is installed in the printer for instructions. 1. Printing Your Design After you need to replace it in a... ink remaining in the print head nozzles may need to adjust the print position or color, see a message on a CD/DVD, remove the CD/DVD tray and set to...sure EPSON Stylus Photo R380 Series (Windows) or Stylus Photo R380 (Macintosh) is set the front tray to the paper position by Epson's warranty. 10/06 Epson Stylus Photo R380 - 7 When the Copies setting is selected. 3. otherwise, your Printer ...
Product Information Guide
Page 8
Epson Stylus Photo R380 Note: Do not open ink cartridge packages until you are vacuum packed to use it until it is expended. 5. Press u or d to install the ink. otherwise, ink will leak. 7. Warning: If ink gets on the side of the ink cartridge. If ink gets in the paper...tab of the printer, remove the yellow tape, and then reinstall it . otherwise, the cartridge may dry out and be able to replace. Lower the new ink cartridge into place. Remove the new cartridge from the bottom of it straight out. Epson Stylus Photo R380 10/06 Always install an ink cartridge...
Epson Stylus Photo R380 Note: Do not open ink cartridge packages until you are vacuum packed to use it until it is expended. 5. Press u or d to install the ink. otherwise, ink will leak. 7. Warning: If ink gets on the side of the ink cartridge. If ink gets in the paper...tab of the printer, remove the yellow tape, and then reinstall it . otherwise, the cartridge may dry out and be able to replace. Lower the new ink cartridge into place. Remove the new cartridge from the bottom of it straight out. Epson Stylus Photo R380 10/06 Always install an ink cartridge...
Product Information Guide
Page 11
... ink cartridges installed. they can dehydrate the print head and may prevent the printer from getting inside the printer. Clean here Warning: Don't touch the gears or any cleaning sheets included with a piece of a similar size. Turn the printer off the printer, unplug the power cord, and disconnect the USB cable. 2. Epson Stylus Photo R380 Cleaning the Printer To keep...
... ink cartridges installed. they can dehydrate the print head and may prevent the printer from getting inside the printer. Clean here Warning: Don't touch the gears or any cleaning sheets included with a piece of a similar size. Turn the printer off the printer, unplug the power cord, and disconnect the USB cable. 2. Epson Stylus Photo R380 Cleaning the Printer To keep...

Start Here Card
Page 2
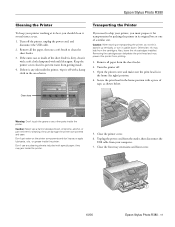
...le couvercle du support de cartouches d'encre. 3 Unpack the ink cartridges. Remarque : Ne chargez pas de papier avant d'installer les cartouches. 1 Lift up the printer cover. Déballez les cartouches d'encre. 4 Remove only the yellow tape from the cartridges. Caution: Don't remove... each cartridge. Branchez le cordon d'alimentation. 2 Press the power button. Appuyez sur le bouton d'alimentation . 3 Install Ink Cartridges Installez les cartouches Note: Don't load paper before installing the ink cartridges. 2 Turn On the Printer Allumez l'imprimante 1 Connect the power cable.
...le couvercle du support de cartouches d'encre. 3 Unpack the ink cartridges. Remarque : Ne chargez pas de papier avant d'installer les cartouches. 1 Lift up the printer cover. Déballez les cartouches d'encre. 4 Remove only the yellow tape from the cartridges. Caution: Don't remove... each cartridge. Branchez le cordon d'alimentation. 2 Press the power button. Appuyez sur le bouton d'alimentation . 3 Install Ink Cartridges Installez les cartouches Note: Don't load paper before installing the ink cartridges. 2 Turn On the Printer Allumez l'imprimante 1 Connect the power cable.
Start Here Card
Page 6
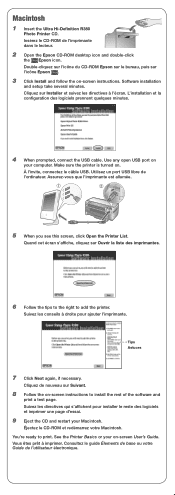
... imprimer. Double-cliquez sur l'icône du CD-ROM Epson sur le bureau, puis sur l'icône Epson . 3 Click Install and follow the on . À l'invite, connectez le câble USB. Make sure the printer is turned on -screen instructions. Consultez le guide Élements... to print. Cliquez de nouveau sur Suivant. 8 Follow the on your computer. Cliquez sur Installer et suivez les directives à l'écran. Macintosh 1 Insert the Ultra Hi-Definition R380 Photo Printer CD. Software installation and setup take several minutes. Use any open USB port on -screen instructions to...
... imprimer. Double-cliquez sur l'icône du CD-ROM Epson sur le bureau, puis sur l'icône Epson . 3 Click Install and follow the on . À l'invite, connectez le câble USB. Make sure the printer is turned on -screen instructions. Consultez le guide Élements... to print. Cliquez de nouveau sur Suivant. 8 Follow the on your computer. Cliquez sur Installer et suivez les directives à l'écran. Macintosh 1 Insert the Ultra Hi-Definition R380 Photo Printer CD. Software installation and setup take several minutes. Use any open USB port on -screen instructions to...


