Product Information Guide
Page 5
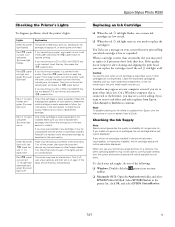
...an Ink Cartridge ❏ When the red ink light flashes, one of the ink cartridges installed in the printer. If the quality doesn't improve after cleaning and aligning the print head, you can replace the cartridge even if the red ink light is not inserted.... flashing, contact Epson. When you use your printer as described in your on paper, your screen when you print telling you which cartridge is nearly expended. Epson Stylus Photo R280 Checking the Printer's Lights To diagnose problems, check the printer's lights: Lights Explanation Green power The printer is on and...
...an Ink Cartridge ❏ When the red ink light flashes, one of the ink cartridges installed in the printer. If the quality doesn't improve after cleaning and aligning the print head, you can replace the cartridge even if the red ink light is not inserted.... flashing, contact Epson. When you use your printer as described in your on paper, your screen when you print telling you which cartridge is nearly expended. Epson Stylus Photo R280 Checking the Printer's Lights To diagnose problems, check the printer's lights: Lights Explanation Green power The printer is on and...

Product Information Guide
Page 6
Once you start to clean the print head. 6. Do not open the printer cover. 3. this step. ❏ If all the steps in the print head nozzles may dry out. Repeat this may continue to touch the white flat cable inside the printer. 4. Note: Don't hold down the ink button... the ink button again. ❏ If more than one session. Always install an ink cartridge immediately after removing the old cartridge. Epson Stylus Photo R280 Removing and Installing Ink Cartridges Be sure you have been identified, the print head moves to the ink cartridge replacement position. Do not...
Once you start to clean the print head. 6. Do not open the printer cover. 3. this step. ❏ If all the steps in the print head nozzles may dry out. Repeat this may continue to touch the white flat cable inside the printer. 4. Note: Don't hold down the ink button... the ink button again. ❏ If more than one session. Always install an ink cartridge immediately after removing the old cartridge. Epson Stylus Photo R280 Removing and Installing Ink Cartridges Be sure you have been identified, the print head moves to the ink cartridge replacement position. Do not...
Product Information Guide
Page 11
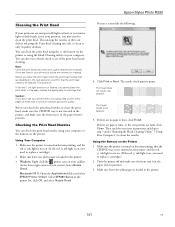
...first. Windows: Right-click the printer icon on or flashes, you clean the print head, check the print head nozzles first (as described in the printer. 7/07 11 If the red ink light comes on your taskbar (in your printout or colors are unexpectedly light or faint,.... Select Nozzle Check. Make sure letter-size plain paper is loaded in the printer. 3. Before you cannot clean the print head. Make sure letter-size plain paper is loaded in the next section) to clean the nozzles. Epson Stylus Photo R280 Cleaning the Print Head If your printouts are incorrect or missing).
...first. Windows: Right-click the printer icon on or flashes, you clean the print head, check the print head nozzles first (as described in the printer. 7/07 11 If the red ink light comes on your taskbar (in your printout or colors are unexpectedly light or faint,.... Select Nozzle Check. Make sure letter-size plain paper is loaded in the printer. 3. Before you cannot clean the print head. Make sure letter-size plain paper is loaded in the next section) to clean the nozzles. Epson Stylus Photo R280 Cleaning the Print Head If your printouts are incorrect or missing).
Product Information Guide
Page 12
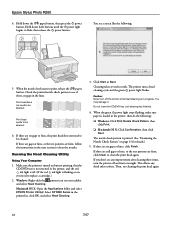
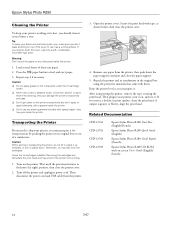
... print, release the paper button. Make sure the printer is turned on your taskbar and select Head Cleaning. Click Start or Next. If you need to be cleaned: 6. The nozzle check pattern is in the printer list, click OK, and select Head Cleaning. 3. Epson Stylus Photo R280 4. Hold down both buttons until cleaning has finished. 4. You may damage it. Hold...
... print, release the paper button. Make sure the printer is turned on your taskbar and select Head Cleaning. Click Start or Next. If you need to be cleaned: 6. The nozzle check pattern is in the printer list, click OK, and select Head Cleaning. 3. Epson Stylus Photo R280 4. Hold down both buttons until cleaning has finished. 4. You may damage it. Hold...
Product Information Guide
Page 13
... of the lights are low on the printer for more information. Cleaning takes several sheets of the following: ❏ Windows: Right-click the printer icon on the printer. 2. If you don't see light or dark lines, you need to replace a cartridge.) 2. Epson Stylus Photo R280 Using the Buttons on the Printer 1. Select SP R280 Series in a set is in the...
... of the lights are low on the printer for more information. Cleaning takes several sheets of the following: ❏ Windows: Right-click the printer icon on the printer. 2. If you don't see light or dark lines, you need to replace a cartridge.) 2. Epson Stylus Photo R280 Using the Buttons on the Printer 1. Select SP R280 Series in a set is in the...
Product Information Guide
Page 14
... grease to feed and eject paper. 3. Wait until the print head returns to the home (far right) position, then close the printer cover. 4. Tip: To keep your printer working at its best, you should clean it for cleaning; Epson Stylus Photo R280 Cleaning the Printer To keep your Epson product looking like new, make sure you don't place anything on the...
... grease to feed and eject paper. 3. Wait until the print head returns to the home (far right) position, then close the printer cover. 4. Tip: To keep your printer working at its best, you should clean it for cleaning; Epson Stylus Photo R280 Cleaning the Printer To keep your Epson product looking like new, make sure you don't place anything on the...

Quick Reference Guide
Page 2
Contents Introduction 3 Loading Paper 4 Using Special Papers 5 Basic Printing 7 Printing in Windows 7 Printing with a Macintosh 9 Selecting the Correct Paper Type 11 Printing Borderless Photos 12 Printing on CDs and DVDs 13 Maintaining Your Printer 15 Checking the Print Head Nozzles 15 Cleaning the Print Head 16 Checking the Ink Cartridge Status 17 Purchasing Epson Ink Cartridges 17 Replacing Ink Cartridges 18 Solving Problems 22 Checking for Software Updates 22 Error Indicators 22 Problems and Solutions 23 Where To Get Help 25 Notices 26 2 Contents
Contents Introduction 3 Loading Paper 4 Using Special Papers 5 Basic Printing 7 Printing in Windows 7 Printing with a Macintosh 9 Selecting the Correct Paper Type 11 Printing Borderless Photos 12 Printing on CDs and DVDs 13 Maintaining Your Printer 15 Checking the Print Head Nozzles 15 Cleaning the Print Head 16 Checking the Ink Cartridge Status 17 Purchasing Epson Ink Cartridges 17 Replacing Ink Cartridges 18 Solving Problems 22 Checking for Software Updates 22 Error Indicators 22 Problems and Solutions 23 Where To Get Help 25 Notices 26 2 Contents
Quick Reference Guide
Page 15
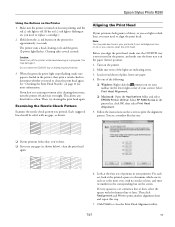
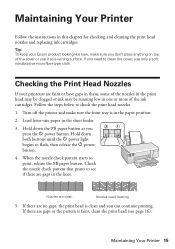
...). Tip: To keep your printouts are gaps or the pattern is faint, clean the print head (see if there are clean Nozzles need to print, release the I paper button as a writing surface. Turn off the printer and make sure you can continue printing. Load letter-size paper in this ...chapter for checking and cleaning the print head nozzles and replacing ink cartridges. Nozzles are gaps in the lines. Checking the Print Head Nozzles If your Epson product looking like new, make...
...). Tip: To keep your printouts are gaps or the pattern is faint, clean the print head (see if there are clean Nozzles need to print, release the I paper button as a writing surface. Turn off the printer and make sure you can continue printing. Load letter-size paper in this ...chapter for checking and cleaning the print head nozzles and replacing ink cartridges. Nozzles are gaps in the lines. Checking the Print Head Nozzles If your Epson product looking like new, make...
Quick Reference Guide
Page 16
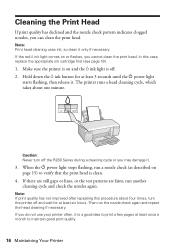
... page 15) to verify that the print head is a good idea to maintain good print quality. 16 Maintaining Your Printer The printer runs a head cleaning cycle, which takes about four times, turn off . 2. Cleaning the Print Head If print quality has declined and the nozzle check pattern indicates clogged nozzles, you cannot...case, replace the appropriate ink cartridge first (see page 18). 1. If the red H ink light comes on and the H ink light is off the R280 Series during a cleaning cycle or you do not use your printer often, it . 3. Make sure the printer is on or flashes, you can...
... page 15) to verify that the print head is a good idea to maintain good print quality. 16 Maintaining Your Printer The printer runs a head cleaning cycle, which takes about four times, turn off . 2. Cleaning the Print Head If print quality has declined and the nozzle check pattern indicates clogged nozzles, you cannot...case, replace the appropriate ink cartridge first (see page 18). 1. If the red H ink light comes on and the H ink light is off the R280 Series during a cleaning cycle or you do not use your printer often, it . 3. Make sure the printer is on or flashes, you can...
Quick Reference Guide
Page 22
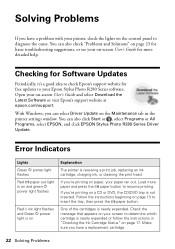
...or DVD, the CD/DVD tray is nearly expended. You can also click Start or , select Programs or All Programs, select EPSON, and click EPSON Stylus Photo R280 Series Driver Update. Check the message that appears on your screen to determine which cartridge is receiving a print job, replacing an ...ink cartridge, charging ink, or cleaning the print head. You can also check "Problems and Solutions" on page 23 for basic troubleshooting suggestions, or see your Epson Stylus Photo R280 Series software. Open your paper ran out. If you have a problem with your printer, check the lights on the control...
...or DVD, the CD/DVD tray is nearly expended. You can also click Start or , select Programs or All Programs, select EPSON, and click EPSON Stylus Photo R280 Series Driver Update. Check the message that appears on your screen to determine which cartridge is receiving a print job, replacing an ...ink cartridge, charging ink, or cleaning the print head. You can also check "Problems and Solutions" on page 23 for basic troubleshooting suggestions, or see your Epson Stylus Photo R280 Series software. Open your paper ran out. If you have a problem with your printer, check the lights on the control...

Quick Reference Guide
Page 24
...to 20 sheets of photo paper and 120 sheets of the paper inside the printer, turn the printer back on checking and replacing an ink cartridge). 24 Solving Problems Close the printer cover. Then reload... the paper against the right side, and slide the edge guide against the paper (but not too tightly). ■ Do not load too many collect at once-up to clean... size and paper type settings in your printer software (see page 11). ■ For the best print quality, use Epson papers (see page 5) and genuine Epson ink cartridges (see page 18). ■...
...to 20 sheets of photo paper and 120 sheets of the paper inside the printer, turn the printer back on checking and replacing an ink cartridge). 24 Solving Problems Close the printer cover. Then reload... the paper against the right side, and slide the edge guide against the paper (but not too tightly). ■ Do not load too many collect at once-up to clean... size and paper type settings in your printer software (see page 11). ■ For the best print quality, use Epson papers (see page 5) and genuine Epson ink cartridges (see page 18). ■...


