

Technical Brief (Ink Jet Printers)
Page 1
... component is on the core technologies used in Epson printers and all ink solution. Epson MicroPiezo® technology Produces precise ink droplet size and placement Epson Papers Epson papers are designed to receive Epson inks and offer the optimal output quality High Resolution Printing High resolution allows the printer to produce greater detail in delivering exceptional print...
... component is on the core technologies used in Epson printers and all ink solution. Epson MicroPiezo® technology Produces precise ink droplet size and placement Epson Papers Epson papers are designed to receive Epson inks and offer the optimal output quality High Resolution Printing High resolution allows the printer to produce greater detail in delivering exceptional print...

Technical Brief (Ink Jet Printers)
Page 2
...more tone representations • The smallest ink droplets can be combined to precisely print crisp details in other ink jet printers: Epson MicroPiezo Technology Mechanical method: Precise electrical pulses cause the ink reservoir wall to produce a greater number of different colored ...are used in dense coverage areas to improve print speed With this technique, Epson printers can be combined to increase the number of different ink droplet sizes. Epson printers are increased Epson printers use high-precision mechanical pumps to have fast print speeds without increasing the ...
...more tone representations • The smallest ink droplets can be combined to precisely print crisp details in other ink jet printers: Epson MicroPiezo Technology Mechanical method: Precise electrical pulses cause the ink reservoir wall to produce a greater number of different colored ...are used in dense coverage areas to improve print speed With this technique, Epson printers can be combined to increase the number of different ink droplet sizes. Epson printers are increased Epson printers use high-precision mechanical pumps to have fast print speeds without increasing the ...

Technical Brief (Ink Jet Printers)
Page 3
... customer is an amateur photographer looking to receive Epson inks. The Epson printer drivers use a halftoning module that places ink droplets to as halftoning, that produces fast, high-quality, color-accurate output. Epson, Exceed Your Vision, MicroPiezo, AcuPhoto Halftoning, Claria, Epson UltraChrome K3, Epson UltraChrome Hi-Gloss, and PictureMate are for applying ink droplets to determine the...
... customer is an amateur photographer looking to receive Epson inks. The Epson printer drivers use a halftoning module that places ink droplets to as halftoning, that produces fast, high-quality, color-accurate output. Epson, Exceed Your Vision, MicroPiezo, AcuPhoto Halftoning, Claria, Epson UltraChrome K3, Epson UltraChrome Hi-Gloss, and PictureMate are for applying ink droplets to determine the...
Basics
Page 2
Contents Welcome 2 Prepare to Print 5 Choose Photos and Print 8 Do More With Your Photos 15 Save Photos to a CD 25 Print From a Computer 27 Print From an External Device 42 Replace Print Pack 48 Take PictureMate With You 52 Set PictureMate Preferences 55 Printer Care and Troubleshooting 60 Notices 69 Index 79
Contents Welcome 2 Prepare to Print 5 Choose Photos and Print 8 Do More With Your Photos 15 Save Photos to a CD 25 Print From a Computer 27 Print From an External Device 42 Replace Print Pack 48 Take PictureMate With You 52 Set PictureMate Preferences 55 Printer Care and Troubleshooting 60 Notices 69 Index 79
Basics
Page 5
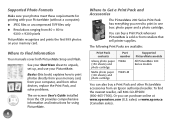
... Series Print Pack has everything you can purchase online at www.epsonstore.com (U.S. You can also buy a Print Pack wherever PictureMate is sold or from an Epson authorized reseller. Or you need to print in one box: photo paper and a photo cartridge. Basics (this book) explains ... PictureMate accessories from retailers that sell printer supplies. To find the nearest reseller, call 800-GO-EPSON (800-463-7766). Where to unpack, set up, and use your memory card. See your Start Here sheet to Find Information Your manuals cover both PictureMate Snap and Flash. sales) or www.epson....
... Series Print Pack has everything you can purchase online at www.epsonstore.com (U.S. You can also buy a Print Pack wherever PictureMate is sold or from an Epson authorized reseller. Or you need to print in one box: photo paper and a photo cartridge. Basics (this book) explains ... PictureMate accessories from retailers that sell printer supplies. To find the nearest reseller, call 800-GO-EPSON (800-463-7766). Where to unpack, set up, and use your memory card. See your Start Here sheet to Find Information Your manuals cover both PictureMate Snap and Flash. sales) or www.epson....
Basics
Page 9
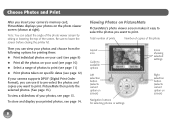
Be sure to print. Viewing Photos on PictureMate PictureMate's photo viewer screen makes it to pre-select the photos and copies you want to lower the screen before closing the printer lid. Total number of prints Number of copies of photos to print (see page 11) ● Print photos taken on specific ... page 9) ● Print all the photos on your card (see page 10) ● Select a range of this photo Layout icon Guide to print. PictureMate then prints the selected photos. (See page 13.) To view a slideshow of the screen. Then you can adjust the angle of the photo viewer screen...
Be sure to print. Viewing Photos on PictureMate PictureMate's photo viewer screen makes it to pre-select the photos and copies you want to lower the screen before closing the printer lid. Total number of prints Number of copies of photos to print (see page 11) ● Print photos taken on specific ... page 9) ● Print all the photos on your card (see page 10) ● Select a range of this photo Layout icon Guide to print. PictureMate then prints the selected photos. (See page 13.) To view a slideshow of the screen. Then you can adjust the angle of the photo viewer screen...
Basics
Page 20
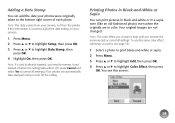
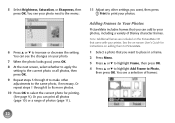
... highlight Color Effect, then press OK. Your original images are automatically date-stamped until you turn off the setting. Note: The date comes from the printer. To use the same color effect whenever you print, see this information is kept until you remove the memory card or cancel all settings.) Your...
... highlight Color Effect, then press OK. Your original images are automatically date-stamped until you turn off the setting. Note: The date comes from the printer. To use the same color effect whenever you print, see this information is kept until you remove the memory card or cancel all settings.) Your...
Basics
Page 21
...print your photos without using a computer. Note: These settings affect only your camera supports PRINT Image Matching (P.I.M.) or Exif Print, the printer's P.I .M. Two types of your photos. or PhotoEnhance are available: ● Automatic adjustments If your printed pictures. If you want...select the current photo for the best results. 20 The PhotoEnhance setting improves your original image files. Automatically Fixing Your Photos PictureMate's automatic image adjustments are too light or too dark, you can manually adjust their brightness or control the saturation and sharpness...
...print your photos without using a computer. Note: These settings affect only your camera supports PRINT Image Matching (P.I.M.) or Exif Print, the printer's P.I .M. Two types of your photos. or PhotoEnhance are available: ● Automatic adjustments If your printed pictures. If you want...select the current photo for the best results. 20 The PhotoEnhance setting improves your original image files. Automatically Fixing Your Photos PictureMate's automatic image adjustments are too light or too dark, you can manually adjust their brightness or control the saturation and sharpness...
Basics
Page 23
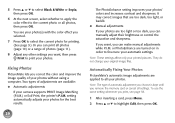
You see your printer. Note: Additional frames are included on the PictureMate CD that came with your photo next to the menu...Photo, then press OK. 5 Select Brightness, Saturation, or Sharpness, then press OK. You see the changes on adding them to PictureMate. 1 Select a photo that you want to place in a frame. 2 Press Menu. 3 Press u or d to highlight...through 8 to make other settings you can see a selection of Disney character frames. Adding Frames to Your Photos PictureMate includes frames that you want , then press Print to print your photo. 7 When the photo looks good,...
You see your printer. Note: Additional frames are included on the PictureMate CD that came with your photo next to the menu...Photo, then press OK. 5 Select Brightness, Saturation, or Sharpness, then press OK. You see the changes on adding them to PictureMate. 1 Select a photo that you want to place in a frame. 2 Press Menu. 3 Press u or d to highlight...through 8 to make other settings you can see a selection of Disney character frames. Adding Frames to Your Photos PictureMate includes frames that you want , then press Print to print your photo. 7 When the photo looks good,...
Basics
Page 26
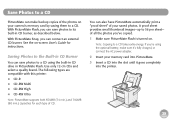
...following types are compatible with this printer: ● CD-R ● CD-RW Multi ● CD-RW High ● CD-RW Ultra Note: PictureMate supports both 650MB (74 min.) and 700MB (80 min.) capacities for instructions. If you can connect an external CD burner. With PictureMate Snap, you 're using the ...optional battery, make backup copies of all the photos you can save photos to a CD using the built-in CD drive in PictureMate Flash. See the on-screen User's Guide for each type...
...following types are compatible with this printer: ● CD-R ● CD-RW Multi ● CD-RW High ● CD-RW Ultra Note: PictureMate supports both 650MB (74 min.) and 700MB (80 min.) capacities for instructions. If you can connect an external CD burner. With PictureMate Snap, you 're using the ...optional battery, make backup copies of all the photos you can save photos to a CD using the built-in CD drive in PictureMate Flash. See the on-screen User's Guide for each type...
Basics
Page 27
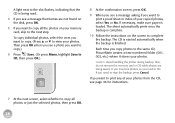
If you copy photos to the same CD, PictureMate creates a new numbered folder (001, 002, etc.) where it stores your photos. A light next to the slot flashes, indicating that frames are being read. 4 If ... automatically prints once the backup is being saved, or you may lose photos on your copied photos, select Yes or No. Caution: Avoid handling the printer during backup. If you want to print any of your photos from the CD, see a message asking if you want to print a proof sheet or...
If you copy photos to the same CD, PictureMate creates a new numbered folder (001, 002, etc.) where it stores your photos. A light next to the slot flashes, indicating that frames are being read. 4 If ... automatically prints once the backup is being saved, or you may lose photos on your copied photos, select Yes or No. Caution: Avoid handling the printer during backup. If you want to print any of your photos from the CD, see a message asking if you want to print a proof sheet or...
Basics
Page 28
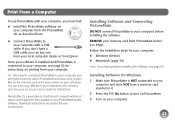
...PictureMate printer software. Periodically, it's a good idea to check Epson's support website at epson.com/support for free updates to your memory card from PictureMate before installing the software. Download instructions are posted for Windows 1 Make sure PictureMate is connected to your computer, you have a memory card inserted in PictureMate... on -screen User's Guide for instructions. Once your software is installed and PictureMate is NOT connected to your computer. 27 Tip: Once you can buy one from Epson. You can insert a memory card in it were a drive on your ...
...PictureMate printer software. Periodically, it's a good idea to check Epson's support website at epson.com/support for free updates to your memory card from PictureMate before installing the software. Download instructions are posted for Windows 1 Make sure PictureMate is connected to your computer, you have a memory card inserted in PictureMate... on -screen User's Guide for instructions. Once your software is installed and PictureMate is NOT connected to your computer. 27 Tip: Once you can buy one from Epson. You can insert a memory card in it were a drive on your ...
Basics
Page 30
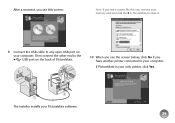
If PictureMate is your PictureMate software. 29 The installer installs your only printer, click Yes. After a moment, you see this screen: Note: If you see the screen below, click No if you see a screen like this one, remove your memory card and click the X in the window to close it. 9 Connect the USB cable to your computer. Then connect the other end to the USB port on the back of PictureMate. 10 When you have another printer connected to any open USB port on your computer.
If PictureMate is your PictureMate software. 29 The installer installs your only printer, click Yes. After a moment, you see this screen: Note: If you see the screen below, click No if you see a screen like this one, remove your memory card and click the X in the window to close it. 9 Connect the USB cable to your computer. Then connect the other end to the USB port on the back of PictureMate. 10 When you have another printer connected to any open USB port on your computer.
Basics
Page 31
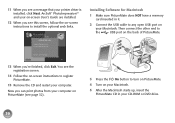
...can print photos from your computer on PictureMate (see page 32). 3 Press the On button to turn on PictureMate. 4 Turn on your Macintosh. 5 After the Macintosh starts up, insert the PictureMate CD in it. 2 Connect the USB cable to register PictureMate. 15 Remove the CD and restart ... drive. 30 Installing Software for Macintosh 1 Make sure PictureMate does NOT have a memory card inserted in your computer. You see the registration screen. 14 Follow the on-screen instructions to any open USB port on your printer driver is installed, click Next. ArcSoft® PhotoImpression&#...
...can print photos from your computer on PictureMate (see page 32). 3 Press the On button to turn on PictureMate. 4 Turn on your Macintosh. 5 After the Macintosh starts up, insert the PictureMate CD in it. 2 Connect the USB cable to register PictureMate. 15 Remove the CD and restart ... drive. 30 Installing Software for Macintosh 1 Make sure PictureMate does NOT have a memory card inserted in your computer. You see the registration screen. 14 Follow the on-screen instructions to any open USB port on your printer driver is installed, click Next. ArcSoft® PhotoImpression&#...
Basics
Page 32
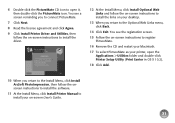
... screen reminding you return to the Optional Web Links menu, click Back. 14 Click Exit. 6 Double-click the PictureMate CD icon to open the Applications > Utilities folder and double-click Printer Setup Utility (Print Center in OS X 10.2). 18 Click Add. 10 When you return to the Install Menu...to install the software. 11 At the Install Menu, click Install Printer Manual to install your on your desktop. 13 When you to connect PictureMate. 7 Click Next. 8 Read the license agreement and click Agree. 9 Click Install Printer Driver and Utilities, then follow the on-screen instructions to install ...
... screen reminding you return to the Optional Web Links menu, click Back. 14 Click Exit. 6 Double-click the PictureMate CD icon to open the Applications > Utilities folder and double-click Printer Setup Utility (Print Center in OS X 10.2). 18 Click Add. 10 When you return to the Install Menu...to install the software. 11 At the Install Menu, click Install Printer Manual to install your on your desktop. 13 When you to connect PictureMate. 7 Click Next. 8 Read the license agreement and click Agree. 9 Click Install Printer Driver and Utilities, then follow the on-screen instructions to install ...
Basics
Page 33
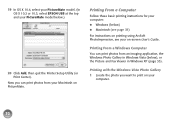
... Windows Photo Gallery in Windows Vista (below .) 20 Click Add, then quit the Printer Setup Utility (or Print Center). Printing with the Windows Vista Photo Gallery 1 Locate the photo you can print photos from your PictureMate model below ), or the Picture and Fax Viewer in Windows XP (page 35). 19... In OS X 10.4, select your PictureMate model. (In OS X 10.2 or 10.3, select EPSON USB at the top and your Macintosh on...
... Windows Photo Gallery in Windows Vista (below .) 20 Click Add, then quit the Printer Setup Utility (or Print Center). Printing with the Windows Vista Photo Gallery 1 Locate the photo you can print photos from your PictureMate model below ), or the Picture and Fax Viewer in Windows XP (page 35). 19... In OS X 10.4, select your PictureMate model. (In OS X 10.2 or 10.3, select EPSON USB at the top and your Macintosh on...
Basics
Page 34
2 Right-click the photo, highlight Open With, and select Windows Photo Gallery. Options 4 Make sure your printer is selected, then choose PictureMate Photo Paper as the Paper type setting. (4 × 6 in is automatically selected as the Paper size setting.) 5 Click Options in the lower right corner of the screen, then select Print from the drop-down menu that appears. Print icon 3 Click the Print icon at the top of the screen and select Printer Properties. 33
2 Right-click the photo, highlight Open With, and select Windows Photo Gallery. Options 4 Make sure your printer is selected, then choose PictureMate Photo Paper as the Paper type setting. (4 × 6 in is automatically selected as the Paper size setting.) 5 Click Options in the lower right corner of the screen, then select Print from the drop-down menu that appears. Print icon 3 Click the Print icon at the top of the screen and select Printer Properties. 33
Basics
Page 35
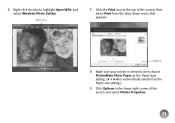
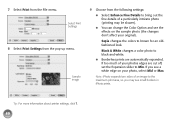
...see what your original). Auto Correction improves the quality of your photo edges are too dark or have a color cast. You see the printer settings window: Sample photo 6 Choose from the following settings: ● Select Borderless to print with a digital camera, select Digital Camera Correction...9679; Select the number of a particularly intricate photo (printing may be slower). ● Select Print Preview to Min. Tip: For more information about printer settings, click Help. 7 Click OK. Black & White changes color photos to black and white. ● If your photo was taken with a ...
...see what your original). Auto Correction improves the quality of your photo edges are too dark or have a color cast. You see the printer settings window: Sample photo 6 Choose from the following settings: ● Select Borderless to print with a digital camera, select Digital Camera Correction...9679; Select the number of a particularly intricate photo (printing may be slower). ● Select Print Preview to Min. Tip: For more information about printer settings, click Help. 7 Click OK. Black & White changes color photos to black and white. ● If your photo was taken with a ...
Basics
Page 38
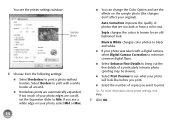
... brown for an oldfashioned look like before you print. ● Select the number of photos that are automatically expanded. Tip: For more information about printer settings, click Help. 8 Click OK. 37 You see the effects on the sample photo (the changes don't affect your original). If you want...the quality of copies you see a white edge on your photo, select Mid or Max. ● You can change the Color Option and see the printer settings screen: Sample image 7 Choose from the following settings: ● Select Borderless to black-and-white. ● If your photo will look . ...
... brown for an oldfashioned look like before you print. ● Select the number of photos that are automatically expanded. Tip: For more information about printer settings, click Help. 8 Click OK. 37 You see the effects on the sample photo (the changes don't affect your original). If you want...the quality of copies you see a white edge on your photo, select Mid or Max. ● You can change the Color Option and see the printer settings screen: Sample image 7 Choose from the following settings: ● Select Borderless to black-and-white. ● If your photo will look . ...
Basics
Page 41
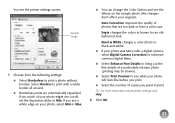
... changes the colors to the maximum print area, so you see the effects on your photo, select Mid or Max. Tip: For more information about printer settings, click ?. 40 If too much of an image to brown for an oldfashioned look. If you may be slower). ● You can change the...
... changes the colors to the maximum print area, so you see the effects on your photo, select Mid or Max. Tip: For more information about printer settings, click ?. 40 If too much of an image to brown for an oldfashioned look. If you may be slower). ● You can change the...

