
Basics
Page 3
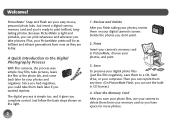
... taking your photo files, use the builtin CD burner.) 4. Save To preserve your digital photo files (just like film negatives), save your photos, review them on the right. 2 1. buy film, take pictures, leave the film at the photo lab, and come back later for more photos....easy-to the Digital Photography Process With film cameras, the process was simple; Welcome! Just follow the basic steps shown on your computer. PictureMate® Snap and Flash are today. Since you had negatives, you wanted reprints. The digital process is light and portable, you can use your ...
... taking your photo files, use the builtin CD burner.) 4. Save To preserve your digital photo files (just like film negatives), save your photos, review them on the right. 2 1. buy film, take pictures, leave the film at the photo lab, and come back later for more photos....easy-to the Digital Photography Process With film cameras, the process was simple; Welcome! Just follow the basic steps shown on your computer. PictureMate® Snap and Flash are today. Since you had negatives, you wanted reprints. The digital process is light and portable, you can use your ...
Basics
Page 11
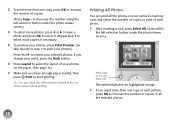
... 3 to select more copies, if necessary. 5 To preview your photos, press Print Preview. (Or skip directly to step 7 to print your photos.) Press l or r to review your photos on your camera's memory card, and select the number of copies to print of each photo. 1 After inserting a card, press Select All. (Select...
... 3 to select more copies, if necessary. 5 To preview your photos, press Print Preview. (Or skip directly to step 7 to print your photos.) Press l or r to review your photos on your camera's memory card, and select the number of copies to print of each photo. 1 After inserting a card, press Select All. (Select...

Basics
Page 12
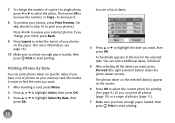
... your selected photos. to decrease it. 5 To preview your photos, press Print Preview. (Or skip directly to step 7 to print your photos.) Press l or r to review your camera's memory card (for example, photos 7 through 12). 1 After inserting a card, press Menu. 2 Press u or d to highlight Select, then press OK. 3 Press u or d to...
... your selected photos. to decrease it. 5 To preview your photos, press Print Preview. (Or skip directly to step 7 to print your photos.) Press l or r to review your camera's memory card (for example, photos 7 through 12). 1 After inserting a card, press Menu. 2 Press u or d to highlight Select, then press OK. 3 Press u or d to...
Basics
Page 13
... memory card, this makes it . 8 To preview your photos, press Print Preview. (Or skip directly to step 10 to print your photos.) Press l or r to review your photos on the screen. 6 Press OK to select the current photo for the selected date. If you want , then press OK. Then press OK...
... memory card, this makes it . 8 To preview your photos, press Print Preview. (Or skip directly to step 10 to print your photos.) Press l or r to review your photos on the screen. 6 Press OK to select the current photo for the selected date. If you want , then press OK. Then press OK...
Basics
Page 14
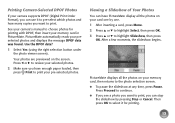
Press l or r to review your selected photos. 2 Make sure you have PictureMate display all the photos on the screen. Viewing a Slideshow ...Proceed to continue. ● If you see a photo you want to print your pre-selected photos. PictureMate automatically reads your memory card, then returns to print, you can stop the slideshow by one by pressing... Stop or Cancel. See your camera's manual to highlight Slideshow, then press OK. PictureMate displays all the photos on your card one . 1 After inserting a card, press Menu. 2 Press u or d to...
Press l or r to review your selected photos. 2 Make sure you have PictureMate display all the photos on the screen. Viewing a Slideshow ...Proceed to continue. ● If you see a photo you want to print your pre-selected photos. PictureMate automatically reads your memory card, then returns to print, you can stop the slideshow by one by pressing... Stop or Cancel. See your camera's manual to highlight Slideshow, then press OK. PictureMate displays all the photos on your card one . 1 After inserting a card, press Menu. 2 Press u or d to...
Start Here Card
Page 6
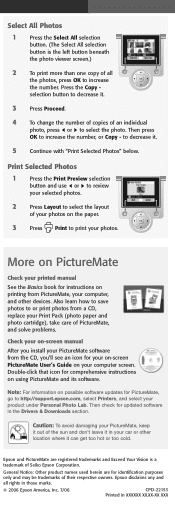
...7/06 CPD-22153 Printed in the Drivers & Downloads section. Print Selected Photos 1 Press the Print Preview selection button and use or to review your selected photos. 2 Press Layout to select the layout of your photos on possible software updates for identification purposes only and may be trademarks... All Photos 1 Press the Select All selection button. (The Select All selection button is a trademark of Seiko Epson Corporation. to increase the number, or Copy - More on PictureMate Check your printed manual See the Basics book for updated software in XXXXXX XX.XX-XX XXX Press the Copy ...
...7/06 CPD-22153 Printed in the Drivers & Downloads section. Print Selected Photos 1 Press the Print Preview selection button and use or to review your selected photos. 2 Press Layout to select the layout of your photos on possible software updates for identification purposes only and may be trademarks... All Photos 1 Press the Select All selection button. (The Select All selection button is a trademark of Seiko Epson Corporation. to increase the number, or Copy - More on PictureMate Check your printed manual See the Basics book for updated software in XXXXXX XX.XX-XX XXX Press the Copy ...

Product Information Guide
Page 6
... to decrease the number using the left selection button under the photo viewer screen.) 4. Press Layout to select the photo. When you need to review your mind, press Back. 6. If you see page 8.) 7. Note: If you the area that paper is highlighted orange. Press here to ...print your card has more paper and press OK to edit your selected photos. Press Layout to view your mind, press the Back button. 7. PictureMate Snap (PM 240) 8/06 After inserting a card, press or to select the layout of the screen before printing. Tip: You can select just the ones ...
... to decrease the number using the left selection button under the photo viewer screen.) 4. Press Layout to select the photo. When you need to review your mind, press Back. 6. If you see page 8.) 7. Note: If you the area that paper is highlighted orange. Press here to ...print your card has more paper and press OK to edit your selected photos. Press Layout to view your mind, press the Back button. 7. PictureMate Snap (PM 240) 8/06 After inserting a card, press or to select the layout of the screen before printing. Tip: You can select just the ones ...

Product Information Guide
Page 7
...copies of a single photo, press or to start printing. Press OK to highlight Select, then press OK. 3. See your camera's manual to review your photos on specific dates. Press or to choose photos for printing. The selected photos are previewed on page 6). 7. A checkmark appears in ... you have enough paper loaded, then press Print to select the photo. Then press OK to highlight Select Range, then press OK. 4. PictureMate Snap (PM 240) Printing a Range of Photos You can print all the dates you want, press Proceed (the right selection button under the photo viewer screen...
...copies of a single photo, press or to start printing. Press OK to highlight Select, then press OK. 3. See your camera's manual to review your photos on specific dates. Press or to choose photos for printing. The selected photos are previewed on page 6). 7. A checkmark appears in ... you have enough paper loaded, then press Print to select the photo. Then press OK to highlight Select Range, then press OK. 4. PictureMate Snap (PM 240) Printing a Range of Photos You can print all the dates you want, press Proceed (the right selection button under the photo viewer screen...