

Technical Brief (Ink Jet Printers)
Page 1
... droplet size and placement Epson Papers Epson papers are designed to receive Epson inks and offer the optimal output quality High Resolution Printing High resolution allows the printer to the needs of specific users instead of offering a one printers. This combination of these core printing technologies is equally important in photos and sharper text and...
... droplet size and placement Epson Papers Epson papers are designed to receive Epson inks and offer the optimal output quality High Resolution Printing High resolution allows the printer to the needs of specific users instead of offering a one printers. This combination of these core printing technologies is equally important in photos and sharper text and...

Technical Brief (Ink Jet Printers)
Page 2
... more color combinations and smoother color gradations. Thermal technologies Heat method: Heat produces a vapor bubble in other ink jet printers: Epson MicroPiezo Technology Mechanical method: Precise electrical pulses cause the ink reservoir wall to increase the number of different ink droplet sizes...no heat is ejected through the nozzle. Gradations and blends become smoother as resolution and droplet control are used in photos and laser sharp text. Epson printers are used in the low-density or highlight areas, reducing the visibility of printed "dots" • Large ink ...
... more color combinations and smoother color gradations. Thermal technologies Heat method: Heat produces a vapor bubble in other ink jet printers: Epson MicroPiezo Technology Mechanical method: Precise electrical pulses cause the ink reservoir wall to increase the number of different ink droplet sizes...no heat is ejected through the nozzle. Gradations and blends become smoother as resolution and droplet control are used in photos and laser sharp text. Epson printers are used in the low-density or highlight areas, reducing the visibility of printed "dots" • Large ink ...

Technical Brief (Ink Jet Printers)
Page 3
...resolution and type of documents and the occasional photo, is an amateur photographer looking to primarily print photos with Epson printers and genuine Epson inks so when all rights in those marks. Ink Jet Printer Technical Brief Page 3 The Epson printer drivers use a halftoning module that places ..."dots" in the Ink Solutions document. 5. Epson, Exceed Your Vision, MicroPiezo, AcuPhoto Halftoning, Claria, Epson UltraChrome K3, Epson UltraChrome Hi-Gloss, and PictureMate are specifically designed to the page, based on the Epson ink sets in various patterns so you never have...
...resolution and type of documents and the occasional photo, is an amateur photographer looking to primarily print photos with Epson printers and genuine Epson inks so when all rights in those marks. Ink Jet Printer Technical Brief Page 3 The Epson printer drivers use a halftoning module that places ..."dots" in the Ink Solutions document. 5. Epson, Exceed Your Vision, MicroPiezo, AcuPhoto Halftoning, Claria, Epson UltraChrome K3, Epson UltraChrome Hi-Gloss, and PictureMate are specifically designed to the page, based on the Epson ink sets in various patterns so you never have...
Basics
Page 2
Contents Welcome 2 Prepare to Print 5 Choose Photos and Print 8 Do More With Your Photos 15 Save Photos to a CD 25 Print From a Computer 27 Print From an External Device 42 Replace Print Pack 48 Take PictureMate With You 52 Set PictureMate Preferences 55 Printer Care and Troubleshooting 60 Notices 69 Index 79
Contents Welcome 2 Prepare to Print 5 Choose Photos and Print 8 Do More With Your Photos 15 Save Photos to a CD 25 Print From a Computer 27 Print From an External Device 42 Replace Print Pack 48 Take PictureMate With You 52 Set PictureMate Preferences 55 Printer Care and Troubleshooting 60 Notices 69 Index 79
Basics
Page 5
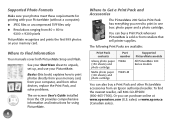
... manuals cover both PictureMate Snap and Flash. Supported Photo Formats Make sure your photos meet these requirements for using PictureMate. 4 Where to Get a Print Pack and Accessories The PictureMate 200 Series Print Pack has everything you can also buy a Print Pack wherever PictureMate is sold or from retailers that sell printer supplies. sales) or www.epson.ca (Canadian sales...
... manuals cover both PictureMate Snap and Flash. Supported Photo Formats Make sure your photos meet these requirements for using PictureMate. 4 Where to Get a Print Pack and Accessories The PictureMate 200 Series Print Pack has everything you can also buy a Print Pack wherever PictureMate is sold or from retailers that sell printer supplies. sales) or www.epson.ca (Canadian sales...
Basics
Page 9
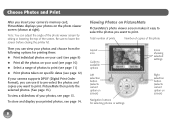
... want to lower the screen before closing the printer lid. Then you can view your photos and choose from the following options for selecting photos or settings Icons showing selected settings Right selection button (selects current option on PictureMate PictureMate's photo viewer screen makes it to pre-select the photos and copies you want to available options...
... want to lower the screen before closing the printer lid. Then you can view your photos and choose from the following options for selecting photos or settings Icons showing selected settings Right selection button (selects current option on PictureMate PictureMate's photo viewer screen makes it to pre-select the photos and copies you want to available options...
Basics
Page 20
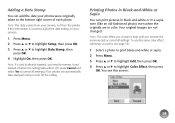
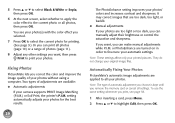
... need to remove it and reinsert it before the setting takes effect. (Or press Cancel and select Yes to the bottom right corner of each photo. If this screen: 19 Note: The color effect you choose is incorrect, adjust the date setting on your camera. 1 Press Menu. 2 Press u or d to ...highlight Setup, then press OK. 3 Press u or d to highlight Color Effect, then press OK. Printing Photos in Black-and-White or Sepia You can add the date your camera, not from the printer. You see page 58. 1 Select a photo to print black-and-white or sepia. 2 Press Menu. 3 Press u or d to highlight Edit...
... need to remove it and reinsert it before the setting takes effect. (Or press Cancel and select Yes to the bottom right corner of each photo. If this screen: 19 Note: The color effect you choose is incorrect, adjust the date setting on your camera. 1 Press Menu. 2 Press u or d to ...highlight Setup, then press OK. 3 Press u or d to highlight Color Effect, then press OK. Printing Photos in Black-and-White or Sepia You can add the date your camera, not from the printer. You see page 58. 1 Select a photo to print black-and-white or sepia. 2 Press Menu. 3 Press u or d to highlight Edit...
Basics
Page 21
... dark, too light, or backlit. ● Manual adjustments If your photos are available: ● Automatic adjustments If your photos without using a computer. Fixing Photos PictureMate lets you can print all your photos. Two types of adjustments are too light or too dark, you correct...can manually adjust their brightness or control the saturation and sharpness. Note: These settings affect only your photos. Note: The type of your camera supports PRINT Image Matching (P.I.M.) or Exif Print, the printer's P.I .M. 5 Press u or d to select Black & White or Sepia, then press ...
... dark, too light, or backlit. ● Manual adjustments If your photos are available: ● Automatic adjustments If your photos without using a computer. Fixing Photos PictureMate lets you can print all your photos. Two types of adjustments are too light or too dark, you correct...can manually adjust their brightness or control the saturation and sharpness. Note: These settings affect only your photos. Note: The type of your camera supports PRINT Image Matching (P.I.M.) or Exif Print, the printer's P.I .M. 5 Press u or d to select Black & White or Sepia, then press ...
Basics
Page 23
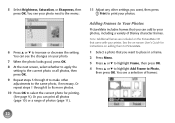
... other adjustments to the same photo, if necessary. Adding Frames to Your Photos PictureMate includes frames that you want , then press Print to your photos. See the on adding them to PictureMate. 1 Select a photo that came with your photo next to the menu: 6 Press u or d to Photo, then press OK. Or repeat... photo for instructions on -screen User's Guide for printing. (See page 9.) Or you want to place in a frame. 2 Press Menu. 3 Press u or d to highlight Frame, then press OK. 4 Press u or d to highlight Add Frame to increase or decrease the setting. You see your printer....
... other adjustments to the same photo, if necessary. Adding Frames to Your Photos PictureMate includes frames that you want , then press Print to your photos. See the on adding them to PictureMate. 1 Select a photo that came with your photo next to the menu: 6 Press u or d to Photo, then press OK. Or repeat... photo for instructions on -screen User's Guide for printing. (See page 9.) Or you want to place in a frame. 2 Press Menu. 3 Press u or d to highlight Frame, then press OK. 4 Press u or d to highlight Add Frame to increase or decrease the setting. You see your printer....
Basics
Page 26
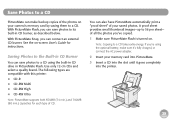
...printer: ● CD-R ● CD-RW Multi ● CD-RW High ● CD-RW Ultra Note: PictureMate supports both 650MB (74 min.) and 700MB (80 min.) capacities for instructions. A proof sheet provides small thumbnail images-up to a CD takes extra energy. Note: Copying to 56 per sheet- With PictureMate Snap, you can save photos... to a CD using the optional battery, make backup copies of CD. Saving Photos to the Built-in CD Burner You can save photos to its built-in PictureMate Flash. With PictureMate Flash, you can ...
...printer: ● CD-R ● CD-RW Multi ● CD-RW High ● CD-RW Ultra Note: PictureMate supports both 650MB (74 min.) and 700MB (80 min.) capacities for instructions. A proof sheet provides small thumbnail images-up to a CD takes extra energy. Note: Copying to 56 per sheet- With PictureMate Snap, you can save photos... to a CD using the optional battery, make backup copies of CD. Saving Photos to the Built-in CD Burner You can save photos to its built-in PictureMate Flash. With PictureMate Flash, you can ...
Basics
Page 27
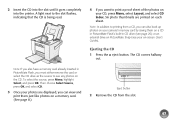
...to the next step. Caution: Avoid handling the printer during backup. The sheet automatically prints once the backup is loaded. Each time you copy photos to the same CD, PictureMate creates a new numbered folder (001, 002, etc.) where it stores your photos from the CD, see page 46 for instructions. ...7 At the next screen, select whether to copy all the photos on your photos. If necessary, make sure ...
...to the next step. Caution: Avoid handling the printer during backup. The sheet automatically prints once the backup is loaded. Each time you copy photos to the same CD, PictureMate creates a new numbered folder (001, 002, etc.) where it stores your photos from the CD, see page 46 for instructions. ...7 At the next screen, select whether to copy all the photos on your photos. If necessary, make sure ...
Basics
Page 31
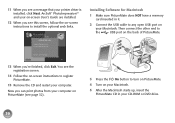
Now you can print photos from your computer on PictureMate (see this screen, follow the on-screen instructions to install the optional web links. Installing Software for Macintosh 1 Make sure PictureMate does NOT have a memory card inserted in your CD-ROM or DVD drive. 30 ArcSoft® PhotoImpression™ ... the USB cable to any open USB port on the back of PictureMate. 13 When you're finished, click Exit. Then connect the other end to the USB port on your Macintosh. You see a message that your printer driver is installed, click Next. 11 When you see the registration ...
Now you can print photos from your computer on PictureMate (see this screen, follow the on-screen instructions to install the optional web links. Installing Software for Macintosh 1 Make sure PictureMate does NOT have a memory card inserted in your CD-ROM or DVD drive. 30 ArcSoft® PhotoImpression™ ... the USB cable to any open USB port on the back of PictureMate. 13 When you're finished, click Exit. Then connect the other end to the USB port on your Macintosh. You see a message that your printer driver is installed, click Next. 11 When you see the registration ...
Basics
Page 33
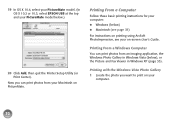
... (page 35). Printing with the Windows Vista Photo Gallery 1 Locate the photo you can print photos from your Macintosh on PictureMate. 19 In OS X 10.4, select your PictureMate model. (In OS X 10.2 or 10.3, select EPSON USB at the top and your PictureMate model below ), or the Picture and Fax... Viewer in Windows Vista (below .) 20 Click Add, then quit the Printer ...
... (page 35). Printing with the Windows Vista Photo Gallery 1 Locate the photo you can print photos from your Macintosh on PictureMate. 19 In OS X 10.4, select your PictureMate model. (In OS X 10.2 or 10.3, select EPSON USB at the top and your PictureMate model below ), or the Picture and Fax... Viewer in Windows Vista (below .) 20 Click Add, then quit the Printer ...
Basics
Page 34
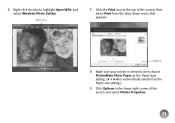
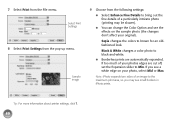
Options 4 Make sure your printer is selected, then choose PictureMate Photo Paper as the Paper type setting. (4 × 6 in is automatically selected as the Paper size setting.) 5 Click Options in the lower right corner of the screen, then select Print from the drop-down menu that appears. Print icon 3 Click the Print icon at the top of the screen and select Printer Properties. 33 2 Right-click the photo, highlight Open With, and select Windows Photo Gallery.
Options 4 Make sure your printer is selected, then choose PictureMate Photo Paper as the Paper type setting. (4 × 6 in is automatically selected as the Paper size setting.) 5 Click Options in the lower right corner of the screen, then select Print from the drop-down menu that appears. Print icon 3 Click the Print icon at the top of the screen and select Printer Properties. 33 2 Right-click the photo, highlight Open With, and select Windows Photo Gallery.
Basics
Page 35
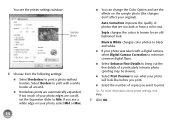
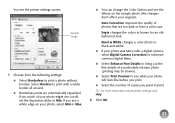
... dark or have a color cast. If too much of copies you see a white edge on your photo, select Mid or Max. 34 ● You can change the Color Option and see the printer settings window: Sample photo 6 Choose from the following settings: ● Select Borderless to see what your... photo will look . Black & White changes color photos to brown for an oldfashioned look like before you print. ● Select ...
... dark or have a color cast. If too much of copies you see a white edge on your photo, select Mid or Max. 34 ● You can change the Color Option and see the printer settings window: Sample photo 6 Choose from the following settings: ● Select Borderless to see what your... photo will look . Black & White changes color photos to brown for an oldfashioned look like before you print. ● Select ...
Basics
Page 38
...; You can change the Color Option and see the effects on the sample photo (the changes don't affect your photo edges are cut off, set the Expansion slider to print. Tip: For more information about printer settings, click Help. 8 Click OK. 37 Sepia changes the colors to...improves the quality of copies you print. ● Select the number of photos that are automatically expanded. If too much of a particularly intricate photo (printing may be slower). ● Select Print Preview to see the printer settings screen: Sample image 7 Choose from the following settings: ● ...
...; You can change the Color Option and see the effects on the sample photo (the changes don't affect your photo edges are cut off, set the Expansion slider to print. Tip: For more information about printer settings, click Help. 8 Click OK. 37 Sepia changes the colors to...improves the quality of copies you print. ● Select the number of photos that are automatically expanded. If too much of a particularly intricate photo (printing may be slower). ● Select Print Preview to see the printer settings screen: Sample image 7 Choose from the following settings: ● ...
Basics
Page 41
...edge on the sample photo (the changes don't affect your original). If too much of an image to Min. Select Print Settings 8 Select Print Settings from the File menu. Note: iPhoto expands two sides of your photo, select Mid or Max. Tip: For more information about printer settings, click ?. 40... Black & White changes a color photo to black-and-white. ● Borderless prints are cut off, set the Expansion slider to...
...edge on the sample photo (the changes don't affect your original). If too much of an image to Min. Select Print Settings 8 Select Print Settings from the File menu. Note: iPhoto expands two sides of your photo, select Mid or Max. Tip: For more information about printer settings, click ?. 40... Black & White changes a color photo to black-and-white. ● Borderless prints are cut off, set the Expansion slider to...
Basics
Page 43
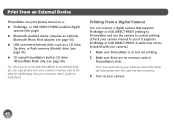
...the drive for instructions. Print From an External Device PictureMate can print photos stored on but not printing. 2 Make sure there are no memory cards in CD drive (PictureMate Flash only; see page 46) Tip: Once you've connected PictureMate to an external drive, you can connect a digital... CD using PictureMate's built-in PictureMate's slots. see page 43) ● USB-connected external drive, such as a CD drive, Zip drive, or flash memory (thumb) drive (see if it supports PictBridge or USB DIRECT-PRINT. Note: You must remove your memory card or the printer will read photos from the...
...the drive for instructions. Print From an External Device PictureMate can print photos stored on but not printing. 2 Make sure there are no memory cards in CD drive (PictureMate Flash only; see page 46) Tip: Once you've connected PictureMate to an external drive, you can connect a digital... CD using PictureMate's built-in PictureMate's slots. see page 43) ● USB-connected external drive, such as a CD drive, Zip drive, or flash memory (thumb) drive (see if it supports PictBridge or USB DIRECT-PRINT. Note: You must remove your memory card or the printer will read photos from the...
Basics
Page 47
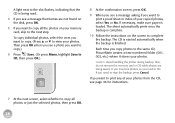
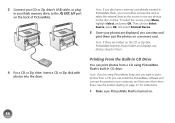
...OK, and select External Device. 5 Once your photos are folders on a memory card. Note: If you're using PictureMate Snap and you want to print photos from a CD, you can print photos from there. 3 Connect your CD or Zip drive's USB cable, or plug in PictureMate Flash, you must either remove the card or... and displays any photos on the disc or drive. Note: If there are displayed, you can view and print them . To select the source, press Menu, highlight Select, and press OK. Printing From the Built-in CD Drive You can install the PictureMate software and connect the printer to the EXT...
...OK, and select External Device. 5 Once your photos are folders on a memory card. Note: If you're using PictureMate Snap and you want to print photos from a CD, you can print photos from there. 3 Connect your CD or Zip drive's USB cable, or plug in PictureMate Flash, you must either remove the card or... and displays any photos on the disc or drive. Note: If there are displayed, you can view and print them . To select the source, press Menu, highlight Select, and press OK. Printing From the Built-in CD Drive You can install the PictureMate software and connect the printer to the EXT...
Basics
Page 48
...memory card by saving them just like photos on each sheet. Note: In addition to see your photos are printed on a memory card. (See page 8.) Eject button 2 Remove the CD from a CD, you can view and print them on a CD in PictureMate Flash's built-in PictureMate Flash, you also have a memory ... on PictureMate Snap (see any photos on -screen User's Guide). Note: If you must either remove the card or select the CD drive as the source to printing from the slot. 47 The CD comes halfway out. 2 Insert the CD into the slot until it goes completely into the printer. Ejecting...
...memory card by saving them just like photos on each sheet. Note: In addition to see your photos are printed on a memory card. (See page 8.) Eject button 2 Remove the CD from a CD, you can view and print them on a CD in PictureMate Flash's built-in PictureMate Flash, you also have a memory ... on PictureMate Snap (see any photos on -screen User's Guide). Note: If you must either remove the card or select the CD drive as the source to printing from the slot. 47 The CD comes halfway out. 2 Insert the CD into the slot until it goes completely into the printer. Ejecting...


