

Technical Brief (Ink Jet Printers)
Page 3
... to the page, based on the same page. Ink System: Epson offers a variety of Seiko Epson Corporation. 4. Additionally, unlike competitive printers tht require special or optional inks, with Epson papers. Epson, Exceed Your Vision, MicroPiezo, AcuPhoto Halftoning, Claria, Epson UltraChrome K3, Epson UltraChrome Hi-Gloss, and PictureMate are registered trademarks or trademarks of ink systems to receive...
... to the page, based on the same page. Ink System: Epson offers a variety of Seiko Epson Corporation. 4. Additionally, unlike competitive printers tht require special or optional inks, with Epson papers. Epson, Exceed Your Vision, MicroPiezo, AcuPhoto Halftoning, Claria, Epson UltraChrome K3, Epson UltraChrome Hi-Gloss, and PictureMate are registered trademarks or trademarks of ink systems to receive...
Basics
Page 2
Contents Welcome 2 Prepare to Print 5 Choose Photos and Print 8 Do More With Your Photos 15 Save Photos to a CD 25 Print From a Computer 27 Print From an External Device 42 Replace Print Pack 48 Take PictureMate With You 52 Set PictureMate Preferences 55 Printer Care and Troubleshooting 60 Notices 69 Index 79
Contents Welcome 2 Prepare to Print 5 Choose Photos and Print 8 Do More With Your Photos 15 Save Photos to a CD 25 Print From a Computer 27 Print From an External Device 42 Replace Print Pack 48 Take PictureMate With You 52 Set PictureMate Preferences 55 Printer Care and Troubleshooting 60 Notices 69 Index 79
Basics
Page 3
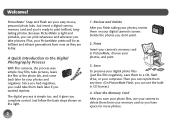
...labs. Review and Delete After you finish taking your photos, review them any time. (On PictureMate Flash, you can print whenever and wherever you have space for your memory card so you...use the builtin CD burner.) 4. Welcome! A Quick Introduction to print brilliant, longlasting photos. Because PictureMate is simple too, and it gives you don't want. 2. buy film, take pictures. The ... photos you complete control. Clear the Memory Card After you wanted reprints. Plus, your PictureMate prints will be as brilliant and vibrant generations from your photos and negatives. Just follow ...
...labs. Review and Delete After you finish taking your photos, review them any time. (On PictureMate Flash, you can print whenever and wherever you have space for your memory card so you...use the builtin CD burner.) 4. Welcome! A Quick Introduction to print brilliant, longlasting photos. Because PictureMate is simple too, and it gives you don't want. 2. buy film, take pictures. The ... photos you complete control. Clear the Memory Card After you wanted reprints. Plus, your PictureMate prints will be as brilliant and vibrant generations from your photos and negatives. Just follow ...
Basics
Page 4
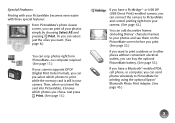
... is still in other places without convenient electrical outlets, you can add decorative frames (including Disney® character frames) to PictureMate for printing using the optional Epson® Bluetooth Photo Print Adapter. (See page 43.) 3 or USB DP (USB Direct Print)-enabled camera, you can ...connect the camera to PictureMate and control printing right from PictureMate-no computer required. (See page 17.) If your camera supports DPOF (Digital ...
... is still in other places without convenient electrical outlets, you can add decorative frames (including Disney® character frames) to PictureMate for printing using the optional Epson® Bluetooth Photo Print Adapter. (See page 43.) 3 or USB DP (USB Direct Print)-enabled camera, you can ...connect the camera to PictureMate and control printing right from PictureMate-no computer required. (See page 17.) If your camera supports DPOF (Digital ...
Basics
Page 5
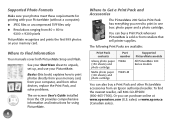
...PictureMate. 4 Where to Get a Print Pack and Accessories The PictureMate...instructions for printing with your PictureMate (without a computer): ●...PictureMate models All PictureMate 200 Series models You can also buy a Print Pack wherever PictureMate...PictureMate. To find the nearest reseller, call 800-GO-EPSON (800-463-7766). Where to unpack, set up, and use your computer, and from other PictureMate accessories from an Epson... authorized reseller. See your memory card. Basics (this book) explains how to 9200 × 9200 pixels PictureMate...
...PictureMate. 4 Where to Get a Print Pack and Accessories The PictureMate...instructions for printing with your PictureMate (without a computer): ●...PictureMate models All PictureMate 200 Series models You can also buy a Print Pack wherever PictureMate...PictureMate. To find the nearest reseller, call 800-GO-EPSON (800-463-7766). Where to unpack, set up, and use your computer, and from other PictureMate accessories from an Epson... authorized reseller. See your memory card. Basics (this book) explains how to 9200 × 9200 pixels PictureMate...
Basics
Page 6
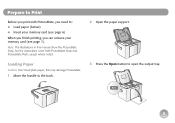
Loading Paper Caution: Don't load plain paper; this manual show the PictureMate Snap, but the instructions cover both PictureMate Snap and PictureMate Flash, except where noted. Prepare to Print Before you print with PictureMate, you can remove your memory card (see page 7). Note: The illustrations in this may damage PictureMate. 1 Move the handle to the back. 2 Open the paper support. 3 Press the Open button to : ● Load paper (below) ● Insert your memory card (see page 6) When you finish printing, you need to open the output tray. 5
Loading Paper Caution: Don't load plain paper; this manual show the PictureMate Snap, but the instructions cover both PictureMate Snap and PictureMate Flash, except where noted. Prepare to Print Before you print with PictureMate, you can remove your memory card (see page 7). Note: The illustrations in this may damage PictureMate. 1 Move the handle to the back. 2 Open the paper support. 3 Press the Open button to : ● Load paper (below) ● Insert your memory card (see page 6) When you finish printing, you need to open the output tray. 5

Basics
Page 7
... at a time. Inserting Your Memory Card 1 Press the On button to turn on the next page. When the card is in all the way). Note: PictureMate can't read multiple cards at once. 4 Push the card in carefully until it stops (it flat in a dry area to prevent curling. See page 48... for more paper, order a PictureMate 200 Series Print Pack. Note: When you may lose photos on and begins to open the output tray, if necessary. 3 Insert the memory card into...
... at a time. Inserting Your Memory Card 1 Press the On button to turn on the next page. When the card is in all the way). Note: PictureMate can't read multiple cards at once. 4 Push the card in carefully until it stops (it flat in a dry area to prevent curling. See page 48... for more paper, order a PictureMate 200 Series Print Pack. Note: When you may lose photos on and begins to open the output tray, if necessary. 3 Insert the memory card into...
Basics
Page 9
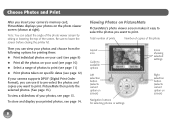
Choose Photos and Print After you want to print. Then you want to print. PictureMate then prints the selected photos. (See page 13.) To view a slideshow of photos to print (see page 11) ● Print photos taken on specific dates (...) Navigation buttons for printing them: ● Print individual photos on your photos, see page 14. Viewing Photos on PictureMate PictureMate's photo viewer screen makes it to select the photos you insert your camera's memory card, PictureMate displays your photos on your card (see page 10) ● Select a range of your card (see page...
Choose Photos and Print After you want to print. Then you want to print. PictureMate then prints the selected photos. (See page 13.) To view a slideshow of photos to print (see page 11) ● Print photos taken on specific dates (...) Navigation buttons for printing them: ● Print individual photos on your photos, see page 14. Viewing Photos on PictureMate PictureMate's photo viewer screen makes it to select the photos you insert your camera's memory card, PictureMate displays your photos on your card (see page 10) ● Select a range of your card (see page...
Basics
Page 10
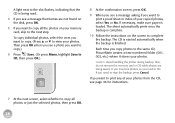
... the ones you want , press OK to edit your photos. 2 When you see page 55). Note: You can select how many photos are not using PictureMate, the screen goes dark after about 13 minutes to view your photo, see page 15 for printing. If you've set the screen to display...
... the ones you want , press OK to edit your photos. 2 When you see page 55). Note: You can select how many photos are not using PictureMate, the screen goes dark after about 13 minutes to view your photo, see page 15 for printing. If you've set the screen to display...
Basics
Page 14
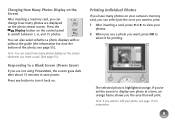
...on your memory card, then returns to select it to pre-select which photos and how many copies you have PictureMate display all the photos on the screen. PictureMate displays all the photos on your card one by pressing Stop or Cancel. Then press OK to the photo ... d to highlight Select, then press OK. 3 Press u or d to choose photos for printing. 13 PictureMate automatically reads your pre-selected photos. After a few moments, the slideshow begins. See your memory card in PictureMate. Press Proceed to continue. ● If you see a photo you want to print, you can use it...
...on your memory card, then returns to select it to pre-select which photos and how many copies you have PictureMate display all the photos on the screen. PictureMate displays all the photos on your card one by pressing Stop or Cancel. Then press OK to the photo ... d to highlight Select, then press OK. 3 Press u or d to choose photos for printing. 13 PictureMate automatically reads your pre-selected photos. After a few moments, the slideshow begins. See your memory card in PictureMate. Press Proceed to continue. ● If you see a photo you want to print, you can use it...
Basics
Page 15
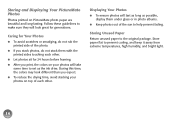
Store paper flat to the original package. Storing and Displaying Your PictureMate Photos Photos printed on your photos on top of the sun to set as possible, display them with the printed sides touching each other . ● ... time to help prevent fading. During this time, the colors may look great for 24 hours before framing. ● After you print, the colors on PictureMate photo paper are beautiful and long-lasting. Storing Unused Paper Return unused paper to prevent curling, and keep it away from extreme temperatures, high humidity...
Store paper flat to the original package. Storing and Displaying Your PictureMate Photos Photos printed on your photos on top of the sun to set as possible, display them with the printed sides touching each other . ● ... time to help prevent fading. During this time, the colors may look great for 24 hours before framing. ● After you print, the colors on PictureMate photo paper are beautiful and long-lasting. Storing Unused Paper Return unused paper to prevent curling, and keep it away from extreme temperatures, high humidity...
Basics
Page 17
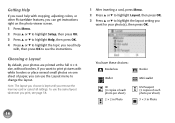
... press OK. 3 Press u or d to highlight Help, then press OK. 4 Press u or d to highlight the topic you need help with cropping, adjusting colors, or other PictureMate features, you can get instructions right on one sheet of each photo per sheet) 3 × 3 in Photo Border Mini-wallet US Passport (2 copies of paper...
... press OK. 3 Press u or d to highlight Help, then press OK. 4 Press u or d to highlight the topic you need help with cropping, adjusting colors, or other PictureMate features, you can get instructions right on one sheet of each photo per sheet) 3 × 3 in Photo Border Mini-wallet US Passport (2 copies of paper...
Basics
Page 18
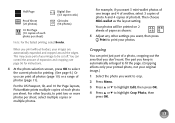
... without borders, your image to be printed on 2 sheets of paper as the layout setting. For the US Passport, ID, and 10 Per Page layouts, PictureMate prints multiple copies of each photo per sheet) Note: For the fastest printing, select Border. For example, if you don't want 3 mini-wallet photos of...
... without borders, your image to be printed on 2 sheets of paper as the layout setting. For the US Passport, ID, and 10 Per Page layouts, PictureMate prints multiple copies of each photo per sheet) Note: For the fastest printing, select Border. For example, if you don't want 3 mini-wallet photos of...
Basics
Page 21
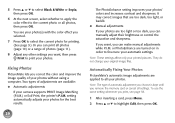
Fixing Photos PictureMate lets you correct the color and improve the image quality of your automatic settings. If you want , then press Print to print your camera supports ... use the same setting whenever you print, see your photo(s) with the color effect you can print all your printed pictures. Automatically Fixing Your Photos PictureMate's automatic image adjustments are available: ● Automatic adjustments If your photos. setting automatically adjusts your photos for printing. (See page 9.) Or you want , you remove...
Fixing Photos PictureMate lets you correct the color and improve the image quality of your automatic settings. If you want , then press Print to print your camera supports ... use the same setting whenever you print, see your photo(s) with the color effect you can print all your printed pictures. Automatically Fixing Your Photos PictureMate's automatic image adjustments are available: ● Automatic adjustments If your photos. setting automatically adjusts your photos for printing. (See page 9.) Or you want , you remove...
Basics
Page 23
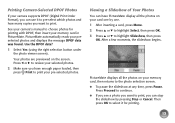
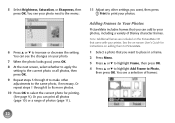
... Adjust any other adjustments to select the current photo for instructions on your photos. You see a selection of frames: 22 Adding Frames to Your Photos PictureMate includes frames that you want , then press Print to print your photo. 7 When the photo looks good, press OK. 8 At the next screen, ... a range of Disney character frames. See the on-screen User's Guide for printing. (See page 9.) Or you can see the changes on adding them to PictureMate. 1 Select a photo that came with your photo next to the menu: 6 Press u or d to Photo, then press OK. Or repeat steps 1 through 8 to ...
... Adjust any other adjustments to select the current photo for instructions on your photos. You see a selection of frames: 22 Adding Frames to Your Photos PictureMate includes frames that you want , then press Print to print your photo. 7 When the photo looks good, press OK. 8 At the next screen, ... a range of Disney character frames. See the on-screen User's Guide for printing. (See page 9.) Or you can see the changes on adding them to PictureMate. 1 Select a photo that came with your photo next to the menu: 6 Press u or d to Photo, then press OK. Or repeat steps 1 through 8 to ...
Basics
Page 24
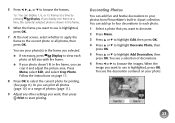
5 Press l, r, u, or d to your photos from PictureMate's built-in clipart collection. Follow the instructions on your photo: 23 You see a selection of photos (page 11). 9 Adjust any other settings you want to ...
5 Press l, r, u, or d to your photos from PictureMate's built-in clipart collection. Follow the instructions on your photo: 23 You see a selection of photos (page 11). 9 Adjust any other settings you want to ...
Basics
Page 25
Your photo is rotated on PictureMate's photo viewer screen. 7 Adjust the size and position of the decoration: ● Press Zoom In to make it larger. ● Press Zoom Out to make ...
Your photo is rotated on PictureMate's photo viewer screen. 7 Adjust the size and position of the decoration: ● Press Zoom In to make it larger. ● Press Zoom Out to make ...
Basics
Page 26
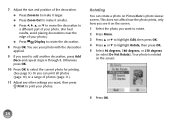
... photos to a CD using the optional battery, make backup copies of the photos on -screen User's Guide for each type of your saved photos. With PictureMate Snap, you 're using the built-in CD drive in CD burner, as described below. If you can connect an external CD burner. Save Photos to... printer. 25 The following types are compatible with this printer: ● CD-R ● CD-RW Multi ● CD-RW High ● CD-RW Ultra Note: PictureMate supports both 650MB (74 min.) and 700MB (80 min.) capacities for instructions. See the on your camera's memory card by saving them to a CD. Use...
... photos to a CD using the optional battery, make backup copies of the photos on -screen User's Guide for each type of your saved photos. With PictureMate Snap, you 're using the built-in CD drive in CD burner, as described below. If you can connect an external CD burner. Save Photos to... printer. 25 The following types are compatible with this printer: ● CD-R ● CD-RW Multi ● CD-RW High ● CD-RW Ultra Note: PictureMate supports both 650MB (74 min.) and 700MB (80 min.) capacities for instructions. See the on your camera's memory card by saving them to a CD. Use...
Basics
Page 27
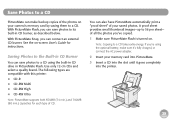
The sheet automatically prints once the backup is complete. 10 Follow the instructions on the screen to the same CD, PictureMate creates a new numbered folder (001, 002, etc.) where it stores your photos. Each time you copy photos to complete the backup. If you want to ...
The sheet automatically prints once the backup is complete. 10 Follow the instructions on the screen to the same CD, PictureMate creates a new numbered folder (001, 002, etc.) where it stores your photos. Each time you copy photos to complete the backup. If you want to ...
Basics
Page 28
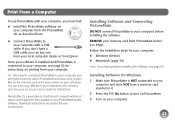
... to your computer before you begin. Installing Software and Connecting PictureMate DO NOT connect PictureMate to check Epson's support website at epson.com/support for instructions on printing from your computer from Epson. Once your software is installed and PictureMate is NOT connected to your computer with your computer, you..., you have problems installing the software, see page 32 for free updates to the memory card. Tip: Once you've connected PictureMate to your computer, see page 65. REMOVE your memory card from your computer to your computer. 27 If you don't have...
... to your computer before you begin. Installing Software and Connecting PictureMate DO NOT connect PictureMate to check Epson's support website at epson.com/support for instructions on printing from your computer from Epson. Once your software is installed and PictureMate is NOT connected to your computer with your computer, you..., you have problems installing the software, see page 32 for free updates to the memory card. Tip: Once you've connected PictureMate to your computer, see page 65. REMOVE your memory card from your computer to your computer. 27 If you don't have...

