Basics
Page 5
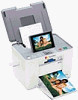
... Start Here sheet to unpack, set up your PictureMate Dash or Zoom and print -no computer required! sales) or www.epson.ca (Canadian sales). Supported Photo Formats Make sure your photos meet these requirements for printing with all the way right, to Find Information Your manuals cover both PictureMate Dash and Zoom. To print from the outside of...
... Start Here sheet to unpack, set up your PictureMate Dash or Zoom and print -no computer required! sales) or www.epson.ca (Canadian sales). Supported Photo Formats Make sure your photos meet these requirements for printing with all the way right, to Find Information Your manuals cover both PictureMate Dash and Zoom. To print from the outside of...
Basics
Page 7
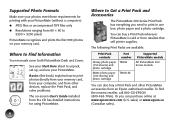
this manual show PictureMate Dash, but the instructions cover both PictureMate Dash and PictureMate Zoom, except where noted. Loading Paper Caution: Don't load plain paper; Note: The illustrations in this may damage PictureMate. 1 Move the handle to the back. 2 Open the paper support. 3 Press the corner of the output tray to : ● Load paper (below) ● Insert your memory card (see page 7) When you finish printing, you can remove your memory card (see page 8). Prepare to Print Before you print with PictureMate, you need to open it. 6
this manual show PictureMate Dash, but the instructions cover both PictureMate Dash and PictureMate Zoom, except where noted. Loading Paper Caution: Don't load plain paper; Note: The illustrations in this may damage PictureMate. 1 Move the handle to the back. 2 Open the paper support. 3 Press the corner of the output tray to : ● Load paper (below) ● Insert your memory card (see page 7) When you finish printing, you can remove your memory card (see page 8). Prepare to Print Before you print with PictureMate, you need to open it. 6
Basics
Page 14
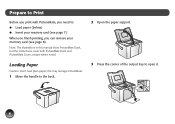
... at any time, press Back or Stop/Clear. ● If you see a photo you want to change any print settings from the defaults, press Menu. See your camera's manual to choose photos for instructions. 3 Make sure you have PictureMate display all the photos on your memory card one by one. 1 After inserting a card, press Menu...
... at any time, press Back or Stop/Clear. ● If you see a photo you want to change any print settings from the defaults, press Menu. See your camera's manual to choose photos for instructions. 3 Make sure you have PictureMate display all the photos on your memory card one by one. 1 After inserting a card, press Menu...

Basics
Page 20
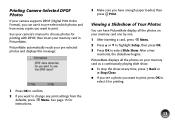
... camera supports PRINT Image Matching® (P.I.M.) or Exif Print, the printer's P.I .M. You can make manual adjustments while P.I .M. Note: These settings affect only your photos in order to highlight Fix Photos, then press OK. 19 Two types of adjustments are too light ... Landscape, or Night scene. They do not change your photos' colors and increases contrast and sharpness. Fixing Photos PictureMate lets you correct the color and improve the image quality of your automatic settings. If your photos are available: ● Automatic adjustments The Enhance setting, which...
... camera supports PRINT Image Matching® (P.I.M.) or Exif Print, the printer's P.I .M. You can make manual adjustments while P.I .M. Note: These settings affect only your photos in order to highlight Fix Photos, then press OK. 19 Two types of adjustments are too light ... Landscape, or Night scene. They do not change your photos' colors and increases contrast and sharpness. Fixing Photos PictureMate lets you correct the color and improve the image quality of your automatic settings. If your photos are available: ● Automatic adjustments The Enhance setting, which...

Basics
Page 21
... The setting you select applies to all your photos' colors and increases contrast and sharpness. If you see the AUTO icon on your memory card. 1 Select a photo that include P.I.M. (PRINT Image Matching) or Exif Print data. ● None: Prints photos as is or bypasses P.I .M.: This information... helps ensure an accurate image reproduction for files that you about the setting. You can manually fix individual photos or fix all photos in the current print job. 20 If you select Enhance, you are too dark, too bright, or backlit. (Enhance is...
... The setting you select applies to all your photos' colors and increases contrast and sharpness. If you see the AUTO icon on your memory card. 1 Select a photo that include P.I.M. (PRINT Image Matching) or Exif Print data. ● None: Prints photos as is or bypasses P.I .M.: This information... helps ensure an accurate image reproduction for files that you about the setting. You can manually fix individual photos or fix all photos in the current print job. 20 If you select Enhance, you are too dark, too bright, or backlit. (Enhance is...

Basics
Page 29
...USB-connected external drive, such as a CD drive, Zip drive, or flash memory (thumb) drive (see page 32) Tip: Once you've connected PictureMate to an external drive, you can copy photos from a camera. 3 Turn on a: ● PictBridge- Note: You must remove your memory card or the printer will read photos...safekeeping. Print From an External Device PictureMate can connect a digital camera that supports PictBridge or USB DIRECT-PRINT printing to PictureMate and use the camera to control printing. (Check your camera manual to see if it supports PictBridge or USB DIRECT-PRINT. see page 29)...
...USB-connected external drive, such as a CD drive, Zip drive, or flash memory (thumb) drive (see page 32) Tip: Once you've connected PictureMate to an external drive, you can copy photos from a camera. 3 Turn on a: ● PictBridge- Note: You must remove your memory card or the printer will read photos...safekeeping. Print From an External Device PictureMate can connect a digital camera that supports PictBridge or USB DIRECT-PRINT printing to PictureMate and use the camera to control printing. (Check your camera manual to see if it supports PictBridge or USB DIRECT-PRINT. see page 29)...

Basics
Page 30
...photos from a CD that you need to a computer, disconnect it or turn off the computer. 29 I/F port on PictureMate. (See your camera before inserting a memory card in JPEG or uncompressed Tiff file format. 4 Connect your camera's USB cable to the back of PictureMate.... Some CDs may not work.) 1 Make sure PictureMate is connected to adjust any print ...an External Drive 5 Use your camera's controls to select and print photos on the back of PictureMate and print just like you do when you insert a memory card...
...photos from a CD that you need to a computer, disconnect it or turn off the computer. 29 I/F port on PictureMate. (See your camera before inserting a memory card in JPEG or uncompressed Tiff file format. 4 Connect your camera's USB cable to the back of PictureMate.... Some CDs may not work.) 1 Make sure PictureMate is connected to adjust any print ...an External Drive 5 Use your camera's controls to select and print photos on the back of PictureMate and print just like you do when you insert a memory card...
Basics
Page 39
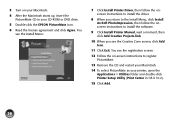
... Utility (Print Center in your Macintosh. 4 After the Macintosh starts up, insert the PictureMate CD in OS X 10.2). 15 Click Add. 38 You see the Install Menu: 7 Click Install Printer Driver, then follow the onscreen instructions to install the driver. 8 When you return to the Install ... onscreen instructions to install the software. 9 Click Install Printer Manual, wait a moment, then click Add Creative Projects link. 10 When you see the registration screen. 12 Follow the on your CD-ROM or DVD drive. 5 Double-click the EPSON PictureMate icon. 6 Read the license agreement and click Agree....
... Utility (Print Center in your Macintosh. 4 After the Macintosh starts up, insert the PictureMate CD in OS X 10.2). 15 Click Add. 38 You see the Install Menu: 7 Click Install Printer Driver, then follow the onscreen instructions to install the driver. 8 When you return to the Install ... onscreen instructions to install the software. 9 Click Install Printer Manual, wait a moment, then click Add Creative Projects link. 10 When you see the registration screen. 12 Follow the on your CD-ROM or DVD drive. 5 Double-click the EPSON PictureMate icon. 6 Read the license agreement and click Agree....

Basics
Page 67
... be damp. See page 49 to replace it is not set to the edge of PictureMate. ● Make sure the handle is faint or has gaps in your photo are wrong or missing. ● Make sure the Color Effect setting is , load new paper with the glossy or whiter side up ). Load ...it . Your print is not resting on the Enhance or P.I.M. See page 19. ● Try manually adjusting the brightness, saturation, or sharpness. Problems With Paper Feeding Paper doesn't eject fully or is wrinkled. Let each photo from the top of the paper, but don't make them too tight. Wait for a minute before...
... be damp. See page 49 to replace it is not set to the edge of PictureMate. ● Make sure the handle is faint or has gaps in your photo are wrong or missing. ● Make sure the Color Effect setting is , load new paper with the glossy or whiter side up ). Load ...it . Your print is not resting on the Enhance or P.I.M. See page 19. ● Try manually adjusting the brightness, saturation, or sharpness. Problems With Paper Feeding Paper doesn't eject fully or is wrinkled. Let each photo from the top of the paper, but don't make them too tight. Wait for a minute before...
Basics
Page 84
...settings, 17 to 18 Windows, 44 Lever, cartridge, 50 to 52 License agreement, 35, 38 Lights memory card, 7 to 8 On, 63, 69 Lines in photos, fixing, 60 to 61, 65 Loading paper, 6 to 7, 67 Lock, cartridge, 50 to 52 M Macintosh basic printing, 46 to 48 Bluetooth printing, 31 ... Printer Setup Utility, 38 to 39 Maintenance, 60 to 63 Manuals, 4, 36, 38 Margins incorrect, 21 to 22, 67 selecting, 17 to 18 Memory card adapters, 8 compatibility, 8 light, 7 to 8 problems, 64 removing, 8, 34 Menu button, 15 to 26 Mini-wallet photos, 17 to 18 Missing colors, 66 N Network installation, 65 Noise, PictureMate,...
...settings, 17 to 18 Windows, 44 Lever, cartridge, 50 to 52 License agreement, 35, 38 Lights memory card, 7 to 8 On, 63, 69 Lines in photos, fixing, 60 to 61, 65 Loading paper, 6 to 7, 67 Lock, cartridge, 50 to 52 M Macintosh basic printing, 46 to 48 Bluetooth printing, 31 ... Printer Setup Utility, 38 to 39 Maintenance, 60 to 63 Manuals, 4, 36, 38 Margins incorrect, 21 to 22, 67 selecting, 17 to 18 Memory card adapters, 8 compatibility, 8 light, 7 to 8 problems, 64 removing, 8, 34 Menu button, 15 to 26 Mini-wallet photos, 17 to 18 Missing colors, 66 N Network installation, 65 Noise, PictureMate,...
Start Here
Page 6
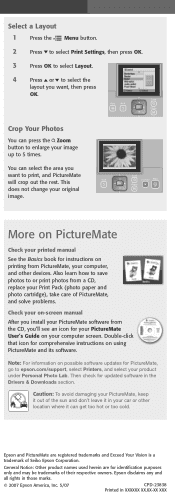
...product under Personal Photo Lab. You can select the area you want , then press OK. Double-click that icon for identification purposes only and may be trademarks of PictureMate, and solve problems. Check your on-screen manual After you install your PictureMate software from PictureMate, your computer screen. Epson disclaims any and...of the sun and don't leave it can press the Zoom button to enlarge your original image. Also learn how to save photos to epson.com/support, select Printers, and select your car or other devices. Crop Your Photos You can get too hot or too cold.
...product under Personal Photo Lab. You can select the area you want , then press OK. Double-click that icon for identification purposes only and may be trademarks of PictureMate, and solve problems. Check your on-screen manual After you install your PictureMate software from PictureMate, your computer screen. Epson disclaims any and...of the sun and don't leave it can press the Zoom button to enlarge your original image. Also learn how to save photos to epson.com/support, select Printers, and select your car or other devices. Crop Your Photos You can get too hot or too cold.


