
Owners Manual
Page 2
...; Projector Lens Cover with string · Remote Control · 2AA Batteries for the remote control (three-cell alkaline manganese batteries) The NL model is not fitted with a lens or lens cover. · Power Cord · Computer Cable · Computer Cable (mini D-Sub 15-pin/5BNC) · Audio Cable · RCA Audio Cable · RCA Audio Cable · Main Cable (Yellow) (Red/White) · USB Mouse Cable · PS/2 Mouse Cable · Serial Mouse Cable · Mac Mouse Cable PS/2 MOUSE SERIAL MOUSE MAC MOUSE...
...; Projector Lens Cover with string · Remote Control · 2AA Batteries for the remote control (three-cell alkaline manganese batteries) The NL model is not fitted with a lens or lens cover. · Power Cord · Computer Cable · Computer Cable (mini D-Sub 15-pin/5BNC) · Audio Cable · RCA Audio Cable · RCA Audio Cable · Main Cable (Yellow) (Red/White) · USB Mouse Cable · PS/2 Mouse Cable · Serial Mouse Cable · Mac Mouse Cable PS/2 MOUSE SERIAL MOUSE MAC MOUSE...
Owners Manual
Page 17
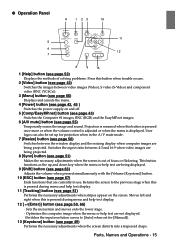
... 10 Power Help Menu Esc Sync. Parts, Names and Operations - 15 Projection is resumed when this button is pressed once more or when the volume control is adjusted or when the menu is pressed during menu and help text are not displayed. (Switches the input resolution across to the previous stage when this is out of solving problems. Press this is displayed. Switches the aspect ratio between 4:3 and 16:9 when video images...
... 10 Power Help Menu Esc Sync. Parts, Names and Operations - 15 Projection is resumed when this button is pressed once more or when the volume control is adjusted or when the menu is pressed during menu and help text are not displayed. (Switches the input resolution across to the previous stage when this is out of solving problems. Press this is displayed. Switches the aspect ratio between 4:3 and 16:9 when video images...

Owners Manual
Page 18
... Port This is used during stack projection. 16 - Outputs only the sound for Computer #1 across to either mini D-Sub15 (analog) or DVI-D (digital). Parts, Names and Operations G I/O Ports 321 Computer 1 5 6 10 8 12 Computer 2 /Component Video R/Cr/Pr G/Y B/Cb/Pb H/C Sync V Sync Remote Mouse/Com Audio S-Video S-Audio/Audio2 Video L-Audio-R Monitor Out Stack Out 4 7 11 9 13 1 Computer 1 mini D-Sub 15 Port Inputs the computer's analog image signals. 2 Change-over Switch Switches the valid port for connected...
... Port This is used during stack projection. 16 - Outputs only the sound for Computer #1 across to either mini D-Sub15 (analog) or DVI-D (digital). Parts, Names and Operations G I/O Ports 321 Computer 1 5 6 10 8 12 Computer 2 /Component Video R/Cr/Pr G/Y B/Cb/Pb H/C Sync V Sync Remote Mouse/Com Audio S-Video S-Audio/Audio2 Video L-Audio-R Monitor Out Stack Out 4 7 11 9 13 1 Computer 1 mini D-Sub 15 Port Inputs the computer's analog image signals. 2 Change-over Switch Switches the valid port for connected...

Owners Manual
Page 20
...-screen will be used for approximately ten seconds. 8 [Power] button (see page 58, 62) Enlarges and reduces the size of the image. Press the [ESC] key to cancel the freeze mode. 4 [A/V Mute] button (see page 42, 46) Switches the remote control unit on and off. Parts, Names and Operations Remote Control G Front Panel 1 2 3 4 5 6 7 Freeze A/V Mute E-Zoom Power R/C ON OFF 3 2 5 4 1 Enter Esc 8 9 10 11 1 Remote control light-receiving area Outputs the remote control unit's signals. 2 Indicator...
...-screen will be used for approximately ten seconds. 8 [Power] button (see page 58, 62) Enlarges and reduces the size of the image. Press the [ESC] key to cancel the freeze mode. 4 [A/V Mute] button (see page 42, 46) Switches the remote control unit on and off. Parts, Names and Operations Remote Control G Front Panel 1 2 3 4 5 6 7 Freeze A/V Mute E-Zoom Power R/C ON OFF 3 2 5 4 1 Enter Esc 8 9 10 11 1 Remote control light-receiving area Outputs the remote control unit's signals. 2 Indicator...
Owners Manual
Page 29
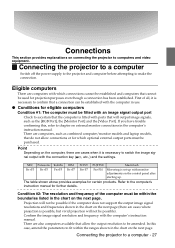
... connection. I Connecting the projector to a computer Switch off the power supply to the projector and computer before attempting to computers and video equipment. The table shown above provides examples for projection purposes even though a connection has been established. Confirm the image signal resolution and frequency with monitor adjustments on the next page (there are computers, such as combined computer/monitor models and laptop models, that will output image signals...
... connection. I Connecting the projector to a computer Switch off the power supply to the projector and computer before attempting to computers and video equipment. The table shown above provides examples for projection purposes even though a connection has been established. Confirm the image signal resolution and frequency with monitor adjustments on the next page (there are computers, such as combined computer/monitor models and laptop models, that will output image signals...

Owners Manual
Page 37
... supported. Operations cannot be guaranteed on upgraded Windows 98/2000 environments. · Only a computer mouse connected to the mouse/com port can be used. · The mouse cannot be used when the effect function is in progress. · There are cases where certain settings must be operated with the remote control in order to use PS/2 mouse cable (supplied) Serial mouse cable (supplied) USB mouse cable (supplied) MAC mouse cable (supplied) USB mouse cable (supplied) Mouse/COM Port...
... supported. Operations cannot be guaranteed on upgraded Windows 98/2000 environments. · Only a computer mouse connected to the mouse/com port can be used. · The mouse cannot be used when the effect function is in progress. · There are cases where certain settings must be operated with the remote control in order to use PS/2 mouse cable (supplied) Serial mouse cable (supplied) USB mouse cable (supplied) MAC mouse cable (supplied) USB mouse cable (supplied) Mouse/COM Port...

Owners Manual
Page 45
... blinking in P Preset - Point · Set the date and time when the EasyMP.net default setting screen is set will be displayed. Tracking Sync. A message stating "No Image Signals Input" will be displayed (there are being input. The initial setup screen on the settings). (see page 70) The image will be displayed. Keystone Shift Volume Tracking Comp1 Esc Menu Help Comp1 Comp2/YCbCr Capture Auto Video APPs Resize P in green. 2 Select the Port to switch the input source. Press the port button connected...
... blinking in P Preset - Point · Set the date and time when the EasyMP.net default setting screen is set will be displayed. Tracking Sync. A message stating "No Image Signals Input" will be displayed (there are being input. The initial setup screen on the settings). (see page 70) The image will be displayed. Keystone Shift Volume Tracking Comp1 Esc Menu Help Comp1 Comp2/YCbCr Capture Auto Video APPs Resize P in green. 2 Select the Port to switch the input source. Press the port button connected...

Owners Manual
Page 66
...Color : 0 Tint : 0 Sharpness : 0 Gamma : Dynamic Normal Natural Smooth Motion : ON OFF Video Signal Select [Auto ] Reset Execute :Select :Enter Image menu - Brightness Contrast Sharpness Gamma Dynamic Resolution Preset Reset :Select :Enter Adjustment : 9999 : 99 : 0 : 0 : 0 : Normal Natural : Auto Manual [ Select Execute Select ] Image menu · Computer (D-Sub 15/BNC) Video Audio Effect Setting Capture Advanced About Reset All Position Tracking Sync. Menu Configuration Also, the image menu will differ in accordance with the input source (connected...
...Color : 0 Tint : 0 Sharpness : 0 Gamma : Dynamic Normal Natural Smooth Motion : ON OFF Video Signal Select [Auto ] Reset Execute :Select :Enter Image menu - Brightness Contrast Sharpness Gamma Dynamic Resolution Preset Reset :Select :Enter Adjustment : 9999 : 99 : 0 : 0 : 0 : Normal Natural : Auto Manual [ Select Execute Select ] Image menu · Computer (D-Sub 15/BNC) Video Audio Effect Setting Capture Advanced About Reset All Position Tracking Sync. Menu Configuration Also, the image menu will differ in accordance with the input source (connected...
Owners Manual
Page 67
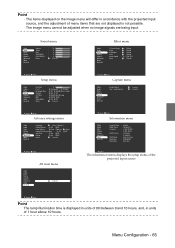
... menu Video Audio Effect Setting Capture Advanced About Reset All Lamp ON Time Video Source Frequency SYNC Polarity SYNC Mode Resolution Refresh Rate : 9999 H : Computer1 : H 999. 99 KHz : V 999. 99 Hz : H Positive : V Negative : Sync On Green : 9999x9999 : 999. 9 Hz :Select The information menu displays the setup status of the projected input source :Select :Enter Point The lamp illumination time is displayed in units of 0H between 0 and 10 hours, and, in accordance with the projected input source, and the adjustment...
... menu Video Audio Effect Setting Capture Advanced About Reset All Lamp ON Time Video Source Frequency SYNC Polarity SYNC Mode Resolution Refresh Rate : 9999 H : Computer1 : H 999. 99 KHz : V 999. 99 Hz : H Positive : V Negative : Sync On Green : 9999x9999 : 999. 9 Hz :Select The information menu displays the setup status of the projected input source :Select :Enter Point The lamp illumination time is displayed in units of 0H between 0 and 10 hours, and, in accordance with the projected input source, and the adjustment...

Owners Manual
Page 68
... Capture Auto Video APPs Resize P in accordance with the projected input source. Press the [Sync +, -] button on the projector (lower the [Enter] button up or down on the remote control unit) to select the sub item. Operation method 1 Press the [Menu] button. Menu Power Help Comp/ Video Menu Esc Sync. Press the [Sync +, -] button on the projector (lower the [Enter] button up or down on the remote control unit) to select the required item. The items displayed...
... Capture Auto Video APPs Resize P in accordance with the projected input source. Press the [Sync +, -] button on the projector (lower the [Enter] button up or down on the remote control unit) to select the sub item. Operation method 1 Press the [Menu] button. Menu Power Help Comp/ Video Menu Esc Sync. Press the [Sync +, -] button on the projector (lower the [Enter] button up or down on the remote control unit) to select the required item. The items displayed...

Owners Manual
Page 70
... for video images. Manual : Press the [Enter] button and select the required set up , down, left and right. Normal Sets the input resolution. Auto : Automatically adjusts the input resolution. Menu Operations Dynamic: Produces an image with natural tint. Audio It is to save the current computer input signal adjustment values (input resolution, tracking, synchronization signals, Brightness, Contrast, Sharpness, Gamma display position). Depends on the connection signals Adjusts disturbance, blurring and vertical noise that appears 0 on the adjustment screen...
... for video images. Manual : Press the [Enter] button and select the required set up , down, left and right. Normal Sets the input resolution. Auto : Automatically adjusts the input resolution. Menu Operations Dynamic: Produces an image with natural tint. Audio It is to save the current computer input signal adjustment values (input resolution, tracking, synchronization signals, Brightness, Contrast, Sharpness, Gamma display position). Depends on the connection signals Adjusts disturbance, blurring and vertical noise that appears 0 on the adjustment screen...

Owners Manual
Page 73
... to view images saved onto the memory card and copy them onto computers connected to the yardstick value. · The black level and white level settings are only used when multiple projectors are being projected. Adjusts the color temperature* of time to the default - Press the [Enter] button and select the required language from the color setting menu displayed. · Set the color temperature value to the network with which messages are being input...
... to view images saved onto the memory card and copy them onto computers connected to the yardstick value. · The black level and white level settings are only used when multiple projectors are being projected. Adjusts the color temperature* of time to the default - Press the [Enter] button and select the required language from the color setting menu displayed. · Set the color temperature value to the network with which messages are being input...

Owners Manual
Page 74
... all advanced setting menu adjustment values to the default values. Perform the reset procedure after the lamp has been replaced. (see page 97) · The image menu and information displayed will be adjusted. · The information menu displays the status of the input source settings being projected. · If a message stating [Image capture failed] is required to project images onto a half-transparent screen OFF from the ceiling. Set at [ON] to suspend the projector from the...
... all advanced setting menu adjustment values to the default values. Perform the reset procedure after the lamp has been replaced. (see page 97) · The image menu and information displayed will be adjusted. · The information menu displays the status of the input source settings being projected. · If a message stating [Image capture failed] is required to project images onto a half-transparent screen OFF from the ceiling. Set at [ON] to suspend the projector from the...

Owners Manual
Page 95
EMP Link V will not cease operations. Select a COM port number that the Operation Indicator is not being used by pressing the [Power] button. G Were the connections established with your dealer. When the Indicators Provide No Help - 93 G Did installation end normally? G The fan will not function G Are the connection settings correct? Re-install if not. Reboot the computer. Point If an abnormality remains after checking the results of time required...
EMP Link V will not cease operations. Select a COM port number that the Operation Indicator is not being used by pressing the [Power] button. G Were the connections established with your dealer. When the Indicators Provide No Help - 93 G Did installation end normally? G The fan will not function G Are the connection settings correct? Re-install if not. Reboot the computer. Point If an abnormality remains after checking the results of time required...

Owners Manual
Page 96
... maintenance procedures. Cleaning the projector, Cleaning the lens, Cleaning the Air Filter Please clean the air filter about every 100 hours of the projector, replacing consumable items and other injuries. Warning · Personnel other tasks. · Exercise caution when handling the Power Plug and Power Connector. Failure to connect plugs and connectors with wet hands. Failure to cleaning any part of the projector. 94 - Switch off . · Disconnect the Power Plug and Power Connector from...
... maintenance procedures. Cleaning the projector, Cleaning the lens, Cleaning the Air Filter Please clean the air filter about every 100 hours of the projector, replacing consumable items and other injuries. Warning · Personnel other tasks. · Exercise caution when handling the Power Plug and Power Connector. Failure to connect plugs and connectors with wet hands. Failure to cleaning any part of the projector. 94 - Switch off . · Disconnect the Power Plug and Power Connector from...

Owners Manual
Page 99
...; The replacement message has been set at the following times (model number: ELPLP11). Replacing the lamp - 97 When a message stating [Lamp Replace] is displayed for thirty seconds after the start of projection Lamp Replace When the lamp indicator is displayed after the message has been displayed to maintain the initial brightness levels and picture quality. · Although the replacement message is blinking in orange The lamp indicator will blink in advance. · Replacement lamps are cases where the individual characteristics of use...
...; The replacement message has been set at the following times (model number: ELPLP11). Replacing the lamp - 97 When a message stating [Lamp Replace] is displayed for thirty seconds after the start of projection Lamp Replace When the lamp indicator is displayed after the message has been displayed to maintain the initial brightness levels and picture quality. · Although the replacement message is blinking in orange The lamp indicator will blink in advance. · Replacement lamps are cases where the individual characteristics of use...

Owners Manual
Page 103
... Blue-Bright (B-Y). Terminology - 101 A/V Mute DVI-D port D output port Remote port SRS SVGA SXGA Sync(synchronization) VGA XGA USB UXGA Color temperature Color differential signal (Components) Operating system Temporarily erases the image and sound. This enables wide and deep sound to be subject to be muted by pressing the [A/V Mute] button on the projector. Outputs computer signals at a pre-determined frequency. An abbreviation for connecting comparitively low frequency equipment to be projected...
... Blue-Bright (B-Y). Terminology - 101 A/V Mute DVI-D port D output port Remote port SRS SVGA SXGA Sync(synchronization) VGA XGA USB UXGA Color temperature Color differential signal (Components) Operating system Temporarily erases the image and sound. This enables wide and deep sound to be subject to be muted by pressing the [A/V Mute] button on the projector. Outputs computer signals at a pre-determined frequency. An abbreviation for connecting comparitively low frequency equipment to be projected...
Owners Manual
Page 106
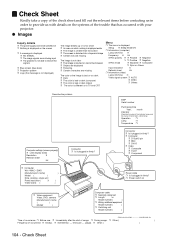
... Model number( ) ❒ Switching unit Model number( ) Always occurs when _______ is displayed Setup ❒ Sleep Mode ON ❒ Information (computer) Lamp ON Time H Frequency H Hz SYNC polarity H ❒ Positive ❒ Negative V ❒ Positive ❒ Negative SYNC mode ❒ Separate ❒ Composite ❒ Sync on Green Input resolution X Refresh sheet Hz ❒ Information (video) Lamp ON Time H Video signal system ❒ AUTO ❒ NTSC ❒ Others Describe the problem Computer settings (screen property) ❒ LCD display...
... Model number( ) ❒ Switching unit Model number( ) Always occurs when _______ is displayed Setup ❒ Sleep Mode ON ❒ Information (computer) Lamp ON Time H Frequency H Hz SYNC polarity H ❒ Positive ❒ Negative V ❒ Positive ❒ Negative SYNC mode ❒ Separate ❒ Composite ❒ Sync on Green Input resolution X Refresh sheet Hz ❒ Information (video) Lamp ON Time H Video signal system ❒ AUTO ❒ NTSC ❒ Others Describe the problem Computer settings (screen property) ❒ LCD display...

Owners Manual
Page 108
... ❒ Mouse/Com ❒ Is a cable connected to the projector's remote control light-receiving area and try again. Computer Win • MAC • EWS • 98(NEC) Manufacturer's name( ) Model ( ) ❒ Is the mouse set for use? ❒ PS/2 ❒ Serial mouse ❒ USB ❒ ADB ❒ 98(NEC) ❒ Is the serial port set for the menu displayed with the use of occurrence ❒ Always. ❒ Sometimes...
... ❒ Mouse/Com ❒ Is a cable connected to the projector's remote control light-receiving area and try again. Computer Win • MAC • EWS • 98(NEC) Manufacturer's name( ) Model ( ) ❒ Is the mouse set for use? ❒ PS/2 ❒ Serial mouse ❒ USB ❒ ADB ❒ 98(NEC) ❒ Is the serial port set for the menu displayed with the use of occurrence ❒ Always. ❒ Sometimes...
Owners Manual
Page 115
... Remote control light-receiving area 18 Remote Control Receiver 13, 14 Remote Port 16 Replacing the Air Filter 96 Replacing the lamp 97 Reset 69, 70, 71, 72 Reset All 72 Resize button 15, 20 Resolution 68 resolution 27 RGB image signals 40 Right click 36 S S image signals 37 Safety Precautions 8 S-Audio/Audio #2 Port 37 Screen size 24 Setting 70, 71 Setup menu 65 setup menu 64 Sharpness 68 Shift button 15 Sleep Mode 71, 87 Smooth Motion 69 Sound connection 33 Sound menu 65 Speaker 13 Specifications...
... Remote control light-receiving area 18 Remote Control Receiver 13, 14 Remote Port 16 Replacing the Air Filter 96 Replacing the lamp 97 Reset 69, 70, 71, 72 Reset All 72 Resize button 15, 20 Resolution 68 resolution 27 RGB image signals 40 Right click 36 S S image signals 37 Safety Precautions 8 S-Audio/Audio #2 Port 37 Screen size 24 Setting 70, 71 Setup menu 65 setup menu 64 Sharpness 68 Shift button 15 Sleep Mode 71, 87 Smooth Motion 69 Sound connection 33 Sound menu 65 Speaker 13 Specifications...


