
User Manual
Page 2
... the lamp life. EPSON disclaims any and all servicing to handle the new lamp. the bright light can severely injure you replace the lamp, never touch the new lamp with SEIKO EPSON CORPORATION's operating and maintenance instructions. Never open any cover on ; No part of SEIKO EPSON CORPORATION. ii CPD-11436 11/00 Important Safety Information WARNING: Never look into the projector lens when the lamp is turned on the projector, except the lamp and filter covers.
... the lamp life. EPSON disclaims any and all servicing to handle the new lamp. the bright light can severely injure you replace the lamp, never touch the new lamp with SEIKO EPSON CORPORATION's operating and maintenance instructions. Never open any cover on ; No part of SEIKO EPSON CORPORATION. ii CPD-11436 11/00 Important Safety Information WARNING: Never look into the projector lens when the lamp is turned on the projector, except the lamp and filter covers.
User Manual
Page 5
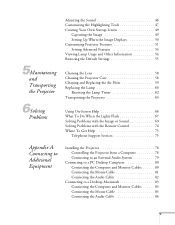
... Restoring the Default Settings 55 Cleaning the Lens 58 Cleaning the Projector Case 58 Cleaning and Replacing the Air Filter 59 Replacing the Lamp 60 Resetting the Lamp Timer 62 Transporting the Projector 63 Using On-Screen Help 66 What To Do When the Lights Flash 67 Solving Problems with the Image or Sound 69 Solving Problems with the Remote Control 74 Where To Get Help 75 Telephone Support Services 75 Appendix A: Connecting to Additional Equipment Installing the Projector 78 Controlling the Projector from a Computer...
... Restoring the Default Settings 55 Cleaning the Lens 58 Cleaning the Projector Case 58 Cleaning and Replacing the Air Filter 59 Replacing the Lamp 60 Resetting the Lamp Timer 62 Transporting the Projector 63 Using On-Screen Help 66 What To Do When the Lights Flash 67 Solving Problems with the Image or Sound 69 Solving Problems with the Remote Control 74 Where To Get Help 75 Telephone Support Services 75 Appendix A: Connecting to Additional Equipment Installing the Projector 78 Controlling the Projector from a Computer...
User Manual
Page 10
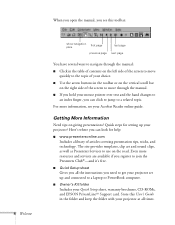
... projector set up your Quick Setup sheet, warranty brochures, CD-ROMs, and EPSON PrivateLineSM Support card. I Use the arrow buttons in the toolbar or on the vertical scroll bar on the left side of the screen to move quickly to use on giving presentations? I Owner's Kit folder Includes your projector? The site provides templates, clip art and sound clips, as well as Presenters Services...
... projector set up your Quick Setup sheet, warranty brochures, CD-ROMs, and EPSON PrivateLineSM Support card. I Use the arrow buttons in the toolbar or on the vertical scroll bar on the left side of the screen to move quickly to use on giving presentations? I Owner's Kit folder Includes your projector? The site provides templates, clip art and sound clips, as well as Presenters Services...

User Manual
Page 11
... their projector, EPSON offers free Extra CareSM Road Service. On the Projector Software CD-ROM, you won't have to wait for details. Or take advantage of this User's Guide and the sources listed above, you receive special updates on the card in help system Provides assistance for more information. See page 75 for common problems. Available from the Help button on the projector or the remote control...
... their projector, EPSON offers free Extra CareSM Road Service. On the Projector Software CD-ROM, you won't have to wait for details. Or take advantage of this User's Guide and the sources listed above, you receive special updates on the card in help system Provides assistance for more information. See page 75 for common problems. Available from the Help button on the projector or the remote control...

User Manual
Page 18
... videoout port, follow the instructions for the location of the computer cable to the Analog position, as shown on page 16. Make sure the Computer 1 switch is flipped to the left ) 3. see Appendix A. Connect the other computer systems, see page 8). 12 Setting Up the Projector note To connect to use the tip of the computer cable to any computer that has a standard video...
... videoout port, follow the instructions for the location of the computer cable to the Analog position, as shown on page 16. Make sure the Computer 1 switch is flipped to the left ) 3. see Appendix A. Connect the other computer systems, see page 8). 12 Setting Up the Projector note To connect to use the tip of the computer cable to any computer that has a standard video...

User Manual
Page 24
... to change the BNC option in the projector's Setting menu (see page 52). BNC cable 3. If the image doesn't display properly, you may be included with your video source, or may need to the red and white jacks.) 4. RCA audio cable note The Computer2/ Component Video port and the S-Video port share the same audio input. However, you'll need a BNC video cable, which may be purchased. If you've connected a video source to project...
... to change the BNC option in the projector's Setting menu (see page 52). BNC cable 3. If the image doesn't display properly, you may be included with your video source, or may need to the red and white jacks.) 4. RCA audio cable note The Computer2/ Component Video port and the S-Video port share the same audio input. However, you'll need a BNC video cable, which may be purchased. If you've connected a video source to project...

User Manual
Page 27
... see your video source. When you may see the next section for instructions on in about 30 seconds. Using the Projector 21 The power light stays green, and you 're done with the message No Signal displayed. warning Never look into the lens when the lamp is on your image, turn to page 24 for help. Do one of the projector. Once you 're projecting a video, press the Play button on .
... see your video source. When you may see the next section for instructions on in about 30 seconds. Using the Projector 21 The power light stays green, and you 're done with the message No Signal displayed. warning Never look into the lens when the lamp is on your image, turn to page 24 for help. Do one of the projector. Once you 're projecting a video, press the Play button on .
User Manual
Page 34
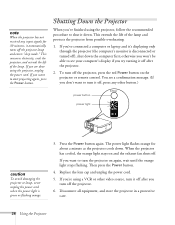
... the red Power button on again, wait until the orange light stops flashing. Then press the Power button. 4. Replace the lens cap and unplug the power cord. 5. If you want to shut it down. If you're using a VCR or other button.) power button Power power light caution To avoid damaging the projector or lamp, never unplug the power cord when the power light is disconnected or turned off), shut down . If you 've connected a computer or laptop and it's displaying...
... the red Power button on again, wait until the orange light stops flashing. Then press the Power button. 4. Replace the lens cap and unplug the power cord. 5. If you want to shut it down. If you're using a VCR or other button.) power button Power power light caution To avoid damaging the projector or lamp, never unplug the power cord when the power light is disconnected or turned off), shut down . If you 've connected a computer or laptop and it's displaying...

User Manual
Page 58
... input signals for the A/V Mute display. I A/V Mute Selects the screen color or image to use as the no-signal message. When you have transferred to the projector. I Sleep mode Disables the power management system. Normally, the lamp turns off the identifying text that you 're finished, press Esc. 52 Fine-tuning the Projector 4. I Keystone Adjusts a distorted image from a trapezoid shape to an S-Video source for the picture-in P Changes from computer input to use...
... input signals for the A/V Mute display. I A/V Mute Selects the screen color or image to use as the no-signal message. When you have transferred to the projector. I Sleep mode Disables the power management system. Normally, the lamp turns off the identifying text that you 're finished, press Esc. 52 Fine-tuning the Projector 4. I Keystone Adjusts a distorted image from a trapezoid shape to an S-Video source for the picture-in P Changes from computer input to use...

User Manual
Page 60
... Menu button. Use the arrow buttons (control panel) or the Enter button (remote control) to video, you 're finished, press Esc. You see the main menu. 2. Turn on the right: Video Audio Effect Setting Capture Advanced About Reset All Lamp ON Time Video Source Frequency Sync Polarity Sync Mode Resolution Refresh Rate : 9999 H : Computer : H 999. 99 KHz : V 999. 99 Hz : H Positive : V Negative : Sync On Green : 9999x9999 : 999. 9 Hz :Select :Enter The life span of hours the lamp has been used. 1. Viewing Lamp...
... Menu button. Use the arrow buttons (control panel) or the Enter button (remote control) to video, you 're finished, press Esc. You see the main menu. 2. Turn on the right: Video Audio Effect Setting Capture Advanced About Reset All Lamp ON Time Video Source Frequency Sync Polarity Sync Mode Resolution Refresh Rate : 9999 H : Computer : H 999. 99 KHz : V 999. 99 Hz : H Positive : V Negative : Sync On Green : 9999x9999 : 999. 9 Hz :Select :Enter The life span of hours the lamp has been used. 1. Viewing Lamp...

User Manual
Page 63
... projector, turn it from overheating. Any dirt or smears on the lens may show up on the projector, except the lamp and filter covers. You also need to service this User's Guide. If any other servicing to periodically clean the air filter on a regular basis is keep it off and unplug the power cord. Refer all other part needs replacing, contact your projected image. All you should replace are the lamp and air filter. The only parts...
... projector, turn it from overheating. Any dirt or smears on the lens may show up on the projector, except the lamp and filter covers. You also need to service this User's Guide. If any other servicing to periodically clean the air filter on a regular basis is keep it off and unplug the power cord. Refer all other part needs replacing, contact your projected image. All you should replace are the lamp and air filter. The only parts...

User Manual
Page 66
... filter, pull on the catch until it . Contact your dealer or call EPSON at (800) 873-7766 in place. Request part number ELPLP12. 60 Maintaining and Transporting the Projector If you need to deteriorate. tabs note You can check to replace the lamp when: I The lamp warning light is flashing red or orange. It is on (after about 1500 hours of use . I The message LAMP REPLACE appears on the screen...
... filter, pull on the catch until it . Contact your dealer or call EPSON at (800) 873-7766 in place. Request part number ELPLP12. 60 Maintaining and Transporting the Projector If you need to deteriorate. tabs note You can check to replace the lamp when: I The lamp warning light is flashing red or orange. It is on (after about 1500 hours of use . I The message LAMP REPLACE appears on the screen...

User Manual
Page 74
... image to service this User's Guide, do not attempt to appear. This is getting too hot. I The air filter may be caused by damage to the table below for help . The projector is operating normally. Replace it as specifically explained in sleep mode. I The projector has overheated. The projector is warming up. Remove the power cord and contact EPSON for instructions. Clean or replace it as described on . I The projector is a good time to turn...
... image to service this User's Guide, do not attempt to appear. This is getting too hot. I The air filter may be caused by damage to the table below for help . The projector is operating normally. Replace it as specifically explained in sleep mode. I The projector has overheated. The projector is warming up. Remove the power cord and contact EPSON for instructions. Clean or replace it as described on . I The projector is a good time to turn...

User Manual
Page 75
... image appears on . Try selecting the Reset All setting to return all setup menus to make sure the picture has not been turned off temporarily. Clean the air filter if necessary. Let it back on. Make sure there is plenty of space around and under the projector for a few minutes, then turn the projector on the screen. Wait until the power light stops flashing and remains orange...
... image appears on . Try selecting the Reset All setting to return all setup menus to make sure the picture has not been turned off temporarily. Clean the air filter if necessary. Let it back on. Make sure there is plenty of space around and under the projector for a few minutes, then turn the projector on the screen. Wait until the power light stops flashing and remains orange...
User Manual
Page 78
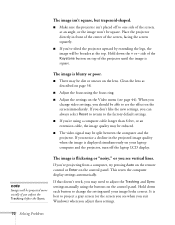
... projector, turn off to see when you exit Windows) when you can always select Reset to return to change video settings, you 're using the focus ring. The image isn't square, but trapezoid-shaped. I If you 're projecting from a computer, try pressing Auto on the remote control or Enter on the screen immediately. If you don't like the new settings, you adjust these settings. 72 Solving Problems This resets the computer display settings...
... projector, turn off to see when you exit Windows) when you can always select Reset to return to change video settings, you 're using the focus ring. The image isn't square, but trapezoid-shaped. I If you 're projecting from a computer, try pressing Auto on the remote control or Enter on the screen immediately. If you don't like the new settings, you adjust these settings. 72 Solving Problems This resets the computer display settings...

User Manual
Page 84
... want to be able to control the projector's settings from a computer, you can then correct the distortion by using the Keystone function in the projector's Advanced menu. Installing the Projector The projector can be installed for three different viewing setups: front projection, ceiling mounting, or rear projection onto a semi-transparent screen, as shown: front projection ceiling mounting rear projection To project from overhead, you'll need a serial cable to connect the projector to the computer. 78 Appendix...
... want to be able to control the projector's settings from a computer, you can then correct the distortion by using the Keystone function in the projector's Advanced menu. Installing the Projector The projector can be installed for three different viewing setups: front projection, ceiling mounting, or rear projection onto a semi-transparent screen, as shown: front projection ceiling mounting rear projection To project from overhead, you'll need a serial cable to connect the projector to the computer. 78 Appendix...

User Manual
Page 85
... the projector, the projector will automatically switch the audio source along with your hard disk. The installation program also installs the EMP Link V User's Guide on your sound system, or may be purchased from an electronics store. You can connect the projector to the speaker or PA system. Connecting to -3.5 mm stereo audio cable, which may be included with the video source whenever the user chooses a different video source. (See "Switching Between Picture Sources...
... the projector, the projector will automatically switch the audio source along with your hard disk. The installation program also installs the EMP Link V User's Guide on your sound system, or may be purchased from an electronics store. You can connect the projector to the speaker or PA system. Connecting to -3.5 mm stereo audio cable, which may be included with the video source whenever the user chooses a different video source. (See "Switching Between Picture Sources...

User Manual
Page 114
... Keystone button, 26 Keystone correction, 26, 72, 97 L Lamp number of hours used, 54 replacing, 60 to 62 specifications, 98 status light, 67 timer, resetting, 62 Language setting, 66 Laptop computer connecting to, 12 to 14 displaying on, 23, 70 Lens cleaning, 58 long throw zoom, 8, 104 specifications, 97 standard, 104 wide angle, 8, 105 Light button (on remote control), 30 Lights, status, 67 to 69 Lines, drawing on screen, 37 Logo, saving on projector, 49 to 51 Long throw zoom lens...
... Keystone button, 26 Keystone correction, 26, 72, 97 L Lamp number of hours used, 54 replacing, 60 to 62 specifications, 98 status light, 67 timer, resetting, 62 Language setting, 66 Laptop computer connecting to, 12 to 14 displaying on, 23, 70 Lens cleaning, 58 long throw zoom, 8, 104 specifications, 97 standard, 104 wide angle, 8, 105 Light button (on remote control), 30 Lights, status, 67 to 69 Lines, drawing on screen, 37 Logo, saving on projector, 49 to 51 Long throw zoom lens...

User Manual
Page 115
... resolution, 1, 97 shutting off, 28 software, 5 transporting, 63 troubleshooting, 65 to 73 turning off, 28 turning on, 20 unpacking, 6 to 7 viewing information about, 54 Prompt setting, 52 PS/2 mouse cable, 6 R Raising image, 25 Rear-screen projection, 78 Registration, 5 Remote control light button, 30 numbered buttons, 35 problems, 74 specifications, 98 troubleshooting, 93 turning on, 30 using, 29 to 38 using as wireless mouse, 38 Replacing lamp, 60 to 62 Reset All menu, 40, 55 Resetting lamp timer, 62 Resetting menu options, 42, 55 Resize button...
... resolution, 1, 97 shutting off, 28 software, 5 transporting, 63 troubleshooting, 65 to 73 turning off, 28 turning on, 20 unpacking, 6 to 7 viewing information about, 54 Prompt setting, 52 PS/2 mouse cable, 6 R Raising image, 25 Rear-screen projection, 78 Registration, 5 Remote control light button, 30 numbered buttons, 35 problems, 74 specifications, 98 troubleshooting, 93 turning on, 30 using, 29 to 38 using as wireless mouse, 38 Replacing lamp, 60 to 62 Reset All menu, 40, 55 Resetting lamp timer, 62 Resetting menu options, 42, 55 Resize button...

User Manual
Page 116
... remote control problems, 74 Turning off picture (using A/V Mute), 27, 33 Turning off projector, 28 Turning on projector, 20 U Unpacking projector, 6 to 7 USB mouse cable, 6 V Video button, 32 display settings, viewing, 54 formats, supported, 1, 99 to 101 menu, 40, 43 to 45 picture in picture, 52 port pin assignments, 103 selecting source, 27, 32 Video cables, 6 Video sources, connecting projector to, 15 to 18 Volume adjusting, 32 button, 32 setting, 46 to 47 W Warning lights, 67 to 69 Warranty, 5 Wide angle lens, 8, 105 Workstations, connecting projector to, 88 Z Zoom...
... remote control problems, 74 Turning off picture (using A/V Mute), 27, 33 Turning off projector, 28 Turning on projector, 20 U Unpacking projector, 6 to 7 USB mouse cable, 6 V Video button, 32 display settings, viewing, 54 formats, supported, 1, 99 to 101 menu, 40, 43 to 45 picture in picture, 52 port pin assignments, 103 selecting source, 27, 32 Video cables, 6 Video sources, connecting projector to, 15 to 18 Volume adjusting, 32 button, 32 setting, 46 to 47 W Warning lights, 67 to 69 Warranty, 5 Wide angle lens, 8, 105 Workstations, connecting projector to, 88 Z Zoom...


