Owners Manual
Page 3
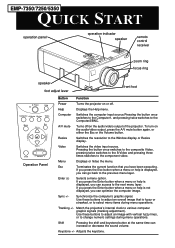
...image that you press the Enter button when a menu or help is displayed, you can increase or decrease the sound volume. EMP-7350/7250/5350 QUICK START operation panel operation indicator speaker remoto control receiver zoom ring focus ring speaker foot adjust lever front foot Power Help ...Button Function Power Turns the projector on or off /on the audio/video output, press the A/V mute button again, or either the Esc or the Volume button. Use these buttons to change numeric settings during menu operations. Computer Switches the computer input source.Pressing the button ...
...image that you press the Enter button when a menu or help is displayed, you can increase or decrease the sound volume. EMP-7350/7250/5350 QUICK START operation panel operation indicator speaker remoto control receiver zoom ring focus ring speaker foot adjust lever front foot Power Help ...Button Function Power Turns the projector on or off /on the audio/video output, press the A/V mute button again, or either the Esc or the Volume button. Use these buttons to change numeric settings during menu operations. Computer Switches the computer input source.Pressing the button ...
Owners Manual
Page 4
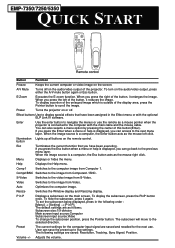
...press it enlarges the image. Subscreen size:1/9 division Main screen input source:Computer Subscreen input source:Video To change the subscreen position, press the Pointer button. E-Zoom Executes the E-zoom function. Power Turns the projector on or off /on the audio/video output of the... in P]. The default settings are saved and recalled for the computer input signal are as a mouse pointer when the projector is displayed, you press the Enter when a menu or help is connected to the next menu layer. EMP-7350/7250/5350 QUICK START Freeze A/V Mute E-Zoom Power R/C ON OFF ...
...press it enlarges the image. Subscreen size:1/9 division Main screen input source:Computer Subscreen input source:Video To change the subscreen position, press the Pointer button. E-Zoom Executes the E-zoom function. Power Turns the projector on or off /on the audio/video output of the... in P]. The default settings are saved and recalled for the computer input signal are as a mouse pointer when the projector is displayed, you press the Enter when a menu or help is connected to the next menu layer. EMP-7350/7250/5350 QUICK START Freeze A/V Mute E-Zoom Power R/C ON OFF ...
Owners Manual
Page 48
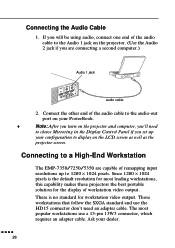
...adapter cable. The most leading workstations, this capability makes these projectors the best portable solution for workstation video output. s s s s s 28 Since 1280 × 1024 pixels is no standard for the display of remapping input resolutions up your configuration to the audio-out port on ...to choose Mirroring in the Display Control Panel if you turn on the LCD screen as well as the projector screen. Ask your PowerBook. ♦ Note: After you set up to a High-End Workstation The EMP-7350/7250/5350 are connecting a second computer.) Audio 1 jack audio cable 2. ...
...adapter cable. The most leading workstations, this capability makes these projectors the best portable solution for workstation video output. s s s s s 28 Since 1280 × 1024 pixels is no standard for the display of remapping input resolutions up your configuration to the audio-out port on ...to choose Mirroring in the Display Control Panel if you turn on the LCD screen as well as the projector screen. Ask your PowerBook. ♦ Note: After you set up to a High-End Workstation The EMP-7350/7250/5350 are connecting a second computer.) Audio 1 jack audio cable 2. ...
Owners Manual
Page 59
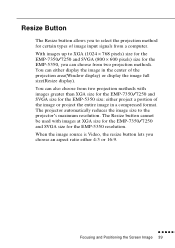
... format. s s s s s s Focusing and Positioning the Screen Image 39 The projector automatically reduces the image size to XGA (1024 × 768 pixels) size for the EMP-7350/7250 and SVGA (800 × 600 pixels) size for the EMP-5350 size: either project a portion of the image or project the entire image in... the center of image input signals from a computer. The Resize button cannot be used with images greater than XGA size for the EMP-7350/7250 and SVGA size for the EMP-5350, you can choose from two projection methods with images at XGA size for the EMP-7350/7250 and SVGA size for...
... format. s s s s s s Focusing and Positioning the Screen Image 39 The projector automatically reduces the image size to XGA (1024 × 768 pixels) size for the EMP-7350/7250 and SVGA (800 × 600 pixels) size for the EMP-5350 size: either project a portion of the image or project the entire image in... the center of image input signals from a computer. The Resize button cannot be used with images greater than XGA size for the EMP-7350/7250 and SVGA size for the EMP-5350, you can choose from two projection methods with images at XGA size for the EMP-7350/7250 and SVGA size for...

Owners Manual
Page 60
Controlling the Projector You can use the operation panel on top of the projector or the remote control to perform the following actions: • Turn power on or off • Auto set-up of the computer image • Switch between input images (Computer 1, Computer 2, video-computer) • Access the projector menus to adjust the image, audio, video, and display settings • Control resizing • Control display freeze • Control display blanking • Adjust or mute audio output • Use custom functions • Move the pointer s s s s s 40
Controlling the Projector You can use the operation panel on top of the projector or the remote control to perform the following actions: • Turn power on or off • Auto set-up of the computer image • Switch between input images (Computer 1, Computer 2, video-computer) • Access the projector menus to adjust the image, audio, video, and display settings • Control resizing • Control display freeze • Control display blanking • Adjust or mute audio output • Use custom functions • Move the pointer s s s s s 40

Owners Manual
Page 63
... settings are saved: Resolution, Tracking, Sync Signal, Position. The subscreen will move to the image from S-Video. s s s s s s Controlling the Projector 43 Switches to the video image from Video. Displays a subscreen on the main screen. To set the subscreen being displayed, press in P Preset Volume +/- ...image from Computer2 / BNC. To display the subscreen, press the PinP button once. Subscreen size:1/9 division Main screen input source:Computer Subscreen input source:Video To change the subscreen position, press the Pointer button. Button Help Comp 1 Comp2/BNC S-Video Video ...
... settings are saved: Resolution, Tracking, Sync Signal, Position. The subscreen will move to the image from S-Video. s s s s s s Controlling the Projector 43 Switches to the video image from Video. Displays a subscreen on the main screen. To set the subscreen being displayed, press in P Preset Volume +/- ...image from Computer2 / BNC. To display the subscreen, press the PinP button once. Subscreen size:1/9 division Main screen input source:Computer Subscreen input source:Video To change the subscreen position, press the Pointer button. Button Help Comp 1 Comp2/BNC S-Video Video ...

Owners Manual
Page 64
...the remote control. Resize Switches the resolution to the Computer2/BNC. However, you can use the operation panel to control the projector instead of the projector. The following table summarizes the functions on the audio/video output, press the A/V mute button again, or either the ...Volume button. To turn on the operation panel. Button Function Power Turns the projector on or off /on the audio/videio output of the remote control. Computer A/V mute Switches the computer input source.Pressing the button once switches to the Computer1, and pressing twice switches to...
...the remote control. Resize Switches the resolution to the Computer2/BNC. However, you can use the operation panel to control the projector instead of the projector. The following table summarizes the functions on the audio/video output, press the A/V mute button again, or either the ...Volume button. To turn on the operation panel. Button Function Power Turns the projector on or off /on the audio/videio output of the remote control. Computer A/V mute Switches the computer input source.Pressing the button once switches to the Computer1, and pressing twice switches to...

Owners Manual
Page 65
Button Function Video Switches the video input source. Menu Displays or hides the menu. Tracking +/- Pressing the shift and keystone button at the same time can...you press the Enter button when a menu or help is not displayed, you set the computer 2/ BNC switch on the back of the projector to the BNC, the computer source is displayed, you can go back to the BNC. Enter Selects a menu option. Sync +/- Synchronize ...settings during menu operations. Shift. Adjust the keystone. * When you can increase or decrease the sound volume. s s s s s s Controlling the Projector 45
Button Function Video Switches the video input source. Menu Displays or hides the menu. Tracking +/- Pressing the shift and keystone button at the same time can...you press the Enter button when a menu or help is not displayed, you set the computer 2/ BNC switch on the back of the projector to the BNC, the computer source is displayed, you can go back to the BNC. Enter Selects a menu option. Sync +/- Synchronize ...settings during menu operations. Shift. Adjust the keystone. * When you can increase or decrease the sound volume. s s s s s s Controlling the Projector 45

Owners Manual
Page 74
... to adjust the selected color. Increase the sharpness to move the screen position in the corresponding direction. s s s s s 54 Matches the projector's internal clock to correct fuzziness or screen flicker. Lightens or darkens the overall image. Adjusts the screen sharpness. Adjusts the color balance (Red:Green...:Blue) of the input source. Next, use the Enter button (remote) or up and down , left and right buttons (operation panel) to select a color...
... to adjust the selected color. Increase the sharpness to move the screen position in the corresponding direction. s s s s s 54 Matches the projector's internal clock to correct fuzziness or screen flicker. Lightens or darkens the overall image. Adjusts the screen sharpness. Adjusts the color balance (Red:Green...:Blue) of the input source. Next, use the Enter button (remote) or up and down , left and right buttons (operation panel) to select a color...

Owners Manual
Page 75
... preset up to display the confirmation screen. Select this item and then press the Enter button to five settings. The current settings for the computer input signal are saved: Resolution, Tracking, Sync Signal, Position. The following settings are saved and recalled for the next use. Next, select Yes and then press...
... preset up to display the confirmation screen. Select this item and then press the Enter button to five settings. The current settings for the computer input signal are saved: Resolution, Tracking, Sync Signal, Position. The following settings are saved and recalled for the next use. Next, select Yes and then press...

Owners Manual
Page 79
...source (computer or video) is providing the image. s s s s s s Menu Options 59 Prompt Temporarily displays a message on the projector screen to normal. When the input source is blanked. Message Specifies whether a black screen, a blue screen, or a user logo displays when the screen is the video, ... the computer, select RGB. The lamp will be turned on the audio/video output of the projector, clears all menu items to their initial factory defaults. When the input source is canceled. Returns all special effects, and displays a black, blue, or user logo ...
...source (computer or video) is providing the image. s s s s s s Menu Options 59 Prompt Temporarily displays a message on the projector screen to normal. When the input source is blanked. Message Specifies whether a black screen, a blue screen, or a user logo displays when the screen is the video, ... the computer, select RGB. The lamp will be turned on the audio/video output of the projector, clears all menu items to their initial factory defaults. When the input source is canceled. Returns all special effects, and displays a black, blue, or user logo ...

Owners Manual
Page 82
... panel) or the left of the screen. s s s s s 62 Displays the user logo during the warm-up after the projector is turned on , while OFF turns it looks correct when you to decrease the color temperature value. Selecting ON turns mirroring on . Specifies... the input image signal mode. Positive color temperature values provide a cold white; negative values provide a warmer white. Adjusts the whiteness of the Enter button (remote) to set various projector options. User can select from behind onto a translucent...
... panel) or the left of the screen. s s s s s 62 Displays the user logo during the warm-up after the projector is turned on , while OFF turns it looks correct when you to decrease the color temperature value. Selecting ON turns mirroring on . Specifies... the input image signal mode. Positive color temperature values provide a cold white; negative values provide a warmer white. Adjusts the whiteness of the Enter button (remote) to set various projector options. User can select from behind onto a translucent...

Owners Manual
Page 83
...it off (for a normal image). Selecting ON turns this item and then press the Enter button to automatically switch wireless mouse control whenever the input source computer is changed. Returns all menu items to reset the menu. Select this feature on, while OFF turns it looks correct when you change...No and then press the Enter button to the Mouse/Com 2 port only. Locks or unlocks the Mouse/Com port. Selecting 1 ↔ 2 tells the projector to display the confirmation screen. Select 1 to assign the wireless mouse control to the computer connected to the Mouse/Com 1 port only.
...it off (for a normal image). Selecting ON turns this item and then press the Enter button to automatically switch wireless mouse control whenever the input source computer is changed. Returns all menu items to reset the menu. Select this feature on, while OFF turns it looks correct when you change...No and then press the Enter button to the Mouse/Com 2 port only. Locks or unlocks the Mouse/Com port. Selecting 1 ↔ 2 tells the projector to display the confirmation screen. Select 1 to assign the wireless mouse control to the computer connected to the Mouse/Com 1 port only.
Owners Manual
Page 84
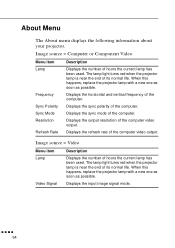
... lamp has been used . The lamp light turns red when the projector lamp is near the end of its normal life. Video Signal Displays the input image signal mode. When this happens, replace the projector lamp with a new one as soon as possible. About Menu The... About menu displays the following information about your projector. When this happens, replace the projector lamp with a new one as ...
... lamp has been used . The lamp light turns red when the projector lamp is near the end of its normal life. Video Signal Displays the input image signal mode. When this happens, replace the projector lamp with a new one as soon as possible. About Menu The... About menu displays the following information about your projector. When this happens, replace the projector lamp with a new one as ...

Owners Manual
Page 119
The pin assignments are female video RGB, 15-pin micro-D-style connectors. Monitor and Computer In 1/2 connector pin assignments The Monitor and Computer In 1/2 connectors are : Input pin Signal 1 Red analogue input 2 Green analogue input 3 Blue analogue input 4 GND 5 GND 6 Red GND 7 Green GND 8 Blue GND 9 Reserved 10 Sync GND 11 GND 12 SDA 13 Horizontal sync/composite sync input 14 Vertical sync input 15 SCL s s s s s s Monitor and Computer In 1/2 connector pin assignments 99
The pin assignments are female video RGB, 15-pin micro-D-style connectors. Monitor and Computer In 1/2 connector pin assignments The Monitor and Computer In 1/2 connectors are : Input pin Signal 1 Red analogue input 2 Green analogue input 3 Blue analogue input 4 GND 5 GND 6 Red GND 7 Green GND 8 Blue GND 9 Reserved 10 Sync GND 11 GND 12 SDA 13 Horizontal sync/composite sync input 14 Vertical sync input 15 SCL s s s s s s Monitor and Computer In 1/2 connector pin assignments 99


