
Quick Reference Guide
Page 1
QUICK REFERENCE GUIDE Be sure to read the User's Guide thoroughly before using this projector. WARNING Never look into the lens while the projector's power is turned on.
QUICK REFERENCE GUIDE Be sure to read the User's Guide thoroughly before using this projector. WARNING Never look into the lens while the projector's power is turned on.
Quick Reference Guide
Page 2
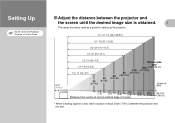
The values should be used as a guide for setting up the projector. 10.1-11.7 m (33.2-38.5 ft.) 6.7-7.8 (22.1-25.6) 3.3-3.9 (11.0-12.7) 2.7-3.1 (8.7-10.1) 20 cm (7.9 in.)* 2.0-2.3 (6.5-7.5) Screen size 300" 1.3-1.5 (4.3-5.0) 200 (610 460 cm) 100 (410 300) 1.0-1.1 (3.2-3.7) 80 (200 ... screen 15.2 (6.0) 30.5 45.7 cm (12.0) (18.0 in.) * When installing against a wall, leave a space of about 20cm (7.9 in User's Guide Adjust the distance between the projector and the wall. Setting Up "Screen Size and Projection Distance" in .) between the...
The values should be used as a guide for setting up the projector. 10.1-11.7 m (33.2-38.5 ft.) 6.7-7.8 (22.1-25.6) 3.3-3.9 (11.0-12.7) 2.7-3.1 (8.7-10.1) 20 cm (7.9 in.)* 2.0-2.3 (6.5-7.5) Screen size 300" 1.3-1.5 (4.3-5.0) 200 (610 460 cm) 100 (410 300) 1.0-1.1 (3.2-3.7) 80 (200 ... screen 15.2 (6.0) 30.5 45.7 cm (12.0) (18.0 in.) * When installing against a wall, leave a space of about 20cm (7.9 in User's Guide Adjust the distance between the projector and the wall. Setting Up "Screen Size and Projection Distance" in .) between the...
Quick Reference Guide
Page 3
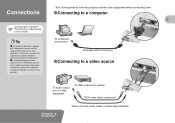
In such cases, you can use the optional component video cable to connect the source to a video source To audio output port of the projector. If connecting component video source (such as a DVD player), you will need to purchase a separate adapter to connect the computer to a Video ...Source" in User's Guide Tip The computer cable that is supplied with the projector may not match the shape of the monitor port on some computers. To computer's monitor port Computer cable (accessory) Connecting to the Computer /Component...
In such cases, you can use the optional component video cable to connect the source to a video source To audio output port of the projector. If connecting component video source (such as a DVD player), you will need to purchase a separate adapter to connect the computer to a Video ...Source" in User's Guide Tip The computer cable that is supplied with the projector may not match the shape of the monitor port on some computers. To computer's monitor port Computer cable (accessory) Connecting to the Computer /Component...
Quick Reference Guide
Page 4
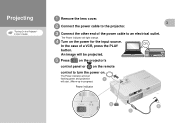
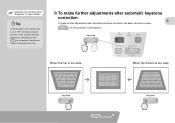
An image will light orange. The Power indicator will be projected. Turn on . Press on the projector's control panel or on the remote control to an electrical outlet. Connect the other end of a VCR, press the PLAY button. Connect the power cable to the projector. In the case of the power cable to turn the power on the power for the input source. Projecting "Turning On the Projector" in progress) Power indicator The Power indicator will start flashing green and projection will start. (Warm-up in User's Guide Remove the lens cover.
An image will light orange. The Power indicator will be projected. Turn on . Press on the projector's control panel or on the remote control to an electrical outlet. Connect the other end of a VCR, press the PLAY button. Connect the power cable to the projector. In the case of the power cable to turn the power on the power for the input source. Projecting "Turning On the Projector" in progress) Power indicator The Power indicator will start flashing green and projection will start. (Warm-up in User's Guide Remove the lens cover.
Quick Reference Guide
Page 5
... down the computer's key and pressing one of the buttons on the computer (such as a button with a or icon on the projector's control panel and follow the prompts which appear in order to the documentation provided with a built-in monitor, or to a laptop ... output destination can normally be changed , after a short wait the projector will start projecting. Refer to "Troubleshooting". Examples of the Function keys. Tip If connecting the projector to a computer with your computer. Projector Remote Control If you may need to change the output destination for ...
... down the computer's key and pressing one of the buttons on the computer (such as a button with a or icon on the projector's control panel and follow the prompts which appear in order to the documentation provided with a built-in monitor, or to a laptop ... output destination can normally be changed , after a short wait the projector will start projecting. Refer to "Troubleshooting". Examples of the Function keys. Tip If connecting the projector to a computer with your computer. Projector Remote Control If you may need to change the output destination for ...
Quick Reference Guide
Page 6
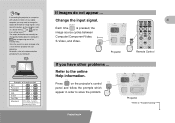
... decrease the "Sharpness" menu setting. If you would like to make further minor adjustments to adjust the projection angle of the projector. When the projector is tilted, it will cause keystone distortion to reduce While pressing the foot adjust buttons, lift up the front of approximately 15...distortion can be corrected using the automatic keystone correction function as long as the vertical angle of tilt is within a range of the projector. Adjustment "Adjusting the Screen Image" in User's Guide Tip If the front adjustable feet have been extended, they can be retracted ...
... decrease the "Sharpness" menu setting. If you would like to make further minor adjustments to adjust the projection angle of the projector. When the projector is tilted, it will cause keystone distortion to reduce While pressing the foot adjust buttons, lift up the front of approximately 15...distortion can be corrected using the automatic keystone correction function as long as the vertical angle of tilt is within a range of the projector. Adjustment "Adjusting the Screen Image" in User's Guide Tip If the front adjustable feet have been extended, they can be retracted ...
Quick Reference Guide
Page 7
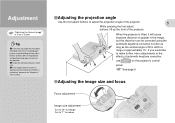
"Manually Correcting Keystone Distortion" in User's Guide Tip If "Auto Keystone" in the "Setting" menu is set to adjust the keystone at this item is "ON"), automatic keystone adjustment is too wide Adjustment / Turning Off the Projector When the top is too wide When the bottom is not carried out. Press on the projector's control panel. To make further adjustments after automatic keystone correction To make further adjustments after automatic keystone correction has been carried out, press on the projector's control panel to "OFF" (the default setting for this time.
"Manually Correcting Keystone Distortion" in User's Guide Tip If "Auto Keystone" in the "Setting" menu is set to adjust the keystone at this item is "ON"), automatic keystone adjustment is too wide Adjustment / Turning Off the Projector When the top is too wide When the bottom is not carried out. Press on the projector's control panel. To make further adjustments after automatic keystone correction To make further adjustments after automatic keystone correction has been carried out, press on the projector's control panel to "OFF" (the default setting for this time.
Quick Reference Guide
Page 9
...in quick succession to turn off the power. If the power cable is disconnected while the Power indicator is pressed once. Press on the projector's control panel or the on the remote control while the confirmation message is displayed, the message will disappear and the... can disconnect the power cable. The Power indicator will return to its original condition. Turning Off the Projector "Turning Off the Projector" in User's Guide Tip If you press a button other than on the projector's control panel or on the remote control twice to turn off the power. To prevent mis-operation...
...in quick succession to turn off the power. If the power cable is disconnected while the Power indicator is pressed once. Press on the projector's control panel or the on the remote control while the confirmation message is displayed, the message will disappear and the... can disconnect the power cable. The Power indicator will return to its original condition. Turning Off the Projector "Turning Off the Projector" in User's Guide Tip If you press a button other than on the projector's control panel or on the remote control twice to turn off the power. To prevent mis-operation...
Quick Reference Guide
Page 10
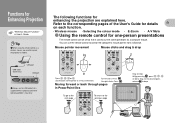
... may occur. Moving forward or back through pages in User's Guide Tip When using the remote control as a wireless mouse, you need to connect the projector as a computer mouse. At the desired point, release to a mouse direction.) For left clicks: Press . Press , , or (Each button corresponds to drop. For right clicks...
... may occur. Moving forward or back through pages in User's Guide Tip When using the remote control as a wireless mouse, you need to connect the projector as a computer mouse. At the desired point, release to a mouse direction.) For left clicks: Press . Press , , or (Each button corresponds to drop. For right clicks...
Quick Reference Guide
Page 11
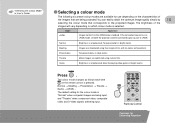
... using natural tints. The brightness of the images that corresponds to the projected images. If the connected source has an sRGB mode, set both the projector and the connected signal source to the sRGB colour standard. Game Brightness is emphasised. The default setting for Enhancing Projection Presentation For presentations in bright...
... using natural tints. The brightness of the images that corresponds to the projected images. If the connected source has an sRGB mode, set both the projector and the connected signal source to the sRGB colour standard. Game Brightness is emphasised. The default setting for Enhancing Projection Presentation For presentations in bright...
Quick Reference Guide
Page 14
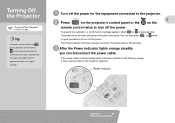
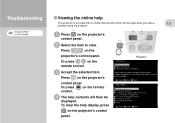
Troubleshooting "Using the Help" in User's Guide Viewing the online help This projector is provided with an online help contents will then be used when you have a problem using the projector. Select the item to view. Press on the remote control. Or press on the projector's control panel. Press on the remote control. Or press on the projector's control panel. Press on the projector's control panel. Accept the selected item. The help function which can be displayed. To clear the help display, press on the projector's control panel. Projector
Troubleshooting "Using the Help" in User's Guide Viewing the online help This projector is provided with an online help contents will then be used when you have a problem using the projector. Select the item to view. Press on the remote control. Or press on the projector's control panel. Press on the remote control. Or press on the projector's control panel. Press on the projector's control panel. Accept the selected item. The help function which can be displayed. To clear the help display, press on the projector's control panel. Projector
Quick Reference Guide
Page 15
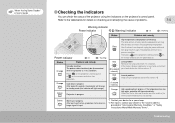
... an image signal is input. *1 Contact your dealer for details on checking and remedying the cause of the projector using the projector and ask for about 45 seconds, the projector will light orange). Refer to standby mode (the indicator will change to the table below for a spare lamp... advise. *1 Red Internal problem Stop using the indicators on the remote control to its previous condition. Press on the projector's control panel or on the projector's control panel. If the temperature rises too high again, projection will return to start projection. Check that the air...
... an image signal is input. *1 Contact your dealer for details on checking and remedying the cause of the projector using the projector and ask for about 45 seconds, the projector will light orange). Refer to standby mode (the indicator will change to the table below for a spare lamp... advise. *1 Red Internal problem Stop using the indicators on the remote control to its previous condition. Press on the projector's control panel or on the projector's control panel. If the temperature rises too high again, projection will return to start projection. Check that the air...


