Quick Guide
Page 2
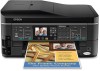
... 545/645 Series After you set up your WorkForce® 545/645 Series (see the Start Here sheet), turn to this Quick Guide and your online User's Guide for the basics. Features Copy, scan, and fax from the easy-to-use control panel Process large documents with the 30-page capacity Automatic Document Feeder Easy networking-Wi-Fi and Ethernet Copy files to and from mobile devices with Epson Connect Where to find information See this manual show...
... 545/645 Series After you set up your WorkForce® 545/645 Series (see the Start Here sheet), turn to this Quick Guide and your online User's Guide for the basics. Features Copy, scan, and fax from the easy-to-use control panel Process large documents with the 30-page capacity Automatic Document Feeder Easy networking-Wi-Fi and Ethernet Copy files to and from mobile devices with Epson Connect Where to find information See this manual show...
Quick Guide
Page 3
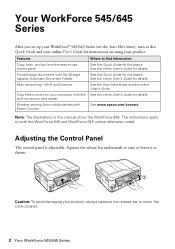
... Control Panel The control panel makes it up. 1 2 3 4 5 6 7 8 WorkForce 645 9 only 10 Tip: To turn off 2 Press Photo to access the Print Photos menu 3 Press Copy to access your product's Copy mode 4 View menus and status on the screen, or to use all the features of inactivity. To save energy, the screen goes dark after several minutes of your product's Scan menu 9 Shows wireless network status 10 Resets the active menu selection to its volume, press F Setup, select Printer Setup...
... Control Panel The control panel makes it up. 1 2 3 4 5 6 7 8 WorkForce 645 9 only 10 Tip: To turn off 2 Press Photo to access the Print Photos menu 3 Press Copy to access your product's Copy mode 4 View menus and status on the screen, or to use all the features of inactivity. To save energy, the screen goes dark after several minutes of your product's Scan menu 9 Shows wireless network status 10 Resets the active menu selection to its volume, press F Setup, select Printer Setup...
Quick Guide
Page 6
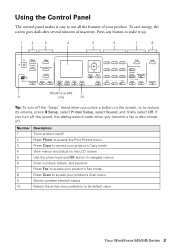
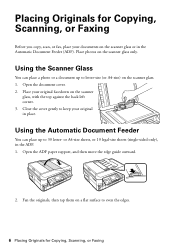
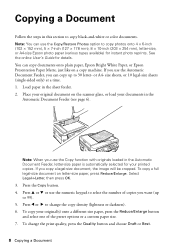
... legal-size sheets (single-sided only), in place. Using the Scanner Glass You can place up to 30 letter- Place your documents on the scanner glass or in the Automatic Document Feeder (ADF). Open the ADF paper support, and then move the edge guide outward. 2. Open the document cover. 2. Place photos on a flat surface to keep your original in the ADF. 1. Close the cover gently to even the edges. 6 Placing Originals for Copying, Scanning...
... legal-size sheets (single-sided only), in place. Using the Scanner Glass You can place up to 30 letter- Place your documents on the scanner glass or in the Automatic Document Feeder (ADF). Open the ADF paper support, and then move the edge guide outward. 2. Open the document cover. 2. Place photos on a flat surface to keep your original in the ADF. 1. Close the cover gently to even the edges. 6 Placing Originals for Copying, Scanning...
Quick Guide
Page 8
...-size Epson photo paper (various types available) for details. To change the copy density (lightness or darkness). 6. size sheets, or 10 legal-size sheets (single-sided only) at a time. 1. Press u or d or use the numeric keypad to select the number of the preset options or a custom paper size. 7. If you use the Automatic Document Feeder, you want (up to 99). 5. Select Legal->Letter, then press OK. 3. Copying a Document Follow the steps in this section to change the print...
...-size Epson photo paper (various types available) for details. To change the copy density (lightness or darkness). 6. size sheets, or 10 legal-size sheets (single-sided only) at a time. 1. Press u or d or use the numeric keypad to select the number of the preset options or a custom paper size. 7. If you use the Automatic Document Feeder, you want (up to 99). 5. Select Legal->Letter, then press OK. 3. Copying a Document Follow the steps in this section to change the print...
Quick Guide
Page 9
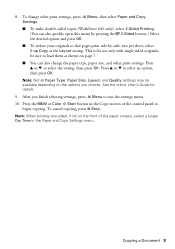
... Paper and Copy Settings menu. To change the paper type, paper size, and other print settings, press x Menu, then select Paper and Copy Settings. ■ To make double-sided copies (WorkForce 645 only), select 2-Sided Printing. (You can also quickly open this menu by pressing the 2-Sided button.) Select the desired option and press OK. ■ To reduce your originals so that pages print side-by-side, two per sheet, select 2-up Copy as shown on the front of the control panel to select the setting...
... Paper and Copy Settings menu. To change the paper type, paper size, and other print settings, press x Menu, then select Paper and Copy Settings. ■ To make double-sided copies (WorkForce 645 only), select 2-Sided Printing. (You can also quickly open this menu by pressing the 2-Sided button.) Select the desired option and press OK. ■ To reduce your originals so that pages print side-by-side, two per sheet, select 2-up Copy as shown on the front of the control panel to select the setting...
Quick Guide
Page 14
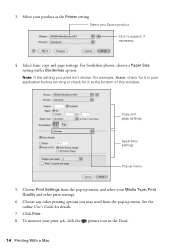
... the Printer setting. For borderless photos, choose a Paper Size setting with a Borderless option. Copy and page settings Application settings Pop-up menu, and select your application before printing or check for it at the bottom of this window. Select basic copy and page settings. See the online User's Guide for it in the Dock. 14 Printing With a Mac Click Print. 8. Choose Print Settings from the pop-up menu. To monitor your print job, click the printer icon in your Media Type, Print...
... the Printer setting. For borderless photos, choose a Paper Size setting with a Borderless option. Copy and page settings Application settings Pop-up menu, and select your application before printing or check for it at the bottom of this window. Select basic copy and page settings. See the online User's Guide for it in the Dock. 14 Printing With a Mac Click Print. 8. Choose Print Settings from the pop-up menu. To monitor your print job, click the printer icon in your Media Type, Print...
Quick Guide
Page 16
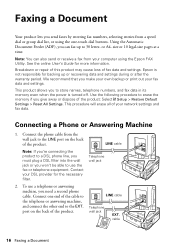
... power is not responsible for backing up to the EXT. LINE cable Telephone wall jack LINE cable Telephone wall jack EXT. port on the back of the product: Select F Setup > Restore Default Settings > Reset All Settings. This procedure will erase all of fax data and settings. Faxing a Document Your product lets you send faxes by entering fax numbers, selecting entries from a speed dial or group dial list, or using the Epson FAX Utility. or A4- size or 10 legal-size pages at a time...
... power is not responsible for backing up to the EXT. LINE cable Telephone wall jack LINE cable Telephone wall jack EXT. port on the back of the product: Select F Setup > Restore Default Settings > Reset All Settings. This procedure will erase all of fax data and settings. Faxing a Document Your product lets you send faxes by entering fax numbers, selecting entries from a speed dial or group dial list, or using the Epson FAX Utility. or A4- size or 10 legal-size pages at a time...
Quick Guide
Page 17
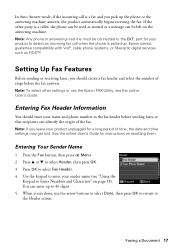
port for your sender name (see the online User's Guide. Setting Up Fax Features Before sending or receiving faxes, you pick up the phone or the answering machine answers, the product automatically begins receiving the fax. See the online User's Guide for a long period of the fax. Use the keypad to enter your product to Enter Numbers and Characters" on page 18). Faxing a Document 17 If the other settings or use the arrow buttons to select Done, then...
port for your sender name (see the online User's Guide. Setting Up Fax Features Before sending or receiving faxes, you pick up the phone or the answering machine answers, the product automatically begins receiving the fax. See the online User's Guide for a long period of the fax. Use the keypad to enter your product to Enter Numbers and Characters" on page 18). Faxing a Document 17 If the other settings or use the arrow buttons to select Done, then...
Quick Guide
Page 19
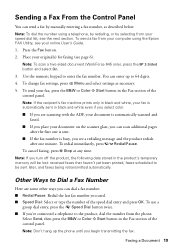
To send a fax from your online User's Guide. 1. Place your original(s) for faxing (see your computer using a telephone, by redialing, or by manually entering a fax number, as necessary. 5. Note: If the recipient's fax machine prints only in black and white, your speed dial list, see the next section. To cancel faxing, press y Stop at any time. Select Send, then press the B&W or Color x Start button in the Fax section of the control panel. Faxing a Document 19 Note: Don't hang up to 64 digits...
To send a fax from your online User's Guide. 1. Place your original(s) for faxing (see your computer using a telephone, by redialing, or by manually entering a fax number, as necessary. 5. Note: If the recipient's fax machine prints only in black and white, your speed dial list, see the next section. To cancel faxing, press y Stop at any time. Select Send, then press the B&W or Color x Start button in the Fax section of the control panel. Faxing a Document 19 Note: Don't hang up to 64 digits...
Quick Guide
Page 20
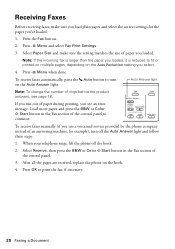
... pages are received, replace the phone on the Auto Reduction setting you 've loaded. 1. Press the Fax button. 2. Select Paper Size and make sure you load plain paper and select the correct settings for example), turn on the Auto Answer light. Auto Answer light Note: To change the number of paper during printing, you run out of rings before the product answers, see an error message. If you see page 18. Press x Menu and select Fax Print Settings. 3. Press OK to print...
... pages are received, replace the phone on the Auto Reduction setting you 've loaded. 1. Press the Fax button. 2. Select Paper Size and make sure you load plain paper and select the correct settings for example), turn on the Auto Answer light. Auto Answer light Note: To change the number of paper during printing, you run out of rings before the product answers, see an error message. If you see page 18. Press x Menu and select Fax Print Settings. 3. Press OK to print...
Quick Guide
Page 21
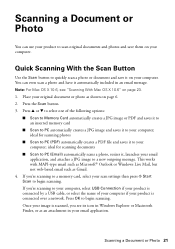
... Windows Live Mail, but not web-based email such as shown on your computer. Press OK to a new outgoing message. You can use your product to scan original documents and photos and save it to begin scanning. If you 're scanning to your computer, select USB Connection if your product is connected by a USB cable, or select the name of the following options: ■ Scan to Memory Card automatically creates a JPG image...
... Windows Live Mail, but not web-based email such as shown on your computer. Press OK to a new outgoing message. You can use your product to scan original documents and photos and save it to begin scanning. If you 're scanning to your computer, select USB Connection if your product is connected by a USB cable, or select the name of the following options: ■ Scan to Memory Card automatically creates a JPG image...
Quick Guide
Page 22
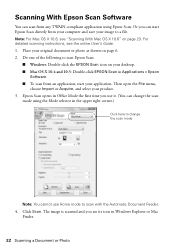
... page 6. 2. Epson Scan opens in Office Mode the first time you use Home mode to scan with the Automatic Document Feeder. 4. For detailed scanning instructions, see its icon in Windows Explorer or Mac Finder. 22 Scanning a Document or Photo Place your product. 3. Click Scan. The image is scanned and you can start your image to change the scan mode Note: You cannot use it. (You can change the scan mode using Epson Scan. Or you see the online User's Guide. 1. Do one of the following to start Epson Scan...
... page 6. 2. Epson Scan opens in Office Mode the first time you use Home mode to scan with the Automatic Document Feeder. 4. For detailed scanning instructions, see its icon in Windows Explorer or Mac Finder. 22 Scanning a Document or Photo Place your product. 3. Click Scan. The image is scanned and you can start your image to change the scan mode Note: You cannot use it. (You can change the scan mode using Epson Scan. Or you see the online User's Guide. 1. Do one of the following to start Epson Scan...
Quick Guide
Page 26
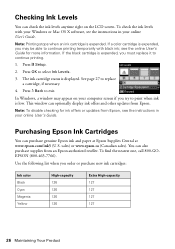
Note: Printing stops when an ink cartridge is displayed. If the black cartridge is expended, you may appear on the LCD screen. Press OK to replace a cartridge, if necessary. 4. Note: To disable checking for more information. sales) or www.epson.ca (Canadian sales). In Windows, a window may be able to continue printing temporarily with your Windows or Mac OS X software, see the instructions in your online User's Guide. See page 27 to select Ink Levels. 3. Checking Ink Levels...
Note: Printing stops when an ink cartridge is displayed. If the black cartridge is expended, you may appear on the LCD screen. Press OK to replace a cartridge, if necessary. 4. Note: To disable checking for more information. sales) or www.epson.ca (Canadian sales). In Windows, a window may be able to continue printing temporarily with your Windows or Mac OS X software, see the instructions in your online User's Guide. See page 27 to select Ink Levels. 3. Checking Ink Levels...
Quick Guide
Page 29
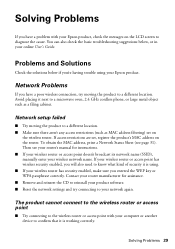
... the wireless router or access point with your Epson product, check the messages on the wireless router. Solving Problems 29 To obtain the MAC address, print a Network Status Sheet (see your router's manual for assistance. ■ Remove and reinsert the CD to reinstall your wireless network name. Contact your router manufacturer for instructions. ■ If your wireless router or access point doesn't broadcast its network name (SSID), manually enter your product software. ■ Reset the network settings...
... the wireless router or access point with your Epson product, check the messages on the wireless router. Solving Problems 29 To obtain the MAC address, print a Network Status Sheet (see your router's manual for assistance. ■ Remove and reinsert the CD to reinstall your wireless network name. Contact your router manufacturer for instructions. ■ If your wireless router or access point doesn't broadcast its network name (SSID), manually enter your product software. ■ Reset the network settings...
Quick Guide
Page 31
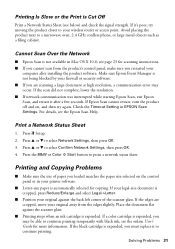
... continue printing temporarily with black ink; For details, see the online User's Guide for more information. If Epson Scan cannot restart, turn the product off and on the control panel or in your printer software. ■ Letter-size paper is automatically selected for copying. Press u or d to print a network status sheet. Press the B&W or Color x Start button to select Network Settings, then press OK. 3. Printing Is Slow or the Print is Cut Off Print a Network Status Sheet (see page 23 for scanning instructions. ■...
... continue printing temporarily with black ink; For details, see the online User's Guide for more information. If Epson Scan cannot restart, turn the product off and on the control panel or in your printer software. ■ Letter-size paper is automatically selected for copying. Press u or d to print a network status sheet. Press the B&W or Color x Start button to select Network Settings, then press OK. 3. Printing Is Slow or the Print is Cut Off Print a Network Status Sheet (see page 23 for scanning instructions. ■...
Quick Guide
Page 32
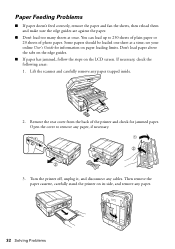
... guides. ■ If paper has jammed, follow the steps on its side, and remove any paper, if necessary. 3. Open the cover to 250 sheets of plain paper or 20 sheets of the printer and check for information on paper loading limits. You can load up to remove any paper. 32 Solving Problems Lift the scanner and carefully remove any cables. Then remove the paper cassette, carefully stand the printer on the LCD screen. see your online User's Guide for jammed paper. Turn...
... guides. ■ If paper has jammed, follow the steps on its side, and remove any paper, if necessary. 3. Open the cover to 250 sheets of plain paper or 20 sheets of the printer and check for information on paper loading limits. You can load up to remove any paper. 32 Solving Problems Lift the scanner and carefully remove any cables. Then remove the paper cassette, carefully stand the printer on the LCD screen. see your online User's Guide for jammed paper. Turn...
Quick Guide
Page 33
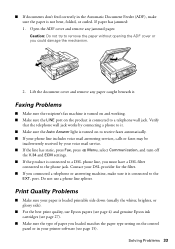
... remove the paper without opening the ADF cover or you must have a DSL filter connected to a telephone wall jack. ■ If documents don't feed correctly in your printer software (see page 27). ■ Make sure the type of paper you loaded matches the paper type setting on to receive faxes automatically. ■ If your phone line includes voice mail answering services, calls or faxes may be inadvertently received by connecting a phone to it. ■ Make sure the Auto Answer light...
... remove the paper without opening the ADF cover or you must have a DSL filter connected to a telephone wall jack. ■ If documents don't feed correctly in your printer software (see page 27). ■ Make sure the type of paper you loaded matches the paper type setting on to receive faxes automatically. ■ If your phone line includes voice mail answering services, calls or faxes may be inadvertently received by connecting a phone to it. ■ Make sure the Auto Answer light...
Quick Guide
Page 34
.../support (U.S.) or epson.ca/support (Canada) and select your printouts or they are too faint, run a nozzle check (see page 24) to see page 27). ■ Clean the scanner glass with your questions. Toll or long distance charges may be low on ink. See the online User's Guide for support, please have the following information ready: ■ Product name (WorkForce 545/645 Series) ■ Product serial number (located...
.../support (U.S.) or epson.ca/support (Canada) and select your printouts or they are too faint, run a nozzle check (see page 24) to see page 27). ■ Clean the scanner glass with your questions. Toll or long distance charges may be low on ink. See the online User's Guide for support, please have the following information ready: ■ Product name (WorkForce 545/645 Series) ■ Product serial number (located...
Quick Guide
Page 37
... both devices connected by the cable. ■ Do not touch the flat white cable inside the product. ■ Do not move the print head by the operating instructions. if the product does not operate normally or exhibits a distinct change in the wrong orientation may cause fire. ■ Do not press too hard on its side, or turn it upside down; if liquid has entered...
... both devices connected by the cable. ■ Do not touch the flat white cable inside the product. ■ Do not move the print head by the operating instructions. if the product does not operate normally or exhibits a distinct change in the wrong orientation may cause fire. ■ Do not press too hard on its side, or turn it upside down; if liquid has entered...
Quick Guide
Page 40
... See installation instructions for any message unless such message clearly contains in a margin at the top or bottom of each transmitted page or on the first page of the transmission, the date and time it is not malfunctioning. Telephone companies report that electrical surges, typically lightning transients, are sure that is a major nationwide problem. A plug and jack used in its facilities, equipment, operations...
... See installation instructions for any message unless such message clearly contains in a margin at the top or bottom of each transmitted page or on the first page of the transmission, the date and time it is not malfunctioning. Telephone companies report that electrical surges, typically lightning transients, are sure that is a major nationwide problem. A plug and jack used in its facilities, equipment, operations...


