User Manual
Page 1
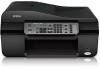
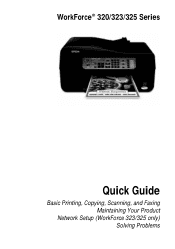
WorkForce® 320/323/325 Series Quick Guide Basic Printing, Copying, Scanning, and Faxing Maintaining Your Product Network Setup (WorkForce 323/325 only) Solving Problems
WorkForce® 320/323/325 Series Quick Guide Basic Printing, Copying, Scanning, and Faxing Maintaining Your Product Network Setup (WorkForce 323/325 only) Solving Problems
User Manual
Page 2
... Document Feeder 7 Copying a Document or Photo 9 Copying a Document or Photo 9 Printing From Your Computer 11 Printing in Windows 11 Printing With a Macintosh 12 Selecting the Correct Paper Type 14 Faxing a Document 15 Connecting a Phone or Answering Machine 15 Setting Up Fax Features 16 Sending a Fax From the Control Panel 18 Receiving Faxes 19 Scanning a Document or Photo 20 Scanning With Epson Scan Software 20 Scanning With Mac OS X 10.6 21 Maintaining Your Product 22 Checking the Print Head Nozzles 22 Cleaning the Print Head 23 Checking Ink Levels 23 Purchasing Epson Ink...
... Document Feeder 7 Copying a Document or Photo 9 Copying a Document or Photo 9 Printing From Your Computer 11 Printing in Windows 11 Printing With a Macintosh 12 Selecting the Correct Paper Type 14 Faxing a Document 15 Connecting a Phone or Answering Machine 15 Setting Up Fax Features 16 Sending a Fax From the Control Panel 18 Receiving Faxes 19 Scanning a Document or Photo 20 Scanning With Epson Scan Software 20 Scanning With Mac OS X 10.6 21 Maintaining Your Product 22 Checking the Print Head Nozzles 22 Cleaning the Print Head 23 Checking Ink Levels 23 Purchasing Epson Ink...
User Manual
Page 3
Replacing Ink Cartridges 25 Wireless Network Setup 27 Installing for the First Time 28 Setting Up Additional Computers 37 Solving Problems 41 Checking for Software Updates 41 Error Indicators 41 Problems and Solutions 42 Where to Get Help 46 Notices 47 Contents 3
Replacing Ink Cartridges 25 Wireless Network Setup 27 Installing for the First Time 28 Setting Up Additional Computers 37 Solving Problems 41 Checking for Software Updates 41 Error Indicators 41 Problems and Solutions 42 Where to Get Help 46 Notices 47 Contents 3
User Manual
Page 4
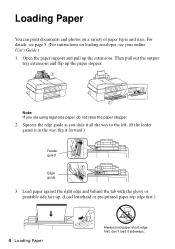
... paper stopper. 2. For details, see page 5. (For instructions on a variety of paper types and sizes. Then pull out the output tray extensions and flip up the extensions. Load paper against the right edge and behind the tab with the glossy or printable side face up. (Load letterhead or pre-printed paper top edge first.) 4 Loading Paper Always load paper short edge first; Loading Paper You can print documents and photos on loading envelopes, see your online User's Guide...
... paper stopper. 2. For details, see page 5. (For instructions on a variety of paper types and sizes. Then pull out the output tray extensions and flip up the extensions. Load paper against the right edge and behind the tab with the glossy or printable side face up. (Load letterhead or pre-printed paper top edge first.) 4 Loading Paper Always load paper short edge first; Loading Paper You can print documents and photos on loading envelopes, see your online User's Guide...
User Manual
Page 9
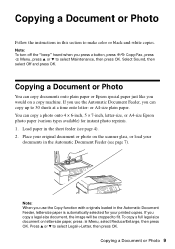
... Document Feeder (see page 4). 2. Press u or d to 30 sheets at a time onto letter- If you use the Copy function with originals loaded in the Automatic Document Feeder, letter-size paper is automatically selected for instant photo reprints. 1. or A4-size plain paper. Note: When you copy a legal-size document, the image will be cropped to make color or black-and-white copies. If you use the Automatic Document Feeder, you can copy up to select Legal->Letter, then press OK. Copying a Document or Photo...
... Document Feeder (see page 4). 2. Press u or d to 30 sheets at a time onto letter- If you use the Copy function with originals loaded in the Automatic Document Feeder, letter-size paper is automatically selected for instant photo reprints. 1. or A4-size plain paper. Note: When you copy a legal-size document, the image will be cropped to make color or black-and-white copies. If you use the Automatic Document Feeder, you can copy up to select Legal->Letter, then press OK. Copying a Document or Photo...
User Manual
Page 10
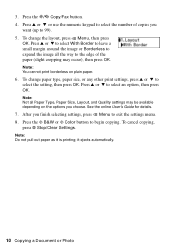
... the online User's Guide for details. 7. Note: Do not pull out paper as it ejects automatically. 10 Copying a Document or Photo Press u or d to select With Border to leave a small margin around the image or Borderless to expand the image all Paper Type, Paper Size, Layout, and Quality settings may occur), then press OK. Note: You cannot print borderless on the options you finish selecting settings, press x Menu...
... the online User's Guide for details. 7. Note: Do not pull out paper as it ejects automatically. 10 Copying a Document or Photo Press u or d to select With Border to leave a small margin around the image or Borderless to expand the image all Paper Type, Paper Size, Layout, and Quality settings may occur), then press OK. Note: You cannot print borderless on the options you finish selecting settings, press x Menu...
User Manual
Page 16
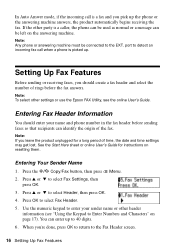
... online User's Guide. Entering Your Sender Name 1. See the Start Here sheet or online User's Guide for a long period of the fax. Press u or d to select Fax Header. 5. Note: Any phone or answering machine must be left on resetting them. Setting Up Fax Features Before sending or receiving faxes, you leave the product unplugged for instructions on the answering machine. Note: If you should enter your sender name or other settings or use the Epson FAX...
... online User's Guide. Entering Your Sender Name 1. See the Start Here sheet or online User's Guide for a long period of the fax. Press u or d to select Fax Header. 5. Note: Any phone or answering machine must be left on resetting them. Setting Up Fax Features Before sending or receiving faxes, you leave the product unplugged for instructions on the answering machine. Note: If you should enter your sender name or other settings or use the Epson FAX...
User Manual
Page 18
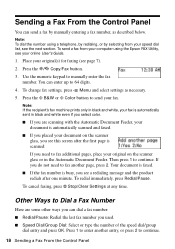
... the Control Panel To send a fax from your speed dial list, see your online User's Guide. 1. Place your original(s) for faxing (see a redialing message and the product redials after the first page is scanned: If you used. ■ Speed Dial/Group Dial: Select or type the number of the speed dial/group dial entry and press OK. Press the x B&W or x Color button to 64 digits. 4. To redial immediately, press Redial/Pause. To cancel faxing, press y Stop/Clear Settings at any time...
... the Control Panel To send a fax from your speed dial list, see your online User's Guide. 1. Place your original(s) for faxing (see a redialing message and the product redials after the first page is scanned: If you used. ■ Speed Dial/Group Dial: Select or type the number of the speed dial/group dial entry and press OK. Press the x B&W or x Color button to 64 digits. 4. To redial immediately, press Redial/Pause. To cancel faxing, press y Stop/Clear Settings at any time...

User Manual
Page 19
... light is reduced to receive the fax, then press 1 at the next screen. 3. To receive faxes automatically, make sure you load plain paper and select the Paper Size setting that matches the size of paper during printing, you 've loaded. Load more paper and press the OK button to print the fax. When your online User's Guide for instructions. If you run out of paper you see the error message Paper out. Press OK to continue. Note: To change the number...
... light is reduced to receive the fax, then press 1 at the next screen. 3. To receive faxes automatically, make sure you load plain paper and select the Paper Size setting that matches the size of paper during printing, you 've loaded. Load more paper and press the OK button to print the fax. When your online User's Guide for instructions. If you run out of paper you see the error message Paper out. Press OK to continue. Note: To change the number...
User Manual
Page 23
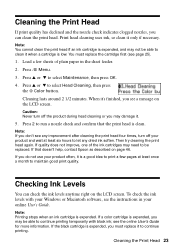
... must replace the cartridge first (see a message on page 46. Press u or d to select Head Cleaning, then press the x Color button. If quality does not improve, one of plain paper in your Windows or Macintosh software, see the online User's Guide for more information. To check the ink levels with black ink; Press u or d to select Maintenance, then press OK. 4. When it . 5. see the instructions in the sheet feeder. 2. Press x Menu. 3. Cleaning the Print...
... must replace the cartridge first (see a message on page 46. Press u or d to select Head Cleaning, then press the x Color button. If quality does not improve, one of plain paper in your Windows or Macintosh software, see the online User's Guide for more information. To check the ink levels with black ink; Press u or d to select Maintenance, then press OK. 4. When it . 5. see the instructions in the sheet feeder. 2. Press x Menu. 3. Cleaning the Print...
User Manual
Page 27
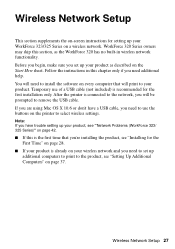
... wireless network and you 're installing the product, see "Network Problems (WorkForce 323/ 325 Series)" on page 37. Temporary use of a USB cable (not included) is recommended for the First Time" on page 28. ■ If your product is the first time that will be prompted to use the buttons on every computer that you need to remove the USB cable. Wireless Network Setup 27 Wireless Network Setup This section supplements the on-screen instructions for setting...
... wireless network and you 're installing the product, see "Network Problems (WorkForce 323/ 325 Series)" on page 37. Temporary use of a USB cable (not included) is recommended for the First Time" on page 28. ■ If your product is the first time that will be prompted to use the buttons on every computer that you need to remove the USB cable. Wireless Network Setup 27 Wireless Network Setup This section supplements the on-screen instructions for setting...
User Manual
Page 30
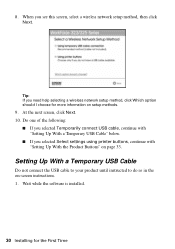
... connect USB cable, continue with "Setting Up With a Temporary USB Cable" below. ■ If you selected Select settings using printer buttons, continue with "Setting Up With the Product Buttons" on -screen instructions. 1. Wait while the software is installed. 30 Installing for more information on setup methods. 9. Tip: If you see this screen, select a wireless network setup method, then click Next. When you need help selecting a wireless network setup method, click Which option should I choose for the First Time 8. Setting...
... connect USB cable, continue with "Setting Up With a Temporary USB Cable" below. ■ If you selected Select settings using printer buttons, continue with "Setting Up With the Product Buttons" on -screen instructions. 1. Wait while the software is installed. 30 Installing for more information on setup methods. 9. Tip: If you see this screen, select a wireless network setup method, then click Next. When you need help selecting a wireless network setup method, click Which option should I choose for the First Time 8. Setting...
User Manual
Page 41
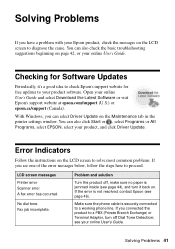
... your Epson product, check the messages on the LCD screen to proceed. Error Indicators Follow the instructions on the Maintenance tab in the printer settings window. Solving Problems 41 You can select Driver Update on the LCD screen to solve most common problems. If you see page 44), and turn off , make sure no paper is not resolved, contact Epson (see your online User's Guide. Fax job incomplete. If you can also click Start or , select Programs...
... your Epson product, check the messages on the LCD screen to proceed. Error Indicators Follow the instructions on the Maintenance tab in the printer settings window. Solving Problems 41 You can select Driver Update on the LCD screen to solve most common problems. If you see page 44), and turn off , make sure no paper is not resolved, contact Epson (see your online User's Guide. Fax job incomplete. If you can also click Start or , select Programs...

User Manual
Page 42
... trouble using . ■ If the product doesn't connect to obtain the MAC address. Problems and Solutions Check the solutions below if you will also need to contact Epson (see page 46) to find or connect to reinstall the product software. 42 Problems and Solutions LCD screen messages The product's ink pads are set on the wireless router or access point. Then see your router or access point's documentation for instructions on manually entering...
... trouble using . ■ If the product doesn't connect to obtain the MAC address. Problems and Solutions Check the solutions below if you will also need to contact Epson (see page 46) to find or connect to reinstall the product software. 42 Problems and Solutions LCD screen messages The product's ink pads are set on the wireless router or access point. Then see your router or access point's documentation for instructions on manually entering...
User Manual
Page 43
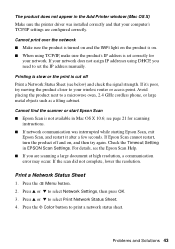
... IP addresses using TCP/IP, make sure the product's IP address is cut off and on, and then try moving the product closer to print a network status sheet. Printing is slow or the print is set the IP address manually. Press u or d to select Print Network Status Sheet. 4. Check the Timeout Setting in Mac OS X 10.6; The product does not appear in the Add Printer window (Mac OS X) Make sure the printer driver was interrupted while starting Epson Scan, exit Epson Scan...
... IP addresses using TCP/IP, make sure the product's IP address is cut off and on, and then try moving the product closer to print a network status sheet. Printing is slow or the print is set the IP address manually. Press u or d to select Print Network Status Sheet. 4. Check the Timeout Setting in Mac OS X 10.6; The product does not appear in the Add Printer window (Mac OS X) Make sure the printer driver was interrupted while starting Epson Scan, exit Epson Scan...
User Manual
Page 44
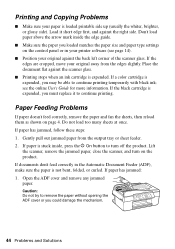
... the scanner glass. ■ Printing stops when an ink cartridge is not bent, folded, or curled. If the black cartridge is expended, you loaded matches the paper size and paper type settings on the control panel or in the Automatic Document Feeder (ADF), make sure the paper is expended. Open the ADF cover and remove any jammed paper. Printing and Copying Problems ■ Make sure your original away from the output tray or sheet feeder. 2. Load it to remove the paper without opening the ADF cover or you must replace it...
... the scanner glass. ■ Printing stops when an ink cartridge is not bent, folded, or curled. If the black cartridge is expended, you loaded matches the paper size and paper type settings on the control panel or in the Automatic Document Feeder (ADF), make sure the paper is expended. Open the ADF cover and remove any jammed paper. Printing and Copying Problems ■ Make sure your original away from the output tray or sheet feeder. 2. Load it to remove the paper without opening the ADF cover or you must replace it...
User Manual
Page 45
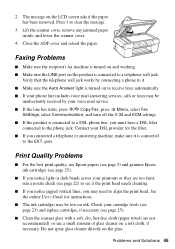
... the Auto Answer light is connected to clear the message. 3. Check your printouts or they are not recommended), or use a small amount of glass cleaner on the LCD screen asks if the paper has been removed. Problems and Solutions 45 Faxing Problems ■ Make sure the recipient's fax machine is connected to align the print head. Verify that the telephone wall jack works by your DSL provider for instructions. ■ The ink cartridges...
... the Auto Answer light is connected to clear the message. 3. Check your printouts or they are not recommended), or use a small amount of glass cleaner on the LCD screen asks if the paper has been removed. Problems and Solutions 45 Faxing Problems ■ Make sure the recipient's fax machine is connected to align the print head. Verify that the telephone wall jack works by your DSL provider for instructions. ■ The ink cartridges...
User Manual
Page 48
... upside down; ■ Do not open the scanner section while the product is copying, printing, scanning, or faxing. ■ Do not touch the flat white cable inside the product. ■ Do not spill liquid on the product. ■ Be careful not to trap your hand inside the product or touch any cartridges during printing. ■ Install a new ink cartridge immediately after removing an expended one.
... upside down; ■ Do not open the scanner section while the product is copying, printing, scanning, or faxing. ■ Do not touch the flat white cable inside the product. ■ Do not spill liquid on the product. ■ Be careful not to trap your hand inside the product or touch any cartridges during printing. ■ Install a new ink cartridge immediately after removing an expended one.

Brochure
Page 1
...-in black and color - speed dial storage up to 180 pages • Get more done - 30-page Auto Document Feeder to 60 numbers; WorkForce® 325 Print | Copy | Scan | Fax | Wi-Fi® Engineered for the life of originals Reliable • Smudge, fade and water resistant prints - Features and Benefits Fast • Save time - 4.3 ISO ppm (black) and 2.2 ISO ppm (color)† • Built-in wireless networking - replace only the color you can count...
...-in black and color - speed dial storage up to 180 pages • Get more done - 30-page Auto Document Feeder to 60 numbers; WorkForce® 325 Print | Copy | Scan | Fax | Wi-Fi® Engineered for the life of originals Reliable • Smudge, fade and water resistant prints - Features and Benefits Fast • Save time - 4.3 ISO ppm (black) and 2.2 ISO ppm (color)† • Built-in wireless networking - replace only the color you can count...

Brochure
Page 2
... PRINT Printing Technology Epson Printer Language Maximum Print Resolution ISO Print Speed† Minimum Ink Droplet Size COPY Copy Quality Copy Quantity Maximum Copy Size Copy Features SCAN Scanner Type Photoelectric Device Optical Resolution Hardware Resolution Maximum Resolution Scanner Bit Depth FAX Fax Specifications CONNECTIVITY Connectivity Operating Systems PAPER HANDLING PC-free Paper Support Maximum Paper Size Paper Sizes Borderless Photo Sizes Paper Types Envelope Types Input Paper Capacity Automatic Document Feeder 4-color (CMYK) drop-on accelerated testing of prints displayed...
... PRINT Printing Technology Epson Printer Language Maximum Print Resolution ISO Print Speed† Minimum Ink Droplet Size COPY Copy Quality Copy Quantity Maximum Copy Size Copy Features SCAN Scanner Type Photoelectric Device Optical Resolution Hardware Resolution Maximum Resolution Scanner Bit Depth FAX Fax Specifications CONNECTIVITY Connectivity Operating Systems PAPER HANDLING PC-free Paper Support Maximum Paper Size Paper Sizes Borderless Photo Sizes Paper Types Envelope Types Input Paper Capacity Automatic Document Feeder 4-color (CMYK) drop-on accelerated testing of prints displayed...


