Brochure
Page 1
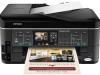
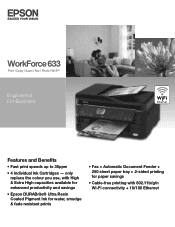
only replace the colour you use, with High & Extra High capacities available for enhanced productivity and savings • Epson DURABrite® Ultra Resin Coated Pigment Ink for water, smudge & fade resistant prints • Fax + Automatic Document Feeder + 250 sheet paper tray + 2-sided printing for paper savings • Cable-free printing with 802.11b/g/n Wi-Fi connectivity + 10/100 Ethernet Features and Benefits • Fast print speeds up to 38ppm • 4 Individual Ink Cartridges - WorkForce 633 Print | Copy | Scan | Fax | Photo | Wi-Fi® Engineered For Business.
only replace the colour you use, with High & Extra High capacities available for enhanced productivity and savings • Epson DURABrite® Ultra Resin Coated Pigment Ink for water, smudge & fade resistant prints • Fax + Automatic Document Feeder + 250 sheet paper tray + 2-sided printing for paper savings • Cable-free printing with 802.11b/g/n Wi-Fi connectivity + 10/100 Ethernet Features and Benefits • Fast print speeds up to 38ppm • 4 Individual Ink Cartridges - WorkForce 633 Print | Copy | Scan | Fax | Photo | Wi-Fi® Engineered For Business.
Brochure
Page 2
... in default, single-side mode, in the fastest mode. Duet AUTOMATIC DOCUMENT FEEDER FUNCTION MAXIMUM DOCUMENT SIZE A4 PAPER TYPES SUPPORTED Plain paper 64~95g/m2 PAPER CAPACITY Up to ISO7779 Pattern with USB* * Drivers if available are measured after first page with Error Correction Mode PC FAX* Windows only Yes GROUP DIAL Yes BROADCAST FAX Yes (mono only) AUTO REDIAL Yes RING DETECTION Yes - Epson iPrint (wireless photo printing from Tech Epson ELECTRICAL SPECIFICATIONS RATED VOLTAGE RATED FREQUENCY POWER CONSUMPTION...
... in default, single-side mode, in the fastest mode. Duet AUTOMATIC DOCUMENT FEEDER FUNCTION MAXIMUM DOCUMENT SIZE A4 PAPER TYPES SUPPORTED Plain paper 64~95g/m2 PAPER CAPACITY Up to ISO7779 Pattern with USB* * Drivers if available are measured after first page with Error Correction Mode PC FAX* Windows only Yes GROUP DIAL Yes BROADCAST FAX Yes (mono only) AUTO REDIAL Yes RING DETECTION Yes - Epson iPrint (wireless photo printing from Tech Epson ELECTRICAL SPECIFICATIONS RATED VOLTAGE RATED FREQUENCY POWER CONSUMPTION...
User Manual
Page 2
... Glass 8 Using the Automatic Document Feeder 8 Copying a Document 10 Copying a Document 10 Printing From a Memory Card 12 Inserting the Card 12 Printing Photos From the LCD Screen 13 Printing From Your Computer 14 Printing in Windows 14 Printing With a Macintosh 15 Selecting the Correct Paper Type 17 Faxing a Document 18 Connecting a Phone or Answering Machine 18 Setting Up Fax Features 19 Sending a Fax From the Control Panel 21 Receiving Faxes 22 Scanning a Document or Photo 23 Quick Scanning With the Scan Button 23 Scanning With Epson Scan Software 24 Scanning With Mac OS...
... Glass 8 Using the Automatic Document Feeder 8 Copying a Document 10 Copying a Document 10 Printing From a Memory Card 12 Inserting the Card 12 Printing Photos From the LCD Screen 13 Printing From Your Computer 14 Printing in Windows 14 Printing With a Macintosh 15 Selecting the Correct Paper Type 17 Faxing a Document 18 Connecting a Phone or Answering Machine 18 Setting Up Fax Features 19 Sending a Fax From the Control Panel 21 Receiving Faxes 22 Scanning a Document or Photo 23 Quick Scanning With the Scan Button 23 Scanning With Epson Scan Software 24 Scanning With Mac OS...
User Manual
Page 5
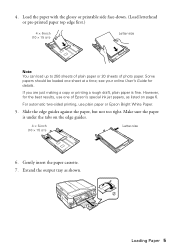
.... Make sure the paper is fine. Gently insert the paper cassette. 7. Load the paper with the glossy or printable side face-down. (Load letterhead or pre-printed paper top edge first.) 4 × 6-inch (10 × 15 cm) Letter-size Note: You can load up to 250 sheets of plain paper or 20 sheets of Epson's special ink jet papers, as shown. Extend the output tray as listed on the edge guides...
.... Make sure the paper is fine. Gently insert the paper cassette. 7. Load the paper with the glossy or printable side face-down. (Load letterhead or pre-printed paper top edge first.) 4 × 6-inch (10 × 15 cm) Letter-size Note: You can load up to 250 sheets of plain paper or 20 sheets of Epson's special ink jet papers, as shown. Extend the output tray as listed on the edge guides...
User Manual
Page 10
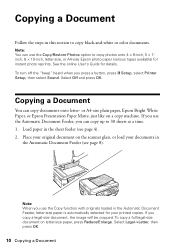
... Copy/Restore Photos option to 30 sheets at a time. 1. If you use the Automatic Document Feeder, you press a button, press F Setup, select Printer Setup, then select Sound. Place your original document on the scanner glass, or load your printed copies. If you use the Copy function with originals loaded in the Automatic Document Feeder, letter-size paper is automatically selected for your documents in the Automatic Document Feeder (see page 4). 2. Load paper in this section to copy black-and-white or color documents. Note: When you copy a legal-size document...
... Copy/Restore Photos option to 30 sheets at a time. 1. If you use the Automatic Document Feeder, you press a button, press F Setup, select Printer Setup, then select Sound. Place your original document on the scanner glass, or load your printed copies. If you use the Copy function with originals loaded in the Automatic Document Feeder, letter-size paper is automatically selected for your documents in the Automatic Document Feeder (see page 4). 2. Load paper in this section to copy black-and-white or color documents. Note: When you copy a legal-size document...
User Manual
Page 11
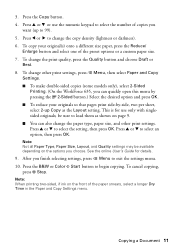
... cancel copying, press y Stop. See the online User's Guide for use the numeric keypad to 99). 5. Note: When printing two-sided, if ink on the front of the preset options or a custom paper size. 7. Copying a Document 11 3. To change the paper type, paper size, and other print settings, press x Menu, then select Paper and Copy Settings. ■ To make double-sided copies (some models only), select 2-Sided Printing. (On the WorkForce 635, you want (up Copy as shown on the options you finish selecting settings, press x Menu...
... cancel copying, press y Stop. See the online User's Guide for use the numeric keypad to 99). 5. Note: When printing two-sided, if ink on the front of the preset options or a custom paper size. 7. Copying a Document 11 3. To change the paper type, paper size, and other print settings, press x Menu, then select Paper and Copy Settings. ■ To make double-sided copies (some models only), select 2-Sided Printing. (On the WorkForce 635, you want (up Copy as shown on the options you finish selecting settings, press x Menu...
User Manual
Page 18
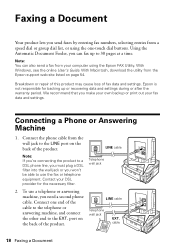
... the telephone or answering machine, and connect the other end to 30 pages at a time. Contact your fax data and settings. LINE cable Telephone wall jack LINE cable Telephone wall jack EXT. We recommend that you need a second phone cable. Connect one -touch dial buttons. port on page 54. Connecting a Phone or Answering Machine 1. Faxing a Document Your product lets you send faxes by entering fax numbers, selecting entries from a speed dial or group dial list, or using the Epson FAX Utility. Epson is not responsible for...
... the telephone or answering machine, and connect the other end to 30 pages at a time. Contact your fax data and settings. LINE cable Telephone wall jack LINE cable Telephone wall jack EXT. We recommend that you need a second phone cable. Connect one -touch dial buttons. port on page 54. Connecting a Phone or Answering Machine 1. Faxing a Document Your product lets you send faxes by entering fax numbers, selecting entries from a speed dial or group dial list, or using the Epson FAX Utility. Epson is not responsible for...
User Manual
Page 19
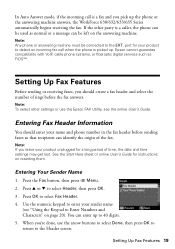
.... See the Start Here sheet or online User's Guide for a long period of the fax. Press u or d to select Fax Header. 4. Setting Up Fax Features 19 Setting Up Fax Features Before sending or receiving faxes, you 're done, use the Epson FAX Utility, see "Using the Keypad to detect an incoming fax call is a fax and you leave your name and phone number in the fax header before the fax answers. In Auto Answer mode, if...
.... See the Start Here sheet or online User's Guide for a long period of the fax. Press u or d to select Fax Header. 4. Setting Up Fax Features 19 Setting Up Fax Features Before sending or receiving faxes, you 're done, use the Epson FAX Utility, see "Using the Keypad to detect an incoming fax call is a fax and you leave your name and phone number in the fax header before the fax answers. In Auto Answer mode, if...

User Manual
Page 21
... Fax button. 2. Place your online User's Guide. 1. To change fax settings, press x Menu and select settings as described below. You can scan additional pages after one is sent. ■ If the fax number is automatically scanned and faxed. ■ If you place your document on the scanner glass, you used. ■ Speed Dial: Select or type the number of the speed dial entry and press OK. To cancel faxing, press y Stop at any time. Use the numeric keypad to send your fax...
... Fax button. 2. Place your online User's Guide. 1. To change fax settings, press x Menu and select settings as described below. You can scan additional pages after one is sent. ■ If the fax number is automatically scanned and faxed. ■ If you place your document on the scanner glass, you used. ■ Speed Dial: Select or type the number of the speed dial entry and press OK. To cancel faxing, press y Stop at any time. Use the numeric keypad to send your fax...
User Manual
Page 22
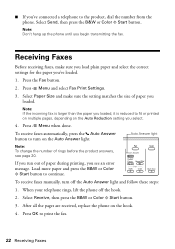
... phone. Press the Fax button. 2. Select Paper Size and make sure you load plain paper and select the correct settings for the paper you've loaded. 1. ■ If you've connected a telephone to print the fax. 22 Receiving Faxes Select Send, then press the B&W or Color x Start button. Press x Menu and select Fax Print Settings. 3. When your telephone rings, lift the phone off the Auto Answer light and follow these steps: 1. Load more paper and press the B&W or Color x Start button to turn...
... phone. Press the Fax button. 2. Select Paper Size and make sure you load plain paper and select the correct settings for the paper you've loaded. 1. ■ If you've connected a telephone to print the fax. 22 Receiving Faxes Select Send, then press the B&W or Color x Start button. Press x Menu and select Fax Print Settings. 3. When your telephone rings, lift the phone off the Auto Answer light and follow these steps: 1. Load more paper and press the B&W or Color x Start button to turn...

User Manual
Page 23
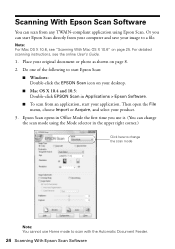
... to a new outgoing message 4. Scanning a Document or Photo 23 You can use your WorkForce 630/632/633/635 Series to your computer, select USB Connection if your product is connected by a USB cable, or select the name of the following options: ■ Scan to Memory Card automatically creates a JPG image or PDF and saves it to an inserted memory card ■ Scan to your computer; ideal for scanning documents ■ Scan to PC (Email) automatically scans a photo, resizes...
... to a new outgoing message 4. Scanning a Document or Photo 23 You can use your WorkForce 630/632/633/635 Series to your computer, select USB Connection if your product is connected by a USB cable, or select the name of the following options: ■ Scan to Memory Card automatically creates a JPG image or PDF and saves it to an inserted memory card ■ Scan to your computer; ideal for scanning documents ■ Scan to PC (Email) automatically scans a photo, resizes...
User Manual
Page 24
... online User's Guide. 1. For detailed scanning instructions, see "Scanning With Mac OS X 10.6" on page 25. Then open the File menu, choose Import or Acquire, and select your original document or photo as shown on your desktop. ■ Mac OS X 10.4 and 10.5: Double-click EPSON Scan in the upper right corner.) Click here to change the scan mode Note: You cannot use it. (You can change the scan mode using the Mode selector in Applications > Epson Software...
... online User's Guide. 1. For detailed scanning instructions, see "Scanning With Mac OS X 10.6" on page 25. Then open the File menu, choose Import or Acquire, and select your original document or photo as shown on your desktop. ■ Mac OS X 10.4 and 10.5: Double-click EPSON Scan in the upper right corner.) Click here to change the scan mode Note: You cannot use it. (You can change the scan mode using the Mode selector in Applications > Epson Software...
User Manual
Page 31
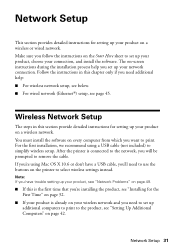
... connected to the network, you want to remove the cable. You must install the software on every computer from which you will be prompted to print. After the printer is already on page 42. Make sure you 'll need to use the buttons on the Start Here sheet to simplify wireless setup. For the first installation, we recommend using Mac OS X 10.6 or don't have trouble setting up your product, see "Network Problems...
... connected to the network, you want to remove the cable. You must install the software on every computer from which you will be prompted to print. After the printer is already on page 42. Make sure you 'll need to use the buttons on the Start Here sheet to simplify wireless setup. For the first installation, we recommend using Mac OS X 10.6 or don't have trouble setting up your product, see "Network Problems...
User Manual
Page 34
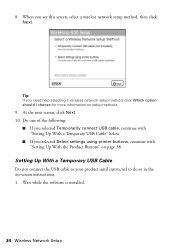
.... Wait while the software is installed. 34 Wireless Network Setup When you selected Select settings using printer buttons, continue with "Setting Up With the Product Buttons" on page 38. Setting Up With a Temporary USB Cable Do not connect the USB cable to your product until instructed to do so in the on setup methods. 9. Tip: If you need help selecting a wireless network setup method, click Which option should I choose for more information on -screen instructions. 1. Do one...
.... Wait while the software is installed. 34 Wireless Network Setup When you selected Select settings using printer buttons, continue with "Setting Up With the Product Buttons" on page 38. Setting Up With a Temporary USB Cable Do not connect the USB cable to your product until instructed to do so in the on setup methods. 9. Tip: If you need help selecting a wireless network setup method, click Which option should I choose for more information on -screen instructions. 1. Do one...

User Manual
Page 49
... Software Updates Periodically, it next to your wireless network name. Avoid placing it 's a good idea to check Epson's support website for instructions on manually entering your product software. Network setup failed ■ Try moving the product to a different location. With Windows, you can select Driver Update on the LCD screen to a different location. ■ If your Epson product, check the messages on the Maintenance tab in the printer settings window. Open your Epson product. Network Problems If you 're having trouble using your online User's Guide...
... Software Updates Periodically, it next to your wireless network name. Avoid placing it 's a good idea to check Epson's support website for instructions on manually entering your product software. Network setup failed ■ Try moving the product to a different location. With Windows, you can select Driver Update on the LCD screen to a different location. ■ If your Epson product, check the messages on the Maintenance tab in the printer settings window. Open your Epson product. Network Problems If you 're having trouble using your online User's Guide...
User Manual
Page 50
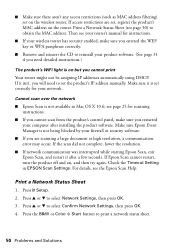
... assigning IP addresses automatically using DHCP. Cannot scan over the network ■ Epson Scan is not being blocked by your computer after a few seconds. Check the Timeout Setting in Mac OS X 10.6; Print a Network Status Sheet 1. Press F Setup. 2. see page 50) to print a network status sheet. 50 Problems and Solutions For details, see your router's manual for scanning instructions. ■ If you cannot scan from the product's control panel, make sure you are set, register the product's MAC address on...
... assigning IP addresses automatically using DHCP. Cannot scan over the network ■ Epson Scan is not being blocked by your computer after a few seconds. Check the Timeout Setting in Mac OS X 10.6; Print a Network Status Sheet 1. Press F Setup. 2. see page 50) to print a network status sheet. 50 Problems and Solutions For details, see your router's manual for scanning instructions. ■ If you cannot scan from the product's control panel, make sure you are set, register the product's MAC address on...
User Manual
Page 51
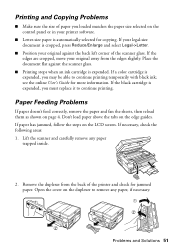
..., check the following areas: 1. Remove the duplexer from the edges slightly. Paper Feeding Problems If paper doesn't feed correctly, remove the paper and fan the sheets, then reload them as shown on the edge guides. Problems and Solutions 51 Printing and Copying Problems ■ Make sure the size of paper you loaded matches the paper size selected on the control panel or in your printer software. ■ Letter-size paper is automatically selected for jammed paper. Open the cover on the LCD screen...
..., check the following areas: 1. Remove the duplexer from the edges slightly. Paper Feeding Problems If paper doesn't feed correctly, remove the paper and fan the sheets, then reload them as shown on the edge guides. Problems and Solutions 51 Printing and Copying Problems ■ Make sure the size of paper you loaded matches the paper size selected on the control panel or in your printer software. ■ Letter-size paper is automatically selected for jammed paper. Open the cover on the LCD screen...

User Manual
Page 53
... glossy side). ■ For the best print quality, use Epson papers (see page 6) and genuine Epson ink cartridges (see page 29). ■ Make sure the type of paper you loaded matches the paper type setting on the control panel or in your printer software (see page 17). ■ If you notice light or dark bands across your cartridge levels (see page 27) and replace cartridges, if necessary (see page 29). ■ Clean the scanner glass with a soft, dry, lint-free cloth (paper...
... glossy side). ■ For the best print quality, use Epson papers (see page 6) and genuine Epson ink cartridges (see page 29). ■ Make sure the type of paper you loaded matches the paper type setting on the control panel or in your printer software (see page 17). ■ If you notice light or dark bands across your cartridge levels (see page 27) and replace cartridges, if necessary (see page 29). ■ Clean the scanner glass with a soft, dry, lint-free cloth (paper...
User Manual
Page 56
... is copying, printing, scanning, or faxing. ■ Be careful not to qualified service personnel under the following conditions: if the power cord or plug is damaged, contact Epson. Do not use the product near water. If discomfort or vision problems remain after a thorough flushing, see a doctor immediately. 56 Notices Except as specifically explained in the documentation. Do not adjust controls that are covered by...
... is copying, printing, scanning, or faxing. ■ Be careful not to qualified service personnel under the following conditions: if the power cord or plug is damaged, contact Epson. Do not use the product near water. If discomfort or vision problems remain after a thorough flushing, see a doctor immediately. 56 Notices Except as specifically explained in the documentation. Do not adjust controls that are covered by...
User Manual
Page 61
... the replacement printer in the United States and Canada. What Epson Will Do To Correct Problems: Should your printer to send your Epson printer prove defective during the warranty period, please call the Epson ConnectionSM at Epson's option, may be another model of exchange, Epson will be covered under this product for continuous production or similar high duty purposes is not considered normal use an address in...
... the replacement printer in the United States and Canada. What Epson Will Do To Correct Problems: Should your printer to send your Epson printer prove defective during the warranty period, please call the Epson ConnectionSM at Epson's option, may be another model of exchange, Epson will be covered under this product for continuous production or similar high duty purposes is not considered normal use an address in...


