Quick Guide
Page 1
Epson Stylus® NX400 Series Quick Guide Basic Copying, Printing, and Scanning Maintaining Your All-in-One Solving Problems
Epson Stylus® NX400 Series Quick Guide Basic Copying, Printing, and Scanning Maintaining Your All-in-One Solving Problems
Quick Guide
Page 4
... for printing from your computer ■ Scan a document or photo and restore or correct the color ■ Perform routine maintenance ■ Solve simple problems This book tells you how to your equipment. Introduction After you have set up your Epson Stylus® NX400 Series all-in-one as you connect it to avoid bodily injury. For additional instructions, see the on-screen User's Guide by double-clicking...
... for printing from your computer ■ Scan a document or photo and restore or correct the color ■ Perform routine maintenance ■ Solve simple problems This book tells you how to your equipment. Introduction After you have set up your Epson Stylus® NX400 Series all-in-one as you connect it to avoid bodily injury. For additional instructions, see the on-screen User's Guide by double-clicking...
Quick Guide
Page 6
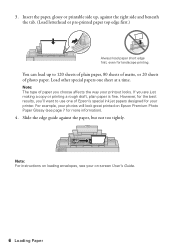
... printed on -screen User's Guide. 6 Loading Paper Load other special papers one of photo paper. For example, your printout looks. Note: The type of paper you 'll want to 120 sheets of plain paper, 80 sheets of matte, or 20 sheets of Epson's special ink jet papers designed for more information). 4. Note: For instructions on loading envelopes, see page 7 for your on Epson Premium Photo Paper Glossy (see your printer. 3. Insert the paper, glossy or printable side up to use...
... printed on -screen User's Guide. 6 Loading Paper Load other special papers one of photo paper. For example, your printout looks. Note: The type of paper you 'll want to 120 sheets of plain paper, 80 sheets of matte, or 20 sheets of Epson's special ink jet papers designed for more information). 4. Note: For instructions on loading envelopes, see page 7 for your on Epson Premium Photo Paper Glossy (see your printer. 3. Insert the paper, glossy or printable side up to use...
Quick Guide
Page 10
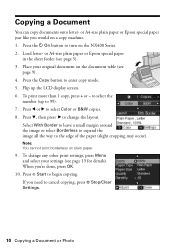
... select the number (up the LCD display screen. 6. Press d, then press r to cancel copying, press y Stop/Clear Settings. 10 Copying a Document or Photo Copying a Document You can copy documents onto letter- or A4-size plain paper or Epson special paper just like you would on plain paper. 9. Select With Border to leave a small margin around the image or select Borderless to expand the image all the way to enter copy mode. 5. To print more than 1 copy, press...
... select the number (up the LCD display screen. 6. Press d, then press r to cancel copying, press y Stop/Clear Settings. 10 Copying a Document or Photo Copying a Document You can copy documents onto letter- or A4-size plain paper or Epson special paper just like you would on plain paper. 9. Select With Border to leave a small margin around the image or select Borderless to expand the image all the way to enter copy mode. 5. To print more than 1 copy, press...
Quick Guide
Page 11
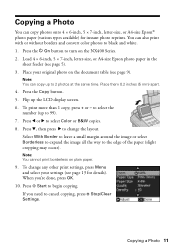
... same time. to cancel copying, press y Stop/Clear Settings. If you 're done, press OK. 10. Load 4 × 6-inch, 5 × 7-inch, letter-size, or A4-size Epson photo paper in the sheet feeder (see page 9). Press l or r to change any other print settings, press Menu and select your original photo on the document table (see page 5). 3. When you need to select the number (up the LCD display screen. 6. Press d, then press r to select Color or B&W copies. 8. Note...
... same time. to cancel copying, press y Stop/Clear Settings. If you 're done, press OK. 10. Load 4 × 6-inch, 5 × 7-inch, letter-size, or A4-size Epson photo paper in the sheet feeder (see page 9). Press l or r to change any other print settings, press Menu and select your original photo on the document table (see page 5). 3. When you need to select the number (up the LCD display screen. 6. Press d, then press r to select Color or B&W copies. 8. Note...
Quick Guide
Page 12
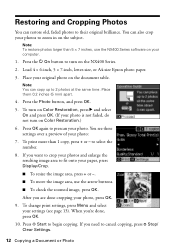
... image, press OK. To change print settings, press Menu and select your settings (see these settings over a preview of your paper, press Display/Crop. ■ To resize the image area, press + or -. ■ To move the image area, use the NX400 Series software on the NX400 Series. 2. Note: To restore photos larger than 1 copy, press + or - Press the Photo button, and press OK. 5. to prescan your original photo on Color Restoration.) 6. Load...
... image, press OK. To change print settings, press Menu and select your settings (see these settings over a preview of your paper, press Display/Crop. ■ To resize the image area, press + or -. ■ To move the image area, use the NX400 Series software on the NX400 Series. 2. Note: To restore photos larger than 1 copy, press + or - Press the Photo button, and press OK. 5. to prescan your original photo on Color Restoration.) 6. Load...
Quick Guide
Page 13
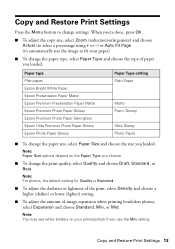
... To change the paper size, select Paper Size and choose the size you loaded. Glossy Ultra Glossy Photo Paper ■ To change the print quality, select Quality and choose Draft, Standard, or Best. Copy and Restore Print Settings 13 Paper type Plain paper Epson Bright White Paper Epson Presentation Paper Matte Epson Premium Presentation Paper Matte Epson Premium Photo Paper Glossy Epson Premium Photo Paper Semi-gloss Epson Ultra Premium Photo Paper Glossy Epson Photo Paper Glossy Paper Type setting Plain Paper Matte Prem. Copy and Restore Print Settings Press the Menu button...
... To change the paper size, select Paper Size and choose the size you loaded. Glossy Ultra Glossy Photo Paper ■ To change the print quality, select Quality and choose Draft, Standard, or Best. Copy and Restore Print Settings 13 Paper type Plain paper Epson Bright White Paper Epson Presentation Paper Matte Epson Premium Presentation Paper Matte Epson Premium Photo Paper Glossy Epson Premium Photo Paper Semi-gloss Epson Ultra Premium Photo Paper Glossy Epson Photo Paper Glossy Paper Type setting Plain Paper Matte Prem. Copy and Restore Print Settings Press the Menu button...
Quick Guide
Page 20
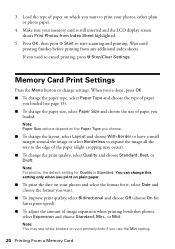
... display screen shows Print Photos from any additional index sheets. Make sure your photos and select the format for it, select Date and choose the format you loaded (see white borders on your memory card is Standard. Note: You may occur). ■ To change the paper type, select Paper Type and choose the type of paper you want to cancel printing, press y Stop/Clear Settings. When you print on plain paper. ■ To print the date on your photos...
... display screen shows Print Photos from any additional index sheets. Make sure your photos and select the format for it, select Date and choose the format you loaded (see white borders on your memory card is Standard. Note: You may occur). ■ To change the paper type, select Paper Type and choose the type of paper you want to cancel printing, press y Stop/Clear Settings. When you print on plain paper. ■ To print the date on your photos...
Quick Guide
Page 21
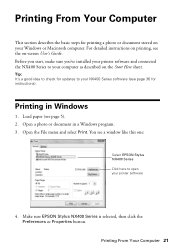
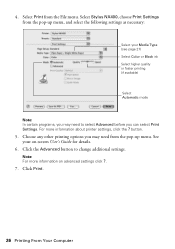
... Windows 1. Printing From Your Computer 21 You see page 36 for printing a photo or document stored on your computer as described on the Start Here sheet. Make sure EPSON Stylus NX400 Series is selected, then click the Preferences or Properties button. Load paper (see the on printing, see page 5). 2. Open the File menu and select Print. Printing From Your Computer This section describes the basic steps for instructions). For detailed instructions on -screen User's Guide. Printing in a Windows program...
... Windows 1. Printing From Your Computer 21 You see page 36 for printing a photo or document stored on your computer as described on the Start Here sheet. Make sure EPSON Stylus NX400 Series is selected, then click the Preferences or Properties button. Load paper (see the on printing, see page 5). 2. Open the File menu and select Print. Printing From Your Computer This section describes the basic steps for instructions). For detailed instructions on -screen User's Guide. Printing in a Windows program...
Quick Guide
Page 24
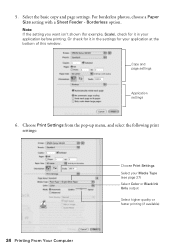
For borderless photos, choose a Paper Size setting with a Sheet Feeder - Borderless option. Copy and page settings Application settings 6. 5. Select the basic copy and page settings. Choose Print Settings from the pop-up menu, and select the following print settings: Choose Print Settings Select your application before printing. Note: If the setting you want isn't shown (for example, Scale), check for it in the settings for it in your Media Type (see page 27) Select Color or Black Ink Only output Select higher...
For borderless photos, choose a Paper Size setting with a Sheet Feeder - Borderless option. Copy and page settings Application settings 6. 5. Select the basic copy and page settings. Choose Print Settings from the pop-up menu, and select the following print settings: Choose Print Settings Select your application before printing. Note: If the setting you want isn't shown (for example, Scale), check for it in the settings for it in your Media Type (see page 27) Select Color or Black Ink Only output Select higher...
Quick Guide
Page 25
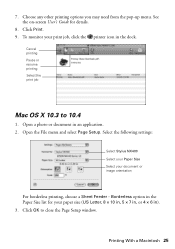
Open a photo or document in the dock. Open the File menu and select Page Setup. See the on-screen User's Guide for your print job, click the printer icon in an application. 2. Click Print. 9. Choose any other printing options you may need from the pop-up menu. To monitor your paper size (US Letter, 8 × 10 in, 5 × 7 in, or 4 × 6 in). 3. Borderless option in the Paper Size list for details. 8. Select the following settings: Select...
Open a photo or document in the dock. Open the File menu and select Page Setup. See the on-screen User's Guide for your print job, click the printer icon in an application. 2. Click Print. 9. Choose any other printing options you may need from the pop-up menu. To monitor your paper size (US Letter, 8 × 10 in, 5 × 7 in, or 4 × 6 in). 3. Borderless option in the Paper Size list for details. 8. Select the following settings: Select...
Quick Guide
Page 26
... Print Settings. For more information on -screen User's Guide for details. 6. Note: For more information about printer settings, click the ? Select Stylus NX400, choose Print Settings from the pop-up menu. See your Media Type (see page 27) Select Color or Black ink Select higher quality or faster printing (if available) Select Automatic mode Note: In certain programs, you may need from the File menu. Click Print. 26 Printing From Your Computer button...
... Print Settings. For more information on -screen User's Guide for details. 6. Note: For more information about printer settings, click the ? Select Stylus NX400, choose Print Settings from the pop-up menu. See your Media Type (see page 27) Select Color or Black ink Select higher quality or faster printing (if available) Select Automatic mode Note: In certain programs, you may need from the File menu. Click Print. 26 Printing From Your Computer button...
Quick Guide
Page 28
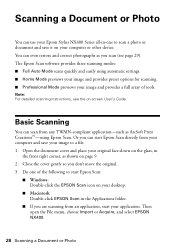
... on -screen User's Guide. Open the document cover and place your image and provides a full array of the following to a file. 1. Then open the File menu, choose Import or Acquire, and select EPSON NX400. 28 Scanning a Document or Photo Close the cover gently so you scan (see the on page 9. 2. Scanning a Document or Photo You can use your Epson Stylus NX400 Series all-in-one of tools. The Epson Scan software provides three scanning modes: ■ Full Auto Mode scans quickly and easily using Epson Scan.
... on -screen User's Guide. Open the document cover and place your image and provides a full array of the following to a file. 1. Then open the File menu, choose Import or Acquire, and select EPSON NX400. 28 Scanning a Document or Photo Close the cover gently so you scan (see the on page 9. 2. Scanning a Document or Photo You can use your Epson Stylus NX400 Series all-in-one of tools. The Epson Scan software provides three scanning modes: ■ Full Auto Mode scans quickly and easily using Epson Scan.
Quick Guide
Page 31
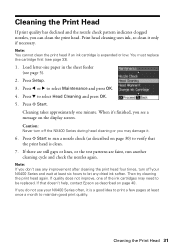
... cleaning the print head again. Press x Start to run another cleaning cycle and check the nozzles again. Note: If you see any improvement after cleaning the print head four times, turn off your NX400 Series often, it only if necessary. Note: You cannot clean the print head if an ink cartridge is clean. 7. Press Setup. 3. Press l or r to select Head Cleaning and press OK. 5. Load letter-size paper in the sheet feeder...
... cleaning the print head again. Press x Start to run another cleaning cycle and check the nozzles again. Note: If you see any improvement after cleaning the print head four times, turn off your NX400 Series often, it only if necessary. Note: You cannot clean the print head if an ink cartridge is clean. 7. Press Setup. 3. Press l or r to select Head Cleaning and press OK. 5. Load letter-size paper in the sheet feeder...
Quick Guide
Page 36
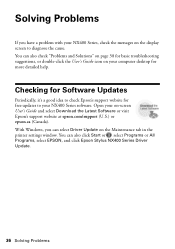
... on-screen User's Guide and select Download the Latest Software or visit Epson's support website at epson.com/support (U.S.) or epson.ca (Canada). Solving Problems If you can select Driver Update on the Maintenance tab in the printer settings window. You can also check "Problems and Solutions" on page 38 for basic troubleshooting suggestions, or double-click the User's Guide icon on your computer desktop for free updates to check Epson's support website for more detailed help. Open your NX400 Series software. You...
... on-screen User's Guide and select Download the Latest Software or visit Epson's support website at epson.com/support (U.S.) or epson.ca (Canada). Solving Problems If you can select Driver Update on the Maintenance tab in the printer settings window. You can also check "Problems and Solutions" on page 38 for basic troubleshooting suggestions, or double-click the User's Guide icon on your computer desktop for free updates to check Epson's support website for more detailed help. Open your NX400 Series software. You...
Quick Guide
Page 37
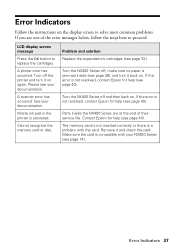
A printer error has occurred. Problem and solution Replace the expended ink cartridges (see page 33.) Turn the NX400 Series off, make sure no paper is not resolved, contact Epson for help (see page 40). Turn the NX400 Series off the printer and turn it and check the card. Contact Epson for help (see page 40). Remove it back on . Make sure the card is not resolved, contact Epson for help (see page 40). Cannot recognize the memory card or disk. If the...
A printer error has occurred. Problem and solution Replace the expended ink cartridges (see page 33.) Turn the NX400 Series off, make sure no paper is not resolved, contact Epson for help (see page 40). Turn the NX400 Series off the printer and turn it and check the card. Contact Epson for help (see page 40). Remove it back on . Make sure the card is not resolved, contact Epson for help (see page 40). Cannot recognize the memory card or disk. If the...
Quick Guide
Page 38
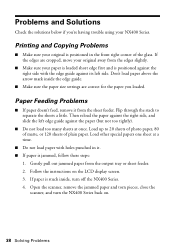
... guide. ■ Make sure the paper size settings are cropped, move your original away from the edges slightly. ■ Make sure your paper is loaded short edge first and is positioned against the right side with holes punched in the front right corner of plain paper. Open the scanner, remove the jammed paper and torn pieces, close the scanner, and turn off the NX400 Series. 4. Paper Feeding Problems ■ If paper doesn't feed, remove...
... guide. ■ Make sure the paper size settings are cropped, move your original away from the edges slightly. ■ Make sure your paper is loaded short edge first and is positioned against the right side with holes punched in the front right corner of plain paper. Open the scanner, remove the jammed paper and torn pieces, close the scanner, and turn off the NX400 Series. 4. Paper Feeding Problems ■ If paper doesn't feed, remove...
Quick Guide
Page 39
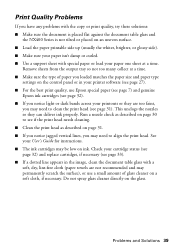
... cleaner directly on ink. See your User's Guide for instructions. ■ The ink cartridges may be low on the glass. Check your cartridge status (see page 32) and replace cartridges, if necessary (see page 33). ■ If a dotted line appears in your printer software (see page 27). ■ For the best print quality, use a small amount of paper you loaded matches the paper size and paper type settings on an uneven surface. ■ Load the paper printable side up (usually...
... cleaner directly on ink. See your User's Guide for instructions. ■ The ink cartridges may be low on the glass. Check your cartridge status (see page 32) and replace cartridges, if necessary (see page 33). ■ If a dotted line appears in your printer software (see page 27). ■ For the best print quality, use a small amount of paper you loaded matches the paper size and paper type settings on an uneven surface. ■ Load the paper printable side up (usually...
Quick Guide
Page 41
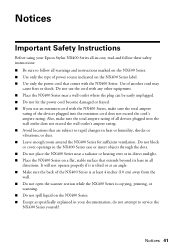
... an angle. ■ Make sure the back of the NX400 Series is at least 4 inches (10 cm) away from the wall. ■ Do not open the scanner section while the NX400 Series is copying, printing, or scanning. ■ Do not spill liquid on the NX400 Series label. ■ Use only the power cord that are subject to rapid changes in heat or...
... an angle. ■ Make sure the back of the NX400 Series is at least 4 inches (10 cm) away from the wall. ■ Do not open the scanner section while the NX400 Series is copying, printing, or scanning. ■ Do not spill liquid on the NX400 Series label. ■ Use only the power cord that are subject to rapid changes in heat or...
Quick Guide
Page 45
... Do To Correct Problems: Should your original product covered by disasters such as you must provide proof of the date of the printer or a part, the item replaced becomes Epson property. Possessions). The replacement printer or part may be free from the Epson authorized service center. If Epson authorizes an exchange for all costs to the Epson product after its option, exchange or repair the printer without charge for...
... Do To Correct Problems: Should your original product covered by disasters such as you must provide proof of the date of the printer or a part, the item replaced becomes Epson property. Possessions). The replacement printer or part may be free from the Epson authorized service center. If Epson authorizes an exchange for all costs to the Epson product after its option, exchange or repair the printer without charge for...


