Quick Guide
Page 1
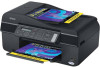
Epson Stylus® NX300/305 Series Quick Guide Basic Printing, Copying, Scanning, and Faxing Maintaining Your All-in-One Solving Problems
Epson Stylus® NX300/305 Series Quick Guide Basic Printing, Copying, Scanning, and Faxing Maintaining Your All-in-One Solving Problems
Quick Guide
Page 2
...4 Loading Paper 5 Using Special Papers 6 Placing Originals for Copying, Scanning, or Faxing 8 Using the Scanner Glass 8 Using the Automatic Document Feeder 9 Copying a Document or Photo 11 Copying a Document 11 Copying a Photo 12 Faxing a Document or Photo 14 Connecting a Phone or Answering Machine 14 Setting Up Fax Features 16 Sending a Fax 20 Receiving Faxes 22 Using the One-touch Dial Buttons 23 Printing From Your Computer 24 Printing in Windows 24 Printing With a Macintosh 26 Selecting the Correct Paper Type 30 Scanning a Document or Photo 31 Basic Scanning 31 Scanning...
...4 Loading Paper 5 Using Special Papers 6 Placing Originals for Copying, Scanning, or Faxing 8 Using the Scanner Glass 8 Using the Automatic Document Feeder 9 Copying a Document or Photo 11 Copying a Document 11 Copying a Photo 12 Faxing a Document or Photo 14 Connecting a Phone or Answering Machine 14 Setting Up Fax Features 16 Sending a Fax 20 Receiving Faxes 22 Using the One-touch Dial Buttons 23 Printing From Your Computer 24 Printing in Windows 24 Printing With a Macintosh 26 Selecting the Correct Paper Type 30 Scanning a Document or Photo 31 Basic Scanning 31 Scanning...
Quick Guide
Page 4
...; Load paper ■ Make a copy of these things without ever turning on your desktop (requires an Internet connection). Of course, your NX300/305 Series can do most of a document or photo ■ Fax a document or photo ■ Get the basic steps for better faxing, copying, scanning, and printing. 4 Introduction Tip: Tips contain hints for printing from your computer ■ Scan multiple pages ■ Perform routine maintenance ■ Solve simple problems This book tells...
...; Load paper ■ Make a copy of these things without ever turning on your desktop (requires an Internet connection). Of course, your NX300/305 Series can do most of a document or photo ■ Fax a document or photo ■ Get the basic steps for better faxing, copying, scanning, and printing. 4 Introduction Tip: Tips contain hints for printing from your computer ■ Scan multiple pages ■ Perform routine maintenance ■ Solve simple problems This book tells...
Quick Guide
Page 5
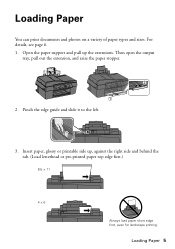
Loading Paper You can print documents and photos on a variety of paper types and sizes. Then open the output tray, pull out the extension, and raise the paper stopper. 2. For details, see page 6. 1. Insert paper, glossy or printable side up the extensions. Open the paper support and pull up , against the right side and behind the tab. (Load letterhead or pre-printed paper top edge first.) 8½ × 11 4 × 6 Always load paper short edge first, even for landscape printing. Loading Paper 5 Pinch the edge guide and slide it to the left. 3.
Loading Paper You can print documents and photos on a variety of paper types and sizes. Then open the output tray, pull out the extension, and raise the paper stopper. 2. For details, see page 6. 1. Insert paper, glossy or printable side up the extensions. Open the paper support and pull up , against the right side and behind the tab. (Load letterhead or pre-printed paper top edge first.) 8½ × 11 4 × 6 Always load paper short edge first, even for landscape printing. Loading Paper 5 Pinch the edge guide and slide it to the left. 3.
Quick Guide
Page 8
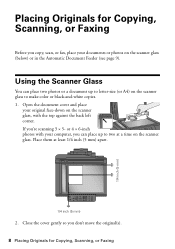
... the Automatic Document Feeder (see page 9). or 4 × 6-inch photos with the top against the back left corner. Using the Scanner Glass You can place up to letter-size (or A4) on the scanner glass to two at least 1/4 inch (5 mm) apart. 1/4 inch (5 mm) 2. Open the document cover and place your computer, you can place two photos or a document up to make color or black-and-white copies. 1.
... the Automatic Document Feeder (see page 9). or 4 × 6-inch photos with the top against the back left corner. Using the Scanner Glass You can place up to letter-size (or A4) on the scanner glass to two at least 1/4 inch (5 mm) apart. 1/4 inch (5 mm) 2. Open the document cover and place your computer, you can place two photos or a document up to make color or black-and-white copies. 1.
Quick Guide
Page 11
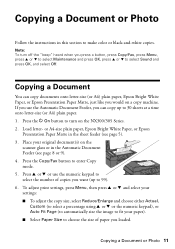
... fit your original document(s) on the NX300/305 Series. 2. Place your paper). ■ Select Paper Size to 99). 6. or A4-size plain paper, Epson Bright White Paper, or Epson Presentation Paper Matte in the sheet feeder (see page 8 or 9). 4. Copying a Document You can copy up to choose the size of copies you loaded. Note: To turn on the scanner glass or in the Automatic Document Feeder (see page 5). 3. Load letter- Copying a Document or Photo Follow the instructions in this section to enter Copy mode. 5.
... fit your original document(s) on the NX300/305 Series. 2. Place your paper). ■ Select Paper Size to 99). 6. or A4-size plain paper, Epson Bright White Paper, or Epson Presentation Paper Matte in the sheet feeder (see page 8 or 9). 4. Copying a Document You can copy up to choose the size of copies you loaded. Note: To turn on the scanner glass or in the Automatic Document Feeder (see page 5). 3. Load letter- Copying a Document or Photo Follow the instructions in this section to enter Copy mode. 5.
Quick Guide
Page 12
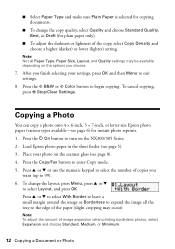
... (lighter) setting. Copying a Photo You can copy a photo onto 4 × 6-inch, 5 × 7-inch, or letter-size Epson photo paper (various types available-see page 5). 3. ■ Select Paper Type and make sure Plain Paper is selected for copying documents. ■ To change the layout, press Menu, press u or d to select Layout, and press OK. Press the x B&W or x Color button to enter Copy mode. 5. Press the P On button to turn on the scanner glass (see page 8). 4. Place your settings, press OK...
... (lighter) setting. Copying a Photo You can copy a photo onto 4 × 6-inch, 5 × 7-inch, or letter-size Epson photo paper (various types available-see page 5). 3. ■ Select Paper Type and make sure Plain Paper is selected for copying documents. ■ To change the layout, press Menu, press u or d to select Layout, and press OK. Press the x B&W or x Color button to enter Copy mode. 5. Press the P On button to turn on the scanner glass (see page 8). 4. Place your settings, press OK...
Quick Guide
Page 14
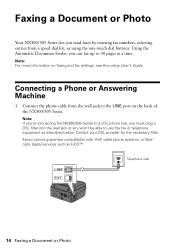
... a time. Note: If you're connecting the NX300/305 Series to a DSL phone line, you must plug a DSL filter into the wall jack or you won't be able to use the fax or telephone equipment as FiOS™. Faxing a Document or Photo Your NX300/305 Series lets you send faxes by entering fax numbers, selecting entries from the wall jack to the LINE port on faxing and fax settings, see the online User's Guide.
... a time. Note: If you're connecting the NX300/305 Series to a DSL phone line, you must plug a DSL filter into the wall jack or you won't be able to use the fax or telephone equipment as FiOS™. Faxing a Document or Photo Your NX300/305 Series lets you send faxes by entering fax numbers, selecting entries from the wall jack to the LINE port on faxing and fax settings, see the online User's Guide.
Quick Guide
Page 16
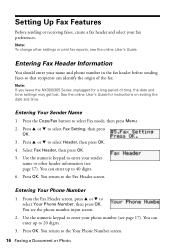
... return to enter your phone number (see the online User's Guide. Use the numeric keypad to the Fax Header screen. Use the numeric keypad to the Your Phone Number screen. 16 Faxing a Document or Photo Press OK. You return to enter your sender name or other settings or print fax reports, see page 17). Select Fax Header, then press OK. 5. Note: If you leave the NX300/305 Series unplugged for instructions on setting the date and time. Press...
... return to enter your phone number (see the online User's Guide. Use the numeric keypad to the Fax Header screen. Use the numeric keypad to the Your Phone Number screen. 16 Faxing a Document or Photo Press OK. You return to enter your sender name or other settings or print fax reports, see page 17). Select Fax Header, then press OK. 5. Note: If you leave the NX300/305 Series unplugged for instructions on setting the date and time. Press...

Quick Guide
Page 18
... incoming faxes are printed, and choose the printed reports you want. 1. Positive values increase the contrast of incoming and outgoing faxes. Press the Copy/Fax button to select Fax mode, then press Menu. 2. Select Fine for small print or detailed line art, Photo for pictures, or Standard for every fax you loaded (letter, legal, or A4). Indicates the size of paper you send. 18 Faxing a Document or Photo Select Scan and Print Settings Use these settings to adjust the image...
... incoming faxes are printed, and choose the printed reports you want. 1. Positive values increase the contrast of incoming and outgoing faxes. Press the Copy/Fax button to select Fax mode, then press Menu. 2. Select Fine for small print or detailed line art, Photo for pictures, or Standard for every fax you loaded (letter, legal, or A4). Indicates the size of paper you send. 18 Faxing a Document or Photo Select Scan and Print Settings Use these settings to adjust the image...
Quick Guide
Page 20
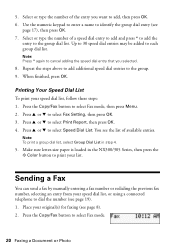
...-size paper is loaded in step 4. 5. Place your speed dial list, or using a connected telephone to print your speed dial list, follow these steps: 1. Sending a Fax You can send a fax by manually entering a fax number or redialing the previous fax number, selecting an entry from your original(s) for faxing (see the list of available entries. Select or type the number of the entry you selected. 8. Press the Copy/Fax button to select Fax Setting, then press OK. 3. Press u or d to select Fax mode...
...-size paper is loaded in step 4. 5. Place your speed dial list, or using a connected telephone to print your speed dial list, follow these steps: 1. Sending a Fax You can send a fax by manually entering a fax number or redialing the previous fax number, selecting an entry from your original(s) for faxing (see the list of available entries. Select or type the number of the entry you selected. 8. Press the Copy/Fax button to select Fax Setting, then press OK. 3. Press u or d to select Fax mode...
Quick Guide
Page 21
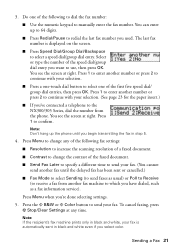
... keypad to manually enter the fax number. Press 1 to enter another fax until you begin transmitting the fax in black and white even if you 're done selecting settings. 5. Press Menu to change any time. Note: If the recipient's fax machine prints only in black and white, your fax. Select or type the number of the first five speed dial/ group dial entries, then press OK. You see the screen at right. To cancel faxing, press y Stop/Clear Settings at...
... keypad to manually enter the fax number. Press 1 to enter another fax until you begin transmitting the fax in black and white even if you 're done selecting settings. 5. Press Menu to change any time. Note: If the recipient's fax machine prints only in black and white, your fax. Select or type the number of the first five speed dial/ group dial entries, then press OK. You see the screen at right. To cancel faxing, press y Stop/Clear Settings at...
Quick Guide
Page 22
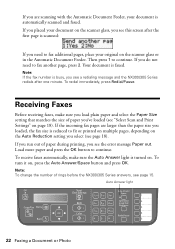
... receiving faxes, make sure the Auto Answer light is turned on. To turn it on, press the Auto Answer/Space button and press OK. Note: To change the number of paper during printing, you see the error message Paper out. If you placed your document on the scanner glass, you see this screen after one minute. Auto Answer light Stop/ Clear Settings Auto Answer/ Space Copy/Fax B&W Color Speed Dial Group Dial/ Backspace Redial/Pause 22 Faxing a Document or Photo If the incoming fax pages are scanning...
... receiving faxes, make sure the Auto Answer light is turned on. To turn it on, press the Auto Answer/Space button and press OK. Note: To change the number of paper during printing, you see the error message Paper out. If you placed your document on the scanner glass, you see this screen after one minute. Auto Answer light Stop/ Clear Settings Auto Answer/ Space Copy/Fax B&W Color Speed Dial Group Dial/ Backspace Redial/Pause 22 Faxing a Document or Photo If the incoming fax pages are scanning...
Quick Guide
Page 24
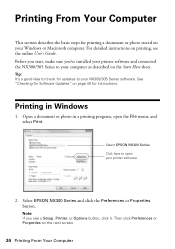
Before you start, make sure you see the online User's Guide. Printing in a printing program, open your NX300/305 Series software. For detailed instructions on the Start Here sheet. Open a document or photo in Windows 1. Select EPSON NX300 Series Click here to open the File menu, and select Print. Note: If you 've installed your printer software and connected the NX300/305 Series to your printer software 2. Select EPSON NX300 Series and click the Preferences or Properties button. See "Checking for Software Updates" on the next screen. 24 Printing From...
Before you start, make sure you see the online User's Guide. Printing in a printing program, open your NX300/305 Series software. For detailed instructions on the Start Here sheet. Open a document or photo in Windows 1. Select EPSON NX300 Series Click here to open the File menu, and select Print. Note: If you 've installed your printer software and connected the NX300/305 Series to your printer software 2. Select EPSON NX300 Series and click the Preferences or Properties button. See "Checking for Software Updates" on the next screen. 24 Printing From...
Quick Guide
Page 27
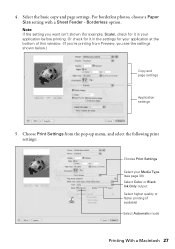
... borderless photos, choose a Paper Size setting with a Sheet Feeder - Or check for your application at the bottom of this window. (If you're printing from the pop-up menu, and select the following print settings: Choose Print Settings Select your application before printing. Note: If the setting you see page 30) Select Color or Black Ink Only output Select higher quality or faster printing (if available) Select Automatic mode Printing With a Macintosh 27 Choose Print Settings...
... borderless photos, choose a Paper Size setting with a Sheet Feeder - Or check for your application at the bottom of this window. (If you're printing from the pop-up menu, and select the following print settings: Choose Print Settings Select your application before printing. Note: If the setting you see page 30) Select Color or Black Ink Only output Select higher quality or faster printing (if available) Select Automatic mode Printing With a Macintosh 27 Choose Print Settings...
Quick Guide
Page 40
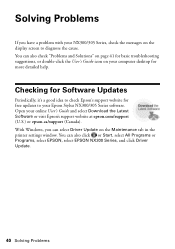
... Programs or Programs, select EPSON, select EPSON NX300 Series, and click Driver Update. 40 Solving Problems Checking for Software Updates Periodically, it's a good idea to your Epson Stylus NX300/305 Series software. You can select Driver Update on your computer desktop for free updates to check Epson's support website for more detailed help. You can also check "Problems and Solutions" on page 41 for basic troubleshooting suggestions, or double-click the User's Guide icon on the Maintenance tab in the printer settings window...
... Programs or Programs, select EPSON, select EPSON NX300 Series, and click Driver Update. 40 Solving Problems Checking for Software Updates Periodically, it's a good idea to your Epson Stylus NX300/305 Series software. You can select Driver Update on your computer desktop for free updates to check Epson's support website for more detailed help. You can also check "Problems and Solutions" on page 41 for basic troubleshooting suggestions, or double-click the User's Guide icon on the Maintenance tab in the printer settings window...
Quick Guide
Page 41
..., or glossy side). Scanner error See your paper is jammed inside the left edge guide. ■ Make sure the type of their service life (see page 44). Press any button (except the P On button) to save power. Turn the NX300/305 Series off and then back on . When the ink pads are saturated, you loaded matches the paper size and paper type settings on the control panel when copying or faxing, or in sleep mode to wake it...
..., or glossy side). Scanner error See your paper is jammed inside the left edge guide. ■ Make sure the type of their service life (see page 44). Press any button (except the P On button) to save power. Turn the NX300/305 Series off and then back on . When the ink pads are saturated, you loaded matches the paper size and paper type settings on the control panel when copying or faxing, or in sleep mode to wake it...
Quick Guide
Page 43
... Setup, select Fax Settings, select Communication, and turn off the V.34 and ECM (Error Correction Mode) settings. ■ If the NX300/305 Series is connected to a DSL phone line, you hang up, make sure the phone is connected to clear the message. 3. Print Quality Problems ■ For the best print quality, use genuine Epson paper (see page 6) and ink cartridges (see page 14). Problems and Solutions 43 Close the ADF cover and reload the paper. Press 1 to a telephone wall jack. Faxing Problems...
... Setup, select Fax Settings, select Communication, and turn off the V.34 and ECM (Error Correction Mode) settings. ■ If the NX300/305 Series is connected to a DSL phone line, you hang up, make sure the phone is connected to clear the message. 3. Print Quality Problems ■ For the best print quality, use genuine Epson paper (see page 6) and ink cartridges (see page 14). Problems and Solutions 43 Close the ADF cover and reload the paper. Press 1 to a telephone wall jack. Faxing Problems...
Quick Guide
Page 46
... hard on the product. ■ Adjust only those controls that are covered by the operating instructions. ■ Do not use aerosol products that contain flammable gases inside the product or touch any cartridges during printing. ■ Install a new ink cartridge immediately after a thorough flushing, see a doctor immediately. ■ Do not put your hand inside or around the ink supply port. Except as the product. Leaving cartridges...
... hard on the product. ■ Adjust only those controls that are covered by the operating instructions. ■ Do not use aerosol products that contain flammable gases inside the product or touch any cartridges during printing. ■ Install a new ink cartridge immediately after a thorough flushing, see a doctor immediately. ■ Do not put your hand inside or around the ink supply port. Except as the product. Leaving cartridges...
Quick Guide
Page 47
... defective unit, Epson will provide telephone diagnostic service to the Epson standard of quality, and, at Epson's option, may be free from lightning. ■ Do not use only a No. 26 AWG or larger telecommunication line cord. Possessions). The replacement printer or part may be new or refurbished to determine whether the printer requires service. You are responsible for parts or labor. Telephone Equipment Safety Instructions When using a telephone...
... defective unit, Epson will provide telephone diagnostic service to the Epson standard of quality, and, at Epson's option, may be free from lightning. ■ Do not use only a No. 26 AWG or larger telecommunication line cord. Possessions). The replacement printer or part may be new or refurbished to determine whether the printer requires service. You are responsible for parts or labor. Telephone Equipment Safety Instructions When using a telephone...


