Start Here Card
Page 1
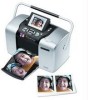
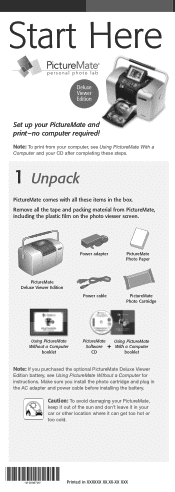
... print -no computer required! Power adapter PictureMate Photo Paper PictureMate Deluxe Viewer Edition Power cable PictureMate Photo Cartridge Using PictureMate Without a Computer booklet PictureMate Using PictureMate Software + With a Computer CD booklet Note: If you install the photo cartridge and plug in XXXXXX XX.XX-XX XXX Note: To print from PictureMate, including the plastic film on the photo viewer screen. Start Here ® 4051812-00 XXX...
... print -no computer required! Power adapter PictureMate Photo Paper PictureMate Deluxe Viewer Edition Power cable PictureMate Photo Cartridge Using PictureMate Without a Computer booklet PictureMate Using PictureMate Software + With a Computer CD booklet Note: If you install the photo cartridge and plug in XXXXXX XX.XX-XX XXX Note: To print from PictureMate, including the plastic film on the photo viewer screen. Start Here ® 4051812-00 XXX...
Start Here Card
Page 2
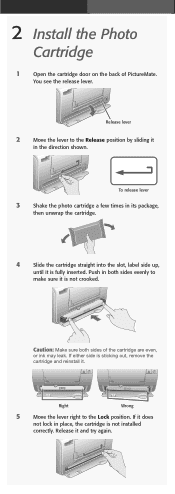
...release lever 3 Shake the photo cartridge a few times in place, the cartridge is not crooked. Right Wrong 5 Move the lever right to the Release position by sliding it does not lock in its package, then unwrap the cartridge. 4 Slide the cartridge straight into the slot, ...cartridge and reinstall it and try again. Push in the direction shown. If either side is fully inserted. You see the release lever. Release it . 2 Install the Photo Cartridge 1 Open the cartridge door on the back of the cartridge are even, or ink may leak. If it in both sides of PictureMate...
...release lever 3 Shake the photo cartridge a few times in place, the cartridge is not crooked. Right Wrong 5 Move the lever right to the Release position by sliding it does not lock in its package, then unwrap the cartridge. 4 Slide the cartridge straight into the slot, ...cartridge and reinstall it and try again. Push in the direction shown. If either side is fully inserted. You see the release lever. Release it . 2 Install the Photo Cartridge 1 Open the cartridge door on the back of the cartridge are even, or ink may leak. If it in both sides of PictureMate...
Start Here Card
Page 3
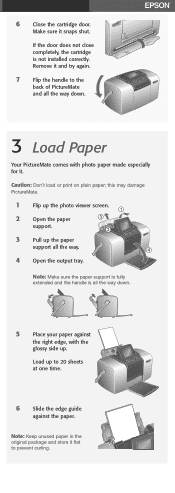
... Note: Make sure the paper support is fully extended and the handle is not installed correctly. 6 Close the cartridge door. Remove it and try again. 7 Flip the handle to the back of PictureMate and all the way. 4 4 Open the output tray. Load up the paper support all the way down ... to 20 sheets at one time. 6 Slide the edge guide against the right edge, with photo paper made especially for it snaps shut. Caution: Don't load or print on plain paper; this may damage PictureMate. 1 Flip up the photo viewer screen. 2 Open the paper support. 3 Pull up to prevent curling.
... Note: Make sure the paper support is fully extended and the handle is not installed correctly. 6 Close the cartridge door. Remove it and try again. 7 Flip the handle to the back of PictureMate and all the way. 4 4 Open the output tray. Load up the paper support all the way down ... to 20 sheets at one time. 6 Slide the edge guide against the right edge, with photo paper made especially for it snaps shut. Caution: Don't load or print on plain paper; this may damage PictureMate. 1 Flip up the photo viewer screen. 2 Open the paper support. 3 Pull up to prevent curling.
Start Here Card
Page 4
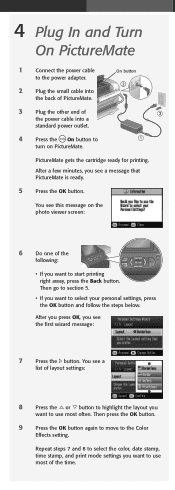
PictureMate gets the cartridge ready for printing. You see a message that PictureMate is ready. 5 Press the OK button. Then go to section 5. • If you want to use most of layout settings: 8 Press the or button to ... Color Effects setting. On button 4 Press the On button to turn on the photo viewer screen: 6 Do one of the power cable into a standard power outlet. After a few minutes, you want to use most often. 4 Plug In and Turn On PictureMate 1 Connect the power cable to the power adapter. 2 Plug the small cable...
PictureMate gets the cartridge ready for printing. You see a message that PictureMate is ready. 5 Press the OK button. Then go to section 5. • If you want to use most of layout settings: 8 Press the or button to ... Color Effects setting. On button 4 Press the On button to turn on the photo viewer screen: 6 Do one of the power cable into a standard power outlet. After a few minutes, you want to use most often. 4 Plug In and Turn On PictureMate 1 Connect the power cable to the power adapter. 2 Plug the small cable...


