Start Here Card
Page 1
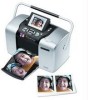
... you purchased the optional PictureMate Deluxe Viewer Edition battery, see Using PictureMate With a Computer and your CD after completing these steps. 1 Unpack PictureMate comes with all the tape and packing material from your PictureMate and print -no computer required! Power adapter PictureMate Photo Paper PictureMate Deluxe Viewer Edition Power cable PictureMate Photo Cartridge Using PictureMate Without a Computer booklet PictureMate Using PictureMate Software + With a Computer...
... you purchased the optional PictureMate Deluxe Viewer Edition battery, see Using PictureMate With a Computer and your CD after completing these steps. 1 Unpack PictureMate comes with all the tape and packing material from your PictureMate and print -no computer required! Power adapter PictureMate Photo Paper PictureMate Deluxe Viewer Edition Power cable PictureMate Photo Cartridge Using PictureMate Without a Computer booklet PictureMate Using PictureMate Software + With a Computer...
Start Here Card
Page 2
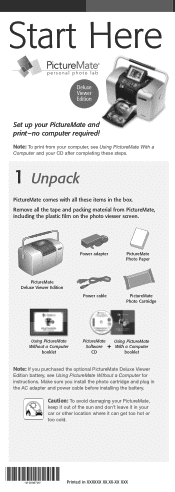
... a few times in its package, then unwrap the cartridge. 4 Slide the cartridge straight into the slot, label side up, until it in both sides of PictureMate. Release it is fully inserted. Push in the direction shown. You see the release lever. Right Wrong 5 Move the lever right to make sure it...
... a few times in its package, then unwrap the cartridge. 4 Slide the cartridge straight into the slot, label side up, until it in both sides of PictureMate. Release it is fully inserted. Push in the direction shown. You see the release lever. Right Wrong 5 Move the lever right to make sure it...
Start Here Card
Page 3
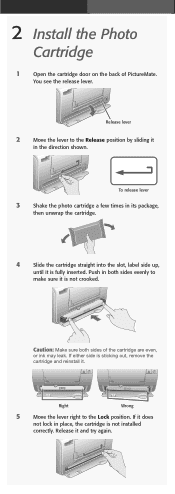
this may damage PictureMate. 1 Flip up the photo viewer screen. 2 Open the paper support. 3 Pull up . Caution: Don't load or print on plain paper; Load up to prevent curling. Note: Keep unused paper in ... is fully extended and the handle is not installed correctly. Remove it and try again. 7 Flip the handle to the back of PictureMate and all the way down . 3 Load Paper Your PictureMate comes with the glossy side up the paper support all the way. 4 4 Open the output tray. 6 Close the cartridge door...
this may damage PictureMate. 1 Flip up the photo viewer screen. 2 Open the paper support. 3 Pull up . Caution: Don't load or print on plain paper; Load up to prevent curling. Note: Keep unused paper in ... is fully extended and the handle is not installed correctly. Remove it and try again. 7 Flip the handle to the back of PictureMate and all the way down . 3 Load Paper Your PictureMate comes with the glossy side up the paper support all the way. 4 4 Open the output tray. 6 Close the cartridge door...
Start Here Card
Page 4
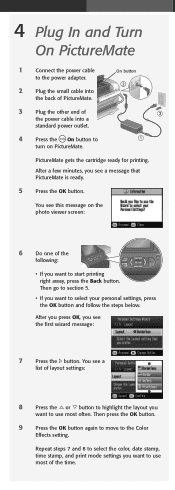
...outlet. On button 4 Press the On button to turn on the photo viewer screen: 6 Do one of the following: • If you want to start printing right away, press the Back button. You see a message that PictureMate is ready. 5 Press the OK button. You see the first wizard ...message: 7 Press the button. PictureMate gets the cartridge ready for printing. After a few minutes, you see a list of layout settings:...
...outlet. On button 4 Press the On button to turn on the photo viewer screen: 6 Do one of the following: • If you want to start printing right away, press the Back button. You see a message that PictureMate is ready. 5 Press the OK button. You see the first wizard ...message: 7 Press the button. PictureMate gets the cartridge ready for printing. After a few minutes, you see a list of layout settings:...
Start Here Card
Page 5
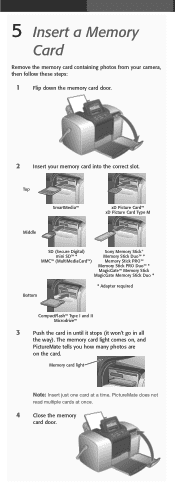
Memory card light Note: Insert just one card at once. 4 Close the memory card door. PictureMate does not read multiple cards at a time. 5 Insert a Memory Card Remove the memory card containing photos from your camera, then follow these steps: 1 Flip down ... I and II Microdrive™ 3 Push the card in until it stops (it won't go in all the way). The memory card light comes on, and PictureMate tells you how many photos are on the card.
Memory card light Note: Insert just one card at once. 4 Close the memory card door. PictureMate does not read multiple cards at a time. 5 Insert a Memory Card Remove the memory card containing photos from your camera, then follow these steps: 1 Flip down ... I and II Microdrive™ 3 Push the card in until it stops (it won't go in all the way). The memory card light comes on, and PictureMate tells you how many photos are on the card.
Start Here Card
Page 6
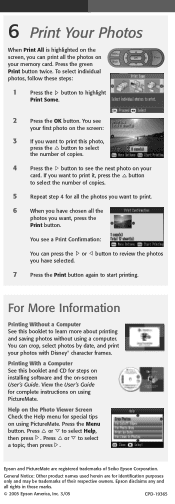
...chosen all the photos you want, press the Print button. View the User's Guide for steps on installing software and the on using PictureMate. Epson and PictureMate are for special tips on your first photo on the screen: 3 If you have selected. 7 Press the Print button again to ... can print all the photos on using PictureMate. You can crop, select photos by date, and print your card. Help on the Photo Viewer Screen Check the Help menu for identification purposes only and may be trademarks of Seiko Epson Corporation. Epson disclaims any and all the photos you want...
...chosen all the photos you want, press the Print button. View the User's Guide for steps on installing software and the on using PictureMate. Epson and PictureMate are for special tips on your first photo on the screen: 3 If you have selected. 7 Press the Print button again to ... can print all the photos on using PictureMate. You can crop, select photos by date, and print your card. Help on the Photo Viewer Screen Check the Help menu for identification purposes only and may be trademarks of Seiko Epson Corporation. Epson disclaims any and all the photos you want...
